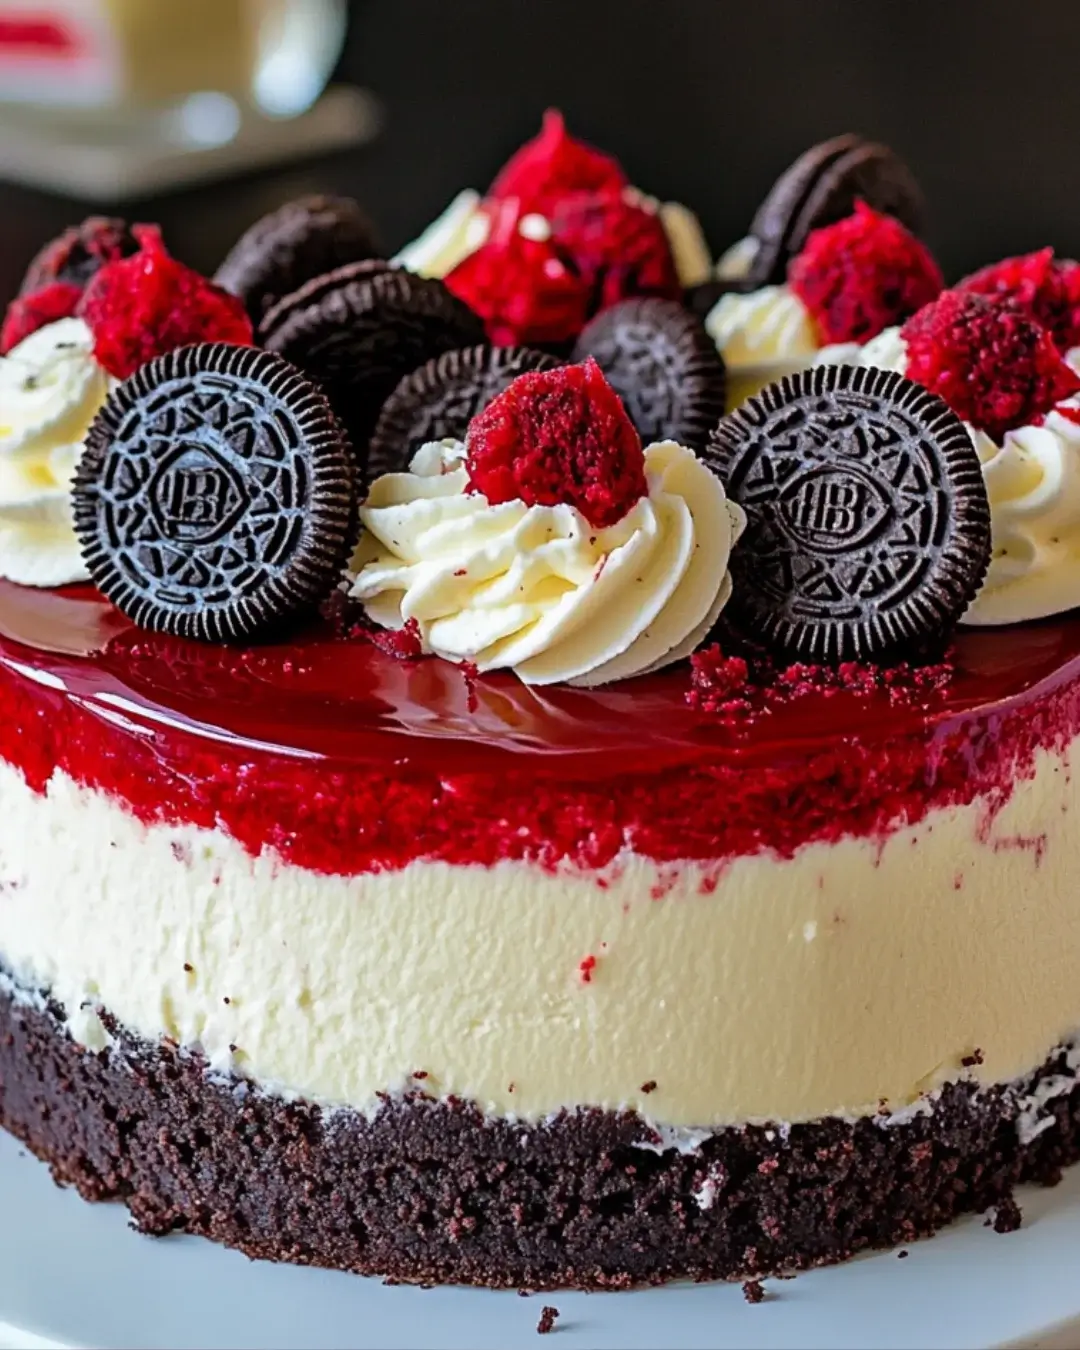
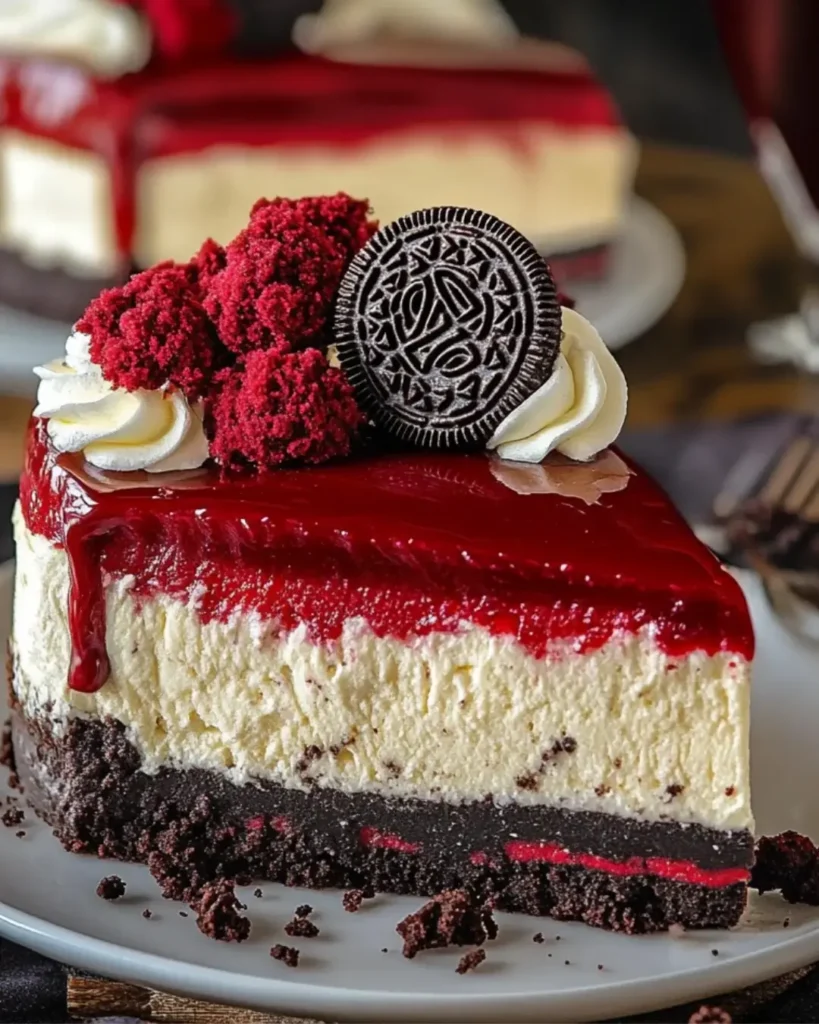
Introduction to Red Velvet Oreo Cheesecake
There’s something magical about dessert that brings people together. The moment I first tasted a Red Velvet Oreo Cheesecake, I knew I had stumbled upon a treasure. This delightful treat combines the rich, velvety flavors of red velvet cake with the creamy goodness of cheesecake, all topped with a cloud of whipped cream. It’s perfect for impressing guests or simply indulging after a long day. Whether you’re celebrating a special occasion or just craving something sweet, this recipe is a quick solution that will leave everyone asking for seconds. Trust me, your taste buds will thank you!
Why You’ll Love This Red Velvet Oreo Cheesecake
This Red Velvet Oreo Cheesecake is a game-changer in the dessert world. It’s not just about the stunning looks; it’s incredibly easy to make, even for those who claim they can’t bake. The rich flavors meld together beautifully, creating a taste sensation that’s both familiar and unique. Plus, it’s a crowd-pleaser, making it perfect for gatherings or cozy nights in. You’ll find yourself making this again and again!
Ingredients for Red Velvet Oreo Cheesecake
Gathering the right ingredients is the first step to creating this stunning Red Velvet Oreo Cheesecake. Each component plays a vital role in achieving that perfect balance of flavor and texture. Here’s what you’ll need:
- Cream Cheese: The star of the show! It provides that rich, creamy base that makes cheesecake so irresistible.
- Granulated Sugar: Sweetness is key. It balances the tanginess of the cream cheese and enhances the overall flavor.
- Sour Cream: This adds a delightful tang and creaminess, making the cheesecake extra luscious.
- Vanilla Extract: A splash of vanilla elevates the flavor profile, adding warmth and depth.
- Eggs: They bind everything together, giving the cheesecake its structure and smooth texture.
- All-Purpose Flour: This helps stabilize the cheesecake, ensuring it holds its shape when sliced.
- Cocoa Powder: Just a hint of cocoa adds a subtle chocolate flavor that complements the red velvet beautifully.
- Baking Powder and Baking Soda: These leavening agents help the cheesecake rise slightly, creating a light texture.
- Red Food Coloring: This is what gives the cheesecake its signature vibrant hue, making it visually stunning.
- Crushed Oreo Cookies: These add a delightful crunch and rich chocolate flavor, enhancing the overall experience.
- Unsalted Butter: Used for the topping, it adds richness and helps the powdered sugar adhere.
- Powdered Sugar: This sweetens the topping and gives it a smooth texture, perfect for spreading.
- Heavy Whipping Cream: Whipped to perfection, it creates a light and airy topping that’s the cherry on top.
For those looking to mix things up, consider adding a splash of almond extract for a richer flavor. If you’re out of Oreos, chocolate sandwich cookies or even graham crackers can work as tasty substitutes. You can find the exact measurements for each ingredient at the bottom of the article, ready for printing!
How to Make Red Velvet Oreo Cheesecake
Creating a Red Velvet Oreo Cheesecake is a delightful journey that combines flavors and textures in a way that will impress anyone who takes a bite. Follow these simple steps, and you’ll be on your way to dessert perfection!
Step 1: Preheat the Oven
Start by preheating your oven to 325°F. This step is crucial because it ensures even baking. While the oven warms up, grease a 9-inch springform pan. This will help your cheesecake release easily once it’s baked, preventing any heartbreak when it’s time to serve.
Step 2: Mix the Cream Cheese and Sugar
In a large mixing bowl, beat the softened cream cheese and granulated sugar together until smooth and creamy. This step is vital for achieving that luscious texture. A well-mixed base means a creamy cheesecake without lumps. Trust me, no one wants a lumpy dessert!
Step 3: Add Sour Cream and Vanilla
Next, add the sour cream and vanilla extract to the mixture. The sour cream adds a delightful tang, while the vanilla enhances the overall flavor. Mix until everything is well combined. This is where the magic begins, as the flavors start to meld together beautifully.
Step 4: Incorporate the Eggs
Now, it’s time to add the eggs, one at a time. This method allows each egg to fully incorporate before adding the next. It’s essential for creating a smooth batter that bakes evenly. Don’t rush this step; take your time to mix well after each addition.
Step 5: Combine Dry Ingredients
In a separate bowl, whisk together the all-purpose flour, cocoa powder, baking powder, and baking soda. Mixing these dry ingredients separately helps ensure they’re evenly distributed. This step is key to avoiding clumps and achieving a perfectly textured cheesecake.
Step 6: Add Red Food Coloring and Oreos
Now, stir in the red food coloring and crushed Oreo cookies. The food coloring gives your cheesecake that signature vibrant hue, while the Oreos add a delightful crunch and rich chocolate flavor. This combination is what makes this dessert truly special!
Step 7: Pour into the Pan
Carefully pour the cheesecake batter into the prepared springform pan. Use a spatula to spread it evenly, ensuring a smooth top. This will help your cheesecake bake evenly and look beautiful when it’s time to serve.
Step 8: Prepare the Topping
In a small bowl, mix the melted butter and powdered sugar together. This mixture will create a sweet topping that adds richness to your cheesecake. Drizzle it over the cheesecake batter before baking for an extra layer of flavor.
Step 9: Bake the Cheesecake
Place the cheesecake in the preheated oven and bake for 45-50 minutes. Keep an eye on it; the center should be set but still slightly jiggly. This is the perfect texture for a creamy cheesecake. Remember, it will continue to firm up as it cools!
Step 10: Cool and Refrigerate
Once baked, turn off the oven and leave the cheesecake inside for an additional hour. This gradual cooling process helps prevent cracks. After that, let it cool completely at room temperature before refrigerating for at least 4 hours or overnight. Patience is key here!
Step 11: Whip the Cream
Finally, whip the heavy cream until stiff peaks form. This will create a light and airy topping that’s the perfect finishing touch. Spread it over the cooled cheesecake just before serving. It’s the cherry on top of your delicious creation!
Tips for Success
- Make sure your cream cheese is at room temperature for easy mixing.
- Don’t skip the cooling step; it helps prevent cracks in your cheesecake.
- Use a water bath for even baking if you want a creamier texture.
- For a fun twist, try adding chocolate chips to the batter.
- Always taste as you go; adjust sweetness to your liking!
Equipment Needed
- 9-inch Springform Pan: Essential for easy removal. A regular cake pan can work, but it may be harder to serve.
- Mixing Bowls: Use a large bowl for the batter and a smaller one for the topping.
- Electric Mixer: A hand mixer is great, but a stand mixer can save time.
- Spatula: Perfect for scraping down the sides and spreading the batter evenly.
- Whisk: Handy for mixing dry ingredients and whipping cream.
Variations
- Chocolate Swirl: Add a chocolate ganache swirl to the batter for an extra chocolatey kick.
- Nutty Delight: Incorporate chopped nuts, like pecans or walnuts, for added texture and flavor.
- Gluten-Free Option: Substitute all-purpose flour with a gluten-free blend to make it suitable for gluten-sensitive friends.
- Mini Cheesecakes: Use a muffin tin to create individual-sized cheesecakes, perfect for parties or portion control.
- Fruit Topping: Top with fresh berries or a berry compote for a refreshing contrast to the rich cheesecake.
Serving Suggestions
- Pair with a scoop of vanilla ice cream for a delightful contrast in temperature and texture.
- Serve alongside fresh berries to add a pop of color and freshness.
- Drizzle with chocolate or caramel sauce for an extra indulgent touch.
- Garnish with mint leaves for a refreshing finish.
- Enjoy with a cup of coffee or a glass of dessert wine to elevate the experience.
FAQs about Red Velvet Oreo Cheesecake
As you embark on your journey to create this stunning Red Velvet Oreo Cheesecake, you might have a few questions. Here are some common queries that can help guide you along the way:
Can I make this cheesecake ahead of time?
Absolutely! This cheesecake actually tastes better after chilling overnight. Just make sure to cover it well in the fridge to keep it fresh.
What can I use instead of cream cheese?
If you’re looking for a lighter option, you can try using Greek yogurt or mascarpone cheese. Just keep in mind that the flavor and texture will vary slightly.
How do I know when the cheesecake is done baking?
The center should be set but still slightly jiggly. It will firm up as it cools, so don’t worry if it looks a bit soft when you take it out!
Can I freeze Red Velvet Oreo Cheesecake?
Yes, you can freeze it! Just wrap it tightly in plastic wrap and then foil. Thaw it in the fridge before serving for the best texture.
What’s the best way to serve this cheesecake?
Serve it chilled, topped with whipped cream and maybe some fresh berries. A drizzle of chocolate or caramel sauce can take it to the next level!
Final Thoughts
Creating a Red Velvet Oreo Cheesecake is more than just baking; it’s about crafting a moment of joy. Each slice is a celebration of flavors, colors, and textures that can brighten any day. Whether you’re sharing it with friends at a gathering or enjoying a quiet evening at home, this cheesecake brings smiles and satisfaction. The blend of creamy cheesecake and the crunch of Oreos is simply irresistible. So, roll up your sleeves, gather your ingredients, and dive into this delightful recipe. Trust me, the happiness it brings is worth every minute spent in the kitchen!
PrintRed Velvet Oreo Cheesecake: A Delightful Recipe to Try!
- Total Time: 5 hours 10 minutes
- Yield: 10 servings
- Diet: Vegetarian
Description
A delicious and visually stunning Red Velvet Oreo Cheesecake that combines the rich flavors of red velvet cake and creamy cheesecake, topped with whipped cream.
Ingredients
- 8 oz cream cheese, softened
- 1 cup granulated sugar
- 1 cup sour cream
- 1 teaspoon vanilla extract
- 2 large eggs
- 1 cup all-purpose flour
- 1 tablespoon cocoa powder
- 1 teaspoon baking powder
- 1 teaspoon baking soda
- 1 teaspoon red food coloring
- 1 cup crushed Oreo cookies
- 1/2 cup unsalted butter, melted
- 1/4 cup powdered sugar
- 1 cup heavy whipping cream
Instructions
- Preheat the oven to 325°F. Grease a 9-inch springform pan and set aside.
- In a large mixing bowl, beat the softened cream cheese and granulated sugar together until smooth and creamy. Add the sour cream and vanilla extract, mixing until well combined.
- Add the eggs one at a time, mixing well after each addition.
- In a separate bowl, whisk together the flour, cocoa powder, baking powder, and baking soda. Gradually add the dry ingredients to the cream cheese mixture, mixing until just combined.
- Stir in the red food coloring and crushed Oreo cookies until evenly distributed.
- Pour the cheesecake batter into the prepared springform pan.
- In a small bowl, mix the melted butter and powdered sugar. Drizzle this mixture over the cheesecake batter.
- Bake in the preheated oven for 45-50 minutes, or until the center is set but still slightly jiggly.
- Turn off the oven and leave the cheesecake inside for an additional hour to cool gradually.
- Remove the cheesecake from the oven and let it cool completely at room temperature. Once cooled, refrigerate for at least 4 hours or overnight before serving.
- Before serving, whip the heavy cream until stiff peaks form and spread it over the top of the cheesecake.
Notes
- For a richer flavor, consider adding a splash of almond extract to the cheesecake batter.
- You can substitute the crushed Oreos with chocolate sandwich cookies or graham crackers for a different crust flavor.
- Prep Time: 20 minutes
- Cook Time: 50 minutes
- Category: Dessert
- Method: Baking
- Cuisine: American
Nutrition
- Serving Size: 1 slice
- Calories: 320
- Sugar: 15g
- Sodium: 200mg
- Fat: 22g
- Saturated Fat: 12g
- Unsaturated Fat: 8g
- Trans Fat: 0g
- Carbohydrates: 25g
- Fiber: 1g
- Protein: 5g
- Cholesterol: 80mg