Introduction to Burnt Honey Pie
There’s something magical about desserts that tell a story, and Burnt Honey Pie is one of those enchanting treats. Growing up, I remember my grandmother’s kitchen filled with the warm, sweet aroma of honey wafting through the air. This unique dessert combines rich honey and cream, creating a flavor that dances on your palate. Perfect for impressing guests or simply treating yourself after a long day, this pie is a delightful way to bring a touch of sweetness into your life. Trust me, once you try it, you’ll be hooked!
Why You’ll Love This Burnt Honey Pie
This Burnt Honey Pie is a game-changer for dessert lovers. It’s incredibly easy to whip up, making it perfect for busy weeknights or last-minute gatherings. The rich, caramelized flavor of the honey paired with creamy filling creates a taste sensation that’s hard to resist. Plus, the slightly burnt top adds a rustic charm that will impress your friends and family. You’ll find yourself making this pie again and again!
Ingredients for Burnt Honey Pie
Gathering the right ingredients is the first step to creating this delightful Burnt Honey Pie. Here’s what you’ll need:
- All-purpose flour: The foundation of your flaky crust, providing structure and texture.
- Salt: A pinch enhances the flavors, balancing the sweetness of the honey.
- Unsalted butter: Chilled and cubed, it adds richness and helps create that perfect flaky crust.
- Granulated sugar: Sweetens the crust just enough to complement the filling.
- Egg yolk: This adds richness and helps bind the crust together.
- Ice water: Keeps the dough cool, ensuring a tender crust.
- Honey: The star of the show! Choose a high-quality honey for the best flavor.
- Heavy cream: Adds a luscious creaminess to the filling.
- Large eggs: They help set the filling, giving it a custard-like texture.
- Vanilla extract: A splash of this adds depth and warmth to the flavor profile.
- Ground cinnamon: A hint of spice that complements the honey beautifully.
- Optional ingredients: For a twist, consider adding a tablespoon of bourbon or whiskey to the filling for an extra kick.
For exact measurements, check the bottom of the article where you can find everything listed for easy printing!
How to Make Burnt Honey Pie
Creating this Burnt Honey Pie is a delightful journey that combines simple steps with rich flavors. Let’s dive into the process!
Step 1: Preheat the Oven
Start by preheating your oven to 350°F. This ensures it’s hot and ready for baking, which is crucial for that perfect pie crust.
Step 2: Prepare the Pie Crust
In a mixing bowl, combine the all-purpose flour and salt. Then, add the chilled, cubed butter. Mix until the mixture resembles coarse crumbs. This is where the magic of a flaky crust begins!
Next, stir in the granulated sugar. Add the egg yolk and ice water, mixing until the dough comes together. Once it’s formed, shape the dough into a disk, wrap it in plastic wrap, and chill for 30 minutes. This step is key for a tender crust.
Step 3: Roll Out the Dough
After chilling, roll out the dough on a floured surface until it’s large enough to fit your 9-inch pie pan. Carefully transfer the dough to the pan, trimming any excess. Prick the bottom with a fork to prevent bubbling, then refrigerate for another 15 minutes. This extra chill helps maintain the crust’s shape while baking.
Step 4: Cook the Honey
In a saucepan over medium heat, cook the honey until it bubbles and turns a deep amber color, about 5-7 minutes. Keep an eye on it; you want that rich caramelization! Once it reaches the right color, remove it from heat and let it cool slightly.
Step 5: Mix the Filling
In a separate bowl, whisk together the heavy cream, eggs, vanilla extract, salt, and ground cinnamon. Gradually whisk in the cooled honey until everything is well combined. This mixture is where the magic happens, blending all those flavors into a creamy filling.
Step 6: Assemble and Bake
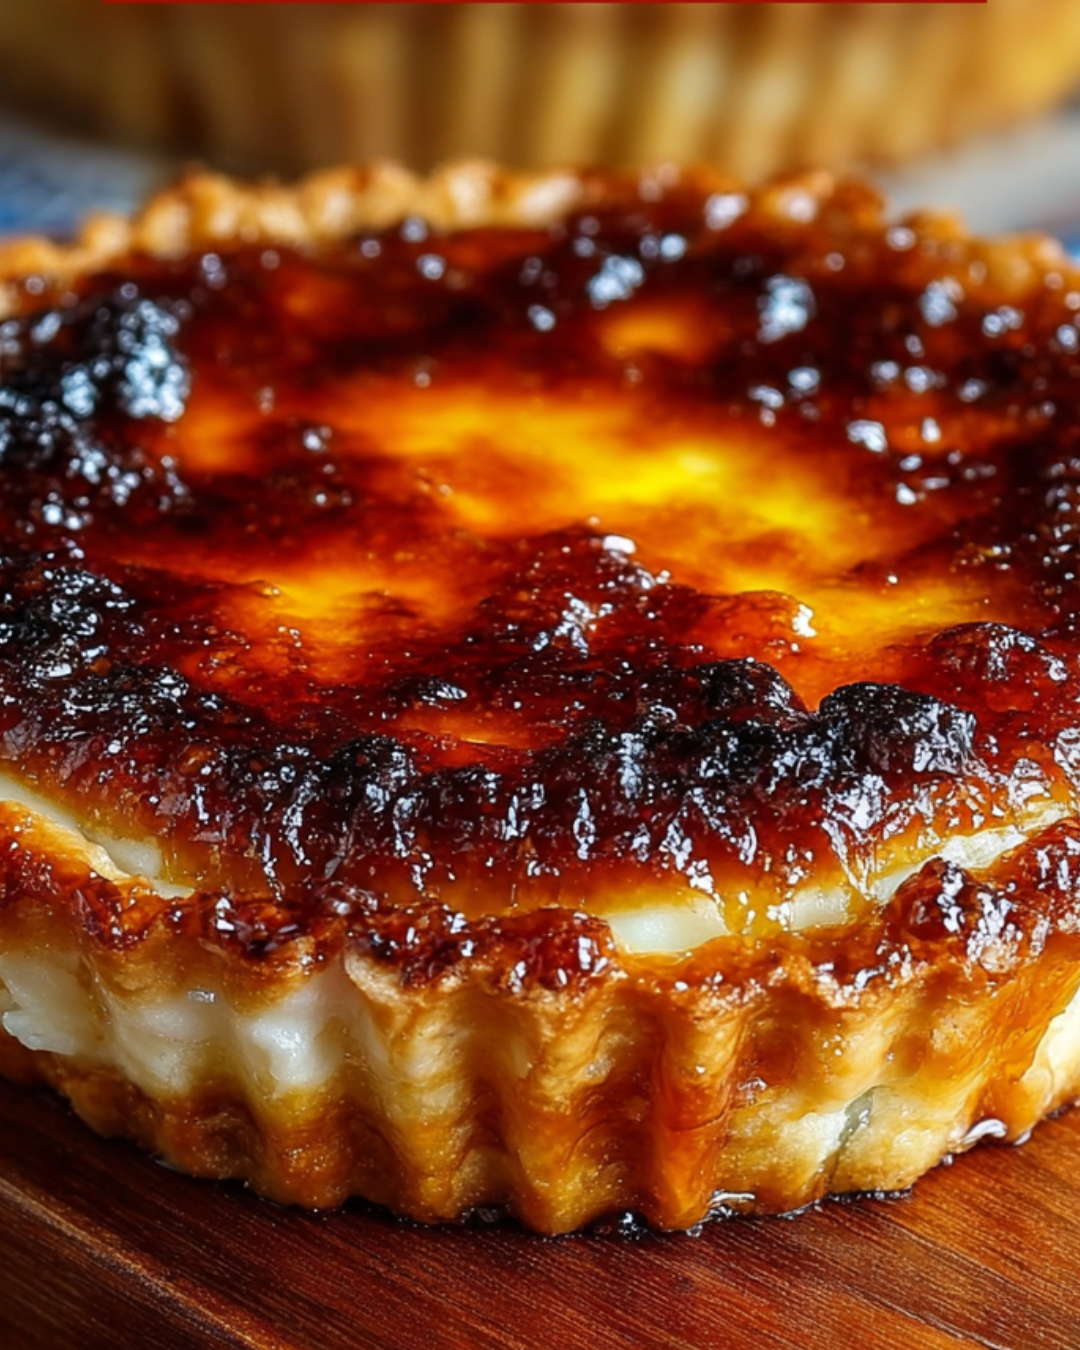
Pour the honey mixture into the prepared pie crust. Bake for 30-35 minutes, or until the filling is set and the top is slightly burnt. That burnt top is what gives this pie its unique character!
Step 7: Cool and Serve
Once baked, let the pie cool at room temperature for at least 1 hour before slicing. This cooling time enhances the flavor and texture, making each slice a true delight.
Tips for Success
- Use cold ingredients for the crust to ensure flakiness.
- Don’t rush the honey cooking process; caramelization is key.
- Let the pie cool completely for the best texture.
- Experiment with different honey varieties for unique flavors.
- For a smoother filling, strain the mixture before pouring it into the crust.
Equipment Needed
- 9-inch pie pan: A standard choice, but a tart pan works too for a stylish edge.
- Mixing bowls: Use any size; just make sure they’re sturdy.
- Whisk: A fork can do the job in a pinch!
- Rolling pin: If you don’t have one, a wine bottle can work as a great substitute.
- Measuring cups and spoons: Essential for accuracy, but eyeballing can be fun for experienced cooks!
Variations
- Nutty Twist: Add chopped nuts like pecans or walnuts to the filling for a delightful crunch.
- Fruit Infusion: Incorporate fresh fruits like sliced peaches or berries into the filling for a fruity flavor boost.
- Gluten-Free Option: Substitute all-purpose flour with a gluten-free blend to make the crust suitable for gluten-sensitive eaters.
- Spiced Honey: Experiment with different spices like nutmeg or cardamom for a unique flavor profile.
- Vegan Version: Use coconut cream and a flax egg to create a dairy-free and egg-free filling.
Serving Suggestions
- Pair with a dollop of freshly whipped cream for added richness.
- Serve alongside a scoop of vanilla ice cream to balance the flavors.
- Drizzle with extra honey or a sprinkle of cinnamon for a beautiful presentation.
- Enjoy with a cup of coffee or herbal tea for a cozy dessert experience.
FAQs about Burnt Honey Pie
Curious about Burnt Honey Pie? Here are some common questions I often hear, along with answers to help you navigate this delicious dessert.
Can I use different types of honey for this pie?
Absolutely! Different honey varieties can bring unique flavors to your Burnt Honey Pie. Try wildflower, clover, or even orange blossom honey for a twist!
What should I do if my pie crust shrinks while baking?
If your crust shrinks, it might be due to overworking the dough or not chilling it long enough. Make sure to chill the dough thoroughly before rolling it out, and handle it gently.
Can I make Burnt Honey Pie ahead of time?
Yes! This pie can be made a day in advance. Just store it in the refrigerator after it cools, and let it come to room temperature before serving for the best flavor.
How do I know when the pie is done baking?
The pie is done when the filling is set and the top has a slight burnt appearance. A gentle jiggle in the center is okay; it will firm up as it cools.
Can I freeze Burnt Honey Pie?
Yes, you can freeze it! Wrap the cooled pie tightly in plastic wrap and aluminum foil. Thaw it in the fridge overnight before serving for the best results.
Final Thoughts
Creating a Burnt Honey Pie is more than just baking; it’s an experience that fills your kitchen with warmth and nostalgia. Each slice offers a delightful balance of sweet and slightly burnt flavors, making it a memorable dessert for any occasion. Whether you’re sharing it with friends or savoring it solo, this pie brings a sense of joy and comfort. I love how it transforms simple ingredients into something extraordinary. So, roll up your sleeves, embrace the process, and let this unique dessert become a cherished part of your culinary repertoire. You won’t regret it!
PrintBurnt Honey Pie: Discover This Unique Dessert Recipe!
- Total Time: 1 hour 20 minutes
- Yield: 8 servings
- Diet: Vegetarian
Description
Burnt Honey Pie is a unique dessert that combines the rich flavors of honey and cream, baked in a flaky crust until slightly burnt on top.
Ingredients
- 1 ½ cups all-purpose flour
- ½ teaspoon salt
- ½ cup unsalted butter, chilled and cubed
- ¼ cup granulated sugar
- 1 large egg yolk
- 3 tablespoons ice water
- 1 cup honey
- 1 cup heavy cream
- 3 large eggs
- 1 teaspoon vanilla extract
- ¼ teaspoon salt
- ½ teaspoon ground cinnamon
Instructions
- Preheat the oven to 350°F.
- In a mixing bowl, combine the flour and salt. Add the chilled butter and mix until the mixture resembles coarse crumbs.
- Stir in the sugar. Add the egg yolk and ice water, mixing until the dough comes together.
- Shape the dough into a disk, wrap in plastic wrap, and refrigerate for 30 minutes.
- Roll out the chilled dough on a floured surface to fit a 9-inch pie pan. Transfer the dough to the pie pan, trimming any excess.
- Prick the bottom with a fork and refrigerate for another 15 minutes.
- In a saucepan over medium heat, cook the honey until it bubbles and turns a deep amber color, about 5-7 minutes. Remove from heat and let it cool slightly.
- In a separate bowl, whisk together the heavy cream, eggs, vanilla extract, salt, and cinnamon. Gradually whisk in the cooled honey until well combined.
- Pour the honey mixture into the prepared pie crust.
- Bake for 30-35 minutes, or until the filling is set and the top is slightly burnt.
- Let the pie cool at room temperature for at least 1 hour before slicing.
Notes
- For a richer flavor, try adding a tablespoon of bourbon or whiskey to the filling.
- To enhance the presentation, serve with a dollop of whipped cream or a scoop of vanilla ice cream on top.
- Prep Time: 45 minutes
- Cook Time: 35 minutes
- Category: Dessert
- Method: Baking
- Cuisine: American
Nutrition
- Serving Size: 1 slice
- Calories: 320
- Sugar: 24g
- Sodium: 150mg
- Fat: 18g
- Saturated Fat: 10g
- Unsaturated Fat: 8g
- Trans Fat: 0g
- Carbohydrates: 30g
- Fiber: 0g
- Protein: 4g
- Cholesterol: 100mg