A Classic Comfort Food, Made Healthier
Crispy, golden, and packed with flavor—chicken tenders are a timeless favorite for all ages. Whether served at restaurants, fast-food chains, or home kitchens, they never fail to bring a satisfying crunch and juicy bite.
But what if you could enjoy the same crispy, flavorful texture without deep frying? That’s where baked chicken tenders come in. By baking instead of frying, you get all the deliciousness of classic chicken tenders with fewer calories, less grease, and no mess from frying oil.
These oven-baked tenders are not only healthier but also incredibly easy to make, requiring just a few basic ingredients and minimal prep time. They’re perfect for family dinners, meal prep, or even as a high-protein snack.
In this article, we’ll explore the history of chicken tenders, tips for achieving the crispiest texture, creative serving ideas, variations, frequently asked questions, and expert storage tips.
A Brief History: The Rise of Chicken Tenders
Chicken tenders, also called chicken strips, chicken fingers, or chicken goujons, have been a staple in American fast food and casual dining for decades. While fried chicken has deep Southern roots, chicken tenders as we know them today became widely popular in the 1970s and 1980s, thanks to restaurants and fast-food chains serving them as a kid-friendly alternative to bone-in fried chicken.
Over time, home cooks began adapting the recipe, creating oven-baked versions that mimic the crispy texture of deep-fried tenders while being lighter and healthier. Today, baked chicken tenders are a go-to meal for those looking for a balance of nutrition and indulgence.
What Makes Baked Chicken Tenders So Good?
1. Extra Crispy Without Frying
- Baking at a high temperature helps achieve a golden, crispy crust without the need for deep frying.
- Panko breadcrumbs and a well-seasoned coating create that signature crunch.
2. Healthier and Lower in Fat
- Unlike deep-fried tenders, baked tenders are lower in saturated fat and calories.
- Using olive oil spray or a light drizzle of oil ensures crispiness without excess grease.
3. Easy and Quick to Make
- Requires minimal prep—just coat, bake, and enjoy.
- No messy oil or deep frying setup needed.
4. Perfect for Meal Prep and Freezer-Friendly
- Can be made in batches and stored for later use.
- Freezes well for quick weeknight meals or easy reheating.
How to Serve Baked Chicken Tenders: The Best Pairings
1. Classic Dipping Sauces
No chicken tender experience is complete without a great dipping sauce. Some of the best options include:
- Honey Mustard – Sweet, tangy, and creamy.
- Barbecue Sauce – Smoky and slightly sweet.
- Ranch Dressing – Cool, creamy, and herby.
- Buffalo Sauce – Spicy and bold.
- Garlic Aioli – Rich and garlicky for extra depth.
2. Served as a Meal
- With Fries – A classic pairing, either with baked sweet potato fries or traditional fries.
- With a Side Salad – A fresh, crisp salad balances out the crispy chicken.
- With Rice and Veggies – Makes for a balanced meal with protein, carbs, and fiber.
3. Turn Them Into a Sandwich or Wrap
- Place the tenders in a toasted bun with lettuce, tomato, and mayo for a crispy chicken sandwich.
- Wrap them in a flour tortilla with avocado, cheese, and ranch dressing for a chicken wrap.
4. Add Them to a Salad
- Slice baked tenders over a Caesar salad, Cobb salad, or Mediterranean bowl for extra protein.
Creative Variations: Make It Your Own
While classic baked chicken tenders are delicious on their own, you can customize them with different flavors. Here are some ideas:
1. Spicy Buffalo Tenders
- Toss the baked tenders in Buffalo sauce after baking.
- Serve with celery sticks and blue cheese dressing.
2. Parmesan Herb Crusted Tenders
- Add grated Parmesan cheese and Italian seasoning to the breadcrumb coating.
- Serve with marinara sauce for a twist on chicken Parmesan.
3. Honey Garlic Glazed Tenders
- Brush with a honey garlic glaze after baking for a sweet-savory combo.
4. Gluten-Free Version
- Swap out breadcrumbs for crushed gluten-free crackers or almond flour.
5. Extra Crunch with Cornflakes
- Use crushed cornflakes instead of breadcrumbs for an ultra-crispy coating.
Ingredients: The Perfect Blend of Flavor and Crunch
- Chicken Breasts or Tenders – Fresh or thawed, cut into strips
- Panko Breadcrumbs – For an extra crispy coating
- Eggs – Helps the breading stick
- Seasonings – Garlic powder, paprika, onion powder, salt, and black pepper
- Parmesan Cheese (Optional) – Adds depth of flavor to the coating
- Olive Oil Spray – Helps achieve a golden, crispy texture
Directions: Making the Ultimate Crispy Baked Tenders
Step 1: Prep the Chicken
- Cut chicken breasts into strips if not using pre-cut tenders.
Step 2: Set Up the Breading Stations
- Beat eggs in one bowl.
- Mix breadcrumbs, Parmesan (if using), and seasonings in another bowl.
Step 3: Coat the Chicken
- Dip each chicken strip into the beaten eggs, then coat with the breadcrumb mixture.
- For extra crunch, repeat the egg and breadcrumb coating process.
Step 4: Arrange and Bake
- Place tenders on a parchment-lined baking sheet (or a wire rack for more crispiness).
- Spray lightly with olive oil.
- Bake at 400°F (200°C) for 20-25 minutes, flipping halfway.
Step 5: Serve and Enjoy
- Let the tenders rest for a few minutes before serving.
- Pair with your favorite dips like honey mustard, BBQ sauce, or ranch.
Nutritional Breakdown: A Guilt-Free Indulgence
- Calories: 375 per serving
- Carbohydrates: 25g
- Protein: 35g
- Fat: 14g
- Sodium: Moderate, depending on seasoning
These crispy oven-baked chicken tenders deliver all the crunch of fried tenders without the extra oil. Perfect for weeknight meals, meal prep, or a healthier game-day snack!
Frequently Asked Questions (FAQs)
1. How Do I Make My Baked Chicken Tenders Extra Crispy?
- Use panko breadcrumbs instead of regular breadcrumbs for a crunchier texture.
- Place tenders on a wire rack over a baking sheet to allow air circulation.
- Lightly spray the coated tenders with olive oil before baking.
2. Can I Use Chicken Breasts Instead of Chicken Tenders?
Yes! Simply slice boneless, skinless chicken breasts into strips to create homemade tenders.
3. What’s the Best Way to Store Leftovers?
- Store in an airtight container in the fridge for up to 3 days.
- To maintain crispiness, reheat in the oven or air fryer instead of microwaving.
4. Can I Freeze Baked Chicken Tenders?
Yes! Freeze cooked tenders on a baking sheet, then transfer them to a freezer-safe bag for up to 2 months. Reheat in the oven at 375°F (190°C) for 10-12 minutes.
5. Can I Use an Air Fryer Instead of an Oven?
Absolutely! Air fryers create extra crispiness with less oil. Air fry at 375°F for 12-15 minutes, flipping halfway.
6. What If I Don’t Have Breadcrumbs?
- Use crushed cornflakes, pretzels, or crushed crackers as an alternative.
- Blend old bread into homemade breadcrumbs for a fresh option.
Conclusion: Why You Should Try Baked Chicken Tenders
Baked chicken tenders are the perfect balance of crispy, flavorful, and healthy—proving that you don’t need to deep fry to achieve a golden, crunchy coating. With simple ingredients, easy preparation, and endless variations, they are a versatile meal option for any occasion.
Whether you serve them with classic dipping sauces, on a sandwich, or over a salad, these oven-baked tenders are guaranteed to be a hit. Plus, with easy meal prep and freezer-friendly options, they’re a go-to recipe for busy weeknights.
So why not skip the drive-thru and make these homemade baked chicken tenders instead? Once you try them, they’ll quickly become a household favorite—crispy on the outside, tender on the inside, and packed with delicious flavor!
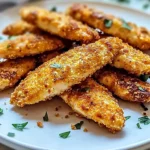
Homemade Baked Chicken Tenders: Crispy, Flavorful, and Better Than Fried
- Total Time: 35 minutes
- Yield: Serves 4
Description
Enjoy crispy, golden-brown chicken tenders without the excess oil! These oven-baked chicken tenders are packed with flavor, coated in crunchy panko breadcrumbs, and baked to perfection. A healthier alternative to traditional fried tenders, they’re perfect for a quick meal or a guilt-free snack.
Ingredients
- Chicken breasts or tenders (fresh or thawed, cut into strips)
- Panko breadcrumbs (for an extra crispy coating)
- Eggs (helps the breading stick)
- Seasonings (garlic powder, paprika, onion powder, salt, and black pepper)
- Parmesan cheese (optional, adds depth of flavor to the coating)
- Olive oil spray (helps achieve a golden, crispy texture)
Instructions
- Prep the Chicken: Cut chicken breasts into strips if not using pre-cut tenders.
- Set Up the Breading Stations: Beat eggs in one bowl. In another bowl, mix breadcrumbs, Parmesan (if using), and seasonings.
- Coat the Chicken: Dip each chicken strip into the beaten eggs, then coat with the breadcrumb mixture. For extra crunch, repeat the egg and breadcrumb coating process.
- Arrange and Bake: Place tenders on a parchment-lined baking sheet (or a wire rack for extra crispiness). Spray lightly with olive oil. Bake at 400°F (200°C) for 20-25 minutes, flipping halfway.
- Serve and Enjoy: Let the tenders rest for a few minutes before serving. Pair with your favorite dips like honey mustard, BBQ sauce, or ranch.
Notes
- Extra Crispy Tip: Use a wire rack for even crispier tenders.
- Gluten-Free Option: Swap panko breadcrumbs for gluten-free breadcrumbs.
- Storage: Store leftovers in an airtight container in the fridge for up to 3 days.
- Reheating: Reheat in the oven at 375°F for 5-7 minutes to maintain crispiness.
- Prep Time: 10 minutes
- Cook Time: 25 minutes
- Category: Main Dish
- Method: Baking
- Cuisine: American