A Sweet Tradition Born in the Kitchen
Easter has always been a time of family, laughter, and sweet indulgence. Growing up, my grandmother had a way of making every holiday feel special—not with extravagant gifts, but with food that brought everyone together. I still remember the first time she let me help her in the kitchen, my little hands carefully placing pastel candies on top of a creamy dessert that smelled like childhood. It was the first time I experienced the magic of a no-bake treat, something that didn’t require waiting for an oven timer to go off—just pure, instant joy.
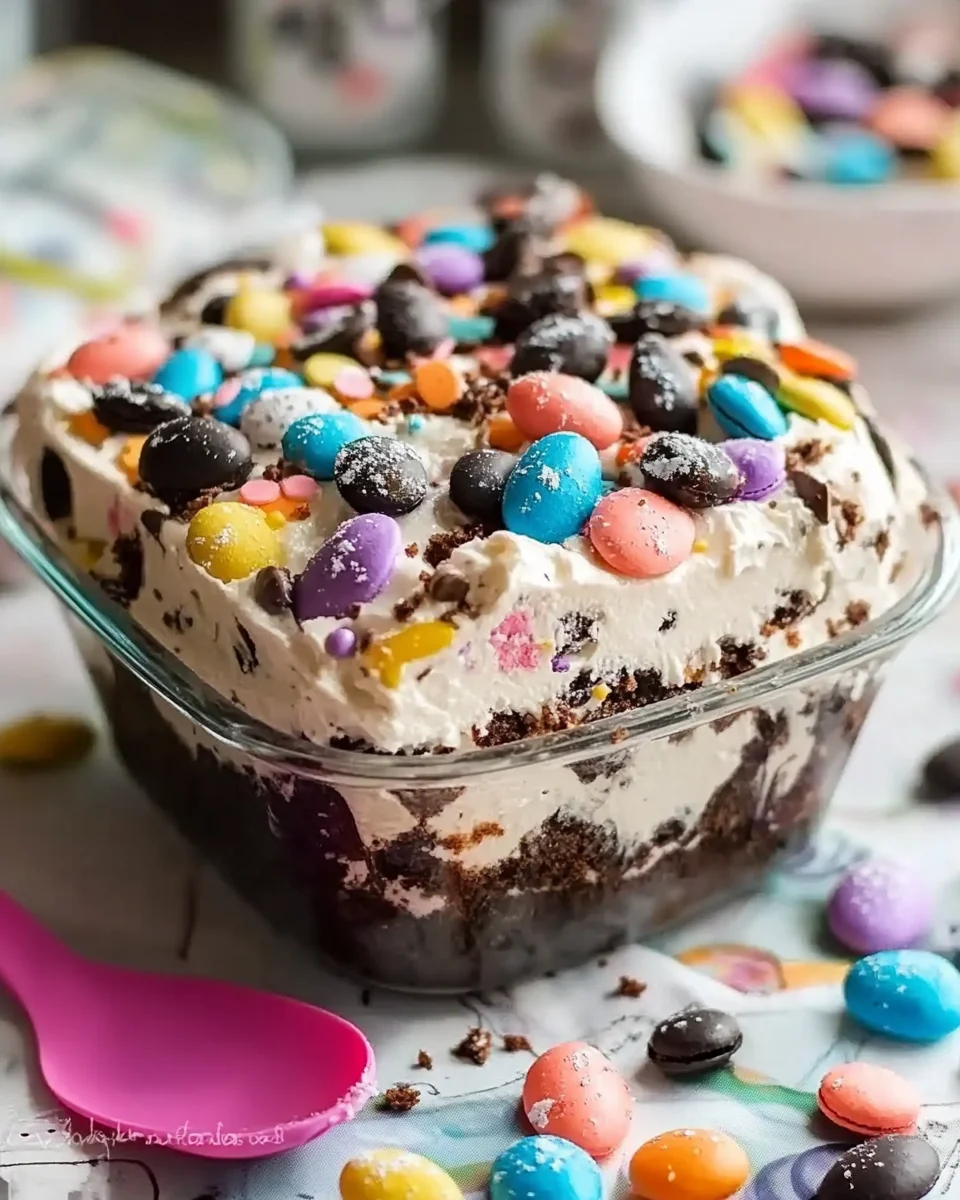
Fast forward to today, and that tradition continues with this Easter Dirt Cake Casserole. It’s a dessert that is as fun to make as it is to eat, with layers of crunchy Oreo cookies, fluffy pudding, and a rich cream cheese filling. But the real beauty of this dish? It’s foolproof. Whether you’re an experienced baker or a kitchen novice, this recipe guarantees a crowd-pleasing dessert without the stress.
If you’re looking for a show-stopping Easter dessert that requires minimal effort but delivers maximum flavor, this is it. Let’s dive into what makes this dish so special.
Why This Dessert is an Easter Must-Have
Easter celebrations often call for a mix of indulgent and light desserts, something that balances out the savory dishes on the table. This Easter Dirt Cake Casserole checks all the boxes.
✔ No-Bake Simplicity – Perfect for busy hosts or last-minute dessert planners.
✔ Creamy and Crunchy Balance – The combination of Oreos and a rich pudding-cream cheese mixture makes every bite irresistible.
✔ Easter-Themed Fun – With colorful candy-coated chocolates and mini Oreos, this dessert is as festive as it is delicious.
✔ Make-Ahead Friendly – Saves time and stress on Easter morning.
✔ Kid-Approved – Children love helping with this recipe, making it a perfect family bonding activity.
Whether you’re serving this at a brunch, a family gathering, or as an after-dinner treat, it’s sure to become a new Easter tradition.
Creative Twists and Variations
One of the best things about this recipe is how versatile it is. You can easily switch up the flavors and decorations to suit your preferences.
Chocolate Lover’s Dream
Swap the vanilla pudding for chocolate pudding and add a drizzle of melted chocolate over the top for an extra indulgent version.
Springtime Citrus Twist
For a lighter, fresher take, use lemon pudding and crushed Golden Oreos instead of chocolate ones. The result? A bright, zesty dessert perfect for spring.
Nut-Free and Allergy-Friendly Adjustments
If you’re serving guests with nut allergies, double-check the candy toppings and consider using a nut-free chocolate alternative. For a gluten-free option, simply use gluten-free sandwich cookies instead of Oreos.
Make It a Bunny Garden
Want to make this even more Easter-themed? Use shredded coconut dyed green to resemble grass, then add chocolate bunnies or candy eggs for a decorative, garden-inspired look.
Pro Tips for the Best Easter Dirt Cake Casserole
Even though this is an easy dessert, a few tricks can elevate it from good to exceptional.
✅ Chill It Well – Let the dessert set in the refrigerator for at least 2 hours (overnight is even better) to allow the flavors to meld.
✅ Use Softened Cream Cheese – Make sure your cream cheese is fully softened before mixing to avoid any lumps in the filling.
✅ Crush Oreos Evenly – For a smoother texture, use a food processor or crush the cookies in a zip-top bag with a rolling pin.
✅ Layer Thoughtfully – Spreading each layer evenly ensures every bite has the perfect balance of crunch and creaminess.
✅ Serve Cold – This dessert tastes best when properly chilled, keeping it firm and refreshing.
Storage and Make-Ahead Tips
One of the biggest advantages of this dessert is that it can be prepared in advance, freeing up your time on Easter day.
- Refrigeration: Store the dessert in an airtight container in the fridge for up to 3 days.
- Freezing: Not recommended, as the pudding and cream cheese layers may become too watery when thawed.
- Make-Ahead Tip: You can assemble the entire casserole the night before, keeping it covered in the fridge until ready to serve. Just add the candy decorations right before serving for the freshest look.
Ingredients: The Magic Behind the Layers
- Base & Topping:
- 1 package (14 oz) Oreo cookies, crushed
- ½ cup mini Oreo cookies (for topping)
- Creamy Filling:
- 1 package (8 oz) cream cheese, softened
- ¼ cup unsalted butter, softened
- 1 cup powdered sugar
- 1 package (3.4 oz) instant vanilla pudding mix
- 2 cups cold milk
- 1 container (8 oz) whipped topping (Cool Whip), thawed
- Festive Garnish:
- 1 cup pastel-colored candy-coated chocolates (e.g., M&M’s)
Directions: Layering the Goodness
1. Preparing the Oreo Crust
- Crush the Oreos using a food processor or place them in a zip-top bag and crush with a rolling pin.
- Reserve ½ cup of crushed Oreos for the topping.
- Spread the remaining crushed Oreos evenly into the bottom of a 9×13-inch baking dish.
2. Making the Cream Cheese Layer
- In a mixing bowl, beat the softened cream cheese, butter, and powdered sugar until smooth and creamy.
- Gently fold in the thawed Cool Whip until fully combined.
3. Preparing the Pudding Mixture
- In a separate bowl, whisk the vanilla pudding mix with cold milk until thickened (about 5 minutes).
- Fold the pudding into the cream cheese mixture until smooth.
4. Assembling the Layers
- Spread the cream cheese-pudding mixture evenly over the Oreo base.
- Sprinkle the reserved crushed Oreos over the top.
5. Decorating & Chilling
- Garnish with mini Oreos and pastel-colored candy-coated chocolates.
- Cover and refrigerate for at least 2 hours to let the flavors meld.
Nutritional Breakdown (Per Serving, Based on 12 Servings)
- Calories: 320
- Protein: 4g
- Carbohydrates: 42g
- Fat: 16g
- Saturated Fat: 9g
- Sugar: 28g
- Fiber: 1g
- Sodium: 180mg
Serving & Storage Tips
- Best served cold for the perfect creamy texture.
- Make ahead: Can be prepped a day in advance and stored in the fridge.
- Storage: Keeps well in an airtight container for up to 3 days.
This no-bake Easter Dirt Cake Casserole is a festive, colorful treat that will be the star of any spring celebration.
Frequently Asked Questions (FAQs)
Can I use homemade whipped cream instead of Cool Whip?
Absolutely! Simply whip 1 cup of heavy cream with 2 tablespoons of sugar until stiff peaks form. This will give you a richer, homemade taste.
Can I make this dessert in individual cups instead of a casserole dish?
Yes! Layering the dessert in individual cups or mason jars makes for a beautiful presentation and easy serving.
What if I don’t have instant pudding mix?
You can use homemade pudding, but make sure it’s thick and cooled before adding it to the cream cheese mixture.
How can I make this dessert less sweet?
You can reduce the powdered sugar in the cream cheese mixture or use dark chocolate Oreos for a less sugary flavor.
Can I add fruit to this dessert?
Definitely! Sliced strawberries or bananas make a delicious addition to the layers, adding a refreshing contrast to the richness.
The Final Bite: Why This Easter Dessert Stands Out
Easter is about celebrating traditions, spending time with loved ones, and enjoying good food. This Easter Dirt Cake Casserole embodies all of that in a single dish. It’s simple yet impressive, nostalgic yet adaptable, and most importantly—delicious.
As you prepare your Easter menu, consider adding this no-bake masterpiece to your dessert table. Whether it’s the kids sneaking extra candy pieces on top or the adults savoring every creamy bite, one thing is guaranteed—this dish will bring smiles all around.
So, gather your ingredients, invite your little helpers into the kitchen, and create a dessert that’s not just for Easter but for memories that last a lifetime. Happy baking!
Print
Easter Dirt Cake Casserole: A Nostalgic No-Bake Delight
- Total Time: 2 hours 15 minutes (including chilling time)
- Yield: 12 servings
Description
A festive and creamy no-bake dessert featuring layers of crushed Oreos, a velvety cream cheese-pudding filling, and colorful candy-coated chocolates. Perfect for Easter gatherings and spring celebrations!
Ingredients
- Base & Topping:
- 1 package (14 oz) Oreo cookies, crushed
- ½ cup mini Oreo cookies (for topping)
- Creamy Filling:
- 1 package (8 oz) cream cheese, softened
- ¼ cup unsalted butter, softened
- 1 cup powdered sugar
- 1 package (3.4 oz) instant vanilla pudding mix
- 2 cups cold milk
- 1 container (8 oz) whipped topping (Cool Whip), thawed
- Festive Garnish:
- 1 cup pastel-colored candy-coated chocolates (e.g., M&M’s)
Instructions
- Prepare the Oreo Crust
- Crush the Oreos using a food processor or place them in a zip-top bag and crush with a rolling pin.
- Reserve ½ cup of crushed Oreos for the topping.
- Spread the remaining crushed Oreos evenly into the bottom of a 9×13-inch baking dish.
- Make the Cream Cheese Layer
- In a mixing bowl, beat the softened cream cheese, butter, and powdered sugar until smooth and creamy.
- Gently fold in the thawed Cool Whip until fully combined.
- Prepare the Pudding Mixture
- In a separate bowl, whisk the vanilla pudding mix with cold milk until thickened (about 5 minutes).
- Fold the pudding into the cream cheese mixture until smooth.
- Assemble the Layers
- Spread the cream cheese-pudding mixture evenly over the Oreo base.
- Sprinkle the reserved crushed Oreos over the top.
- Decorate & Chill
- Garnish with mini Oreos and pastel-colored candy-coated chocolates.
- Cover and refrigerate for at least 2 hours to let the flavors meld.
Notes
- Best served cold for the perfect creamy texture.
- Can be made a day in advance and stored in the fridge.
- Keeps well in an airtight container for up to 3 days.
- Prep Time: 15 minutes
- Cook Time: 0 minutes
- Category: Dessert
- Method: No-Bake
- Cuisine: American