A Childhood Memory That Inspired a Tradition
Every Easter morning, my siblings and I would wake up to the sight of pastel-colored baskets filled with chocolates, jelly beans, and plush bunnies. But the real magic was in the treats my grandmother would prepare. Among the carefully arranged sweets were tiny edible baskets, filled with candy eggs and a bit of coconut “grass.” They weren’t fancy, just small cakes shaped into baskets, but they were made with love.
Those little confections became a tradition in our family. My grandmother always said, “Food should be as joyful to look at as it is to eat.” That sentiment stuck with me, and as I grew older, I found myself wanting to recreate those memories in a more modern way. That’s how these Easter Basket Cake Pops were born—a combination of nostalgic charm and contemporary dessert creativity.
Perfect for family gatherings, Easter brunch, or gifting to loved ones, these cake pops capture the essence of spring in a single bite. They bring back childhood wonder while being a delightful project for bakers of all skill levels. If you’ve ever longed for a way to blend artistry with flavor, these charming little baskets are the perfect treat to make and share.
Why You’ll Love Easter Basket Cake Pops
- Visually Stunning – These cake pops look like miniature Easter baskets, complete with candy eggs and edible grass. They’re almost too cute to eat.
- Customizable – Change the colors, candy decorations, or even the cake flavor to match your preference.
- Great for Gifting – Wrapped in cellophane with a ribbon, these make perfect Easter gifts for friends, neighbors, or teachers.
- Fun for Kids and Adults – Whether you’re making them with little ones or surprising guests, they add an interactive element to your Easter table.
- Make-Ahead Friendly – You can prepare these in advance, making Easter morning stress-free.
Tips and Tricks for Perfect Cake Pops
1. Getting the Right Cake Consistency
The key to well-formed cake pops is the right ratio of cake crumbs to frosting. Too much frosting makes them too soft, while too little results in a crumbly texture. Aim for a dough-like consistency that holds its shape.
2. Shaping the Basket Base
Shaping the cake pop base into a rounded cylinder gives a more realistic basket effect. A flat-bottomed basket is easier to decorate and stands more securely.
3. The Secret to a Smooth Coating
Dipping cake pops can be tricky. To avoid a thick, uneven coating, melt your chocolate or candy wafers slowly, stirring frequently. If it thickens too much, adding a little vegetable shortening or coconut oil can help create a smoother texture.
4. Securing the Basket Handles
Licorice handles can droop if they’re too long or if the coating hasn’t fully set. Cut them to the right size and insert them while the coating is still tacky but not too wet. You can also refrigerate them for a few minutes to help them set faster.
5. Decorating Like a Pro
Using a toothpick to apply small details like basket outlines or attaching decorations ensures precision. Sprinkling sanding sugar before the coating dries adds a touch of sparkle and texture.
Ingredients: Sweet Treats for Your Basket
- For the Cake Pops:
- 1 batch of prepared cake (crumbled)
- 1 batch of frosting (to mix with cake crumbs)
- For the Coating & Decorations:
- Chocolate or candy coating (melted)
- Licorice belts (cut into ¼-inch strips, about 3 ½ inches long)
- White sanding sugar
- Sweetarts jelly beans (for “eggs”)
- Green candy wafers (melted)
- Green candy shred or shredded coconut (tinted green)
Directions: Crafting Your Mini Easter Baskets
- Shape the Basket Base
- Prepare cake pops by mixing crumbled cake with frosting until moldable.
- Roll into balls, then shape into basket bases by flattening slightly and defining edges.
- Use a toothpick to create two small indentations on top for the handle placement.
- Dipping & Decorating the Basket
- Dip the cake baskets into melted chocolate or candy coating.
- Quickly insert the licorice handles before the coating sets to secure them.
- Adding Basket Details
- Using a toothpick dipped in melted candy wafers, outline the top edge of the basket.
- Sprinkle white sanding sugar over the outline before it dries.
- Let the coating set before proceeding.
- Creating the Easter Egg Centerpiece
- Dip one side of each jelly bean in melted green candy wafers and attach to the top center of each basket.
- Allow the eggs to set before adding grass.
- Adding the Grass Garnish
- Apply melted green candy wafers around the eggs and in between the handles.
- Gently press green candy shred or tinted shredded coconut onto the coated areas to resemble grass.
- Let everything dry completely before serving.
Nutritional Information: A Bite-Sized Indulgence
(Note: Approximate values per cake pop, depending on cake and frosting used)
- Calories: ~200
- Carbohydrates: ~30g
- Fat: ~8g
- Sugar: ~20g
- Protein: ~2g
These Easter Basket Cake Pops are a delightful way to celebrate the holiday—adorable, fun to make, and irresistibly sweet!
FAQs: Your Easter Basket Cake Pop Questions Answered
1. Can I use store-bought cake and frosting?
Absolutely! Using store-bought cake and frosting saves time, and since the cake is crumbled and mixed, the texture remains perfect. Just be mindful of frosting amounts—start small and add more as needed.
2. How far in advance can I make these cake pops?
Cake pops can be made up to a week in advance and stored in an airtight container in the refrigerator. If making them more than a couple of days ahead, consider freezing them and thawing them at room temperature before serving.
3. What other decorations can I use?
If you can’t find green candy shred, shredded coconut tinted with food coloring works well. Mini chocolate eggs, pastel M&Ms, or even small fondant flowers can add extra charm.
4. My cake pops keep falling off the stick. What am I doing wrong?
If your cake pops fall off, they might be too heavy, too soft, or the stick wasn’t secured properly. Try dipping the stick in melted coating before inserting it into the cake ball—this helps it stay in place. Also, refrigerate the shaped cake pops before dipping to firm them up.
5. Can I make these without sticks?
Definitely! If you prefer, these can be served as cake truffles. Simply shape them into baskets, decorate as usual, and place them in mini cupcake liners for a cute presentation.
6. What flavors work best?
Classic flavors like vanilla, chocolate, and red velvet work well, but you can get creative! Lemon cake with cream cheese frosting or carrot cake with a hint of cinnamon adds a seasonal touch.
7. What’s the best way to display these at an Easter party?
Styrofoam blocks covered in pastel paper work great for holding cake pops upright. Alternatively, placing them in an Easter basket filled with shredded paper or grass makes for a beautiful presentation.
Making Easter Sweeter, One Cake Pop at a Time
Easter is a holiday of renewal, joy, and togetherness, and nothing embodies that spirit better than baking something special for loved ones. These Easter Basket Cake Pops bring a touch of childhood nostalgia, creative fun, and delicious flavor to your spring celebrations.
Whether you’re making them for your family, as gifts, or just as a fun project to celebrate the season, they’re guaranteed to bring smiles. So go ahead, gather your ingredients, and start crafting your edible Easter masterpieces. After all, the sweetest memories are made in the kitchen.

Easter Basket Cake Pops: A Sweet Tradition of Springtime Joy
- Total Time: 1 hour
- Yield: 20 cake pops (approx.)
Description
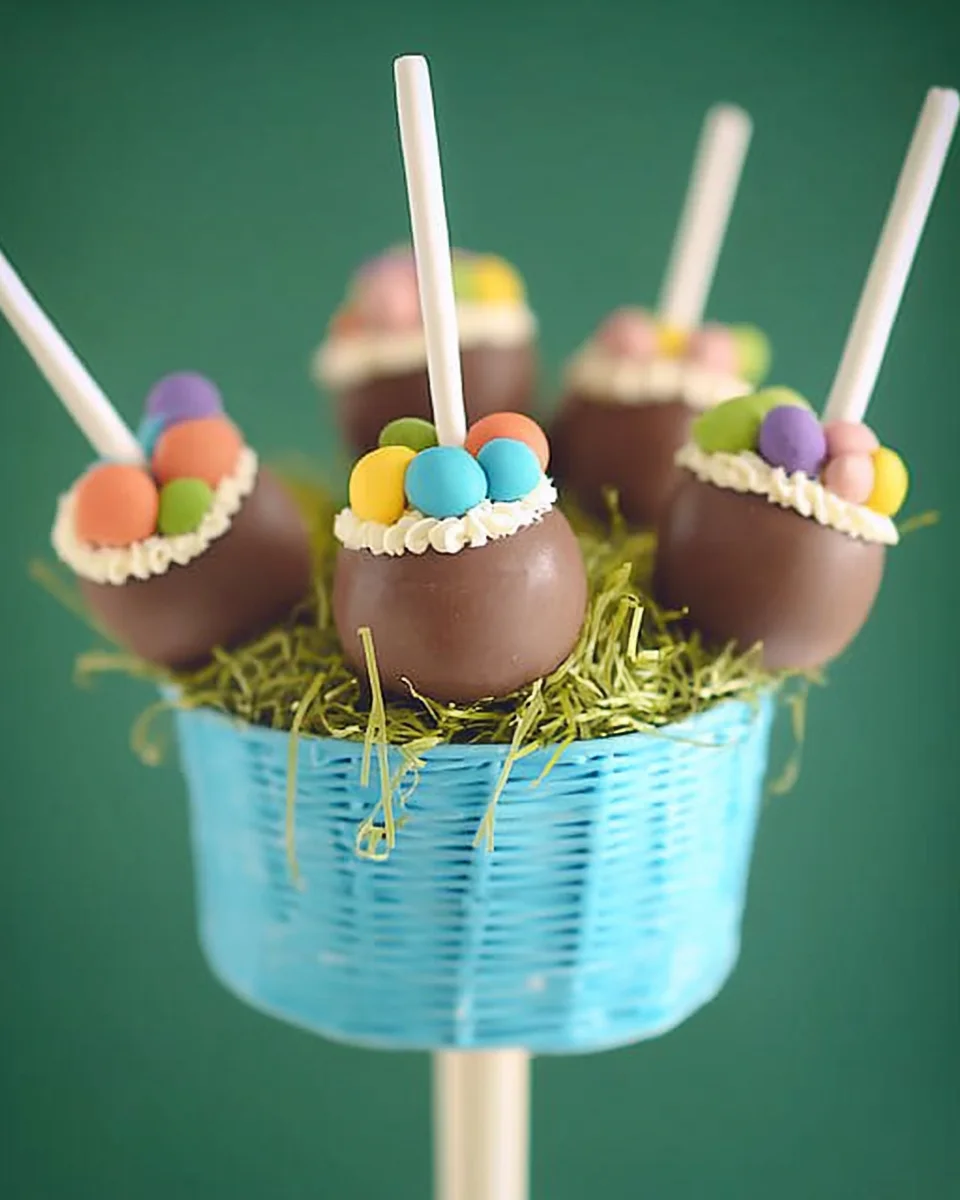
These Easter Basket Cake Pops are charming, delicious, and perfect for celebrating spring! With their candy-coated baskets, licorice handles, and jelly bean eggs nestled in edible grass, these treats bring festive sweetness to any Easter gathering.
Ingredients
For the Cake Pops:
- 1 batch prepared cake, crumbled
- 1 batch frosting (for binding cake crumbs)
For the Coating & Decorations:
- Chocolate or candy coating, melted
- Licorice belts, cut into ¼-inch strips (~3 ½ inches long)
- White sanding sugar
- Sweetarts jelly beans (for “eggs”)
- Green candy wafers, melted
- Green candy shred or shredded coconut (tinted green)
Instructions
- Shape the Basket Base:
- Combine crumbled cake with frosting until easily moldable.
- Form into balls, flatten slightly, and shape into small basket bases.
- Create two small indentations on the top with a toothpick for handles.
- Dipping & Decorating:
- Dip each cake basket into melted chocolate or candy coating.
- Immediately insert licorice handles into indentations before the coating hardens.
- Basket Details:
- Outline the top rim of each basket with a toothpick dipped in melted candy wafers.
- Sprinkle the outline with white sanding sugar before it dries completely.
- Egg Centerpiece:
- Dip one side of jelly beans into melted green candy wafers.
- Place onto the top center of each basket, allowing eggs to set firmly.
- Grass Garnish:
- Spread additional melted green candy wafers around the jelly bean eggs.
- Sprinkle green candy shred or tinted coconut to resemble grass.
- Allow to set fully before serving.
Notes
- Customize baskets using your favorite cake flavors and frostings.
- Ensure candies and decorations are applied quickly, as melted candy coatings set rapidly.
- Prep Time: 30 minutes
- Cook Time: 30 minutes
- Category: Dessert
- Method: No-Bake
- Cuisine: American