Introduction to Twix Ice Cream Cake Recipe
What Makes Twix Ice Cream Cake Special?
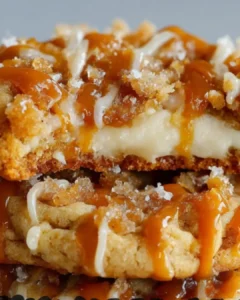
Twix Ice Cream Cake is a delightful treat that combines the best of both worlds: ice cream and candy bars. This cake is not just a dessert; it’s an experience! The layers of creamy vanilla ice cream, crunchy Twix bars, and a rich chocolate cookie crust create a symphony of flavors and textures. Each bite offers a perfect balance of sweetness and crunch, making it irresistible. Plus, the addition of chocolate fudge and caramel sauces elevates this cake to a whole new level of indulgence. It’s a dessert that brings joy to both kids and adults alike!
The Perfect Dessert for Any Occasion
Whether you’re celebrating a birthday, hosting a summer barbecue, or simply craving something sweet, Twix Ice Cream Cake fits the bill. Its impressive appearance and delicious taste make it a showstopper at any gathering. You can easily customize it to suit your guests’ preferences, making it versatile for any event. Plus, it’s a no-bake dessert, which means less time in the kitchen and more time enjoying the company of friends and family. So, why not treat yourself and your loved ones to this delightful cake? It’s sure to become a favorite!
Ingredients for Twix Ice Cream Cake Recipe
Essential Ingredients
To create the delicious Twix Ice Cream Cake, you’ll need a few essential ingredients. These components work together to form the base, layers, and toppings of the cake. Here’s what you’ll need:
- 1 ½ cups crushed Twix bars: About 10 fun-sized bars will do. These add a delightful crunch and caramel flavor.
- 1 ½ cups chocolate sandwich cookies: Crushed cookies, like Oreos, create a rich and tasty crust.
- ½ cup unsalted butter: Melted butter helps bind the cookie crumbs together for a sturdy base.
- 1 quart vanilla ice cream: Softened ice cream is the star of the show, providing a creamy texture.
- 1 cup chocolate fudge sauce: This sauce adds a rich chocolate flavor that complements the cake.
- 1 cup whipped topping: A light and fluffy topping that adds a nice finish to the cake.
- 1 cup caramel sauce: Drizzling this over the ice cream adds sweetness and a gooey texture.
- Extra crushed Twix bars: For topping, these add a final touch of crunch and flavor.
Optional Ingredients for Customization
While the essential ingredients create a fantastic cake, you can customize it to suit your taste. Here are some optional ingredients to consider:
- Chocolate ice cream: Swap vanilla for chocolate ice cream for an extra chocolatey treat.
- Peanut butter sauce: Drizzle some peanut butter sauce for a nutty twist.
- Chopped nuts: Add crushed peanuts or almonds for added crunch and flavor.
- Different candy bars: Experiment with other candy bars like Snickers or Milky Way for a unique flavor.
- Fresh fruit: Sliced bananas or strawberries can add a refreshing touch.
Feel free to mix and match these optional ingredients to create your perfect Twix Ice Cream Cake. The possibilities are endless!
Step-by-Step Preparation of Twix Ice Cream Cake Recipe
Step 1: Prepare the Base
To start, preheat your oven to 350°F. In a mixing bowl, combine the crushed chocolate sandwich cookies and melted butter. Stir until the crumbs are well coated. This mixture will form the crust of your cake. Next, press the cookie mixture firmly into the bottom of a 9-inch springform pan. Make sure it’s even and compact. Bake the crust for 10 minutes, then remove it from the oven. Allow it to cool completely before moving on to the next step. This cooling time is crucial for a sturdy base!
Step 2: Layer the Ice Cream
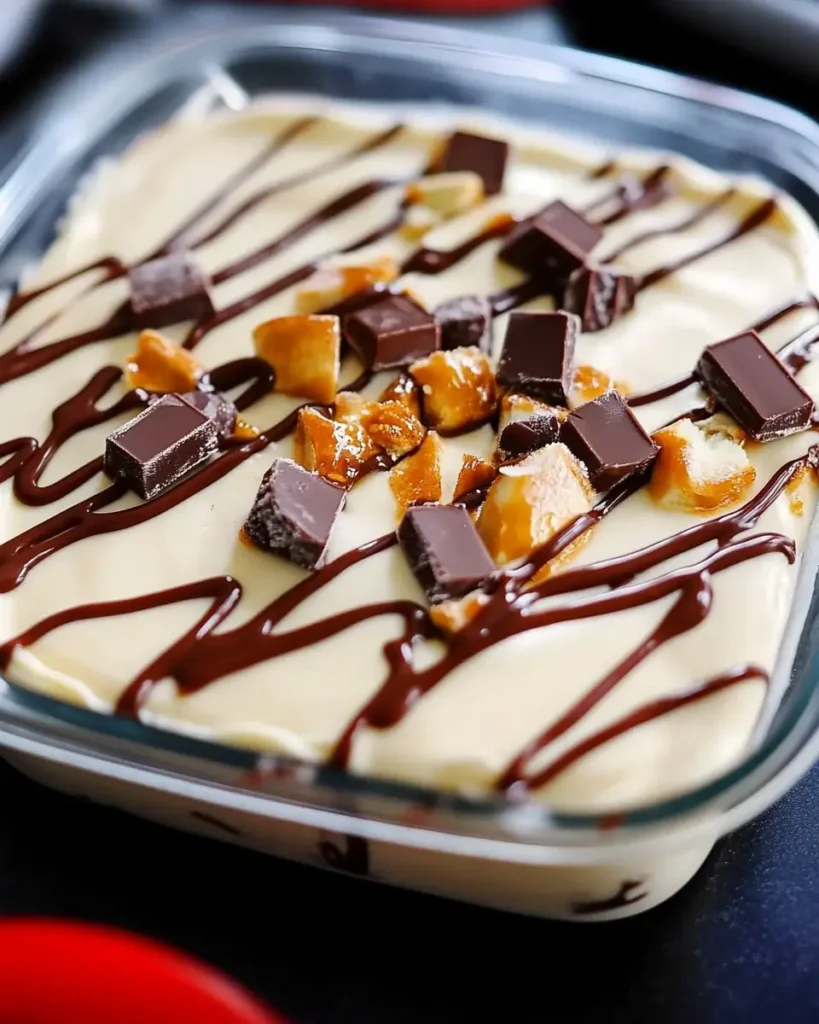
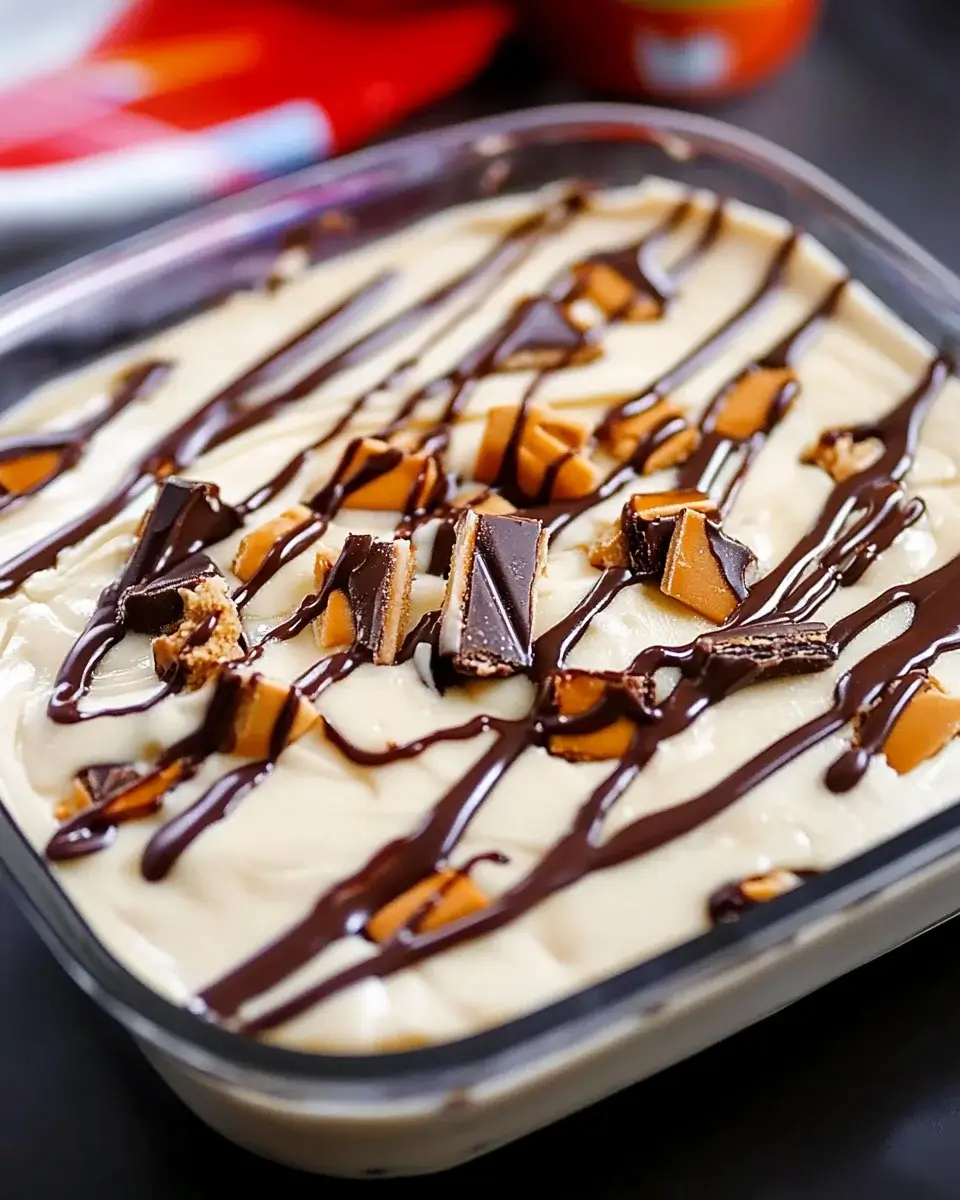
Once your crust is cool, it’s time to add the ice cream. Take your softened vanilla ice cream and spread it evenly over the cooled crust. Use a spatula to smooth it out, ensuring every corner is filled. This layer of ice cream is the heart of your cake, so make it nice and even. After that, drizzle half of the chocolate fudge sauce and half of the caramel sauce over the ice cream. This will create a delicious swirl of flavors that will melt in your mouth!
Step 3: Add Twix and Other Toppings
Now comes the fun part! Sprinkle the crushed Twix bars over the ice cream layer. Press them gently into the ice cream to ensure they stick. This adds a delightful crunch and caramel flavor to each bite. If you want to get creative, you can add any optional toppings you like at this stage. Think about adding chopped nuts or even a drizzle of peanut butter sauce for an extra twist!
Step 4: Freeze the Cake
After layering the ice cream and toppings, it’s time to freeze the cake. Cover the springform pan with plastic wrap and place it in the freezer. Let it freeze for at least 4 hours, or until the ice cream is firm. This step is essential for achieving the perfect texture. You want it to be solid enough to slice easily when you’re ready to serve!
Step 5: Serve and Enjoy
When you’re ready to enjoy your Twix Ice Cream Cake, remove it from the freezer. Let it sit at room temperature for about 10 minutes. This will make slicing much easier. Once it’s slightly softened, carefully remove the sides of the springform pan. Spread the whipped topping over the top of the cake, creating a beautiful finish. Drizzle the remaining chocolate fudge and caramel sauces over the whipped topping, and sprinkle with extra crushed Twix bars for that final touch. Slice, serve, and enjoy this delicious dessert with family and friends!
Variations of Twix Ice Cream Cake Recipe
Different Ice Cream Flavors to Try
While vanilla ice cream is a classic choice for your Twix Ice Cream Cake, there are many other flavors you can experiment with. Each flavor brings its own unique twist to the cake. Here are some delicious options:
- Chocolate Ice Cream: For chocolate lovers, using chocolate ice cream will enhance the rich flavors of the cake. It creates a double chocolate experience that is simply divine!
- Cookies and Cream: This flavor adds a delightful crunch with bits of cookies mixed in. It pairs perfectly with the Twix bars for an extra layer of texture.
- Mint Chocolate Chip: If you enjoy a refreshing taste, mint chocolate chip ice cream can add a cool twist. The mint flavor complements the chocolate and caramel beautifully.
- Strawberry Ice Cream: For a fruity touch, strawberry ice cream can lighten the dessert. It adds a sweet and tangy flavor that contrasts nicely with the rich toppings.
- Peanut Butter Cup: This flavor brings a nutty richness that pairs wonderfully with the Twix bars. It’s a great option for those who love peanut butter!
Feel free to mix and match these flavors to create your own signature Twix Ice Cream Cake. Each variation will offer a new taste adventure!
Alternative Toppings and Mix-Ins
In addition to the classic toppings, you can get creative with alternative toppings and mix-ins. Here are some ideas to elevate your Twix Ice Cream Cake:
- Chopped Nuts: Adding crushed peanuts, almonds, or walnuts can provide a satisfying crunch. Nuts also add a nice contrast to the creamy ice cream.
- Fresh Fruit: Sliced bananas, strawberries, or raspberries can add a refreshing burst of flavor. They also make the cake look vibrant and appealing.
- Chocolate Chips: Sprinkle mini chocolate chips on top for an extra chocolatey touch. They can also be mixed into the ice cream layer for added texture.
- Toffee Bits: For an extra layer of sweetness, consider adding toffee bits. They will enhance the caramel flavor and add a delightful crunch.
- Drizzles of Nutella: A drizzle of Nutella can add a rich hazelnut flavor that pairs beautifully with the other ingredients.
These alternative toppings and mix-ins allow you to personalize your Twix Ice Cream Cake. Get creative and have fun with it!
Cooking Note for Twix Ice Cream Cake Recipe
Tips for Achieving the Best Texture
Getting the perfect texture for your Twix Ice Cream Cake is key to its success. Here are some helpful tips to ensure your cake turns out just right:
- Soften the Ice Cream: Before spreading the ice cream, let it sit at room temperature for about 10-15 minutes. This makes it easier to spread and helps create a smooth layer.
- Cool the Crust Completely: Allow the cookie crust to cool completely before adding the ice cream. A warm crust can melt the ice cream, leading to a messy cake.
- Freeze Between Layers: If you want to add multiple layers of ice cream or toppings, freeze the cake for about 30 minutes between each layer. This helps keep the layers distinct and prevents them from mixing.
- Use a Warm Knife for Slicing: To slice the cake easily, dip your knife in warm water and wipe it dry before cutting. This will help you get clean slices without melting the ice cream too much.
Common Mistakes to Avoid
Even the best bakers can make mistakes! Here are some common pitfalls to watch out for when making your Twix Ice Cream Cake:
- Not Pressing the Crust Firmly: If the cookie crust isn’t pressed down firmly, it may crumble when you slice the cake. Make sure to pack it tightly into the pan.
- Skipping the Freezing Time: Don’t rush the freezing process. If the cake isn’t frozen long enough, it will be too soft to slice properly.
- Overfilling the Pan: Be careful not to overfill the springform pan. Leave some space at the top for the whipped topping and any additional toppings you plan to add.
- Using Cold Ice Cream: Avoid using ice cream that is too hard. If it’s too cold, it will be difficult to spread evenly over the crust.
By following these tips and avoiding common mistakes, you’ll create a Twix Ice Cream Cake that is not only delicious but also visually appealing. Enjoy the process and have fun making this delightful dessert!
Serving Suggestions for Twix Ice Cream Cake Recipe
Ideal Pairings and Accompaniments
When it comes to serving your Twix Ice Cream Cake, the right accompaniments can enhance the experience. Here are some delightful pairings to consider:
- Fresh Berries: Serve the cake with a side of fresh strawberries, raspberries, or blueberries. The tartness of the berries balances the sweetness of the cake beautifully.
- Chocolate Sauce: Offer extra chocolate fudge sauce on the side for drizzling. This allows guests to customize their dessert and adds an extra layer of indulgence.
- Coffee or Tea: A warm cup of coffee or tea pairs perfectly with the cold, creamy cake. The warmth of the drink complements the chilled dessert, creating a delightful contrast.
- Ice Cream Scoops: For an extra treat, serve a scoop of vanilla or chocolate ice cream alongside the cake. This adds to the ice cream experience and makes it even more decadent.
- Whipped Cream: A dollop of whipped cream on the side can add a light and fluffy texture that complements the rich flavors of the cake.
These pairings not only enhance the flavor but also make your dessert table look inviting and delicious!
Presentation Tips for a Stunning Dessert
Presentation is key when serving your Twix Ice Cream Cake. Here are some tips to make it visually appealing:
- Use a Cake Stand: Present your cake on a decorative cake stand. This elevates the cake and makes it the centerpiece of your dessert table.
- Garnish with Fresh Ingredients: Add fresh mint leaves or edible flowers on top for a pop of color. This adds a touch of elegance and freshness to the presentation.
- Drizzle Sauces Artistically: When drizzling chocolate and caramel sauces, do it in a zigzag pattern for a professional look. This creates an eye-catching design that draws attention.
- Slice Neatly: Use a warm knife to slice the cake, ensuring clean edges. Neat slices make the cake look more appealing and inviting.
- Serve on Colorful Plates: Choose colorful or patterned plates to serve the cake. This adds vibrancy and makes the dessert stand out even more.
With these presentation tips, your Twix Ice Cream Cake will not only taste amazing but also look stunning, making it a perfect dessert for any occasion!
Tips for Making the Perfect Twix Ice Cream Cake Recipe
Storage Tips for Leftovers
After enjoying your delicious Twix Ice Cream Cake, you may have some leftovers. Proper storage is key to keeping it fresh and tasty. Here are some helpful tips:
- Keep it Covered: Always cover the cake with plastic wrap or aluminum foil. This prevents freezer burn and keeps the flavors intact.
- Use an Airtight Container: If you have a large enough container, transfer the cake to an airtight container. This is especially useful if you want to store individual slices.
- Label and Date: If you’re storing the cake for a while, label it with the date. This way, you’ll know how long it’s been in the freezer.
- Freeze for Up to 2 Weeks: The Twix Ice Cream Cake can be stored in the freezer for up to two weeks. After that, the quality may start to decline.
- Thawing Tips: When you’re ready to enjoy the leftovers, take the cake out of the freezer and let it sit at room temperature for about 10 minutes. This will make slicing easier.
How to Make Ahead of Time
If you’re planning a special occasion, making the Twix Ice Cream Cake ahead of time is a great idea. Here’s how to do it:
- Prepare the Cake a Day in Advance: You can make the cake a day before your event. Just follow the recipe and freeze it as directed. This allows the flavors to meld together.
- Store in the Freezer: Once the cake is assembled and frozen, keep it in the freezer until you’re ready to serve. This ensures it stays fresh and firm.
- Decorate Just Before Serving: For the best presentation, add the whipped topping and drizzles of fudge and caramel just before serving. This keeps the toppings looking fresh and appealing.
- Plan for Thawing Time: Remember to take the cake out of the freezer about 10 minutes before serving. This will make it easier to slice and enjoy.
- Consider Portioning: If you’re expecting a large crowd, consider making two smaller cakes instead of one large one. This way, you can serve them fresh and keep one in the freezer for later.
By following these tips, you can ensure that your Twix Ice Cream Cake is not only delicious but also convenient to prepare ahead of time. Enjoy the sweet rewards of your efforts!
Breakdown of Time for Twix Ice Cream Cake Recipe
Prep Time
The prep time for your Twix Ice Cream Cake is quite manageable. You’ll need about 20 minutes to gather your ingredients and prepare the crust and ice cream layers. This includes crushing the cookies and Twix bars, mixing the crust, and spreading the ice cream. It’s a fun and quick process that gets you one step closer to enjoying this delicious dessert!
Cooking Time
Cooking time is minimal for this no-bake cake. You’ll spend about 10 minutes baking the cookie crust in the oven. After that, there’s no additional cooking required! The real magic happens in the freezer, where the cake sets up beautifully.
Total Time
In total, you should plan for about 4 hours and 30 minutes to make your Twix Ice Cream Cake. This includes the 10 minutes of baking and the 4 hours of freezing time. While it may seem like a long wait, the result is well worth it! You’ll have a stunning and delicious cake ready to impress your family and friends.
Nutritional Information for Twix Ice Cream Cake Recipe
Calories and Macronutrients
Understanding the nutritional content of your Twix Ice Cream Cake is important, especially if you’re mindful of your diet. Each serving of this delightful dessert contains approximately 320 calories. Here’s a breakdown of the macronutrients per serving:
- Calories: 320
- Net Carbs: 38g
- Protein: 4g
- Fat: 16g
These values can vary based on the specific ingredients you choose, especially if you opt for low-fat or sugar-free alternatives. It’s always a good idea to check the labels of your ingredients for the most accurate information.
Health Considerations
While Twix Ice Cream Cake is a delicious treat, it’s important to enjoy it in moderation. Here are some health considerations to keep in mind:
- High Sugar Content: The cake contains sugar from the ice cream, sauces, and candy bars. If you’re watching your sugar intake, consider using sugar-free options.
- Caloric Density: With 320 calories per serving, this dessert is calorie-dense. Pair it with lighter meals throughout the day to balance your intake.
- Allergies: Be cautious if you have allergies. The cake contains dairy and gluten, so it may not be suitable for those with lactose intolerance or gluten sensitivity.
- Customization for Health: You can make healthier choices by using low-fat ice cream, reduced-sugar toppings, or even adding fresh fruit for added nutrients.
By being mindful of these factors, you can enjoy your Twix Ice Cream Cake while still maintaining a balanced diet. Remember, it’s all about moderation and making informed choices!
FAQs about Twix Ice Cream Cake Recipe
Can I use different candy bars in this recipe?
Absolutely! One of the best things about the Twix Ice Cream Cake is its versatility. You can easily swap out Twix bars for other candy bars. For example, Snickers, Milky Way, or even Reese’s Peanut Butter Cups can add a unique twist to your cake. Just make sure to crush them into small pieces, similar to how you would with the Twix bars. This way, you’ll still get that delightful crunch and flavor in every bite!
How long can I store the Twix Ice Cream Cake?
Your Twix Ice Cream Cake can be stored in the freezer for up to two weeks. To keep it fresh, make sure to cover it tightly with plastic wrap or aluminum foil. If you have individual slices, consider placing them in an airtight container. This will help prevent freezer burn and maintain the cake’s delicious taste. Just remember to let it sit at room temperature for about 10 minutes before serving, so it’s easier to slice!
Is it possible to make this cake dairy-free?
Yes, you can make a dairy-free version of the Twix Ice Cream Cake! Look for dairy-free ice cream options available at your local grocery store. Many brands offer delicious alternatives made from almond, coconut, or soy milk. Additionally, ensure that the toppings and sauces you use are also dairy-free. With these substitutions, you can enjoy this delightful dessert without the dairy!
What is the best way to slice the ice cream cake?
Slicing an ice cream cake can be tricky, but with the right technique, it can be done easily! First, dip a sharp knife in warm water and wipe it dry. This will help the knife glide through the cake smoothly. Make sure to slice quickly to avoid melting the ice cream too much. If you find the cake is still too hard, let it sit at room temperature for about 10 minutes before slicing. This will make it easier to cut through the layers without making a mess!
Conclusion on Twix Ice Cream Cake Recipe
Recap of the Recipe and Its Appeal
The Twix Ice Cream Cake is a delightful dessert that combines the rich flavors of chocolate, caramel, and creamy ice cream. With its crunchy cookie crust and layers of Twix bars, this cake is sure to impress anyone who takes a bite. The recipe is simple and straightforward, making it accessible for bakers of all skill levels. Plus, the ability to customize it with different ice cream flavors and toppings means you can create a unique version that suits your taste. Whether you’re celebrating a special occasion or just treating yourself, this cake is a perfect choice!
Encouragement to Try Making It at Home
Now that you have all the details, why not give the Twix Ice Cream Cake a try? It’s a fun and rewarding project that will bring joy to your kitchen and delight to your table. Gather your ingredients, invite some friends or family to join in, and enjoy the process of creating this delicious dessert. Remember, the best part of baking is sharing your creations with loved ones. So roll up your sleeves, and let the sweet adventure begin! You won’t regret it!
Twix Ice Cream Cake Recipe is a must-try dessert!
Ingredients
Method
- Prepare the DishLightly grease an 8×8-inch or 9×9-inch baking dish with non-stick spray. Set aside.
- Make the CrustPlace shortbread cookies in a Ziplock bag and crush into fine crumbs using a rolling pin. Transfer to the baking dish, mix with melted butter, and press evenly to form the crust. Freeze for 20 minutes.
- Build the FillingIn a mixing bowl, combine softened vanilla ice cream with half of the chopped Twix bars. Spread the mixture evenly over the chilled crust.
- Add Toppings and FreezeSprinkle the remaining Twix pieces on top. Cover and freeze the cake for at least 6 hours or overnight for best texture.
- Finish with DrizzleMelt chocolate chips in the microwave in 20-second intervals, stirring between bursts until smooth. Drizzle melted chocolate and caramel topping over the frozen cake.
- Slice and ServeCut into squares and serve immediately. Keep any leftovers frozen in an airtight container for up to 3 months.
Notes
- Make sure the ice cream is softened enough to mix easily but not melted.
- You can substitute Twix with other candy bars like Snickers or Milky Way for variety.
- For a saltier twist, sprinkle crushed pretzels on top before freezing.
- Perfect for make-ahead entertaining—just drizzle right before serving.