Introduction to Heath Bar Poke Cake
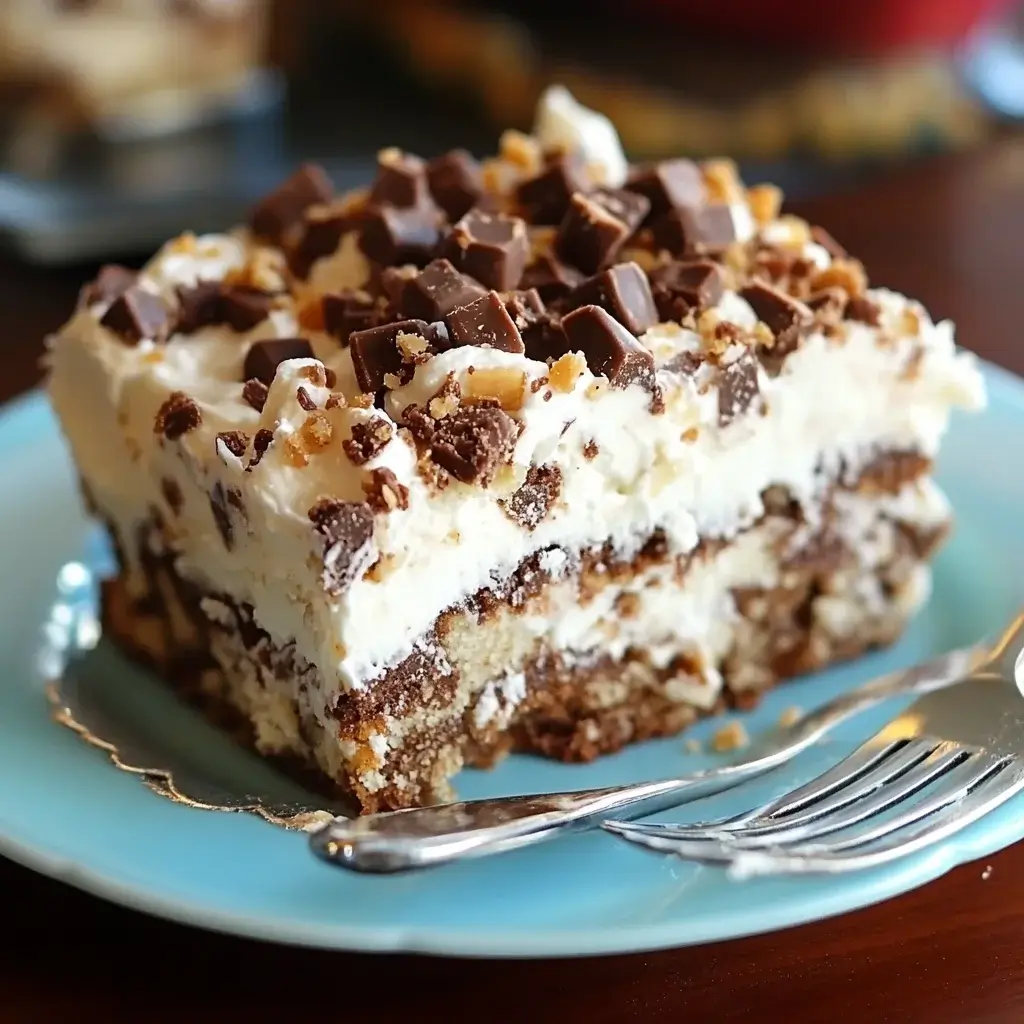
There’s something magical about desserts that bring back memories, isn’t there? The Heath Bar Poke Cake is one of those delightful treats that can transport you back to simpler times. This cake is not just a dessert; it’s a quick solution for a busy day or a sweet way to impress your loved ones. With its rich chocolate flavor, creamy filling, and crunchy Heath bar topping, it’s a crowd-pleaser that requires minimal effort. Trust me, once you serve this cake, you’ll be the hero of the kitchen, and everyone will be asking for seconds!
Why You’ll Love This Heath Bar Poke Cake
This Heath Bar Poke Cake is a dream come true for anyone who loves dessert but craves simplicity. It’s incredibly easy to whip up, making it perfect for those busy weeknights or last-minute gatherings. The combination of rich chocolate and creamy filling is simply irresistible. Plus, the crunchy Heath bar topping adds that extra layer of texture and flavor. You’ll find yourself making this cake again and again!
Ingredients for Heath Bar Poke Cake
Gathering the right ingredients is the first step to creating this delicious Heath Bar Poke Cake. Here’s what you’ll need:
- Chocolate cake mix: The base of our cake, providing that rich chocolate flavor. You can use any brand you prefer.
- Water: Essential for mixing the cake batter, helping to achieve the perfect consistency.
- Vegetable oil: This adds moisture to the cake, ensuring it stays soft and tender.
- Large eggs: They act as a binding agent, giving the cake structure and richness.
- Sweetened condensed milk: This creamy ingredient is key to the poke cake concept, soaking into the holes for a luscious filling.
- Chocolate syrup: Adds an extra layer of chocolatey goodness, enhancing the flavor profile.
- Whipped topping: A light and fluffy layer that balances the richness of the cake and filling.
- Crushed Heath bars: The star of the show! These add a delightful crunch and caramel flavor that complements the chocolate.
For those looking to mix things up, consider substituting the crushed Heath bars with crushed Oreos or Butterfingers for a fun twist. You can find all the exact measurements at the bottom of the article, ready for printing!
How to Make Heath Bar Poke Cake
Creating this Heath Bar Poke Cake is a straightforward process that anyone can master. Follow these simple steps, and you’ll have a dessert that’s sure to impress!
Step 1: Preheat and Prepare
Start by preheating your oven to 350°F (175°C). While it warms up, grab a 9×13-inch baking dish and grease it with butter or cooking spray. A little flour dusting will help the cake release easily later. This step is crucial for a perfect bake!
Step 2: Mix the Batter
In a large mixing bowl, combine the chocolate cake mix, water, vegetable oil, and eggs. Use an electric mixer on medium speed for about 2 minutes. You want a smooth batter, so make sure there are no lumps. The aroma of chocolate will start to fill your kitchen, and trust me, it’s heavenly!
Step 3: Bake the Cake
Pour the batter into your prepared baking dish. Spread it evenly, then pop it into the oven. Bake for 30-35 minutes. To check if it’s done, insert a toothpick in the center. If it comes out clean, you’re good to go! Let it cool for about 15 minutes before moving to the next step.
Step 4: Poke Holes
Once the cake has cooled slightly, take the handle of a wooden spoon and poke holes all over the top. Space them about an inch apart. This is where the magic happens! The holes will allow the creamy filling to seep in, making every bite deliciously moist.
Step 5: Add the Filling
In a separate bowl, mix the sweetened condensed milk and chocolate syrup until smooth. Pour this luscious mixture evenly over the cake, ensuring it fills all the holes. Watch as it seeps in, creating a rich, chocolatey filling that will make your taste buds dance!
Step 6: Chill the Cake
Let the cake cool completely at room temperature. Then, cover it and refrigerate for at least 2 hours. This chilling time allows the flavors to meld beautifully. Trust me, patience is key here!
Step 7: Top and Serve
After chilling, spread the whipped topping over the cake. Don’t be shy—make it generous! Finally, sprinkle the crushed Heath bars on top for that perfect crunch. Slice into squares, serve, and watch everyone enjoy this delightful dessert!

Tips for Success
- Make sure your ingredients are at room temperature for better mixing.
- Don’t skip the chilling step; it enhances the flavor and texture.
- Use a toothpick to check for doneness; it should come out clean.
- For a richer taste, consider adding a layer of chocolate ganache on top.
- Store leftovers in the fridge for up to 3 days—if there are any!
Equipment Needed
- 9×13-inch baking dish: A standard size for this cake; a glass or metal dish works well.
- Mixing bowl: Any large bowl will do; a stand mixer can save time.
- Wooden spoon: Perfect for poking holes; a skewer can also work.
- Measuring cups: Essential for accuracy; use a kitchen scale for precision.
Variations
- Peanut Butter Twist: Swirl in some creamy peanut butter with the whipped topping for a nutty flavor that pairs beautifully with chocolate.
- Minty Fresh: Add a few drops of peppermint extract to the chocolate syrup mixture for a refreshing mint chocolate experience.
- Gluten-Free Option: Use a gluten-free chocolate cake mix to make this dessert suitable for those with gluten sensitivities.
- Fruit Infusion: Layer in some fresh raspberries or strawberries between the cake and whipped topping for a fruity contrast.
- Vegan Version: Substitute eggs with flaxseed meal and use a plant-based whipped topping for a vegan-friendly treat.
Serving Suggestions
- Pair with a scoop of vanilla ice cream for a delightful contrast in temperature and texture.
- Serve alongside fresh berries to add a pop of color and freshness.
- Drizzle extra chocolate syrup on top for an indulgent touch.
- Garnish with mint leaves for a refreshing finish.
FAQs about Heath Bar Poke Cake
Can I make Heath Bar Poke Cake ahead of time?
Absolutely! This cake actually tastes better after chilling for a few hours or even overnight. Just make sure to cover it well in the fridge to keep it fresh.
What can I use instead of Heath bars?
If you want to switch things up, crushed Oreos or Butterfingers work wonderfully. They’ll add a different flavor and texture while still keeping that delightful crunch.
How should I store leftovers?
Store any leftover Heath Bar Poke Cake in an airtight container in the refrigerator. It should stay fresh for up to three days, but I doubt it will last that long!
Can I freeze this cake?
Yes, you can freeze the cake! Just make sure it’s well wrapped. When you’re ready to enjoy it, let it thaw in the fridge overnight before serving.
Is this cake suitable for special diets?
For a gluten-free option, simply use a gluten-free chocolate cake mix. You can also make it vegan by substituting eggs with flaxseed meal and using a plant-based whipped topping.
Final Thoughts
Creating a Heath Bar Poke Cake is more than just baking; it’s about sharing joy and deliciousness with those you love. Each slice is a delightful blend of rich chocolate, creamy filling, and that irresistible crunch from the Heath bars. Whether it’s a family gathering, a potluck, or just a treat for yourself, this cake brings smiles and satisfied taste buds. The best part? It’s simple enough for any home cook to master. So, roll up your sleeves, embrace the process, and enjoy the sweet rewards of your culinary adventure. Trust me, you’ll be glad you did!
PrintHeath Bar Poke Cake: Indulge in a Delicious Dessert!
- Total Time: 2 hours 50 minutes
- Yield: 12 servings
- Diet: Vegetarian
Description
Heath Bar Poke Cake is a delicious dessert that combines chocolate cake with a creamy filling and a crunchy Heath bar topping.
Ingredients
- 1 box chocolate cake mix (15.25 oz)
- 1 cup water
- 1/2 cup vegetable oil
- 3 large eggs
- 1 can sweetened condensed milk (14 oz)
- 1 cup chocolate syrup
- 1 cup whipped topping (like Cool Whip)
- 1 cup crushed Heath bars (about 4–5 bars)
Instructions
- Preheat the oven to 350°F (175°C). Grease and flour a 9×13-inch baking dish.
- In a large mixing bowl, combine the chocolate cake mix, water, vegetable oil, and eggs. Beat on medium speed for 2 minutes until well blended.
- Pour the batter into the prepared baking dish and bake for 30-35 minutes, or until a toothpick inserted in the center comes out clean.
- Once the cake is baked, remove it from the oven and let it cool for about 15 minutes.
- Using the handle of a wooden spoon, poke holes all over the top of the cake, about 1 inch apart.
- In a separate bowl, mix the sweetened condensed milk and chocolate syrup until smooth. Pour the mixture evenly over the cake, allowing it to seep into the holes.
- Let the cake cool completely, then refrigerate for at least 2 hours to allow the flavors to meld.
- After chilling, spread the whipped topping over the cake. Sprinkle the crushed Heath bars on top for garnish.
- Slice into squares and serve.
Notes
- For a richer flavor, consider adding a layer of chocolate ganache on top of the whipped topping.
- You can also substitute the crushed Heath bars with crushed Oreos or Butterfingers for a different twist.
- Prep Time: 15 minutes
- Cook Time: 35 minutes
- Category: Dessert
- Method: Baking
- Cuisine: American
Nutrition
- Serving Size: 1 slice
- Calories: 290
- Sugar: 24g
- Sodium: 200mg
- Fat: 12g
- Saturated Fat: 4g
- Unsaturated Fat: 8g
- Trans Fat: 0g
- Carbohydrates: 38g
- Fiber: 1g
- Protein: 4g
- Cholesterol: 50mg


