There’s something profoundly comforting about the rituals we build around dessert. For my family, those rituals are less about rules and more about rhythms—quiet, shared indulgences that tether us to each other in the simplest of ways. One of the most unforgettable of those traditions came during a particularly emotional summer, when I found myself searching for a way to lift my father’s spirits after a rough few months. He’s never asked for much, but he has two very consistent loves: Oreos and ice cream.
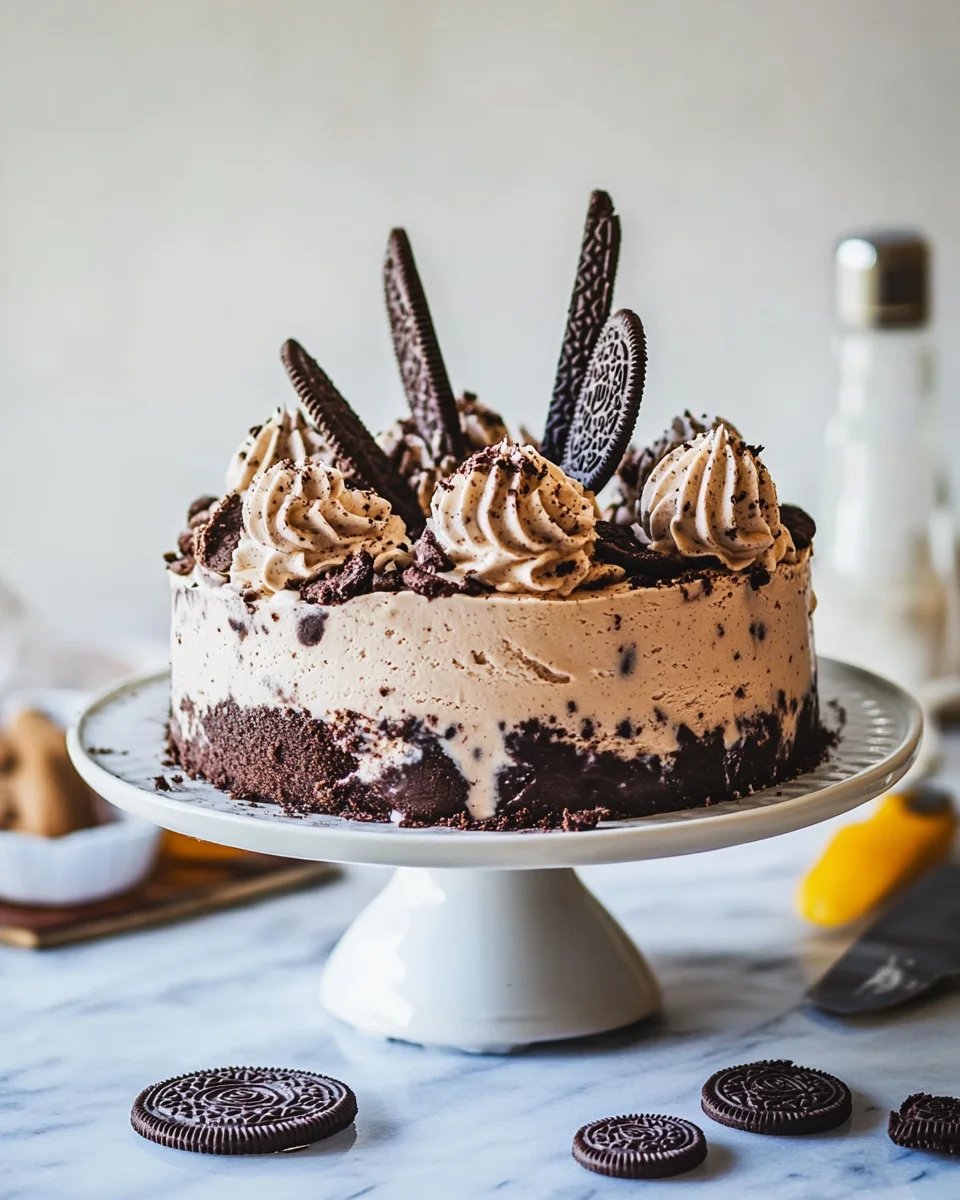
It was close to my parents’ wedding anniversary, and though my dad half-jokingly hinted at cheesecake, my heart nudged me in a different direction. I needed something that felt comforting but celebratory, familiar yet festive. That’s how the Chocolate Oreo Cookie Ice Cream Cake came to life—an idea born from pantry staples and the kind of love that only exists in families who’ve weathered storms together. It turned out to be more than just a dessert. It became a shared memory, a moment of laughter and satisfaction that none of us knew we needed so badly.
The Layered Allure of an Ice Cream Cake
This cake isn’t just a stack of cold treats. It’s a sensory adventure: fudgy chocolate cake crumbled into velvety vanilla ice cream, a rich swirl of chocolate sauce, the familiar crunch of Oreos scattered like confetti, and a smooth dark chocolate glaze drizzled on top. It’s indulgent, yes—but also nostalgic, childlike, and celebratory all at once.
What makes this cake so magical is its flexibility. Whether you’re baking every layer from scratch or opting for the store-bought route, it still ends up looking like a bakery showpiece. No frosting skills required—just a springform pan, a freezer, and the kind of joy that comes from making something just for the people you love.
Tips to Master the Magic
While the recipe itself is straightforward, here are a few thoughtful tips that take this cake from good to unforgettable:
1. Let the Ice Cream Soften Properly
Working with rock-hard ice cream is a shortcut to frustration. Let it sit out just long enough to become pliable but not melted—around 10 to 15 minutes depending on the brand and your room temperature.
2. Use a Springform Pan
This isn’t optional—unless you love digging cakes out with a spoon. The removable sides make unmolding a breeze and create that clean, bakery-style finish.
3. Don’t Skip the Chill Time
As tempting as it is to slice early, resist the urge. The magic happens in the freezer. Four hours is the minimum, but overnight is best for those crisp, defined layers.
4. Customize the Texture
You can pulse the Oreos into fine crumbs for a more uniform texture or leave them chunky for that satisfying crunch. A mix of both is surprisingly delightful.
Endless Possibilities: Variations to Satisfy Every Craving
What makes this cake such a keeper is how easy it is to transform. Here are some dreamy variations to suit any occasion or craving:
The Candy Bar Remix
Substitute Oreos with crushed Kit Kats, Reese’s Peanut Butter Cups, or Ferrero Rocher for a more decadent twist. Each candy changes the profile completely while keeping the spirit of the cake alive.
The Mint Chocolate Affair
Use mint chocolate chip ice cream instead of vanilla and layer with chocolate cookies for a refreshing spin that’s especially perfect for spring or St. Patrick’s Day.
The Mocha Lover’s Dream
Add espresso powder to your chocolate sauce and use coffee ice cream in one of the layers. Top with chocolate-covered espresso beans for extra flair.
Fruit-Forward Fantasy
Add a thin layer of raspberry jam between the cake and ice cream, and top with freeze-dried berries. It cuts through the richness and adds a gourmet vibe.
Serving Suggestions for Sweet Celebrations
While this cake is a star on its own, how and when you serve it can elevate the experience. Here are a few ways to make it feel even more special:
- Birthday Alternative: Skip the standard birthday cake and serve this with sparklers or a single candle. The surprise factor alone is worth it.
- Summer BBQ Showstopper: This dessert holds up surprisingly well at outdoor events if kept in a cooler or freezer until serving time.
- Make it a Sundae Bar: Serve slices with small bowls of extra toppings—whipped cream, chopped nuts, hot fudge, caramel drizzle, or sprinkles—so guests can customize each bite.
Decorating Without Stress
This cake practically decorates itself, but if you want to take it up a notch:
- Chocolate Drizzle: A zigzag of glossy ganache makes everything look intentional and indulgent.
- Extra Oreos: Whole or halved cookies pressed into the top while the cake is still soft make for easy, eye-catching garnishes.
- Whipped Cream Borders: Pipe some around the edge for a bakery-style finish. You can even tint it with natural food coloring for themes or holidays.
Gather Your Magic: Ingredients
For the Cake Base Layer:
- 1 (13-ounce) package Oreos (or chocolate sandwich cookies), plus more for garnish
- 16 ounces chocolate cake (store-bought or homemade; use about ¾ of it)
- ⅔ quart (approx. 2.5 cups) vanilla ice cream, very soft
For the Ice Cream Layer:
- 1⅓ quarts vanilla ice cream, very soft
- ½ cup chocolate sauce (store-bought or homemade)
- ⅓ of the crumbled Oreos
For the Topping:
- Remaining ⅓ of the Oreos
- Remaining ½ cup of chocolate sauce
For the Chocolate Glaze:
- 4 ounces dark chocolate
- 1 tablespoon butter
Craft the Dream: Directions
1. Prep the Stage
Grease a 9–10-inch springform pan with butter or baking spray.
2. Cookie Chaos
Chop or crumble the Oreos and divide into three portions.
3. Build the Base
In a large bowl, crumble the chocolate cake and mix with one-third of the Oreos.
Add 2.5 cups of soft vanilla ice cream and mix until well-combined.
Press this into the bottom of the prepared pan.
4. Ice Cream Delight
In another bowl, mix the remaining 1⅓ quarts of vanilla ice cream with the second portion of Oreos and ½ cup chocolate sauce.
Spread this mixture over the cake layer in the pan.
5. Cookie Top Crown
Press the final third of the cookies into the top and drizzle with remaining chocolate sauce.
Swirl and press so it doesn’t run down the sides.
6. Freeze the Magic
Cover loosely with foil or plastic wrap and freeze at least 4 hours (preferably overnight).
7. Serve with Style
When ready, let it sit for a couple minutes. Run a knife around the edge of the pan and gently release the springform.
Re-freeze the cake while preparing the glaze.
8. Final Touch: Chocolate Glaze
Melt chocolate and butter together on low heat or microwave in 30-second intervals until smooth.
Drizzle over the top before serving. Slice generously and garnish with extra cookies.
Fuel the Fantasy: Nutritional Note
Nutritional info isn’t provided on the original page, but here’s an estimate per serving (1 of 10):
- Calories: ~500–600
- Fat: ~28g
- Carbohydrates: ~65g
- Sugar: ~45g
- Protein: ~6g
(Note: These are rough estimates based on standard ingredient nutrition.)
Would you like a printable version or want me to help turn this into a long-form post, maybe for a blog or newsletter?

Frequently Asked Questions
Can I make this cake ahead of time?
Absolutely. In fact, it’s best when made a day in advance to allow everything to set properly. You can prepare and freeze it up to 5 days before serving.
What if I don’t have a springform pan?
A deep 9-inch round cake pan can work in a pinch—just be sure to line it with plastic wrap or parchment so you can lift the cake out. However, investing in a springform pan is worth it for projects like this.
Can I use homemade ice cream?
Definitely. If you have an ice cream maker, feel free to go the extra mile. Just make sure the texture is soft enough to spread easily when assembling the cake.
Is this recipe kid-friendly?
Very. Kids love helping crumble cookies, swirl in sauce, and decorate the top. Plus, it’s a fun way to introduce them to layered desserts without the fuss of baking.
Can I make this gluten-free or vegan?
Yes! Use gluten-free chocolate cookies and a GF cake base, and opt for dairy-free ice cream and chocolate. The vegan olive oil cake included in the original recipe is a great base option.
Why This Cake Deserves a Spot in Your Recipe Box
There are desserts you make once and forget, and then there are the ones that become part of your story. The Chocolate Oreo Cookie Ice Cream Cake is the latter. It’s the kind of treat that surprises you not just with how good it tastes, but with how it brings people together—smiling, remembering, reaching for seconds even when they’re full.
I’ve made it since that first time—again for birthdays, once just because my husband asked, and even during winter when ice cream cake seems almost rebellious. Every time, it brings back that same feeling: of creating something that’s more than the sum of its parts, something rooted in love, patience, and just a little bit of sugar.
Whether you’re celebrating something big, or simply want to sweeten up the everyday, this cake is a reminder that joy often lives in the freezer, tucked between layers of chocolate and cream.
Let me know if you’d like this adapted into a blog post layout with headings, meta description, or SEO tips. I can also help convert it to a printable version or add a short teaser intro for your homepage.
Print
A Sweet Slice of Summer Memories: Chocolate Oreo Cookie Ice Cream Cake
- Total Time: 4 hours 20 minutes
- Yield: 10 servings
Description
This Chocolate Oreo Cookie Ice Cream Cake is a no-bake dream come true! With layers of crumbled chocolate cake, creamy vanilla ice cream, rich chocolate sauce, and loads of crunchy Oreos, it’s the ultimate frozen treat for birthdays, cookouts, or any dessert emergency. Easy to make, impossible to resist!
Ingredients
For the Cake Base Layer:
1 (13-ounce) package Oreos or chocolate sandwich cookies (plus extra for garnish)
16 ounces chocolate cake (store-bought or homemade)
2 1/2 cups vanilla ice cream, very soft
For the Ice Cream Layer:
1 1/3 quarts vanilla ice cream, very soft
1/2 cup chocolate sauce (store-bought or homemade)
1/3 of the crumbled Oreos
For the Topping:
1/3 of the crumbled Oreos
1/2 cup chocolate sauce
For the Chocolate Glaze:
4 ounces dark chocolate
1 tablespoon butter
Instructions
-
Prepare the Pan
Grease a 9–10 inch springform pan with butter or baking spray. -
Crush the Cookies
Chop or crumble the Oreos and divide into three equal portions. -
Make the Base Layer
In a large bowl, crumble about 3/4 of the chocolate cake and mix with one-third of the Oreos.
Stir in 2 1/2 cups of softened vanilla ice cream until well combined.
Press this mixture evenly into the bottom of the prepared springform pan. -
Add the Ice Cream Layer
In a separate bowl, mix the remaining 1 1/3 quarts of vanilla ice cream with another third of the Oreos and 1/2 cup of chocolate sauce.
Spread evenly over the cake base layer in the pan. -
Top with More Cookies and Sauce
Press the final third of the Oreos into the top of the ice cream.
Drizzle with the remaining 1/2 cup of chocolate sauce, gently swirling or pressing so it stays in place. -
Freeze the Cake
Cover loosely with foil or plastic wrap and freeze for at least 4 hours, preferably overnight. -
Release and Prep for Glaze
Let cake sit at room temp for a couple of minutes. Run a knife along the edge, then gently release the springform.
Return the cake to the freezer while preparing the glaze. -
Make the Chocolate Glaze
Melt dark chocolate and butter in a saucepan over low heat or in the microwave in 30-second intervals until smooth.
Drizzle over the frozen cake just before serving.
-
Serve and Enjoy
Slice generously and garnish with extra Oreos if desired.
Notes
-
Make Ahead: Best made a day in advance for easier slicing and firmer layers.
-
Flavor Twist: Try swapping in cookies and cream, chocolate, or coffee ice cream for a fun variation.
-
No Cake? No Problem: You can replace the cake layer with crushed Oreo crust or brownie chunks.
-
Freezing Tip: For clean slices, dip your knife in hot water between each cut.
- Prep Time: 20 minutes
- Cook Time: Freeze Time 4 hours (or overnight)
- Category: Dessert
- Method: No-Bake, Frozen
- Cuisine: American