As I stood in my kitchen, the sweet aroma of caramelized cookies filled the air, transporting me back to my childhood, where every bite of my favorite treats sparked joy. That nostalgic feeling inspired me to create this delightful Biscoff Icebox Cake, an easy four-ingredient dessert that requires no baking. Perfect for those busy days or spontaneous gatherings, this make-ahead treat not only satisfies that sweet craving but also impressively showcases the warm, rich flavors of cookie butter and the lightness of whipped cream. Each velvety slice is layered with crunchy Biscoff biscuits, making it a crowd-pleaser that’s inviting to everyone—whether they follow a vegetarian diet or simply want a delicious dessert. So, are you ready to whip up some sweet memories? Let’s dive into this delightful recipe!
Why Is This Biscoff Icebox Cake Irresistible?
Effortless Preparation: With only four ingredients, this dessert can be whipped up in minutes, making it an ideal choice for those busy days.
Decadent Flavor: The combination of creamy Biscoff spread and light whipped cream brings a rich, warm sweetness that is simply irresistible.
No Baking Required: Enjoy a hassle-free experience with this no-bake cake—perfect for beginners and seasoned chefs alike!
Crowd-Pleasing Delight: Impress your guests at gatherings or family dinners with a dessert that’s sure to disappear quickly. Serve it alongside your favorite ice cream or fresh berries for an extra touch!
Make-Ahead Fun: This icebox cake can be prepared in advance and stored in the freezer, saving you time for other festivities. Check out other make-ahead favorites like the Sugar Cookie Cheesecake for more easy dessert inspiration!
Biscoff Icebox Cake Ingredients
For the Cream Layer
- Heavy Cream – provides the cake’s rich texture; use cold for better whipping.
- Sweetened Condensed Milk – adds creaminess and sweetness; can be swapped with powdered sugar for a lighter taste.
- Lotus Biscoff Spread – essential for that unique, indulgent flavor; other cookie butter spreads can substitute if needed.
For the Layers
- Lotus Biscoff Biscuits – adds a crunchy texture, perfect for layering; feel free to use other speculoos biscuits if you don’t have Biscoff.
This Biscoff Icebox Cake ingredients list is the perfect guide to creating a delightful, no-bake dessert that will warm your heart and impress your guests!
Step‑by‑Step Instructions for Biscoff Icebox Cake
Step 1: Prepare the Cream
In a cold mixing bowl, combine 1 cup of heavy cream and 1 cup of sweetened condensed milk. Using an electric mixer, whip the mixture on medium-high speed for about 3-5 minutes, or until you achieve stiff peaks. The cream should appear thick and hold its shape, creating a luscious base for your Biscoff Icebox Cake.
Step 2: Fold in Biscoff Spread
Gently fold in 1 cup of Lotus Biscoff spread into the whipped cream mixture using a spatula. Incorporate it carefully until just combined; you want to keep the mixture airy and light while fully blending in the rich flavor of the Biscoff. This creamy layer will define the texture of your icebox cake.
Step 3: Microwave Biscoff Spread
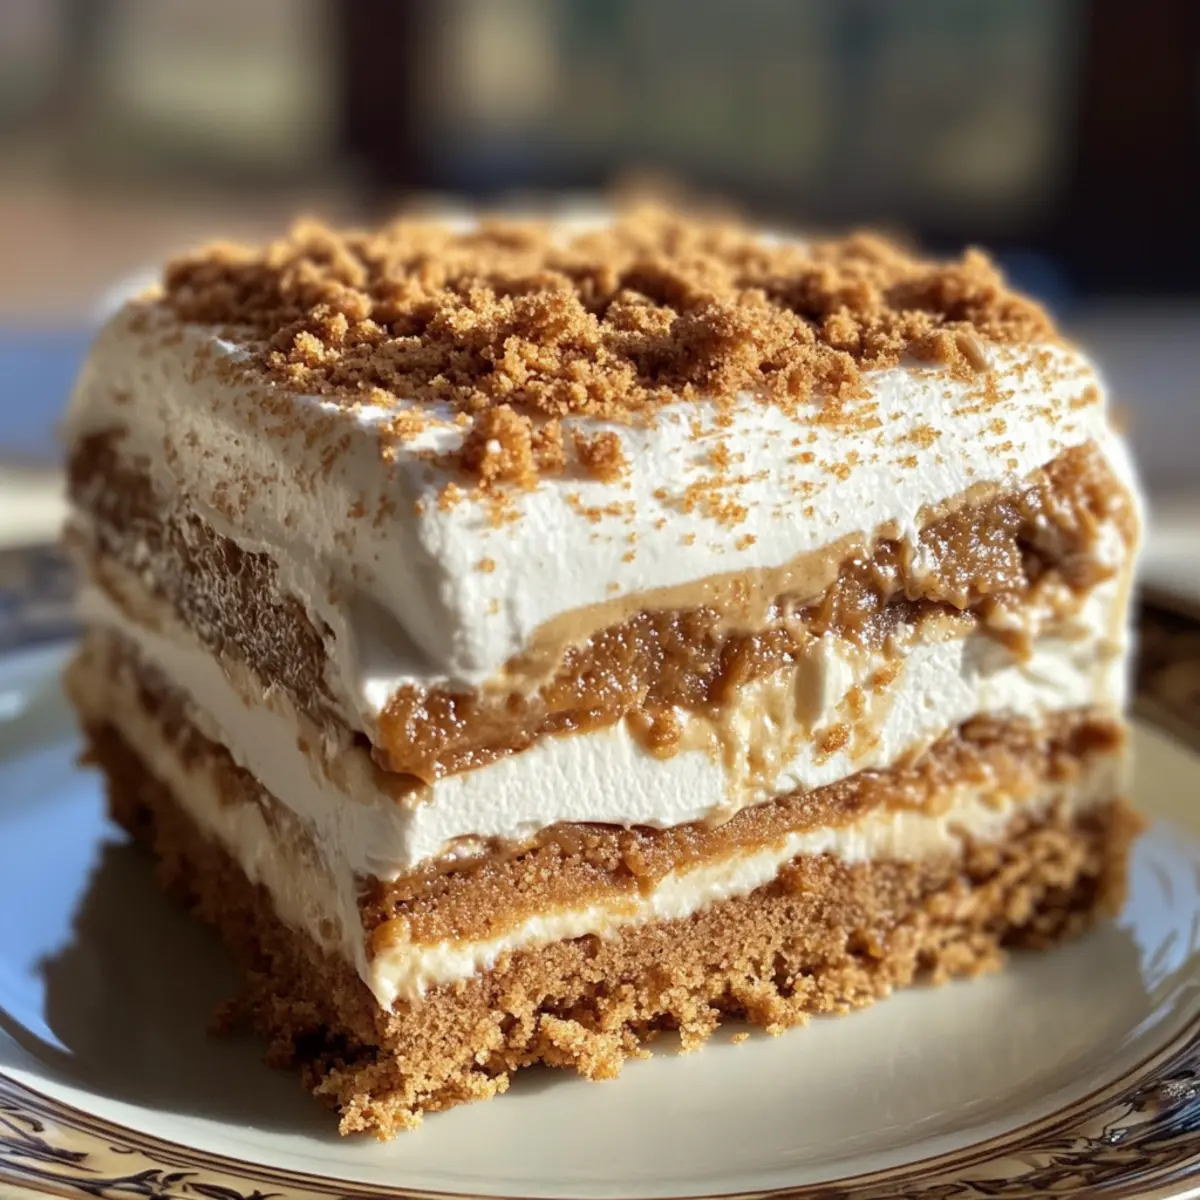
Take an additional 1/4 cup of Lotus Biscoff spread and microwave it for 15 to 20 seconds, or until it becomes runny. This step is crucial as it will create a delightful drizzle between the layers. Make sure to stir it lightly after warming to ensure a smooth consistency that’s easier to drizzle.
Step 4: Line the Loaf Pan
Line a 9×5 inch loaf pan with plastic wrap, leaving extra hanging over the edges for easy removal later. This will prevent the cake from sticking and help maintain its beautiful shape. It’s essential for a perfect presentation when you serve your Biscoff Icebox Cake.
Step 5: Layer the Cake
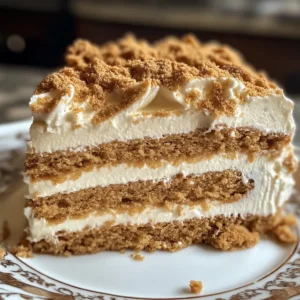
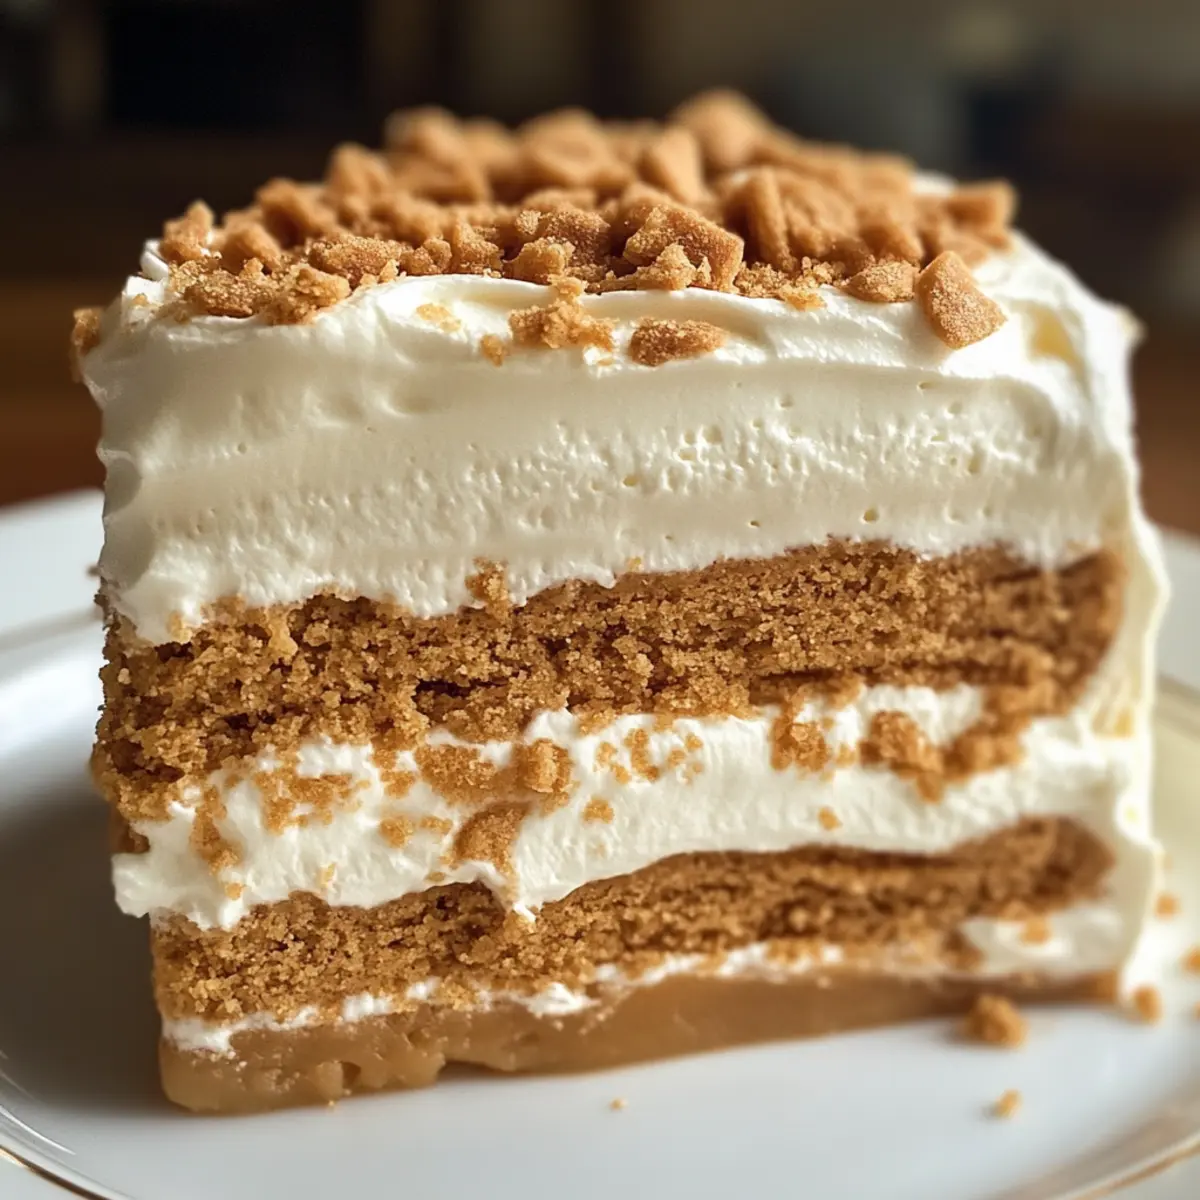
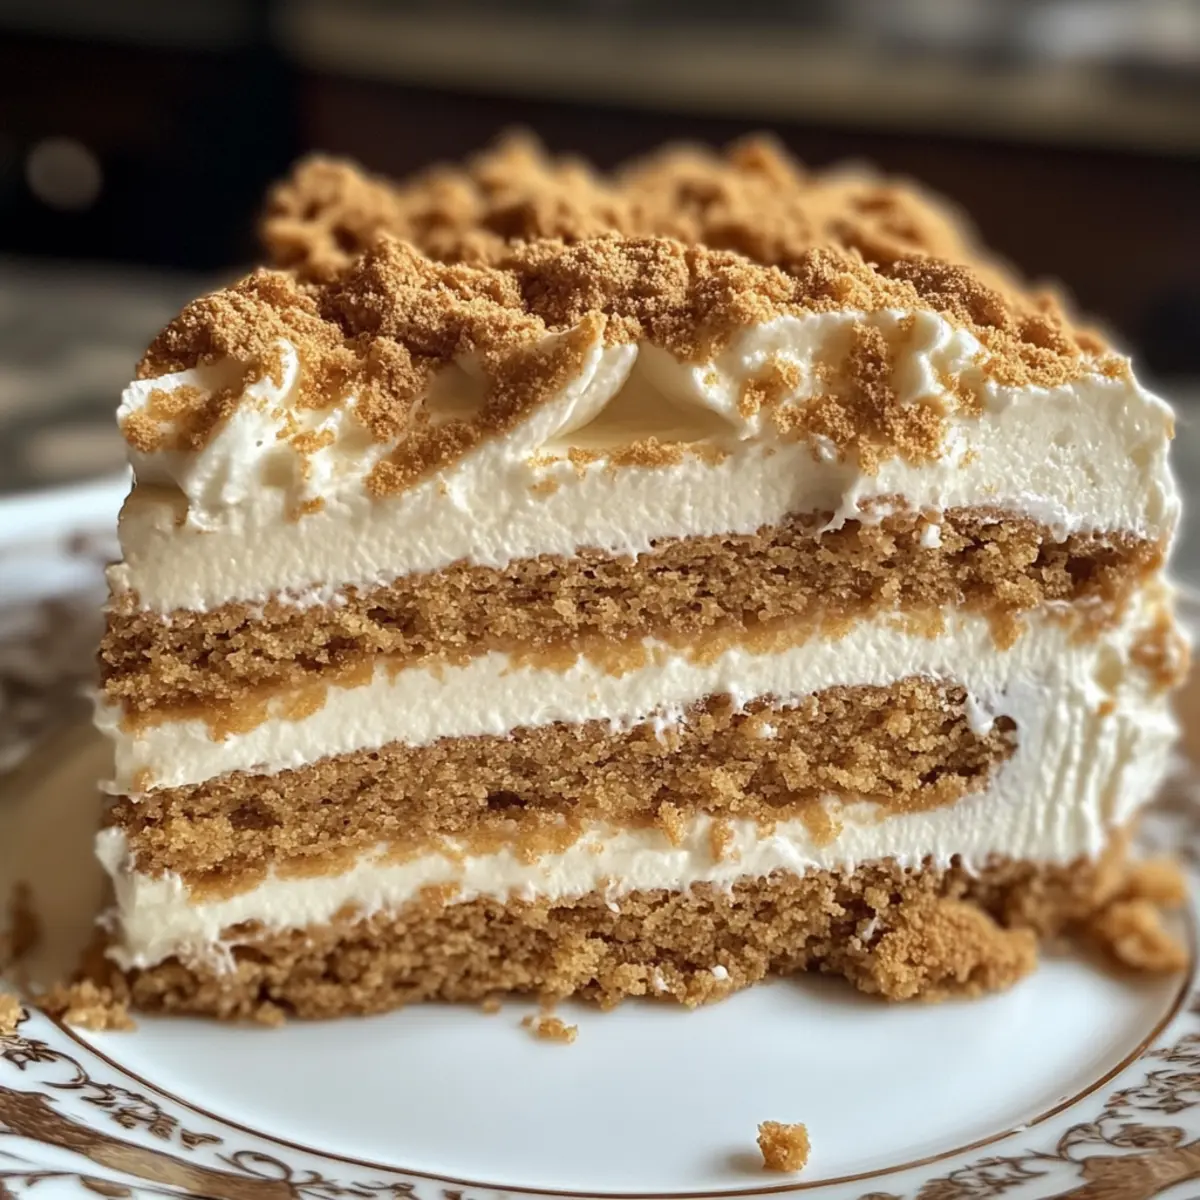
Start by adding a thin layer of the creamy Biscoff mixture to the bottom of the prepared loaf pan. Follow with a layer of Lotus Biscoff biscuits, pressing them gently into the cream. Repeat this layering process two more times, adding more cream and cookies while drizzling the runny Biscoff spread between the layers for extra flavor.
Step 6: Final Touches
Once you’ve layered the final batch of cream on top, use a spatula to smooth the surface evenly. If desired, sprinkle crushed Lotus Biscoff biscuits on the top for a delightful garnish. This adds both texture and visual appeal to your elegant Biscoff Icebox Cake.
Step 7: Freeze the Cake
Wrap the loaf pan tightly with the overhanging plastic wrap, securing the cake inside. Place it in the freezer for at least 2 hours, or ideally overnight, to set properly. This no-bake dessert is best when fully chilled, allowing the flavors to meld beautifully.
Step 8: Serve the Cake
Once set, remove the Biscoff Icebox Cake from the freezer and let it sit at room temperature for about 15 minutes to soften slightly. Use the plastic wrap to lift it out of the pan, then slice into gorgeous pieces. The creamy, dreamy layers will be the highlight of your dessert table!
Make Ahead Options
These Biscoff Icebox Cakes are perfect for meal prep enthusiasts! You can prepare the creamy filling and layer the cake up to 24 hours in advance, allowing the flavors to meld beautifully while saving you time on the day of serving. Simply whip the heavy cream with sweetened condensed milk and fold in the Lotus Biscoff spread. Once layered in the loaf pan, tightly cover it with plastic wrap and store it in the freezer. When you’re ready to serve, remove the cake and let it sit at room temperature for 15 minutes for easier slicing. By preparing ahead, you ensure a delightful dessert that’s just as delicious and ready to impress guests with minimal effort!
How to Store and Freeze Biscoff Icebox Cake
Fridge: Store any leftovers tightly covered in the refrigerator for up to 3 days to maintain freshness and flavor.
Freezer: For longer storage, freeze the Biscoff Icebox Cake wrapped in plastic wrap and aluminum foil for up to 2 weeks. This makes for a delightful treat ready to serve at a moment’s notice.
Thawing: When you’re ready to enjoy, transfer the frozen cake to the fridge for several hours to thaw before slicing. This gradual thawing helps preserve its creamy texture.
Reheating: There’s no need to reheat this dessert; simply enjoy it chilled or allow it to sit at room temperature for 15 minutes before serving for optimal softness.
Biscoff Icebox Cake Variations & Substitutions
Feel free to get creative with your Biscoff Icebox Cake and make it truly your own!
-
Gluten-Free: Use gluten-free biscuits instead of traditional Biscoff to keep the recipe gluten-sensitive friendly while maintaining that delicious crunch.
-
Dairy-Free: Swap the heavy cream with a plant-based alternative like coconut cream, and use dairy-free sweetened condensed milk for a vegan treat that everyone can enjoy.
-
Nutty Twist: Add a bit of almond or hazelnut extract to the cream layer for a nutty flavor that complements the Biscoff beautifully.
-
Chocolate-Lover’s Delight: Incorporate some cocoa powder into the cream layer for a chocolate Biscoff twist that will satisfy any cocoa cravings!
-
Fruit Fusion: Layer in slices of ripe bananas or strawberries next to the biscuits for added freshness and a pop of flavor. This fruity addition makes every bite feel like a celebration!
-
Spicy Kick: Sprinkle a hint of cinnamon or a pinch of pumpkin spice into the cream for a warming flavor that elevates the cake’s comfort factor.
-
Extra Crunch: Add crushed nuts or granola between the layers for an unexpected but delightful texture contrast—perfect for an adventurous palate.
-
Decadent Drizzle: Enhance the visual appeal and flavor by drizzling caramel or chocolate sauce over the top just before serving. Pair this with a scoop of ice cream, your guests will be raving about the dessert all night!
By exploring these variations, your Biscoff Icebox Cake can continuously surprise and delight, much like other make-ahead favorites such as Strawberry Lemon Cake or Caramel Brownie Cheesecake. Enjoy experimenting!
Expert Tips for the Best Biscoff Icebox Cake
-
Chill Everything: Start with a thoroughly chilled bowl and whisk to achieve perfect whipped cream. The colder ingredients will whip better, ensuring your Biscoff Icebox Cake has a light, airy texture.
-
Taste Test: If you opt for powdered sugar instead of sweetened condensed milk, don’t skip the taste test before layering! Adjust the sweetness to match your preference for an even more delightful dessert.
-
Drizzle with Care: Microwave the Lotus Biscoff spread until it’s just runny—not too hot! This ensures you get the perfect drizzle consistency without making it too thin.
-
Layer Wisely: When layering, gently press the biscuits into the cream, but avoid over-compressing. This keeps the cake light while providing that signature crunch.
-
Slicing Technique: For clean slices, use a warm knife when cutting your Biscoff Icebox Cake. This helps you glide through the layers beautifully without squishing them.
What to Serve with Biscoff Icebox Cake
Imagine a gathering where every bite of dessert transports you to a realm of sweet bliss and delightful textures!
-
Fresh Berries: Pair with strawberries, raspberries, or blueberries to brighten the rich flavors of the Biscoff Icebox Cake, adding a refreshing contrast. They add a burst of juiciness that perfectly complements the creamy layers.
-
Whipped Cream: A dollop of freshly whipped cream pairs beautifully with the cake, enhancing its lightness while creating a luscious mouthfeel with each bite.
-
Chocolate Sauce: A drizzle of warm chocolate sauce brings an indulgent twist, amplifying the cake’s richness. The sweet and bitter notes create a heavenly experience for chocolate lovers!
-
Coffee: Serve alongside a strong cup of coffee or an espresso. The bold flavors of coffee complement the sweetness of the cake and highlight the cookie butter notes.
-
Ice Cream: Vanilla or caramel ice cream adds a delightful creaminess alongside the Biscoff Icebox Cake. The cold scoop balances the dessert’s texture beautifully.
-
Cheesecake Bites: For a variety of textures, try mini cheesecake bites. Their creamy tanginess creates a delightful interplay with the dessert’s smooth layers.
-
Coconut Whipped Cream: This tropical twist adds a natural sweetness and lightness that pairs harmoniously with the cake’s decadent layers. It brings an exotic flair to your dessert table.
With these thoughtful pairings, your Biscoff Icebox Cake will become the star of any gathering, inviting everyone to indulge in a sweet explosion of flavor!

Biscoff Icebox Cake Recipe FAQs
What are the best biscuits to use for this Biscoff Icebox Cake?
Absolutely! While Lotus Biscoff biscuits are the star of this recipe, you can substitute them with other speculoos biscuits if that’s what you have on hand. Just ensure they have a similar crunchy texture to create those delightful layers.
How should I store the Biscoff Icebox Cake?
This delicious cake can be stored in the fridge for up to 3 days if you have leftovers, but for long-term enjoyment, wrap it tightly and keep it in the freezer for up to 2 weeks. Just remember to thaw it in the fridge for several hours before serving to keep that creamy texture!
Can I freeze leftover Biscoff Icebox Cake?
Yes, you can definitely freeze the leftovers! To freeze, wrap the cake tightly in plastic wrap and then in aluminum foil to prevent freezer burn. It will stay fresh for up to 2 weeks in the freezer. When ready to enjoy, just let it thaw in the fridge for a few hours.
What if my whipped cream doesn’t thicken?
If your whipped cream isn’t thickening, it might be due to the temperature of your ingredients. Make sure your bowl and whisk are cold before whipping—chilling them in the freezer for 10-15 minutes can work wonders. If it still doesn’t thicken, try adding a tablespoon of powdered sugar to increase stability.
Is there a vegan alternative for this recipe?
Very! You can substitute heavy cream with coconut cream or a non-dairy whip (like almond or soy-based options) for a vegan version. Use sweetened condensed coconut milk instead of regular sweetened condensed milk to keep it dairy-free and just as creamy!
Can I add fruits to my Biscoff Icebox Cake?
Of course! I often layer in fresh fruits like sliced strawberries or bananas for extra flavor and freshness. Just be cautious with the moisture content; a light layer will prevent sogginess while still adding a burst of sweetness that contrasts beautifully with the creamy Biscoff layers.
Irresistible Biscoff Icebox Cake You Can Make in Minutes
Ingredients
Equipment
Method
- Combine 1 cup of heavy cream and 1 cup of sweetened condensed milk in a cold mixing bowl. Whip until stiff peaks are formed, about 3-5 minutes.
- Gently fold in 1 cup of Lotus Biscoff spread into the whipped cream until just combined.
- Microwave an additional 1/4 cup of Lotus Biscoff spread for 15 to 20 seconds until runny, stirring lightly after.
- Line a 9x5 inch loaf pan with plastic wrap, allowing extra to hang over the edges.
- Layer a thin layer of the creamy Biscoff mixture in the bottom of the prepared loaf pan, followed by a layer of Lotus Biscoff biscuits. Repeat two more times, drizzling the warmed Biscoff spread between layers.
- Smooth the surface evenly of the final layer of cream, and optionally, sprinkle crushed Lotus Biscoff biscuits on top.
- Wrap the loaf pan tightly with plastic wrap and freeze for at least 2 hours or overnight.
- Once set, remove from the freezer and let sit at room temperature for about 15 minutes before slicing.