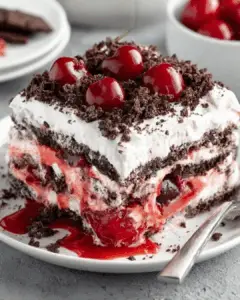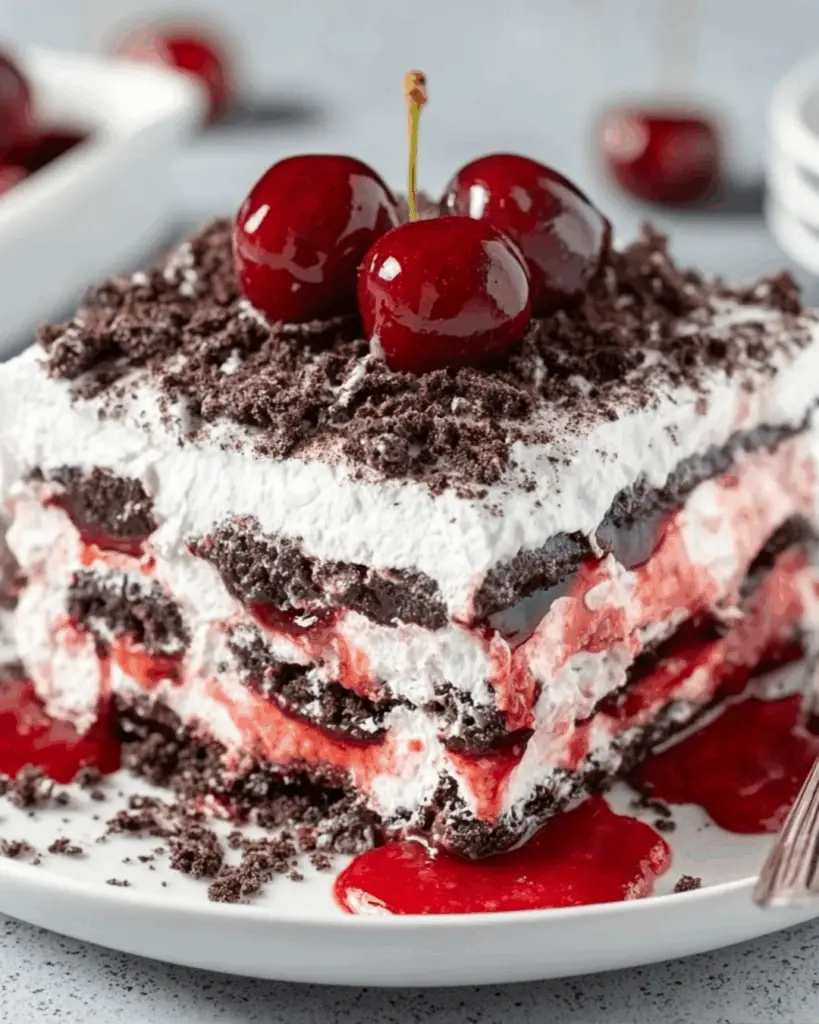
Introduction to Black Forest Icebox Cake
There’s something magical about desserts that come together with minimal fuss, and the Black Forest Icebox Cake is a prime example. This no-bake delight is perfect for those busy days when you want to impress your loved ones without spending hours in the kitchen. With layers of chocolate wafer cookies, fluffy whipped cream, and sweet cherry pie filling, it’s a treat that brings smiles all around. Whether it’s a family gathering or a casual weeknight dinner, this cake is sure to be a hit. Let’s dive into this simple yet indulgent recipe!
Why You’ll Love This Black Forest Icebox Cake
This Black Forest Icebox Cake is a dream come true for anyone who loves dessert but hates the hassle. It’s incredibly easy to whip up, requiring no baking at all. The combination of rich chocolate, creamy whipped goodness, and tart cherries creates a flavor explosion that’s hard to resist. Plus, it can be made ahead of time, making it a perfect choice for gatherings or a sweet treat after a long day.
Ingredients for Black Forest Icebox Cake
Gathering the right ingredients is the first step to creating this delightful Black Forest Icebox Cake. Here’s what you’ll need:
- Heavy whipping cream: This is the star of the show, providing that luscious, creamy texture.
- Powdered sugar: A touch of sweetness to balance the flavors and help stabilize the whipped cream.
- Vanilla extract: Adds a warm, aromatic note that enhances the overall flavor profile.
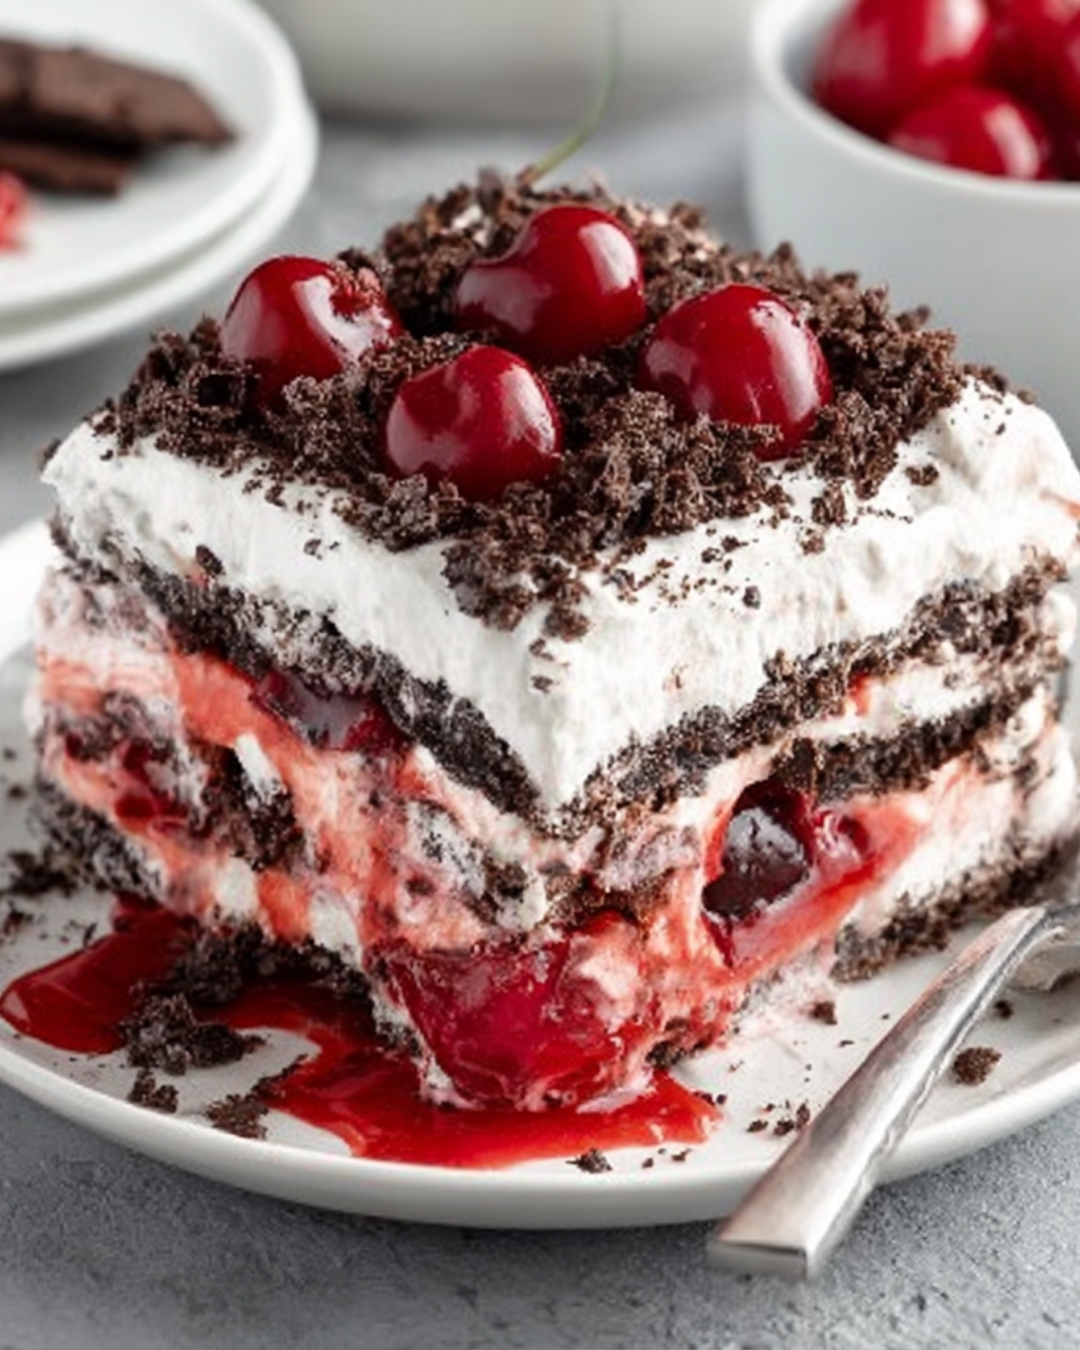
- Cherry pie filling: The tartness of cherries complements the chocolate perfectly, making each bite a burst of flavor.
- Chocolate wafer cookies: These provide the cake’s structure and a delightful crunch, soaking up the creaminess as they soften.
- Chocolate shavings: A decorative touch that adds elegance and a bit of extra chocolatey goodness on top.
- Fresh cherries (optional): For garnish, they add a pop of color and freshness, making the cake even more appealing.
For those looking to mix things up, consider adding a splash of cherry liqueur to the whipped cream for an adult twist. If cherries aren’t your thing, fresh strawberries or raspberries can be substituted for a different fruity flavor. You can find all the exact measurements at the bottom of the article, ready for printing!
How to Make Black Forest Icebox Cake
Creating this Black Forest Icebox Cake is a breeze, and I promise it will be worth every minute. Follow these simple steps, and you’ll have a stunning dessert that’s sure to impress.
Step 1: Whip the Cream
Start by grabbing a large mixing bowl. Add the heavy whipping cream, powdered sugar, and vanilla extract. Using an electric mixer, whip the mixture on medium speed for about 3-5 minutes. You’re aiming for stiff peaks, which means the cream should hold its shape when you lift the beaters. Keep an eye on it; over-whipping can turn it into butter!
Step 2: Prepare the Base
Now, take your serving platter and spread a thin layer of the whipped cream mixture on the bottom. This acts as a glue, helping the cookies stay in place. It doesn’t have to be perfect; just enough to create a nice base for the layers to come.
Step 3: Layer the Cookies
Next, it’s time for the chocolate wafer cookies. Place them over the whipped cream, slightly overlapping each cookie. This creates a solid foundation for the cake. Don’t worry about gaps; the cream will fill them in as it sets.
Step 4: Add Cherry Filling
Spread a generous layer of cherry pie filling over the cookies. The tartness of the cherries is a delightful contrast to the rich chocolate. Follow this with another layer of whipped cream, smoothing it out to cover the cherries completely.
Step 5: Repeat the Layers
Continue the layering process: cookies, cherry filling, and whipped cream. Repeat until you’ve used all your ingredients, finishing with a lovely layer of whipped cream on top. This final layer is your canvas for garnishing later!
Step 6: Chill the Cake
Cover the cake with plastic wrap and pop it in the refrigerator. Let it chill for at least 4 hours, or overnight if you can wait. This step is crucial; it allows the cookies to soften and the flavors to meld beautifully.
Step 7: Garnish and Serve
When you’re ready to serve, take the cake out of the fridge. Garnish the top with chocolate shavings and fresh cherries for that extra touch of elegance. Slice it up, and watch as everyone digs in with delight!
Tips for Success
- Use cold heavy cream for better whipping results; it whips up faster and holds its shape longer.
- Don’t rush the chilling process; letting the cake sit overnight enhances the flavors.
- For a fun twist, try adding crushed nuts or coconut between the layers.
- Keep the cake covered in the fridge to maintain its freshness.
- Experiment with different fruit fillings for a unique flavor profile.
Equipment Needed
- Large mixing bowl: A sturdy bowl for whipping cream; a glass or metal bowl works best.
- Electric mixer: Essential for whipping cream quickly; a whisk can be used, but it requires more effort.
- Serving platter: To assemble and present your cake; any flat surface will do.
- Plastic wrap: For covering the cake while it chills; aluminum foil is a good alternative.
Variations of Black Forest Icebox Cake
- Berry Bliss: Swap out the cherry pie filling for fresh strawberries or raspberries for a lighter, fruity twist.
- Nutty Delight: Add crushed walnuts or pecans between the layers for a delightful crunch and added flavor.
- Chocolate Lovers: Use chocolate mousse instead of whipped cream for an ultra-rich experience.
- Vegan Version: Substitute heavy cream with coconut cream and use dairy-free chocolate wafers for a plant-based treat.
- Alcohol-Infused: Incorporate a splash of cherry liqueur or dark rum into the whipped cream for an adult version.
Serving Suggestions
- Pair with a scoop of vanilla ice cream for an extra creamy experience.
- Serve alongside a cup of freshly brewed coffee or a rich espresso.
- For a festive touch, add a sprig of mint on top for color.
- Present on a decorative cake stand to elevate your dessert display.
FAQs about Black Forest Icebox Cake
Can I make Black Forest Icebox Cake ahead of time?
Absolutely! In fact, making it a day in advance is ideal. The longer it chills, the better the flavors meld together, and the cookies soften perfectly.
What can I substitute for cherry pie filling?
If cherries aren’t your favorite, feel free to swap in fresh strawberries, raspberries, or even blueberries. Each fruit brings its own unique flavor to the cake!
How long does this cake last in the fridge?
This cake can last up to 3-4 days in the refrigerator. Just make sure to keep it covered to maintain its freshness.
Can I freeze Black Forest Icebox Cake?
Yes, you can freeze it! Just wrap it tightly in plastic wrap and aluminum foil. It’s best enjoyed within a month, but it can last longer if stored properly.
Is this dessert suitable for a gluten-free diet?
To make a gluten-free version, simply use gluten-free chocolate wafer cookies. The rest of the ingredients are naturally gluten-free, making it a delicious option for everyone!
Final Thoughts
Creating a Black Forest Icebox Cake is more than just whipping up a dessert; it’s about crafting a moment of joy. Each layer tells a story, from the rich chocolate to the tart cherries, all wrapped in a cloud of whipped cream. This cake is perfect for gatherings, celebrations, or simply treating yourself after a long day. The best part? It’s a no-bake wonder that allows you to spend more time with loved ones and less time in the kitchen. So, roll up your sleeves, dive in, and let this delightful dessert bring smiles to your table!
PrintBlack Forest Icebox Cake: A Simple Delight to Make
- Total Time: 4 hours 20 minutes
- Yield: 8 servings
- Diet: Vegetarian
Description
A delicious and easy-to-make dessert that combines layers of chocolate wafer cookies, whipped cream, and cherry pie filling, perfect for any occasion.
Ingredients
- 2 cups heavy whipping cream
- 1/2 cup powdered sugar
- 1 teaspoon vanilla extract
- 1 cup cherry pie filling
- 1 package (14.1 ounces) chocolate wafer cookies
- 1/4 cup chocolate shavings (for garnish)
- Fresh cherries (for garnish, optional)
Instructions
- In a large mixing bowl, whip the heavy cream, powdered sugar, and vanilla extract together until stiff peaks form. This will take about 3-5 minutes with an electric mixer.
- On a serving platter, spread a thin layer of the whipped cream mixture on the bottom.
- Place a layer of chocolate wafer cookies over the whipped cream, slightly overlapping them.
- Spread a layer of cherry pie filling over the cookies, followed by another layer of whipped cream.
- Repeat the layers (cookies, cherry filling, whipped cream) until all ingredients are used, finishing with a layer of whipped cream on top.
- Cover the cake with plastic wrap and refrigerate for at least 4 hours, or overnight for best results. This allows the cookies to soften and the flavors to meld.
- Before serving, garnish the top with chocolate shavings and fresh cherries if desired.
Notes
- For a richer flavor, add a splash of cherry liqueur to the whipped cream mixture.
- Substitute the cherry pie filling with fresh strawberries or raspberries for a different fruit flavor.
- Prep Time: 20 minutes
- Cook Time: 0 minutes
- Category: Dessert
- Method: No-bake
- Cuisine: American
Nutrition
- Serving Size: 1 slice
- Calories: 320
- Sugar: 20g
- Sodium: 50mg
- Fat: 22g
- Saturated Fat: 13g
- Unsaturated Fat: 9g
- Trans Fat: 0g
- Carbohydrates: 30g
- Fiber: 1g
- Protein: 3g
- Cholesterol: 80mg