Introduction to Cherries in the Snow
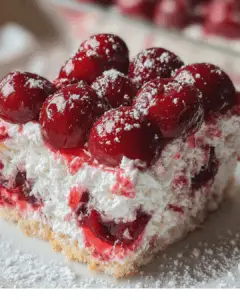
When I think of comfort desserts, Cherries in the Snow always comes to mind. This delightful treat combines the sweetness of cherries with a creamy, dreamy mixture that feels like a warm hug on a chilly day.
Whether you’re looking for a quick solution for a busy weeknight or a show-stopping dessert to impress your loved ones, this recipe has you covered.
It’s simple, satisfying, and perfect for any occasion. Plus, it requires no baking, making it an ideal choice for those of us who want to whip up something special without the fuss.
Why You’ll Love This Cherries in the Snow
Cherries in the Snow is a dessert that checks all the boxes.
It’s incredibly easy to make, taking just a few minutes of your time.
The vibrant flavors of sweet cherries paired with a luscious cream mixture create a taste sensation that’s hard to resist.
Whether you’re hosting a gathering or enjoying a quiet night in, this dessert is sure to impress and satisfy everyone at the table.
Ingredients for Cherries in the Snow
Creating Cherries in the Snow is a breeze, thanks to its simple yet delightful ingredients. Here’s what you’ll need:
- Fresh or frozen pitted cherries: The star of the show! Sweet cherries bring a burst of flavor and color.
- Granulated sugar: This sweetener enhances the natural sweetness of the cherries, making them irresistible.
- Lemon juice: A splash of acidity balances the sweetness, brightening the overall flavor.
- Vanilla extract: This adds a warm, comforting aroma that complements the cherries beautifully.
- Heavy whipping cream: Essential for that rich, creamy texture that makes this dessert so indulgent.
- Sour cream: It adds a tangy contrast to the sweetness, creating a delightful flavor profile.
- Almond extract: A little goes a long way, giving a nutty depth that elevates the dish.
- Powdered sugar: This is used to sweeten the whipped cream, ensuring it’s light and fluffy.
- Vanilla extract (for whipped cream): A second dose of vanilla enhances the creaminess and flavor.
Feel free to get creative! For a lighter version, you can swap out sour cream for Greek yogurt. If you want to add some crunch, consider sprinkling crushed graham crackers or nuts between the layers.
Exact measurements for these ingredients are available at the bottom of the article for easy printing.
How to Make Cherries in the Snow
Creating Cherries in the Snow is a delightful journey that’s as easy as pie—well, easier!
Let’s dive into the steps that will have you serving this luscious dessert in no time.
Step 1: Prepare the Cherry Mixture
Start by grabbing a medium saucepan.
Combine the fresh or frozen pitted cherries, granulated sugar, lemon juice, and 1 teaspoon of vanilla extract.
Cook this mixture over medium heat, stirring occasionally.
In about 5-7 minutes, the cherries will release their juices, and the mixture will bubble.
Once it’s bubbling, remove it from the heat and let it cool slightly.
This step is crucial; it allows the flavors to meld beautifully.
Step 2: Whip the Cream
Now, let’s get to the fun part—whipping the cream!
In a large mixing bowl, pour in the heavy whipping cream.
Whip it until soft peaks form.
Gradually add the powdered sugar and 1/2 teaspoon of vanilla extract.
Keep whipping until you achieve stiff peaks.
This fluffy cloud of cream is what makes Cherries in the Snow so indulgent.
Step 3: Mix the Sour Cream
In another bowl, mix the sour cream with the almond extract.
Stir until well combined.
This mixture adds a tangy twist that balances the sweetness of the cherries.
Trust me, it’s a game-changer!
Step 4: Combine the Cream Mixtures
Gently fold the whipped cream into the sour cream mixture.
Be careful not to deflate the whipped cream; we want to keep that airy texture.
Fold until fully incorporated.
This creamy blend is what makes each bite of Cherries in the Snow so heavenly.
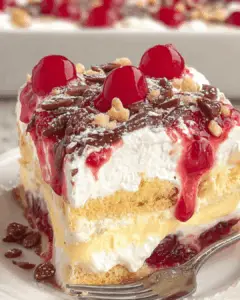
Step 5: Layer the Ingredients
Now it’s time to assemble!
In your serving dishes, start with a layer of the cherry mixture.
Then, add a layer of the cream mixture.
Repeat this process until all the ingredients are used up.
The layers should look beautiful, like a winter wonderland in a glass!
Step 6: Chill and Serve
Finally, cover your creations and chill them in the refrigerator for at least 2 hours.
This chilling time allows the flavors to meld together, creating a dessert that’s even more delicious.
When you’re ready to serve, just scoop it out and enjoy the delightful layers of cherries and cream.
Cherries in the Snow is not just a dessert; it’s a celebration of flavors!

Tips for Success
- Use fresh cherries when in season for the best flavor.
- Don’t rush the chilling process; it enhances the taste.
- For a fun twist, add a splash of your favorite liqueur to the cherry mixture.
- Make it ahead of time; it tastes even better the next day!
- Experiment with different extracts like coconut or hazelnut for unique flavors.
Equipment Needed
- Medium saucepan: A regular pot works just as well for cooking the cherry mixture.
- Large mixing bowl: Any large bowl will do; just ensure it’s big enough for whipping cream.
- Whisk or electric mixer: A hand whisk is great for a workout, but an electric mixer saves time.
- Serving dishes: Use glasses or bowls to showcase those beautiful layers.
Variations of Cherries in the Snow
- Chocolate Drizzle: Add a rich chocolate drizzle on top for a decadent twist that chocolate lovers will adore.
- Berry Medley: Mix in other berries like blueberries or raspberries for a colorful and flavorful combination.
- Nutty Crunch: Incorporate chopped nuts like almonds or walnuts between the layers for added texture and flavor.
- Vegan Option: Substitute heavy cream with coconut cream and use dairy-free yogurt for a delicious vegan version.
- Spiced Cherries: Add a pinch of cinnamon or nutmeg to the cherry mixture for a warm, spiced flavor profile.
Serving Suggestions for Cherries in the Snow
- Pair with a scoop of vanilla ice cream for an extra creamy experience.
- Serve alongside buttery shortbread cookies for a delightful crunch.
- Drizzle with chocolate sauce for a touch of indulgence.
- Garnish with fresh mint leaves for a pop of color.
- Enjoy with a glass of sparkling wine for a festive touch.
FAQs about Cherries in the Snow
Can I use frozen cherries for this recipe?
Absolutely! Frozen cherries work just as well as fresh ones. Just make sure to thaw and drain any excess liquid before using them in the recipe.
How long can I store Cherries in the Snow?
This dessert can be stored in the refrigerator for up to three days. Just keep it covered to maintain its freshness and flavor.
Can I make Cherries in the Snow ahead of time?
Yes! In fact, making it a day in advance allows the flavors to meld beautifully. Just remember to chill it for at least two hours before serving.
What can I substitute for sour cream?
If you’re looking for a lighter option, Greek yogurt is a fantastic substitute. It provides a similar tangy flavor while being a bit healthier.
Is Cherries in the Snow suitable for vegetarians?
Yes, this dessert is vegetarian-friendly! It’s a delightful treat that everyone can enjoy, regardless of dietary preferences.
Final Thoughts
Cherries in the Snow is more than just a dessert; it’s a celebration of flavors and memories.
Each layer tells a story, from the sweet cherries to the creamy mixture that dances on your palate.
This recipe brings joy to gatherings and quiet nights alike, making it a versatile addition to any occasion.
As you savor each bite, you’ll find comfort in its simplicity and delight in its taste.
So, gather your ingredients, embrace the process, and let this delightful treat bring warmth and happiness to your table. You won’t regret it!
Print“Cherries in the Snow: A Delightful Easy Recipe!”
- Total Time: 2 hours 22 minutes
- Yield: 6 servings
- Diet: Vegetarian
Description
Cherries in the Snow is a delightful and easy dessert recipe that combines sweet cherries with a creamy mixture, perfect for any occasion.
Ingredients
- 2 cups fresh or frozen pitted cherries
- 1 cup granulated sugar
- 1 tablespoon lemon juice
- 1 teaspoon vanilla extract
- 1 cup heavy whipping cream
- 1 cup sour cream
- 1 teaspoon almond extract
- 1/4 cup powdered sugar
- 1/2 teaspoon vanilla extract (for whipped cream)
Instructions
- In a medium saucepan, combine the cherries, granulated sugar, lemon juice, and 1 teaspoon of vanilla extract. Cook over medium heat, stirring occasionally, until the cherries release their juices and the mixture begins to bubble, about 5-7 minutes. Remove from heat and let cool slightly.
- In a large mixing bowl, whip the heavy cream until soft peaks form. Gradually add the powdered sugar and 1/2 teaspoon of vanilla extract, continuing to whip until stiff peaks form.
- In another bowl, mix the sour cream and almond extract until well combined.
- Gently fold the whipped cream into the sour cream mixture until fully incorporated.
- In serving dishes, layer the cherry mixture and the cream mixture alternately. Start with a layer of cherries, then add a layer of the cream mixture, repeating until all ingredients are used.
- Chill in the refrigerator for at least 2 hours before serving to allow flavors to meld.
Notes
- For a lighter version, substitute Greek yogurt for sour cream.
- For added texture, sprinkle crushed graham crackers or nuts between the layers.
- Prep Time: 15 minutes
- Cook Time: 7 minutes
- Category: Dessert
- Method: No-bake
- Cuisine: American
Nutrition
- Serving Size: 1 serving
- Calories: 250
- Sugar: 20g
- Sodium: 50mg
- Fat: 18g
- Saturated Fat: 10g
- Unsaturated Fat: 8g
- Trans Fat: 0g
- Carbohydrates: 20g
- Fiber: 1g
- Protein: 3g
- Cholesterol: 60mg