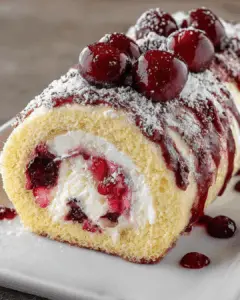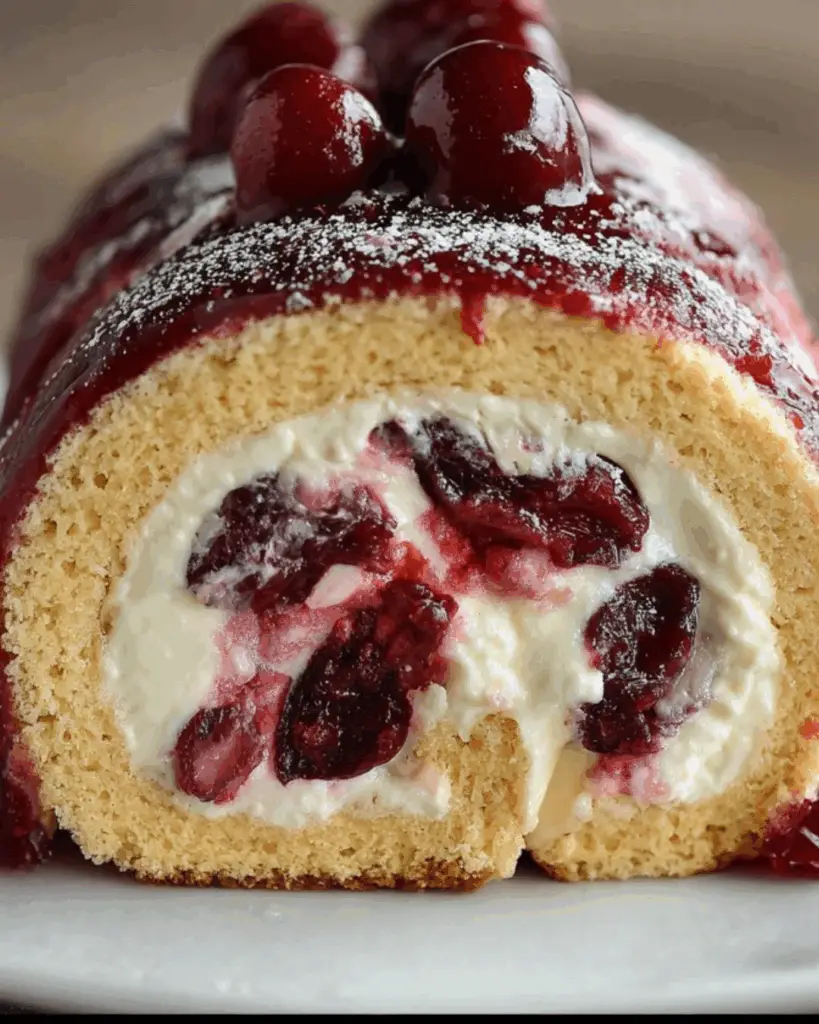
Introduction to Cherry Cheesecake Cake Roll
There’s something magical about desserts that bring back memories, isn’t there? The Cherry Cheesecake Cake Roll is one of those delightful treats that can transport you to simpler times, perhaps a family gathering or a summer picnic.
This recipe is perfect for those busy days when you want to impress your loved ones without spending hours in the kitchen. With its creamy filling and sweet cherry topping, it’s a showstopper that’s surprisingly easy to make.
So, roll up your sleeves and get ready to create a dessert that will have everyone asking for seconds!
Why You’ll Love This Cherry Cheesecake Cake Roll
This Cherry Cheesecake Cake Roll is a dessert that checks all the boxes.
It’s quick to whip up, making it perfect for those last-minute gatherings.
The combination of creamy cheesecake and tart cherries creates a flavor explosion that’s hard to resist.
Plus, it’s visually stunning, so you’ll impress your friends and family without breaking a sweat.
Trust me, this dessert will become a favorite in no time!
Ingredients for Cherry Cheesecake Cake Roll
Creating a Cherry Cheesecake Cake Roll is all about using the right ingredients. Here’s what you’ll need to bring this delightful dessert to life:
- All-purpose flour: The backbone of your cake, providing structure and a light texture.
- Baking powder: This leavening agent helps the cake rise, giving it that fluffy feel.
- Salt: Just a pinch enhances the flavors and balances the sweetness.
- Large eggs: They add moisture and richness, helping to bind everything together.
- Granulated sugar: Sweetens the cake and contributes to its lovely golden color.
- Vanilla extract: A must-have for that warm, comforting flavor that complements the cheesecake.
- Milk: Adds moisture to the batter, making it tender and delicious.
- Unsalted butter: Melted butter enriches the cake, giving it a rich taste and soft texture.
- Cream cheese: The star of the filling, providing that classic cheesecake flavor.
- Powdered sugar: Sweetens the cream cheese filling and gives it a smooth consistency.
- Heavy whipping cream: Whipped to perfection, it lightens the filling and adds a luscious texture.
- Cherry pie filling: The crowning glory, adding a burst of fruity flavor and a pop of color.
Feel free to get creative! You can swap the cherry pie filling for your favorite fruit filling, like strawberry or blueberry, for a twist.
For those who love chocolate, consider adding cocoa powder to the cake batter for a rich, decadent variation.
Exact measurements for these ingredients can be found at the bottom of the article, ready for printing!
How to Make Cherry Cheesecake Cake Roll
Making a Cherry Cheesecake Cake Roll is a delightful journey that combines baking and creativity. Follow these simple steps, and you’ll have a stunning dessert that’s sure to impress.
Step 1: Preheat and Prepare
Start by preheating your oven to 350°F.
While it warms up, grab a 15×10-inch jelly roll pan.
Grease it well and line it with parchment paper, then give the paper a light greasing too.
This will ensure your cake rolls out smoothly later on.
Step 2: Mix Dry Ingredients
In a medium bowl, whisk together the all-purpose flour, baking powder, and salt.
This step is crucial as it helps to evenly distribute the leavening agent.
Make sure there are no lumps; a smooth mixture is key to a fluffy cake.
Step 3: Beat Eggs and Sugar
In a large bowl, beat the eggs and granulated sugar using an electric mixer on high speed.
You want to mix until the mixture is thick and pale, which should take about 5 minutes.
This process incorporates air, giving your cake that light texture we all love.
Step 4: Combine Ingredients
Now, gradually add the flour mixture to the egg and sugar blend.
Alternate this with the milk and melted butter, mixing until just combined.
Be careful not to overmix; a gentle hand keeps the cake tender.
Step 5: Bake the Cake
Spread the batter evenly in your prepared pan.
Bake for 12-15 minutes, or until the cake springs back when lightly touched.
Keep an eye on it; you want a golden top, not a dry one!
Step 6: Roll the Cake
Once baked, remove the cake from the oven and let it cool for about 5 minutes.
Prepare a clean kitchen towel by sprinkling it with powdered sugar.
Carefully invert the cake onto the towel, peel off the parchment, and roll it up with the towel inside.
Let it cool completely in this rolled shape for about 30 minutes.
Step 7: Prepare the Filling
In a medium bowl, beat the softened cream cheese and powdered sugar until smooth.
Add the vanilla extract and mix until well combined.
In another bowl, whip the heavy cream until stiff peaks form.
Gently fold the whipped cream into the cream cheese mixture, creating a light and fluffy filling.
Step 8: Assemble the Cake Roll
Once the cake has cooled, carefully unroll it.
Spread the cream cheese filling evenly over the cake, leaving a small border around the edges.
Spoon the cherry pie filling over the cream cheese layer, then roll the cake back up tightly without the towel.
This is where the magic happens!
Step 9: Chill and Serve
Wrap the rolled cake in plastic wrap and refrigerate for at least 2 hours.
Chilling allows the flavors to meld and makes slicing easier.
When you’re ready to serve, slice the cake roll into pieces and enjoy the delightful layers of cheesecake and cherry goodness!

Tips for Success
- Always preheat your oven for even baking.
- Use room temperature ingredients for a smoother batter.
- Don’t skip the powdered sugar on the towel; it prevents sticking.
- Be gentle when rolling the cake to avoid cracks.
- Chill the cake roll for at least 2 hours for the best texture.
Equipment Needed
- 15×10-inch jelly roll pan: A standard size for this recipe; a baking sheet can work in a pinch.
- Parchment paper: Essential for easy removal; aluminum foil can be a substitute.
- Electric mixer: For beating eggs and cream; a whisk will do if you’re feeling adventurous.
- Kitchen towel: To help roll the cake; a silicone mat can also be handy.
Variations
- Chocolate Cherry Cheesecake Roll: Add 1/4 cup of cocoa powder to the cake batter for a rich chocolate flavor that pairs beautifully with cherries.
- Fruit Medley: Swap out the cherry pie filling for a mix of your favorite fruits, like strawberries, blueberries, or raspberries, for a refreshing twist.
- Gluten-Free Option: Use a gluten-free all-purpose flour blend to make this dessert suitable for those with gluten sensitivities.
- Reduced Sugar: Substitute granulated sugar with a sugar alternative like Stevia or erythritol to cut down on sweetness without sacrificing flavor.
- Vegan Version: Replace eggs with flaxseed meal and use a dairy-free cream cheese alternative for a plant-based delight.
Serving Suggestions
- Pair your Cherry Cheesecake Cake Roll with a scoop of vanilla ice cream for a delightful contrast.
- Serve with a drizzle of chocolate sauce for an extra touch of indulgence.
- Garnish with fresh mint leaves for a pop of color and freshness.
- Enjoy with a cup of coffee or tea to balance the sweetness.
FAQs about Cherry Cheesecake Cake Roll
Can I make the Cherry Cheesecake Cake Roll ahead of time?
Absolutely! This dessert can be made a day in advance. Just keep it wrapped in plastic wrap in the refrigerator. The flavors will meld beautifully overnight.
What can I use instead of cherry pie filling?
If cherries aren’t your thing, feel free to swap in your favorite fruit filling. Strawberry, blueberry, or even a mixed berry filling can add a delightful twist to your cake roll.
How do I store leftovers?
Store any leftover slices in an airtight container in the refrigerator. They should stay fresh for up to three days, but trust me, they won’t last that long!
Can I freeze the Cherry Cheesecake Cake Roll?
Yes, you can freeze it! Wrap the cake roll tightly in plastic wrap and then in aluminum foil. It can be frozen for up to three months. Just thaw it in the fridge before serving.
What’s the best way to slice the cake roll?
Use a sharp, serrated knife to slice the cake roll. This will help you achieve clean cuts without squishing the layers. A gentle sawing motion works best!
Final Thoughts
Creating a Cherry Cheesecake Cake Roll is more than just baking; it’s about crafting a moment of joy.
Each slice reveals layers of creamy cheesecake and sweet cherries, making it a delightful treat for any occasion.
Whether you’re celebrating a special event or simply indulging on a quiet evening, this dessert brings smiles and satisfaction.
It’s a recipe that invites creativity and personal touches, allowing you to make it your own.
So, gather your ingredients, roll up your sleeves, and enjoy the sweet rewards of your culinary adventure!
PrintCherry Cheesecake Cake Roll: A Delightful Dessert Recipe
- Total Time: 2 hours 45 minutes
- Yield: 10 servings
- Diet: Vegetarian
Description
A delightful dessert recipe for Cherry Cheesecake Cake Roll, combining the flavors of cheesecake and cherry in a rolled cake.
Ingredients
- 1 cup all-purpose flour
- 1 teaspoon baking powder
- 1/2 teaspoon salt
- 3 large eggs
- 1 cup granulated sugar
- 1 teaspoon vanilla extract
- 1/4 cup milk
- 1/4 cup unsalted butter, melted
- 8 ounces cream cheese, softened
- 1/2 cup powdered sugar
- 1 teaspoon vanilla extract
- 1 cup heavy whipping cream
- 1 cup cherry pie filling
Instructions
- Preheat the oven to 350°F. Grease a 15×10-inch jelly roll pan and line it with parchment paper. Grease the parchment paper lightly.
- In a medium bowl, whisk together the flour, baking powder, and salt.
- In a large bowl, beat the eggs and granulated sugar with an electric mixer on high speed until thick and pale, about 5 minutes. Mix in the vanilla extract.
- Gradually add the flour mixture, alternating with the milk and melted butter, mixing until just combined.
- Spread the batter evenly in the prepared pan. Bake for 12-15 minutes, or until the cake springs back when lightly touched. Remove from the oven and let cool for 5 minutes.
- While the cake is cooling, prepare a clean kitchen towel by sprinkling it with powdered sugar. Carefully invert the cake onto the towel and peel off the parchment paper.
- Starting from one short end, roll the cake up with the towel inside. Allow it to cool completely in this rolled shape for about 30 minutes.
- In a medium bowl, beat the softened cream cheese and powdered sugar until smooth. Add the vanilla extract and mix until combined.
- In another bowl, whip the heavy cream until stiff peaks form. Gently fold the whipped cream into the cream cheese mixture until well combined.
- Once the cake has cooled, unroll it carefully. Spread the cream cheese filling evenly over the cake, leaving a small border around the edges.
- Spoon the cherry pie filling over the cream cheese layer. Roll the cake back up tightly without the towel.
- Wrap it in plastic wrap and refrigerate for at least 2 hours before serving.
- Slice the cake roll into pieces and serve chilled.
Notes
- For a chocolate twist, add 1/4 cup of cocoa powder to the cake batter.
- You can replace the cherry pie filling with your favorite fruit filling, such as strawberry or blueberry, for a different flavor.
- Prep Time: 30 minutes
- Cook Time: 15 minutes
- Category: Dessert
- Method: Baking
- Cuisine: American
Nutrition
- Serving Size: 1 slice
- Calories: 280
- Sugar: 20g
- Sodium: 150mg
- Fat: 16g
- Saturated Fat: 10g
- Unsaturated Fat: 6g
- Trans Fat: 0g
- Carbohydrates: 30g
- Fiber: 1g
- Protein: 4g
- Cholesterol: 80mg