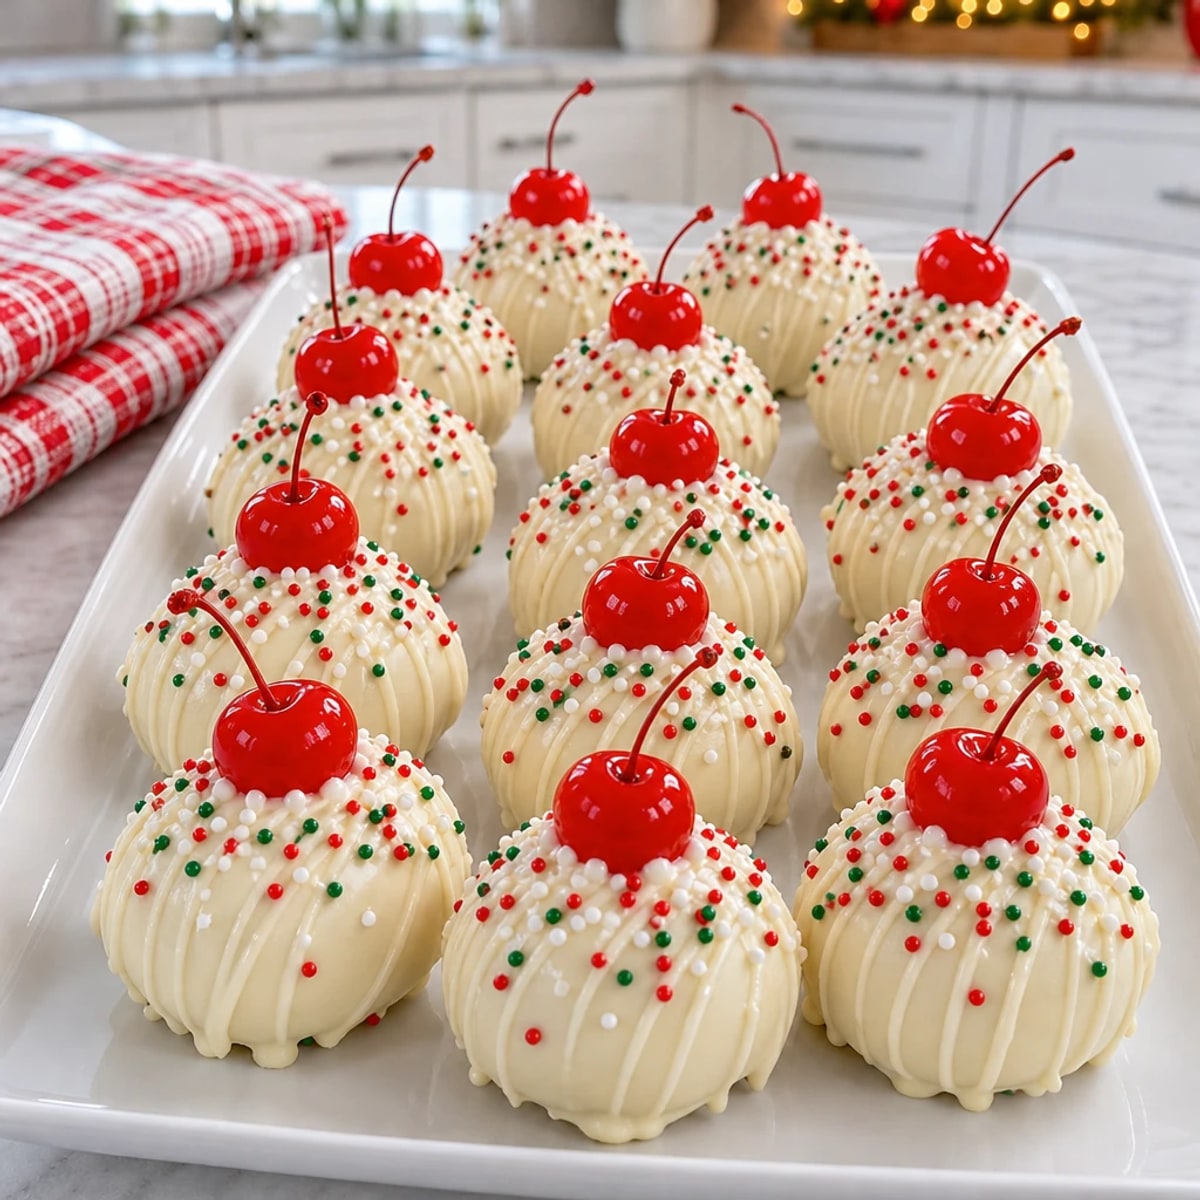
As I was wrapping gifts one chilly evening, the aroma of freshly baked cookies wafted through the house, instantly lifting my spirits. This holiday season, I’m excited to share my delightful recipe for Christmas Cherry Balls. These bite-sized treats are not just visually stunning with their glossy white chocolate coating and festive sprinkles, but they’re also a breeze to whip up—perfect for those busy days leading up to the celebrations. Made from a blend of creamy goodness and vibrant maraschino cherries, these sweet morsels are bound to steal the show at any gathering. With minimal prep time and no baking required, you’ll have more moments to enjoy the season with friends and family. Curious about how to create these festive delights? Let’s dive into the magic of Christmas Cherry Balls!
Why Are Christmas Cherry Balls So Irresistible?
Effortless Preparation: You’ll love how simple these are to make, with no baking involved! Just mix, chill, and coat.
Decadent Flavor: The combination of rich cream cheese and sweet maraschino cherries creates a deliciously unique treat.
Eye-Catching Appeal: Drenched in white chocolate and adorned with vibrant sprinkles, they’re a feast for the eyes!
Perfect for Sharing: These bite-sized delights are perfect for holiday parties, keeping everyone coming back for more.
Versatile Treat: Switch up the decorations to fit any holiday theme! Looking for more festive inspiration? Check out our guide on holiday treats.
Crowd-Pleaser: They are bound to impress friends and family, making them a must-have for your seasonal gatherings!
Christmas Cherry Balls Ingredients
For the Base
• Finely crushed vanilla wafer cookies – A sweet, buttery foundation for your cherry balls.
• Sweetened shredded coconut – Adds texture and a tropical flair.
• Finely chopped maraschino cherries – Infuses a burst of flavor and color into the mix.
For the Cream Mixture
• Cream cheese, softened – Provides a rich and creamy base for the filling.
• Sweetened condensed milk – Enhances sweetness and creaminess.
• Vanilla extract – A must-have for that warm, comforting flavor.
• Almond extract – Adds a lovely depth, especially in festive treats.
• Powdered sugar – Sweetens and helps bind the cream mixture seamlessly.
For the Coating
• White chocolate melting wafers – Creates a glossy and smooth outer layer.
• Coconut oil – Ensures the chocolate melts beautifully and sets perfectly.
For the Decoration
• Christmas sprinkles (red, green, and white) – Make your Christmas Cherry Balls pop with color!
• Melted white chocolate (for drizzling) – Adds a final touch of elegance.
• Whole maraschino cherries with stems – Perfect for a festive garnish!
These Christmas Cherry Balls are a delightful way to celebrate the season and share sweetness with loved ones. Happy cooking!

Step-by-Step Instructions for Christmas Cherry Balls
Step 1: Prepare the Cherries
Drain the chopped maraschino cherries thoroughly and pat them dry with paper towels to remove any excess moisture. This step is crucial to ensure your Christmas Cherry Balls have the perfect texture and flavor. Once dried, set them aside while you gather the other ingredients.
Step 2: Mix the Dry Ingredients
In a large mixing bowl, combine 2 cups of finely crushed vanilla wafer cookies, 1 cup of sweetened shredded coconut, and the prepared maraschino cherries. Stir the mixture until all the ingredients are evenly distributed. This will create a sweet, flavorful base for your cherry balls that’s both delightful to taste and easy to work with.
Step 3: Create the Cream Mixture
In a separate bowl, beat 4 ounces of softened cream cheese until it's smooth and creamy. Then, add in ½ cup of sweetened condensed milk along with 1 teaspoon of vanilla extract and ¼ teaspoon of almond extract. Mix until fully combined, ensuring the cream mixture is rich and velvety, which will complement the dry ingredients beautifully.
Step 4: Combine Mixtures
Add the cream mixture to the bowl containing the cookie mixture. Gently fold everything together until a thick and slightly sticky dough forms. This step should take no more than a few minutes, and you'll notice the dough comes together nicely, ready for chilling.
Step 5: Chill the Dough
Cover the bowl and refrigerate the mixture for 30 minutes. This will make shaping your Christmas Cherry Balls easier, as the dough firms up slightly. While it chills, you can prepare your work area with parchment paper for the next steps.
Step 6: Shape the Balls
Once chilled, scoop approximately 2 tablespoons of the mixture for each ball. Roll each portion gently between your palms to form a smooth round ball. Arrange them on the prepared parchment-lined tray, making sure they do not touch. This will allow them to keep their shape during the next chilling phase.
Step 7: Firm Up the Balls
Refrigerate the shaped cherry balls for an additional 30 minutes until they are firm. This step is essential to ensure your Christmas Cherry Balls maintain their shape when dipped in chocolate, so be patient as they chill.
Step 8: Melt the Chocolate Coating
In a microwave-safe bowl, combine 3 cups of white chocolate melting wafers with 2 tablespoons of coconut oil. Microwave in 20-second intervals while stirring until completely melted and smooth. Allow it to cool slightly while keeping the chocolate fluid for dipping.
Step 9: Dip the Balls
Remove the chilled cherry balls from the refrigerator. Using a dipping fork, dip each ball into the melted white chocolate. Allow the excess chocolate to drip back into the bowl before placing them back on the parchment-lined tray. This shiny coating will make your Christmas Cherry Balls irresistible.
Step 10: Decorate the Balls
Immediately sprinkle the tops of the coated balls with red, green, and white Christmas sprinkles before the chocolate sets. This vibrant decoration will add a festive charm to your sweet treats. Repeat until all cherry balls are coated and decorated.
Step 11: Drizzle Extra Chocolate
Melt additional white chocolate for drizzling, and once smooth, use it to drizzle thin lines over the coated cherry balls for an elegant touch. This step enhances the visual appeal of your Christmas Cherry Balls, making them truly festive.
Step 12: Final Touches and Serve
Drain and pat dry the whole maraschino cherries. Place one whole cherry on top of each ball while the chocolate drizzle is still soft. Refrigerate the finished cherry balls for at least 30 minutes until the chocolate coating is firm. Once ready, arrange them in a rectangular serving dish and serve chilled for the best creamy texture and sweet cherry flavor.

Prep Ahead for Stress-Free Christmas Cherry Balls
Prepare your Christmas Cherry Balls in advance for a delightful and stress-free holiday treat! You can mix the cookie and cream cheese mixtures separately and store them in the fridge for up to 24 hours. Additionally, the shaped balls can be refrigerated for another 30 minutes before dipping if you're short on time when guests arrive. For optimal quality, ensure the balls stay tightly wrapped to prevent excess moisture. When you're ready to finish them off, just dip the chilled balls in the melted white chocolate, sprinkle with festive toppings, and drizzle with extra white chocolate for that perfect holiday touch. Enjoy the luxury of quick assembly during the festivities!
How to Store and Freeze Christmas Cherry Balls
Fridge: Store your Christmas Cherry Balls in an airtight container in the refrigerator for up to 1 week. This keeps them fresh and ready for holiday snacking.
Freezer: For longer storage, freeze the cherry balls in a single layer on a baking tray, then transfer to a freezer-safe container. They can last up to 3 months!
Thawing: When ready to enjoy, simply transfer the balls to the fridge to thaw overnight. They’ll retain their creamy texture and delightful flavor.
Reheating: No need to reheat—these treats are best served chilled, allowing you to savor the sweet cherry and creamy goodness that make Christmas Cherry Balls a holiday hit!
Tips for the Best Christmas Cherry Balls
Chill Before Shaping: Refrigerate the mixture for 30 minutes to make it easier to roll into balls, preventing any stickiness.
Pat Dry Thoroughly: Make sure to drain and pat your maraschino cherries dry to avoid excess moisture, which can affect the texture of your Christmas Cherry Balls.
Smooth Coating: After melting the white chocolate, let it cool slightly before dipping. This prevents the chocolate from becoming too runny and ensures an even coating.
Use a Dipping Fork: A dipping fork helps you easily dip and lift the cherry balls, allowing excess chocolate to drip off for a cleaner finish.
Decorate Immediately: Sprinkle the Christmas sprinkles right after coating while the chocolate is still soft, ensuring they stick beautifully to each ball.
Christmas Cherry Balls Variations & Substitutions
Feel free to get creative with these delightful treats—your imagination is the only limit!
- Nut-Free: Swap the almond extract for more vanilla extract to keep that heavenly flavor without nuts.
- Vegan Option: Use dairy-free cream cheese and sweetened condensed coconut milk to make this recipe plant-based. They’ll still be rich and delicious!
- Chocolate Lovers: Substitute half of the white chocolate coating with dark chocolate for a decadent twist on flavor. The contrast is simply divine.
- Fruit Explosion: Add finely chopped dried fruits like cranberries or apricots for a tangy twist that complements the cherries beautifully. Consider mixing in a bit of zest for freshness!
- Spiced Up: Mix in a pinch of cinnamon or nutmeg into the cream mixture for a warm, spicy note that makes these cherry balls seasonal.
- Coconut Cream: Replace the sweetened shredded coconut with toasted coconut flakes to add an irresistible crunch and depth of flavor.
- Minty Fresh: Sprinkle crushed peppermint on top instead of Christmas sprinkles for a refreshing, holiday-themed treat.
- Festive Shapes: Instead of balls, form the mixture into holiday shapes using cookie cutters—perfect for themed gatherings.
Whether you follow the classic recipe or choose a fun variation, each bite of these Christmas Cherry Balls is guaranteed to spread joy. For more creative holiday ideas, check out our guide on seasonal desserts!
What to Serve with Christmas Cherry Balls?
Elevate your festive table with delightful pairings that complement these sweet cherry treats beautifully.
- Rich Hot Chocolate: A warm cup of hot chocolate brings comforting flavors that perfectly balance the sweetness of the cherry balls.
- Fresh Fruit Platter: Bright strawberries and citrus slices offer a refreshing contrast, cleansing the palate between bites of rich creaminess.
- Spiced Eggnog: The creamy, spiced flavors of eggnog perfectly harmonize with the sweet cherry and chocolate, enhancing the holiday spirit.
- Gourmet Cheese Board: A selection of soft cheeses like brie creates a delightful textural contrast and adds a savory element to the feast.
- Chocolate Dipped Pretzels: The salty crunch of pretzels dipped in chocolate complements the sweetness of the cherry balls, creating an addictively yummy combination.
- Coconut Sorbet: Serving a small scoop of coconut sorbet adds a tropical coolness that pairs beautifully with the cherry and chocolate flavors.
- Warm Cinnamon Rolls: Soft, gooey cinnamon rolls will bring a cozy warmth to the table, making these cherry balls even more of a treat after a delightful meal.
- Pineapple Parfait: Layered with yogurt and berries, this light dessert brings a refreshing brightness and balances the sweetness of your cherry balls.
- Winter Spiced Tea: The aromatic spices in a warm tea will enhance the indulgent flavors of the cherry balls while inviting joyous memories of the season.

Christmas Cherry Balls Recipe FAQs
How do I select the best maraschino cherries?
Absolutely! When choosing maraschino cherries, look for bright, vibrant colors without dark spots or excessive syrup. Ensure the cherries are fresh-seeming and not overly soft; they should have just the right amount of firmness. This will elevate the flavor and appearance of your Christmas Cherry Balls!
How should I store Christmas Cherry Balls?
You should store your Christmas Cherry Balls in an airtight container in the refrigerator for up to 1 week. This helps maintain their creamy texture and delightful flavor. If you notice they’re losing some moisture, you can add a piece of parchment paper in the container to absorb any excess moisture.
Can Christmas Cherry Balls be frozen?
Yes, they can! For freezing, arrange the cherry balls in a single layer on a baking tray, allowing them to freeze solid. Then transfer the frozen balls to a freezer-safe container or a Ziplock bag. They can last up to 3 months in the freezer. When ready to enjoy, simply transfer them to the fridge to thaw overnight for the best texture.
What should I do if my white chocolate is too thick for dipping?
Very! If your melted white chocolate is too thick, try adding a teaspoon of coconut oil or vegetable oil to thin it out. Stir it in while the chocolate is still warm until smooth. This adjustment will ensure a glossy, perfect coating on your Christmas Cherry Balls without feeling clumpy.
Are Christmas Cherry Balls suitable for kids?
Indeed! Christmas Cherry Balls are a kid-friendly treat, but if concerns about allergies arise, be mindful of any potential nut allergies due to almond extract. You can substitute the almond extract with more vanilla extract for a safe and still delicious alternative that everyone can enjoy!
Can I use dark chocolate instead of white chocolate?
Absolutely! If you prefer a richer flavor, dark chocolate works wonderfully. Keep the coconut oil to maintain a smooth consistency. Just ensure it’s melted properly before dipping for that luscious, glossy finish on your Christmas Cherry Balls. Your festive treat will have a unique twist that everyone will love!

Indulge in Sweet Christmas Cherry Balls Delight
- Total Time: 1 hour 15 minutes
- Yield: 24 balls
Description
These Christmas Cherry Balls are a delightful, no-bake treat that combines creamy goodness with sweet maraschino cherries, perfect for the holiday season.
Ingredients
For the Base
- 2 cups finely crushed vanilla wafer cookies (A sweet, buttery foundation for your cherry balls.)
- 1 cup sweetened shredded coconut (Adds texture and a tropical flair.)
- 1 cup finely chopped maraschino cherries (Infuses a burst of flavor and color into the mix.)
For the Cream Mixture
- 4 ounces cream cheese, softened (Provides a rich and creamy base for the filling.)
- ½ cup sweetened condensed milk (Enhances sweetness and creaminess.)
- 1 teaspoon vanilla extract (A must-have for that warm, comforting flavor.)
- ¼ teaspoon almond extract (Adds a lovely depth, especially in festive treats.)
- 2 cups powdered sugar (Sweetens and helps bind the cream mixture seamlessly.)
For the Coating
- 3 cups white chocolate melting wafers (Creates a glossy and smooth outer layer.)
- 2 tablespoons coconut oil (Ensures the chocolate melts beautifully and sets perfectly.)
For the Decoration
- 1 cup Christmas sprinkles (red, green, and white) (Make your Christmas Cherry Balls pop with color!)
- ½ cup melted white chocolate (for drizzling) (Adds a final touch of elegance.)
- 24 whole maraschino cherries with stems (Perfect for a festive garnish!)
Instructions
Step-by-Step Instructions
- Drain the chopped maraschino cherries thoroughly and pat them dry with paper towels to remove any excess moisture.
- In a large mixing bowl, combine the crushed vanilla wafer cookies, shredded coconut, and prepared maraschino cherries. Stir until evenly distributed.
- In a separate bowl, beat the cream cheese until smooth. Add in the sweetened condensed milk, vanilla extract, and almond extract, mixing until combined.
- Add the cream mixture to the cookie mixture and gently fold until a thick dough forms.
- Cover the bowl and refrigerate for 30 minutes.
- After chilling, scoop 2 tablespoons of the mixture and roll gently into balls, placing them on a parchment-lined tray.
- Refrigerate the shaped cherry balls for another 30 minutes until firm.
- In a microwave-safe bowl, combine the white chocolate melting wafers and coconut oil. Microwave in intervals until melted and smooth.
- Dip each chilled cherry ball into the melted chocolate, allowing excess to drip back into the bowl.
- Immediately sprinkle with Christmas sprinkles before the chocolate sets.
- Melt additional white chocolate for drizzling and drizzle over the coated balls for decoration.
- Place one whole cherry on top of each ball while the chocolate is still soft. Refrigerate for 30 minutes until firm.
- Arrange them on a serving dish and serve chilled.
Notes
These can be stored in an airtight container in the fridge for up to 1 week or frozen for longer storage.
Equipment
- Mixing bowls
- Microwave
- Dipping fork
- Parchment paper
Chilling Time: 60 minutes
- Prep Time: 15 minutes
- Category: Dessert
- Cuisine: American
Nutrition
- Serving Size: 1 ball
- Calories: 120
- Sugar: 10
- Sodium: 50
- Fat: 7
- Saturated Fat: 4
- Unsaturated Fat: 3
- Trans Fat: 0
- Carbohydrates: 15
- Protein: 1
- Cholesterol: 15