As I flipped through the vibrant pages of a Greek cookbook, the warm aroma of sizzling cheese suddenly enveloped my senses. It was my first taste of Feta Saganaki, a quick and easy appetizer that instantly enchanted me with its golden, crispy exterior and creamy, salty heart. Imagine whipping up this delightful treat in just 10 minutes—it’s a showstopper that elevates any gathering, whether a casual night in or a festive feast. Plus, it’s vegetarian and gluten-free, making it a perfect option for everyone at the table. Ready to impress your friends and family with this Greek classic? Let’s dive into making your very own Feta Saganaki!

Why is Feta Saganaki so irresistible?
Crispy outside, creamy inside: This delightful contrast makes every bite an experience to savor. Quick and easy preparation: Whip this up in just 10 minutes, great for last-minute gatherings. Versatile serving options: Perfect as part of a mezze platter or as a star appetizer. Crowd-pleaser appeal: Your friends and family won’t be able to resist asking for seconds! For more delicious appetizers, don’t miss out on my guide to Greek mezze ideas. Enjoy the divine fusion of flavors that only Feta Saganaki can deliver!
Feta Saganaki Ingredients
• For the Feta
- Smooth Firm Feta – The star of the dish, it delivers that creamy, salty bite; feel free to substitute with Kefalotyri or Kasseri for a twist.
• For the Coating
- All-Purpose Flour – This coats the feta for a crispy finish when fried; gluten-free flour works great for a gluten-free option.
• For Frying
- Olive Oil – Used for shallow frying, bringing richness to the dish; opt for extra virgin olive oil for enhanced flavor.
• For Garnishing
- Fresh Thyme Leaves – Infuses herbal freshness into every mouthful; dried thyme can be used if you’re in a pinch.
- Sesame Seeds – Add a delightful nutty crunch; toasting them beforehand makes them even more flavorful.
• For Balance
- Honey – Adds a sweet touch to balance the salty feta; maple syrup is a great vegan alternative.
- Lemon Wedges – Brightens the dish with a splash of acidity, making every bite pop.
Now that you have all your ingredients ready, let’s make magic happen in the kitchen with this Feta Saganaki!
Step‑by‑Step Instructions for Feta Saganaki
Step 1: Prepare Feta
Begin by slicing the smooth firm feta into pieces approximately 1 to 1.5 cm thick. This thickness ensures that the feta maintains its shape while also achieving that perfect creamy center. Place the slices on a plate, allowing them to rest as you prepare for the next step.
Step 2: Coat Feta
Lightly coat each slice of feta in all-purpose flour, ensuring an even covering while shaking off any excess flour. This step is crucial for achieving a beautifully crispy crust when frying your feta saganaki. Set the floured feta aside, giving it a moment to breathe before cooking.
Step 3: Heat Oil
In a non-stick skillet, pour in enough extra virgin olive oil to cover the bottom of the pan. Heat the oil over medium-high heat until it shimmers, which indicates that it’s hot enough for frying. This is important to prevent the feta from soaking up too much oil and to achieve that sought-after crispy texture.
Step 4: Fry Feta
Carefully place the coated feta slices in the hot oil, ensuring they aren’t crowded in the pan. Fry each slice for about 4 minutes on one side, or until golden brown and crispy, then gently flip and fry for another 4 minutes. The sizzling sound and golden color will let you know they’re cooking beautifully.
Step 5: Serve
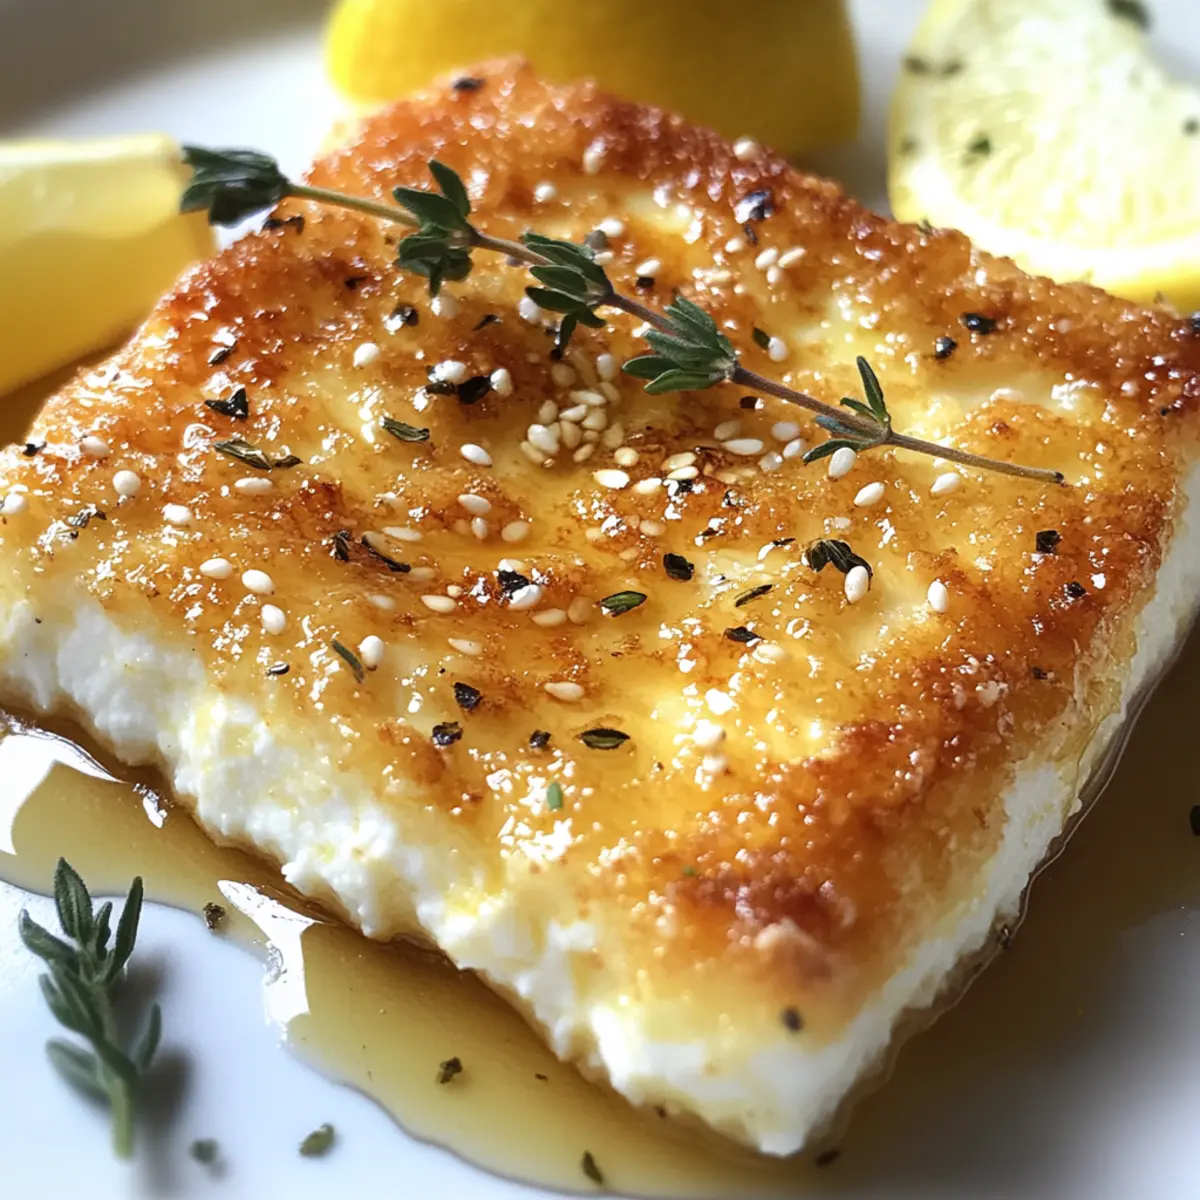
Once the feta saganaki is perfectly golden and crispy on both sides, remove it from the skillet and place it on a serving dish. Drizzle with honey for a touch of sweetness, then garnish with fresh thyme leaves and sesame seeds. Serve immediately alongside lemon wedges to squeeze over for an extra burst of flavor.
What to Serve with Crispy Greek Feta Saganaki?
Create a vibrant Mediterranean feast that delights every palate with these perfect pairings.
-
Mediterranean Olives: Their briny flavor contrasts the creamy feta, adding depth to your appetizer spread. A mix of green and black olives brings colorful variety to the table.
-
Crisp Cucumber Salad: Refreshing and crunchy, it balances the richness of feta saganaki beautifully, making every bite feel light and invigorating. Toss cucumbers with a hint of lemon and olive oil for zest.
-
Toasted Pita Bread: Perfect for dipping into feta or topping with leftovers, offering a satisfying crunch while absorbing the dish’s flavors. Serve warm for an extra touch of comfort!
-
Roasted Red Peppers: Smoky and sweet, they enhance the dish’s complexity and introduce bold flavors to the party. Their vibrant color also brightens up your plate!
-
Greek Tzatziki: This cool yogurt dip complements the warm feta with its tangy freshness, creating a delightful contrast in temperature and taste. Serve it alongside for dipping or drizzling.
-
Lemonade or Sparkling Water: Refresh the palate with something light and bubbly. The citrus notes harmonize with the feta’s richness, making every bite a joy to savor.
-
Baklava for Dessert: Finish your Mediterranean meal on a sweet note! This honey-soaked pastry echoes the sweetness of the saganaki drizzle, creating a charming culinary journey.
-
Red or White Wine: A crisp Sauvignon Blanc or a medium-bodied Red can elevate the flavors of your meal, making for a sophisticated pairing that your guests will love.
Feta Saganaki Variations
Feel free to let your creativity shine as you customize this delicious recipe to suit your taste!
- Cheese Swap: Try halloumi instead of feta for a chewier texture that grills beautifully.
- Spicy Kick: Add a pinch of cayenne or crushed red pepper flakes for a delightful heat that elevates the dish.
- Herbed Delight: Mix fresh chopped herbs like oregano or basil into the honey drizzle for added flavor complexity.
- Nutty Twist: Try coating the feta in crushed nuts like pistachios or almond meal for an irresistible crunch and nutty flavor.
- Mediterranean Medley: Top the finished saganaki with chopped sun-dried tomatoes and olives to enhance the Mediterranean flair.
- Vegan Option: Use tofu lightly pressed to achieve a similar texture and flavor; just make sure to marinate it in olive oil, lemon, and herbs beforehand.
- Sweet & Savory: Experiment with a balsamic glaze drizzle instead of honey for a tangy-sweet finish that surprises the palate.
- Crispy Herb Crust: Substitute the flour with seasoned breadcrumbs for an extra crispy and flavorful exterior that pairs perfectly with the soft feta inside.
No matter the variation, your feta saganaki will surely be a hit! For more great ideas, consider exploring my collection on Greek mezze ideas to pair with this delightful appetizer!
Expert Tips for Feta Saganaki
- Oil Temperature: Ensure the olive oil is sufficiently hot before frying to avoid soggy feta; a shimmering surface is your cue.
- Flour Coating: Don’t overload the feta with flour; shaking off excess is crucial for achieving that desirable crispy layer.
- Cheese Selection: Choose firm varieties of feta for best results to prevent breaking apart in the skillet while cooking your feta saganaki.
- Serving Fresh: This appetizer is best enjoyed immediately after frying, as reheating can compromise the crispy texture.
- Variations: Experiment with spices like paprika for a twist; just sprinkle before frying to elevate your feta saganaki experience.
Storage Tips for Feta Saganaki
Fridge: Store leftover Feta Saganaki in an airtight container in the refrigerator for up to 1 day. This will help maintain its flavor, but the crust may soften.
Freezer: It’s best not to freeze Feta Saganaki, as the texture can become unappealing when thawed. Enjoy it fresh for the best experience.
Reheating: If you have leftovers, gently reheat them in a skillet over low heat until warmed through, allowing the outer crust to regain some crispiness.
Serving Fresh: For optimal flavor and texture, serve Feta Saganaki immediately after frying, as it is best enjoyed fresh and hot!
Make Ahead Options
Feta Saganaki is ideal for busy home cooks seeking to save time during meal prep! You can coat the feta slices in flour up to 24 hours in advance, placing them on a plate lined with parchment paper to prevent sticking. Additionally, you can prepare your garnishes, like fresh thyme and sesame seeds, and store them in airtight containers in the refrigerator for up to 3 days. When you’re ready to serve, simply heat the olive oil in a skillet and fry the prepared feta slices until golden brown, following the original cooking instructions. This way, you’ll enjoy that crispy, delicious experience with minimal effort for any gathering!

Feta Saganaki Recipe FAQs
What kind of feta should I use for Feta Saganaki?
Absolutely! The best choice is a smooth firm feta, which gives you that lovely creamy, salty flavor. If you can’t find it, you can substitute with similar Greek cheeses like Kefalotyri or Kasseri for a different twist.
How should I store leftover Feta Saganaki?
To keep your Feta Saganaki fresh for up to 1 day, place any leftovers in an airtight container in the refrigerator. However, be aware that the crispy crust may soften over time, so it’s best enjoyed immediately.
Can I freeze Feta Saganaki?
It’s best to avoid freezing Feta Saganaki, as the texture tends to decline significantly once thawed. If you want to prepare ahead, consider making fresh batches when you’re ready to serve.
What should I do if the feta breaks apart while frying?
Oh no! If that happens, it might be due to using a softer variety of feta. To prevent this, always use a firm feta and ensure it’s coated properly with flour before frying. If it still breaks, don’t fret—just serve the crumbles as a delicious topping!
Is Feta Saganaki suitable for dietary restrictions?
Very! Feta Saganaki is gluten-free if you use gluten-free flour. For those avoiding dairy, consider substituting the feta with a plant-based cheese. Always remember to check labels for allergens if serving to guests.
How long can I keep Feta Saganaki in the fridge?
Leftover Feta Saganaki can be stored in the fridge for up to 1 day. Just remember to reheat it gently in a skillet over low heat to restore some of that crispy texture before serving again!

Crispy Feta Saganaki: Quick Greek Delight in 10 Minutes
Ingredients
Equipment
Method
- Slice the smooth firm feta into pieces approximately 1 to 1.5 cm thick. Place on a plate to rest.
- Lightly coat each slice in all-purpose flour, shaking off excess. Set aside.
- Heat enough olive oil in a non-stick skillet over medium-high heat until shimmering.
- Fry each slice for about 4 minutes on each side until golden brown and crispy.
- After frying, drizzle with honey, garnish with thyme and sesame seeds, and serve with lemon wedges.