Introduction to Mocha Ice-Cream Cake
There’s something magical about dessert that brings people together, and this Mocha Ice-Cream Cake is no exception. Picture a warm summer evening, friends gathered around, laughter filling the air, and this decadent delight stealing the show. It’s the perfect treat to impress your loved ones or simply indulge after a long day. With layers of rich coffee and chocolate ice cream nestled in a crunchy cookie crust, it’s a quick solution for those busy days when you want to treat yourself. Trust me, this cake will become a staple in your dessert repertoire!
Why You’ll Love This Mocha Ice-Cream Cake
This Mocha Ice-Cream Cake is a game-changer for dessert lovers. It’s incredibly easy to whip up, making it perfect for those hectic weeknights or last-minute gatherings. The combination of coffee and chocolate creates a flavor explosion that’s hard to resist. Plus, it’s a no-bake treat, so you can spend less time in the kitchen and more time enjoying the company of friends and family. What’s not to love?
Ingredients for Mocha Ice-Cream Cake
Gathering the right ingredients is the first step to creating this delightful Mocha Ice-Cream Cake. Here’s what you’ll need:
- Chocolate cookie crumbs: These form the base of your cake, providing a crunchy texture that contrasts beautifully with the creamy ice cream layers.
- Unsalted butter: Melted butter binds the cookie crumbs together, ensuring a firm crust that holds up when you slice into the cake.
- Coffee ice cream: This is where the magic begins! The rich coffee flavor adds depth and pairs perfectly with chocolate.
- Chocolate ice cream: A classic choice that complements the coffee ice cream, creating a luscious combination that’s hard to resist.
- Heavy whipping cream: Whipped to perfection, this adds a light and airy topping that balances the richness of the ice cream.
- Powdered sugar: A touch of sweetness for the whipped cream, making it even more delightful.
- Vanilla extract: Just a hint enhances the overall flavor profile, bringing everything together harmoniously.
- Chocolate syrup: This decadent drizzle not only adds flavor but also makes for a beautiful presentation.
- Brewed coffee: Pouring cooled coffee over the cake adds an extra layer of flavor, soaking into the ice cream for a delightful surprise.
For those looking to customize, consider adding crushed espresso beans between the layers for an extra kick. If you prefer a milder taste, vanilla ice cream can be swapped in for the coffee ice cream. You can find all the exact measurements at the bottom of the article, ready for printing!
How to Make Mocha Ice-Cream Cake
Creating this Mocha Ice-Cream Cake is a delightful journey that’s as enjoyable as the final product. Follow these simple steps, and you’ll have a show-stopping dessert that’s sure to impress!
Step 1: Prepare the Crust
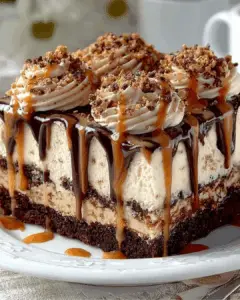
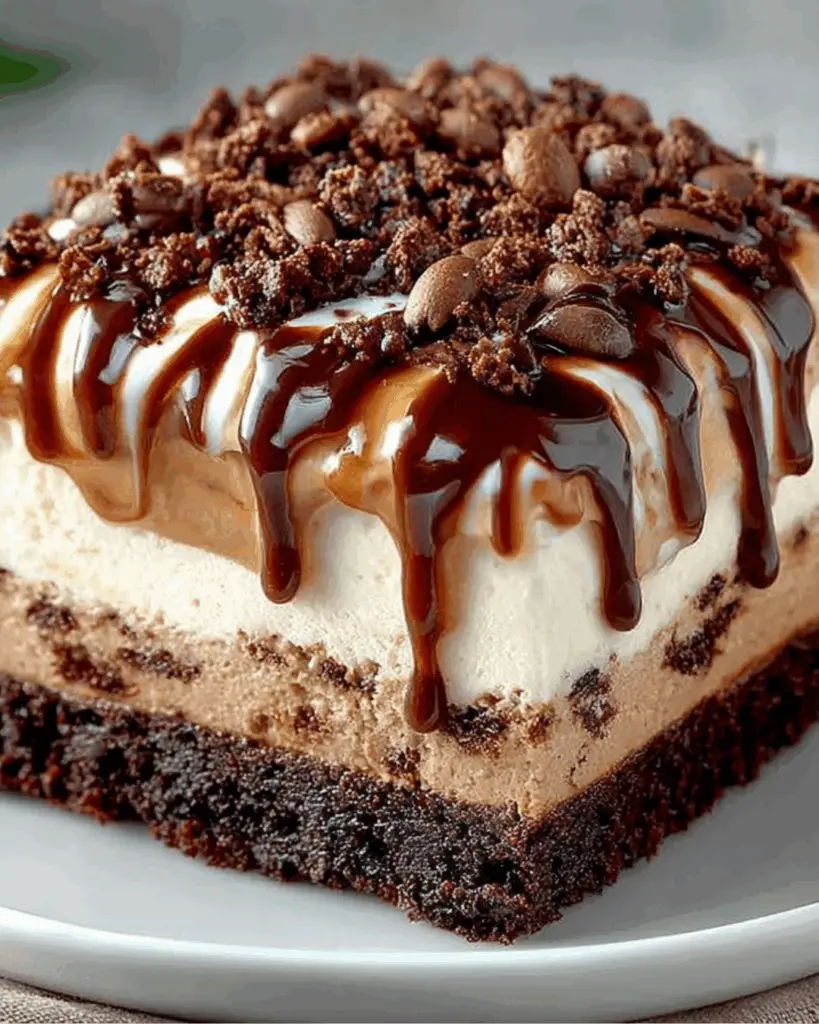
Start by preheating your oven to 350°F (175°C). In a medium bowl, combine the chocolate cookie crumbs with the melted butter. Mix them until they’re well blended. This mixture should feel like damp sand. Next, press it firmly into the bottom of a 9-inch springform pan. Make sure it’s even and compact. Bake the crust for about 10 minutes, then let it cool completely. This crust will provide a delicious crunch that contrasts beautifully with the creamy ice cream layers.
Step 2: Add Coffee Ice Cream
Once your crust has cooled, it’s time to add the first layer of ice cream. Take the softened coffee ice cream and spread it evenly over the crust. Use a spatula to smooth it out, ensuring every bite will be filled with that rich coffee flavor. After you’ve spread it out, place the pan in the freezer for about 30 minutes. This will help the coffee layer firm up nicely, making it easier to add the next layer.
Step 3: Layer Chocolate Ice Cream
After the coffee ice cream has set, it’s time for the chocolate layer. Remove the pan from the freezer and spread the softened chocolate ice cream over the coffee layer. Again, use a spatula to smooth it out evenly. This combination of flavors is what makes this Mocha Ice-Cream Cake so irresistible! Once you’ve added the chocolate layer, return the cake to the freezer for another 30 minutes to let it firm up before moving on to the next step.
Step 4: Whip the Cream
Now for the fun part! In a mixing bowl, whip the heavy cream, powdered sugar, and vanilla extract together until stiff peaks form. This means the cream should hold its shape when you lift the whisk. Once whipped, gently spread the cream over the chocolate ice cream layer. This fluffy topping adds a lightness that balances the richness of the cake. Don’t be shy—make it as thick as you like!
Step 5: Drizzle and Soak
With the whipped cream in place, it’s time to add some flair. Drizzle chocolate syrup over the whipped cream, creating a beautiful pattern. Then, pour the cooled brewed coffee over the top of the cake. This step is crucial as it allows the coffee to soak in slightly, enhancing the flavor. The combination of chocolate and coffee is what makes this dessert truly special. Cover the cake with plastic wrap and freeze it for at least 4 hours, or until it’s completely firm.
Step 6: Freeze and Serve
When you’re ready to serve, remove the cake from the freezer. Carefully take it out of the springform pan. For clean slices, use a warm knife to cut through the layers. This Mocha Ice-Cream Cake is best enjoyed right away, but it can be stored in the freezer for later. Just remember to let it sit for a few minutes at room temperature before slicing if it’s been frozen solid. Enjoy every delicious bite!

Tips for Success
- Make sure your ice cream is softened before spreading; it makes layering much easier.
- Use a warm knife to slice the cake for clean, beautiful pieces.
- For a fun twist, try adding a layer of crushed nuts or chocolate chips between the ice cream layers.
- Let the cake sit at room temperature for a few minutes before serving for easier slicing.
- Store leftovers in an airtight container to maintain freshness.
Equipment Needed
- 9-inch springform pan: Essential for easy removal of the cake. A regular cake pan works too, but slicing may be trickier.
- Mixing bowls: You’ll need a couple for mixing the crust and whipping the cream. Any size will do!
- Spatula: Perfect for spreading ice cream and whipped cream evenly. A butter knife can work in a pinch.
- Whisk or electric mixer: For whipping the cream. A hand whisk is great for a workout!
- Oven: Required for baking the crust. If you don’t have one, a toaster oven can suffice.
Variations
- Nutty Delight: Add a layer of crushed almonds or walnuts between the ice cream layers for a crunchy texture.
- Minty Fresh: Swap the chocolate ice cream for mint chocolate chip ice cream for a refreshing twist.
- Vegan Option: Use dairy-free ice cream and coconut cream for the whipped topping to create a vegan-friendly version.
- Fruit Fusion: Layer in some fresh raspberries or strawberries between the ice cream layers for a fruity contrast.
- Decadent Mocha: Enhance the coffee flavor by using espresso ice cream instead of coffee ice cream for a stronger kick.
Serving Suggestions
- Pair with a hot cup of coffee or espresso to enhance the mocha flavor.
- Serve alongside a scoop of vanilla ice cream for a delightful contrast.
- Garnish with chocolate shavings or fresh berries for an elegant touch.
- Consider a drizzle of caramel sauce for added sweetness.
- Present on a colorful platter to make it visually appealing.
FAQs about Mocha Ice-Cream Cake
Can I make Mocha Ice-Cream Cake ahead of time?
Absolutely! This cake is perfect for making ahead. Just prepare it a day or two in advance and keep it in the freezer. It’ll be ready to impress your guests when you are!
What can I substitute for coffee ice cream?
If coffee isn’t your thing, you can easily swap it for vanilla ice cream. This will give you a milder flavor while still keeping the cake delicious. You could also try espresso ice cream for a stronger coffee kick!
How do I store leftovers?
To keep your Mocha Ice-Cream Cake fresh, store it in an airtight container in the freezer. It should last for about a week, but trust me, it won’t last that long!
Can I use a different type of cookie for the crust?
Definitely! While chocolate cookie crumbs are traditional, you can use graham crackers or even Oreos for a fun twist. Just make sure to adjust the butter accordingly for binding.
Is this cake suitable for special diets?
This Mocha Ice-Cream Cake can be adapted for various diets. For a vegan version, use dairy-free ice cream and coconut cream for the whipped topping. Just check the labels to ensure all ingredients meet your dietary needs!
Final Thoughts
Creating this Mocha Ice-Cream Cake is more than just a cooking project; it’s an experience filled with joy and indulgence. Each layer tells a story, from the crunchy cookie crust to the creamy ice cream that melts in your mouth. It’s a dessert that brings people together, sparking laughter and shared memories. Whether you’re celebrating a special occasion or simply treating yourself after a long day, this cake is sure to impress. So, roll up your sleeves, gather your loved ones, and dive into this delightful creation. Trust me, every bite will be worth it!
PrintMocha Ice-Cream Cake: Indulge in a Decadent Delight
- Total Time: 4 hours 40 minutes
- Yield: 10 servings
- Diet: Vegetarian
Description
A decadent Mocha Ice-Cream Cake that combines layers of coffee and chocolate ice cream with a chocolate cookie crust, topped with whipped cream and chocolate syrup.
Ingredients
- 2 cups chocolate cookie crumbs
- 1/2 cup unsalted butter, melted
- 1 quart coffee ice cream, softened
- 1 quart chocolate ice cream, softened
- 1 cup heavy whipping cream
- 1/4 cup powdered sugar
- 1 teaspoon vanilla extract
- 1/2 cup chocolate syrup
- 1/2 cup brewed coffee, cooled
Instructions
- Preheat your oven to 350°F (175°C). In a medium bowl, combine chocolate cookie crumbs and melted butter. Mix until well combined. Press the mixture firmly into the bottom of a 9-inch springform pan to form the crust. Bake for 10 minutes, then let it cool completely.
- Once the crust is cool, spread the softened coffee ice cream evenly over the crust. Place the pan in the freezer for about 30 minutes to firm up.
- After the coffee ice cream has set, spread the softened chocolate ice cream over the coffee layer. Return the cake to the freezer for another 30 minutes.
- In a mixing bowl, whip the heavy cream, powdered sugar, and vanilla extract until stiff peaks form. Remove the cake from the freezer and spread the whipped cream over the chocolate ice cream layer.
- Drizzle chocolate syrup over the whipped cream and gently swirl it with a spatula for a marbled effect.
- Pour the cooled brewed coffee over the top of the cake, allowing it to soak in slightly. Cover the cake with plastic wrap and freeze for at least 4 hours, or until completely firm.
- To serve, remove the cake from the springform pan and slice with a warm knife for clean cuts.
Notes
- For a richer flavor, try adding a layer of crushed espresso beans between the ice cream layers.
- You can also substitute the coffee ice cream with vanilla ice cream for a milder taste.
- For a festive touch, top with chocolate shavings or cocoa powder before serving.
- Prep Time: 30 minutes
- Cook Time: 10 minutes
- Category: Dessert
- Method: Baking and Freezing
- Cuisine: American
Nutrition
- Serving Size: 1 slice
- Calories: 360
- Sugar: 30g
- Sodium: 150mg
- Fat: 24g
- Saturated Fat: 14g
- Unsaturated Fat: 10g
- Trans Fat: 0g
- Carbohydrates: 30g
- Fiber: 1g
- Protein: 5g
- Cholesterol: 70mg