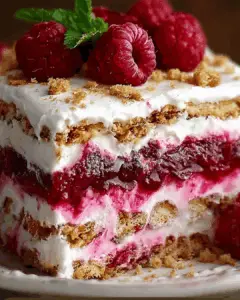
Introduction to No-Bake Raspberry Icebox Cake
Summer days call for something light, refreshing, and oh-so-delicious. That’s where my No-Bake Raspberry Icebox Cake comes in. It’s the perfect treat for those hot afternoons when you want to impress your friends without spending hours in the kitchen. This dessert is not only easy to whip up, but it also requires no baking—just a little patience while it chills. Whether you’re hosting a backyard barbecue or simply craving something sweet, this cake is a delightful solution that will have everyone asking for seconds.
Why You’ll Love This No-Bake Raspberry Icebox Cake
This No-Bake Raspberry Icebox Cake is a game-changer for dessert lovers. It’s incredibly easy to make, requiring minimal effort and no oven time. The layers of creamy whipped goodness and tart raspberries create a flavor explosion that’s simply irresistible. Plus, it’s a fantastic make-ahead option, allowing you to enjoy your time with family and friends instead of being stuck in the kitchen. Trust me, this cake will become your go-to summer treat!
Ingredients for No-Bake Raspberry Icebox Cake
Gathering the right ingredients is the first step to creating this delightful No-Bake Raspberry Icebox Cake. Here’s what you’ll need:
- Heavy whipping cream: This is the star of the show, providing that rich, creamy texture that makes the cake so indulgent.
- Powdered sugar: A touch of sweetness that blends seamlessly into the whipped cream, giving it a light and airy feel.
- Vanilla extract: Just a splash adds depth and warmth to the flavor profile, enhancing the overall taste.
- Fresh raspberries: These juicy gems bring a burst of tartness and color, making the cake visually appealing and delicious.
- Graham crackers: The base of our cake, these crunchy layers provide a delightful contrast to the creamy filling.
- Raspberry jam: This adds an extra layer of raspberry goodness, tying all the flavors together beautifully.
For those looking to mix things up, consider using chocolate graham crackers for a fun twist. You can also swap out the raspberries for strawberries or blueberries if you prefer a different flavor. All ingredient quantities are listed at the bottom of the article for easy reference and printing.
How to Make No-Bake Raspberry Icebox Cake
Creating this No-Bake Raspberry Icebox Cake is a breeze. Follow these simple steps, and you’ll have a stunning dessert ready to impress. Let’s dive in!
Step 1: Whip the Cream
Start by pouring the heavy whipping cream into a large mixing bowl. Using a hand mixer or stand mixer, whip the cream until soft peaks form. This is where the magic begins! Gradually add the powdered sugar and vanilla extract, continuing to whip until you achieve stiff peaks. The cream should be thick and fluffy, perfect for layering.
Step 2: Prepare the Baking Dish
Grab a 9×13-inch baking dish and spread a thin layer of raspberry jam on the bottom. This not only adds flavor but also helps the graham crackers stick. Make sure to cover the entire base for a delicious start!
Step 3: Layer the Graham Crackers
Now it’s time for the graham crackers. Place a single layer over the jam, breaking them as needed to fit. This crunchy layer will provide a delightful contrast to the creamy filling. Don’t worry about perfection; just get them in there!
Step 4: Add the Whipped Cream and Raspberries
Spread half of your whipped cream mixture over the graham crackers. Then, sprinkle half of the fresh raspberries on top. The tartness of the raspberries pairs beautifully with the sweet cream, creating a flavor explosion that’s hard to resist.
Step 5: Repeat the Layers
It’s time to repeat the layers! Add another layer of graham crackers, followed by the remaining whipped cream mixture. Top it off with the rest of the raspberries. This layering technique builds flavor and texture, making each bite a delight.
Step 6: Final Touches
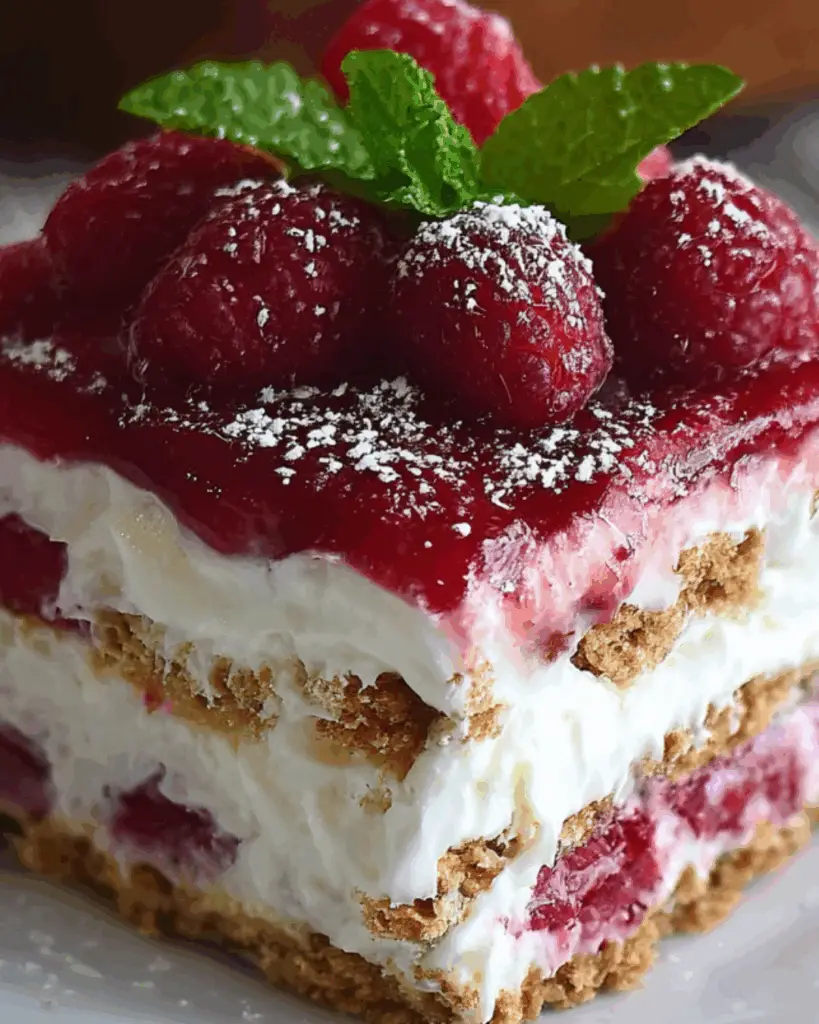
Finish with a final layer of graham crackers on top. Spread the remaining raspberry jam over this layer, ensuring every bite is packed with flavor. This final touch not only looks great but also adds a sweet finish.
Step 7: Chill and Serve
Cover the dish with plastic wrap and refrigerate for at least 4 hours, or overnight for the best results. This chilling time allows the flavors to meld beautifully. When you’re ready to serve, garnish with additional fresh raspberries for a pop of color and freshness. Enjoy your No-Bake Raspberry Icebox Cake!

Tips for Success
- Use cold heavy cream for better whipping results; it holds its shape beautifully.
- Don’t rush the chilling process; overnight is best for flavor development.
- Feel free to mix in some lemon zest for a zesty twist.
- For a firmer texture, add a bit of gelatin to the whipped cream.
- Always taste as you go; adjust sweetness to your liking!
Equipment Needed
- Large mixing bowl: A sturdy bowl for whipping cream; a stand mixer bowl works great too.
- Hand mixer or stand mixer: Essential for achieving those perfect whipped cream peaks.
- 9×13-inch baking dish: Any similar-sized dish will do if you don’t have this exact one.
- Plastic wrap: To cover the cake while it chills; aluminum foil is a good alternative.
Variations
- For a chocolate lover’s dream, swap regular graham crackers for chocolate graham crackers. The rich flavor pairs perfectly with the raspberries.
- Try using different berries! Strawberries or blueberries can be substituted for raspberries, offering a new twist on this classic dessert.
- For a tropical flair, add crushed pineapple to the whipped cream mixture. It adds a refreshing sweetness that’s perfect for summer.
- Make it gluten-free by using gluten-free graham crackers or a similar cookie alternative.
- For a vegan version, substitute heavy cream with coconut cream and use a plant-based sweetener.
Serving Suggestions
- Pair your No-Bake Raspberry Icebox Cake with a scoop of vanilla ice cream for an extra indulgent treat.
- Serve alongside a refreshing mint lemonade or iced tea to balance the sweetness.
- For a beautiful presentation, garnish each slice with a sprig of mint and a few extra raspberries.
FAQs about No-Bake Raspberry Icebox Cake
Can I make this No-Bake Raspberry Icebox Cake ahead of time?
Absolutely! In fact, making it a day in advance is ideal. The chilling time allows the flavors to meld beautifully, enhancing the overall taste. Just cover it well and store it in the fridge until you’re ready to serve.
What can I substitute for raspberries?
If raspberries aren’t your thing, don’t worry! You can easily swap them for strawberries or blueberries. Each berry brings its own unique flavor, making this cake versatile and fun to experiment with.
How long does the No-Bake Raspberry Icebox Cake last in the fridge?
This cake can last up to 3 days in the fridge, but it’s best enjoyed within the first couple of days for optimal freshness. Just make sure to keep it covered to prevent it from drying out.
Can I freeze the No-Bake Raspberry Icebox Cake?
Yes, you can freeze it! Just slice it into portions and wrap each piece tightly in plastic wrap. When you’re ready to enjoy, let it thaw in the fridge for a few hours before serving.
Is this dessert suitable for a gluten-free diet?
Definitely! You can use gluten-free graham crackers or any similar cookie alternative to make this No-Bake Raspberry Icebox Cake gluten-free. It’s a delicious option for everyone to enjoy!
Final Thoughts
Creating this No-Bake Raspberry Icebox Cake is more than just whipping up a dessert; it’s about sharing joy and deliciousness with those you love. Each layer tells a story, from the creamy whipped topping to the tart raspberries that burst with flavor. It’s a treat that invites laughter and conversation around the table, making every gathering a little sweeter. Plus, the ease of preparation means you can focus on what truly matters—enjoying time with family and friends. So, grab those ingredients and let this delightful cake bring a smile to your summer days!
PrintNo-Bake Raspberry Icebox Cake: A Delightful Treat!
- Total Time: 4 hours 20 minutes
- Yield: 8 servings
- Diet: Vegetarian
Description
A refreshing and easy-to-make No-Bake Raspberry Icebox Cake that is perfect for summer gatherings.
Ingredients
- 2 cups heavy whipping cream
- 1 cup powdered sugar
- 1 teaspoon vanilla extract
- 1 cup fresh raspberries (plus extra for garnish)
- 1 package (14.4 ounces) graham crackers
- 1 cup raspberry jam
Instructions
- In a large mixing bowl, whip the heavy cream until soft peaks form. Gradually add the powdered sugar and vanilla extract, continuing to whip until stiff peaks form.
- In a 9×13-inch baking dish, spread a thin layer of raspberry jam on the bottom.
- Place a single layer of graham crackers over the jam, breaking them as needed to fit.
- Spread half of the whipped cream mixture over the graham crackers, followed by half of the fresh raspberries.
- Repeat the layers: add another layer of graham crackers, the remaining whipped cream mixture, and the rest of the raspberries.
- Finish with a final layer of graham crackers on top. Spread the remaining raspberry jam over the top layer of graham crackers.
- Cover the dish with plastic wrap and refrigerate for at least 4 hours, or overnight for best results.
- Before serving, garnish with additional fresh raspberries.
Notes
- For a chocolate twist, use chocolate graham crackers instead of regular ones.
- You can substitute the raspberries with strawberries or blueberries for a different flavor profile.
- Prep Time: 20 minutes
- Cook Time: 0 minutes
- Category: Dessert
- Method: No-Bake
- Cuisine: American
Nutrition
- Serving Size: 1 slice
- Calories: 320
- Sugar: 20g
- Sodium: 50mg
- Fat: 22g
- Saturated Fat: 13g
- Unsaturated Fat: 9g
- Trans Fat: 0g
- Carbohydrates: 30g
- Fiber: 1g
- Protein: 3g
- Cholesterol: 80mg