Introduction to No Bake Turtle Dream Bars
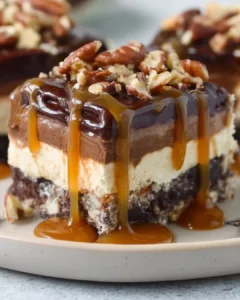
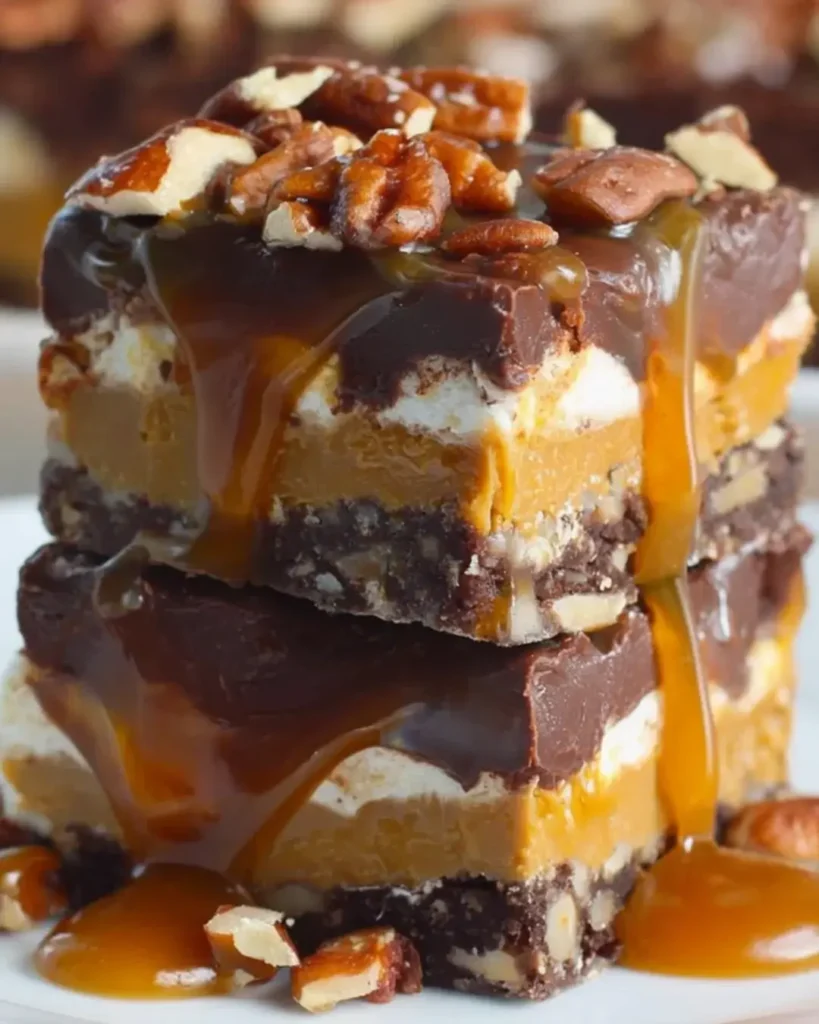
There’s something magical about desserts that come together without the fuss of baking. No Bake Turtle Dream Bars are a perfect example of this. They blend rich chocolate, gooey caramel, and crunchy pecans into a delightful treat that’s sure to impress. Whether you’re looking for a quick solution for a busy day or a sweet surprise for your loved ones, these bars deliver. They’re easy to whip up and even easier to devour. Trust me, once you try them, you’ll wonder how you ever lived without this indulgent dessert in your life!
Why You’ll Love This No Bake Turtle Dream Bars
These No Bake Turtle Dream Bars are a game changer for dessert lovers. They come together in just 20 minutes, making them perfect for those last-minute cravings. The combination of chocolate, caramel, and nuts creates a flavor explosion that’s hard to resist. Plus, there’s no oven required, so you can keep your kitchen cool while still impressing friends and family with a decadent treat. What’s not to love?
Ingredients for No Bake Turtle Dream Bars
Gathering the right ingredients is the first step to creating these delightful No Bake Turtle Dream Bars. Here’s what you’ll need:
- Graham cracker crumbs: These form the base of your crust, providing a sweet and crunchy texture.
- Unsweetened cocoa powder: This adds a rich chocolate flavor to the crust, enhancing the overall taste.
- Powdered sugar: A touch of sweetness that helps bind the crust together while keeping it light.
- Unsalted butter: Melted butter brings everything together, giving the crust a deliciously buttery flavor.
- Semi-sweet chocolate chips: The star of the show! These melt beautifully to create a luscious layer of chocolate.
- Caramel sauce: Drizzled on top, it adds that gooey, sweet element that pairs perfectly with chocolate.
- Chopped pecans: These nuts provide a delightful crunch and a nutty flavor that complements the other ingredients.
- Vanilla extract: A splash of vanilla enhances the overall flavor, making it even more irresistible.
- Salt: Just a pinch helps balance the sweetness and brings out the flavors.
- Whipped topping: This light and airy layer adds a creamy finish to the bars.
For those looking to mix things up, consider substituting the pecans with walnuts or almonds for a different nutty taste. You can also add a pinch of espresso powder to the chocolate for a richer flavor. Exact measurements for these ingredients can be found at the bottom of the article, ready for printing!
How to Make No Bake Turtle Dream Bars
Creating these No Bake Turtle Dream Bars is a breeze! Follow these simple steps, and you’ll have a delicious dessert ready to impress. Let’s dive in!
Step 1: Prepare the Crust
Start by grabbing a medium bowl. Combine graham cracker crumbs, unsweetened cocoa powder, powdered sugar, and a pinch of salt. Mix them well until they’re evenly blended. Then, pour in the melted unsalted butter. Stir until the mixture resembles wet sand. This crust is the foundation of your bars, so make sure it’s well combined!
Step 2: Press the Crust
Now, it’s time to form the crust. Take your mixture and press it evenly into the bottom of a 9×9-inch baking dish. Use the back of a measuring cup or your fingers to ensure it’s compact and smooth. This step is crucial for a sturdy base that holds all the delicious layers together.
Step 3: Melt the Chocolate
Next, let’s melt those chocolate chips! Place them in a microwave-safe bowl. Heat them in 30-second intervals, stirring in between until they’re completely smooth. Be careful not to overheat; you want a silky chocolate layer that will melt in your mouth.
Step 4: Assemble the Layers
Once your chocolate is melted, pour it over the crust. Spread it evenly with a spatula. Now, drizzle the caramel sauce over the chocolate layer. Don’t be shy—let it flow! Finally, sprinkle the chopped pecans on top. This adds a delightful crunch and nutty flavor that pairs perfectly with the chocolate and caramel.
Step 5: Swirl and Top
Here comes the fun part! Take a knife or toothpick and gently swirl the caramel into the chocolate. This creates a beautiful marbled effect. After that, spread the whipped topping evenly over the entire surface. This light layer adds a creamy finish that balances the richness of the chocolate and caramel.
Step 6: Chill and Serve
Cover your dish with plastic wrap and pop it in the refrigerator. Let it chill for at least 2 hours to set. Once it’s firm, take it out and cut it into squares. Serve these chilled bars to your friends and family, and watch their faces light up with delight!

Tips for Success
- Use fresh ingredients for the best flavor, especially the chocolate and caramel.
- Don’t skip the chilling time; it’s essential for the bars to set properly.
- For easier cutting, run a knife under hot water before slicing.
- Experiment with different nuts or add a sprinkle of sea salt on top for extra flavor.
- Store leftovers in an airtight container in the fridge for up to a week.
Equipment Needed
- 9×9-inch baking dish: A square dish is ideal, but any similar-sized dish will work.
- Medium mixing bowl: Use any bowl you have on hand for mixing ingredients.
- Spatula: A rubber spatula is great for spreading, but a spoon will do.
- Microwave-safe bowl: Any bowl that can handle heat will work for melting chocolate.
- Plastic wrap: Use foil if you don’t have plastic wrap for covering the dish.
Variations
- For a gluten-free option, substitute graham cracker crumbs with gluten-free cookie crumbs.
- Add a layer of peanut butter for a delicious twist on the classic flavor combination.
- Try using dark chocolate chips instead of semi-sweet for a richer taste.
- Incorporate shredded coconut for an added texture and tropical flair.
- For a healthier version, use Greek yogurt instead of whipped topping for a creamy layer.
Serving Suggestions
- Pair these No Bake Turtle Dream Bars with a scoop of vanilla ice cream for a delightful contrast.
- Serve with a drizzle of extra caramel sauce on top for an indulgent touch.
- Complement with a strong cup of coffee or a rich hot chocolate.
- Garnish with a sprinkle of sea salt for a sophisticated finish.
FAQs about No Bake Turtle Dream Bars
Can I make No Bake Turtle Dream Bars ahead of time?
Absolutely! These bars are perfect for making ahead. Just prepare them, chill, and store them in the fridge. They’ll stay fresh for up to a week, making them a great option for parties or gatherings.
What can I substitute for pecans in this recipe?
If you’re not a fan of pecans, feel free to swap them out for walnuts or almonds. Both options will add a delightful crunch and nutty flavor to your No Bake Turtle Dream Bars.
How do I store leftovers?
Store any leftover bars in an airtight container in the refrigerator. They’ll keep well for about a week, but trust me, they won’t last that long!
Can I freeze No Bake Turtle Dream Bars?
Yes, you can freeze these bars! Just cut them into squares, wrap them tightly in plastic wrap, and place them in a freezer-safe container. They’ll be good for up to three months. Just thaw them in the fridge before serving.
What’s the best way to cut these bars?
For clean cuts, run a knife under hot water before slicing. This will help the knife glide through the layers without making a mess. Enjoy your perfectly cut No Bake Turtle Dream Bars!
Final Thoughts
No Bake Turtle Dream Bars are more than just a dessert; they’re a celebration of flavors and memories. Each bite is a delightful mix of chocolate, caramel, and nuts that brings a smile to your face. Whether you’re sharing them at a gathering or enjoying a quiet moment with a cup of coffee, these bars create a sense of joy and indulgence. They remind us that sometimes, the simplest recipes can bring the most happiness. So, roll up your sleeves, gather your ingredients, and treat yourself to this easy, no-bake delight. You deserve it!
PrintNo Bake Turtle Dream Bars: Indulge in This Easy Dessert!
- Total Time: 2 hours 20 minutes
- Yield: 12 servings
- Diet: Vegetarian
Description
No Bake Turtle Dream Bars are a delicious and easy dessert that combines chocolate, caramel, and nuts for a delightful treat.
Ingredients
- 1 cup graham cracker crumbs
- 1/2 cup unsweetened cocoa powder
- 1/2 cup powdered sugar
- 1/2 cup unsalted butter, melted
- 1 cup semi-sweet chocolate chips
- 1/2 cup caramel sauce
- 1/2 cup chopped pecans
- 1/2 teaspoon vanilla extract
- 1/4 teaspoon salt
- 1 cup whipped topping
Instructions
- In a medium bowl, combine graham cracker crumbs, cocoa powder, powdered sugar, and salt. Stir in the melted butter until the mixture is well combined and resembles wet sand.
- Press the mixture evenly into the bottom of a 9×9-inch baking dish to form the crust.
- In a microwave-safe bowl, melt the chocolate chips in 30-second intervals, stirring in between until smooth.
- Once melted, pour the chocolate over the crust and spread it evenly.
- Drizzle the caramel sauce over the melted chocolate, then sprinkle the chopped pecans on top.
- Gently swirl the caramel into the chocolate using a knife or toothpick for a marbled effect.
- Spread the whipped topping evenly over the top of the bars.
- Cover the dish with plastic wrap and refrigerate for at least 2 hours to set.
- Once set, cut into squares and serve chilled.
Notes
- For a richer flavor, try adding a pinch of espresso powder to the chocolate mixture.
- You can also substitute the pecans with walnuts or almonds for a different nutty taste.
- Prep Time: 20 minutes
- Cook Time: 0 minutes
- Category: Dessert
- Method: No Bake
- Cuisine: American
Nutrition
- Serving Size: 1 bar
- Calories: 210
- Sugar: 10g
- Sodium: 100mg
- Fat: 14g
- Saturated Fat: 7g
- Unsaturated Fat: 5g
- Trans Fat: 0g
- Carbohydrates: 18g
- Fiber: 1g
- Protein: 2g
- Cholesterol: 15mg