Introduction to Salted Chocolate Caramel Ice Cream Cake
There’s something magical about a dessert that combines the richness of chocolate, the creaminess of ice cream, and the sweet allure of caramel. The Salted Chocolate Caramel Ice Cream Cake is just that—a delightful treat that’s perfect for any occasion.
Whether you’re celebrating a birthday, hosting a summer barbecue, or simply craving something sweet after a long day, this cake is your go-to solution. It’s easy to whip up, and the layers of flavor will impress your family and friends. Trust me, once you serve this, you’ll be the star of the dessert table!
Why You’ll Love This Salted Chocolate Caramel Ice Cream Cake
This Salted Chocolate Caramel Ice Cream Cake is a dream come true for busy home cooks.
It’s quick to prepare, requiring just a few simple steps and minimal baking.
The combination of chocolate and vanilla ice cream, drizzled with caramel, creates a flavor explosion that’s hard to resist.
Plus, it’s a crowd-pleaser, making it the perfect dessert for gatherings or a sweet treat to enjoy at home.
Ingredients for Salted Chocolate Caramel Ice Cream Cake
Creating this Salted Chocolate Caramel Ice Cream Cake is a breeze with just a handful of ingredients. Here’s what you’ll need:
- Chocolate cookie crumbs: These form the base of your cake, providing a rich, chocolatey flavor.
- Unsalted butter: Melted butter helps bind the cookie crumbs together for a sturdy crust.
- Chocolate ice cream: Softened chocolate ice cream adds a luscious layer that’s pure indulgence.
- Vanilla ice cream: This creamy layer balances the richness of the chocolate, creating a delightful contrast.
- Caramel sauce: A sweet drizzle that ties all the flavors together, adding a gooey texture.
- Sea salt: Just a pinch enhances the sweetness and brings out the chocolate flavor.
- Whipped cream: A light, fluffy topping that adds a touch of elegance to your cake.
- Chocolate shavings or sprinkles: Optional, but they make for a beautiful garnish that’s sure to impress.
For those looking to switch things up, consider using dark chocolate ice cream for a richer taste.
If you want to elevate the dessert even further, a layer of chocolate ganache can replace the whipped cream for a decadent finish.
You can find the exact quantities for each ingredient at the bottom of the article, ready for printing!
How to Make Salted Chocolate Caramel Ice Cream Cake
Creating this Salted Chocolate Caramel Ice Cream Cake is a fun and rewarding experience.
Follow these simple steps, and you’ll have a stunning dessert that’s sure to impress.
Step 1: Prepare the Crust
Start by preheating your oven to 350°F (175°C).
In a medium bowl, mix the chocolate cookie crumbs with melted butter until well combined.
This mixture should feel like damp sand.
Press it firmly into the bottom of a 9-inch springform pan to form a solid crust.
Bake for 10 minutes, then let it cool completely.
This crust is the foundation of your cake, so make sure it’s nice and firm!
Step 2: Add the Chocolate Ice Cream
Once the crust is cool, it’s time for the first layer.
Spread the softened chocolate ice cream evenly over the crust.
Use a spatula to smooth it out, making sure it reaches the edges.
After that, pop the pan into the freezer for about 30 minutes.
This helps the chocolate layer set, making it easier to add the next layer.
Step 3: Layer with Caramel and Vanilla Ice Cream
After the chocolate ice cream has firmed up, it’s time to drizzle!
Pour half of the caramel sauce over the chocolate layer, letting it cascade down the sides.
Sprinkle a pinch of sea salt on top to enhance the flavors.
Now, spread the softened vanilla ice cream over the caramel layer.
Return the cake to the freezer for another 30 minutes.
This layering creates a beautiful contrast of flavors and colors.
Step 4: Top with Caramel and Whipped Cream
Once the vanilla ice cream is firm, it’s time for the finishing touches.
Drizzle the remaining caramel sauce over the top, letting it pool in the crevices.
Then, spread a generous layer of whipped cream on top, smoothing it out evenly.
This fluffy layer adds a lightness that balances the richness of the cake.
For an extra touch, feel free to sprinkle chocolate shavings or colorful sprinkles on top.
Step 5: Freeze and Serve
Cover the cake with plastic wrap and freeze for at least 4 hours, or until completely firm.
When you’re ready to serve, carefully remove the sides of the springform pan.
Slice the cake with a warm knife for clean cuts.
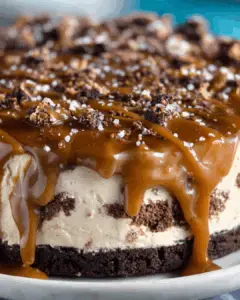
Each slice reveals those beautiful layers of chocolate and vanilla ice cream, drizzled with caramel.
Trust me, your guests will be in awe of this stunning dessert!

Tips for Success
- Let the ice cream soften for easier spreading, but don’t let it melt.
- Use a warm knife to slice the cake for clean, beautiful pieces.
- For a firmer crust, press the cookie crumbs down really well.
- Experiment with different ice cream flavors for a unique twist.
- Keep the cake covered in the freezer to prevent freezer burn.
Equipment Needed
- 9-inch springform pan: Essential for easy removal; a regular cake pan works too, but slicing may be trickier.
- Mixing bowl: Any medium bowl will do for combining ingredients.
- Spatula: Perfect for spreading ice cream; a butter knife can work in a pinch.
- Plastic wrap: To cover the cake while freezing; aluminum foil is a good alternative.
Variations
- Dark Chocolate Delight: Swap regular chocolate ice cream for dark chocolate for a richer, more intense flavor.
- Nutty Twist: Add crushed nuts like pecans or almonds between the ice cream layers for a delightful crunch.
- Fruit Fusion: Layer in fresh berries or banana slices for a fruity contrast to the chocolate and caramel.
- Vegan Option: Use dairy-free ice cream and coconut whipped cream for a delicious vegan version.
- Gluten-Free Crust: Substitute chocolate cookie crumbs with gluten-free cookies to make this dessert gluten-free.
Serving Suggestions
- Pair with a scoop of vanilla ice cream for an extra creamy experience.
- Serve alongside fresh berries for a pop of color and tartness.
- Drizzle additional caramel sauce on individual slices for a decadent touch.
- Complement with a strong coffee or espresso to balance the sweetness.
- Garnish with mint leaves for a refreshing finish.
FAQs about Salted Chocolate Caramel Ice Cream Cake
Can I make this Salted Chocolate Caramel Ice Cream Cake ahead of time?
Absolutely! This cake can be made a day or two in advance. Just keep it covered in the freezer until you’re ready to serve. It actually tastes even better after a day of chilling!
What if I don’t have a springform pan?
No worries! You can use a regular cake pan, but be prepared for a bit of a challenge when it comes to slicing. Just make sure to line the pan with parchment paper for easier removal.
Can I use different flavors of ice cream?
Definitely! Feel free to mix and match your favorite ice cream flavors. Strawberry or mint chocolate chip could add a fun twist to this Salted Chocolate Caramel Ice Cream Cake.
How do I store leftovers?
Store any leftover cake in the freezer, covered tightly with plastic wrap. It should stay fresh for up to a week, but trust me, it won’t last that long!
Is this cake suitable for special diets?
Yes! You can easily adapt this recipe for various dietary needs. Use dairy-free ice cream for a vegan option or gluten-free cookies for a gluten-free version. Enjoy!
Final Thoughts
Creating a Salted Chocolate Caramel Ice Cream Cake is more than just baking; it’s about crafting memories.
Each layer tells a story, from the rich chocolate crust to the creamy ice cream and the sweet caramel drizzle.
This dessert is perfect for gatherings, celebrations, or simply treating yourself after a long day.
The joy of sharing a slice with loved ones, watching their faces light up with delight, is truly priceless.
So, roll up your sleeves, gather your ingredients, and dive into this delicious adventure.
You’ll find that every bite is a celebration of flavor and happiness!
PrintSalted Chocolate Caramel Ice Cream Cake Recipe Awaits You!
- Total Time: 4 hours 40 minutes
- Yield: 10 servings
- Diet: Vegetarian
Description
A delicious layered cake featuring chocolate and vanilla ice cream, drizzled with caramel and topped with whipped cream.
Ingredients
- 2 cups chocolate cookie crumbs
- 1/2 cup unsalted butter, melted
- 1 quart chocolate ice cream, softened
- 1 quart vanilla ice cream, softened
- 1 cup caramel sauce, divided
- 1/2 teaspoon sea salt
- 1 cup whipped cream
- Chocolate shavings or sprinkles for garnish (optional)
Instructions
- Preheat your oven to 350°F (175°C). In a medium bowl, combine the chocolate cookie crumbs and melted butter until well mixed. Press the mixture firmly into the bottom of a 9-inch springform pan to form the crust. Bake for 10 minutes, then remove from the oven and let cool completely.
- Once the crust is cool, spread the softened chocolate ice cream evenly over the crust. Place the pan in the freezer for about 30 minutes to firm up.
- After the chocolate ice cream has set, drizzle half of the caramel sauce over the chocolate layer. Sprinkle with sea salt, then spread the softened vanilla ice cream over the caramel layer. Return the cake to the freezer for another 30 minutes.
- Once the vanilla ice cream is firm, spread the remaining caramel sauce over the top. Finish with a layer of whipped cream, smoothing it out evenly.
- For an extra touch, garnish with chocolate shavings or sprinkles if desired. Cover the cake with plastic wrap and freeze for at least 4 hours, or until completely firm.
- To serve, remove the sides of the springform pan and slice the cake with a warm knife for clean cuts.
Notes
- For a richer flavor, try using dark chocolate ice cream instead of regular chocolate.
- You can also substitute the whipped cream with a layer of chocolate ganache for a decadent finish.
- Prep Time: 30 minutes
- Cook Time: 10 minutes
- Category: Dessert
- Method: Freezing
- Cuisine: American
Nutrition
- Serving Size: 1 slice
- Calories: 350
- Sugar: 25g
- Sodium: 150mg
- Fat: 20g
- Saturated Fat: 10g
- Unsaturated Fat: 5g
- Trans Fat: 0g
- Carbohydrates: 38g
- Fiber: 1g
- Protein: 5g
- Cholesterol: 30mg