A Dessert That Brings Back Memories
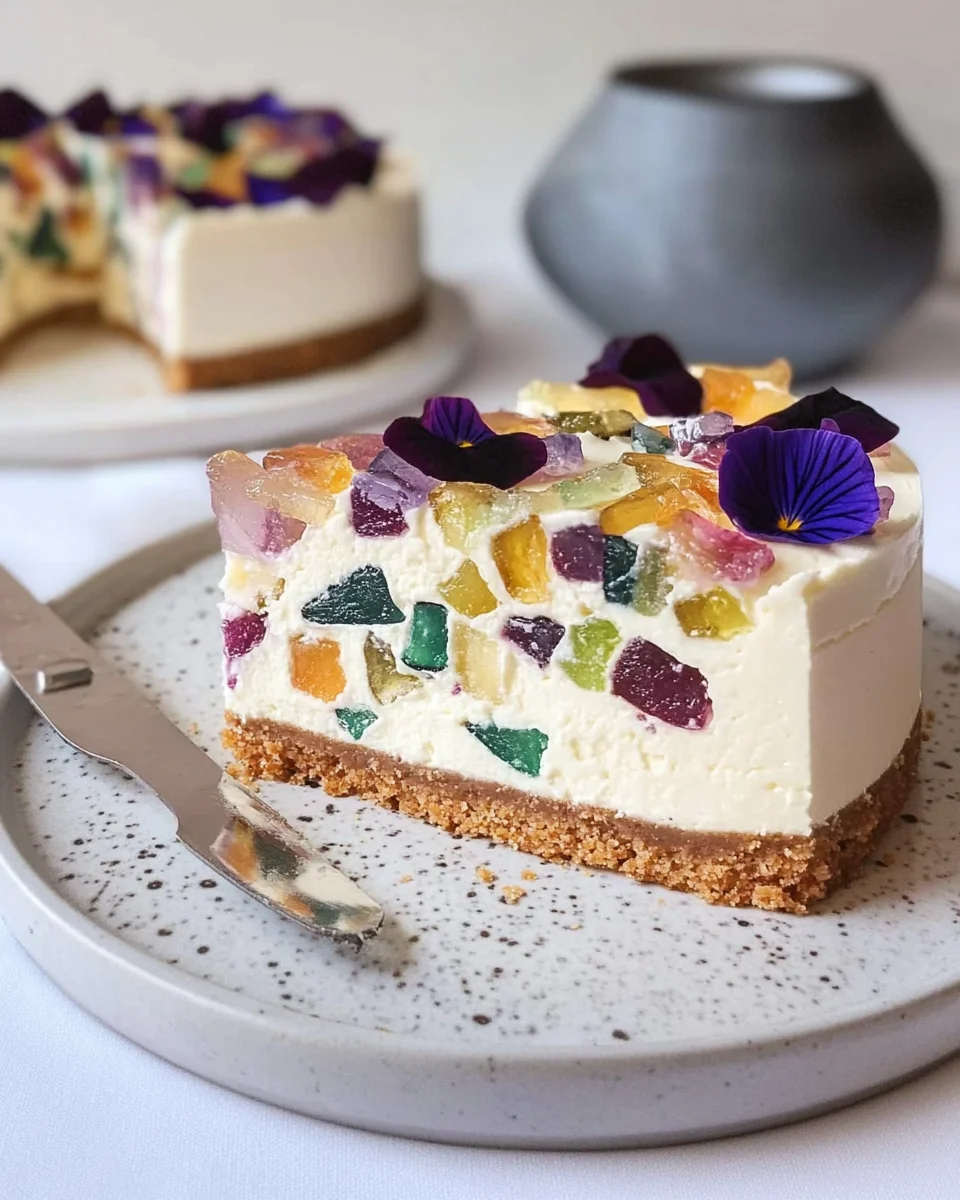
The first time I saw a terrazzo floor, I was mesmerized. The way colorful fragments of marble, quartz, and glass were scattered within the concrete felt like a piece of art frozen in time. Years later, when I stumbled upon a recipe for Terrazzo Cheesecake, it instantly transported me back to that moment—except this time, the colorful fragments were edible.
This cheesecake isn’t just a dessert; it’s an experience. It’s the kind of treat that turns heads at a party, makes children’s eyes light up, and leaves adults wondering how something so beautiful can also taste so divine. With its velvety cream cheese filling, bursts of fruity jello, and a buttery biscuit base, it offers both visual appeal and a luxurious taste.
In this article, we’ll explore what makes Terrazzo Cheesecake so special, expert tips to perfect it, common mistakes to avoid, and answers to frequently asked questions. Whether you’re a seasoned baker or trying it for the first time, this guide will help you master the art of making this stunning dessert.
The Story Behind Terrazzo Cheesecake
Inspired by the classic Italian terrazzo flooring, this cheesecake is a modern dessert that combines nostalgia with creativity. Unlike traditional cheesecakes, which often rely on a smooth, uniform filling, this version embraces the beauty of randomness. The colorful jello pieces embedded within the creamy base create a marbled, mosaic-like effect that makes every slice unique.
Although the exact origin of Terrazzo Cheesecake is unclear, it has gained popularity in recent years as a social media sensation. Its playful, artistic appearance makes it a favorite among home bakers looking to create something visually striking without requiring advanced decorating skills.
Why This Cheesecake Stands Out
1. A Feast for the Eyes
Many desserts taste great, but few are as visually stunning as Terrazzo Cheesecake. The translucent jello pieces catch the light, creating a dazzling effect that feels almost too beautiful to eat—almost.
2. A Perfect Balance of Textures
The creamy cheesecake base contrasts beautifully with the chewy, fruity jello and the slightly crunchy biscuit crust. Every bite delivers a mix of smoothness, softness, and a gentle bite.
3. Customizable Flavors
One of the best things about this cheesecake is how customizable it is. You can experiment with different jello flavors, adjust the tartness with citrus, or even swap out the digestive biscuit base for graham crackers, Oreos, or shortbread.
4. No-Bake Simplicity
Unlike traditional baked cheesecakes, which require precise oven temperatures and a water bath, this version is entirely no-bake. That means no risk of cracks, no need for long baking times, and a much simpler preparation process.
Expert Tips for the Perfect Terrazzo Cheesecake
1. Plan Ahead for the Jello
The jello needs time to set before being added to the cheesecake mixture. Make it the night before so that it’s fully firm by the time you’re ready to assemble the cake.
2. Keep the Jello Pieces Varied
When chopping the jello, cut it into different sizes—some larger and some smaller. This variation creates a more natural, artistic look in the final cheesecake.
3. Use High-Quality Cream Cheese
Since the filling is a major component of this dessert, it’s worth investing in high-quality cream cheese. Avoid low-fat versions, as they can make the texture too runny.
4. Gelatin is Key
Gelatin helps the cheesecake set properly. When adding it to the warm pineapple juice, make sure it dissolves completely before mixing it into the cream cheese base.
5. Give It Enough Chilling Time
Four hours is the minimum chilling time, but overnight is even better. This allows all the flavors to meld together while ensuring a firm, sliceable texture.
Common Mistakes to Avoid
1. Cutting the Jello Too Small
If you dice the jello into tiny pieces, it can get lost in the creamy filling. Keep some chunks larger to maintain the terrazzo effect.
2. Rushing the Setting Process
Putting the cheesecake in the freezer to speed up setting can lead to an uneven texture. Stick to the fridge for the best results.
3. Overmixing the Cream Cheese Base
Too much mixing can introduce air bubbles, leading to a less smooth texture. Mix until just combined.
4. Using Warm Jello in the Mixture
If the jello isn’t fully set before being folded into the cheesecake, it can bleed into the filling, ruining the distinct terrazzo pattern.
Ingredients – A Symphony of Flavors
- ½ pack kiwi jello
- ½ pack lemon jello
- ½ pack blueberry jello
- ½ pack raspberry jello
- 200 g digestive biscuits
- 75 g butter
- 1 tbsp brown sugar
- 6 gelatin sheets
- 100 g sugar
- 1 dl pineapple juice
- 300 g sour cream (35% fat)
- 200 g cream cheese
- 3 dl heavy cream
- 1 lemon (juice)
Directions – Crafting Your Masterpiece
- Prepare the Jello Gems
- Follow the package instructions to make the jello.
- Let it set in separate containers (preferably overnight).
- Build the Buttery Biscuit Base
- Line a 22 cm springform pan with baking paper.
- Crush biscuits into fine crumbs.
- Melt butter, mix it with brown sugar and biscuit crumbs.
- Press the mixture firmly into the pan and refrigerate.
- Create the Creamy Filling
- Soak gelatin sheets in cold water.
- Heat pineapple juice and sugar in a saucepan until it boils.
- Remove from heat, add gelatin, and stir until dissolved. Let it cool slightly.
- Whisk together sour cream, heavy cream, and cream cheese until fluffy.
- Gradually mix in the pineapple juice mixture.
- Add lemon juice to taste.
- Assemble the Terrazzo Effect
- Cut the set jello into varied-sized pieces.
- Gently fold them into the creamy filling.
- Pour the mixture over the biscuit base.
- Let It Set
- Refrigerate for at least four hours before serving.
Nutritional Highlights – A Balanced Indulgence
While exact values depend on portion sizes, this cheesecake offers:
- Rich dairy goodness from cream cheese, sour cream, and heavy cream.
- Sweet yet refreshing fruit flavors from jello and pineapple juice.
- A satisfying crunch from the biscuit base.
Perfect for a colorful dessert that’s as delightful to look at as it is to eat.
FAQs About Terrazzo Cheesecake
1. Can I Use Different Jello Flavors?
Absolutely! While kiwi, lemon, blueberry, and raspberry are commonly used, feel free to experiment with flavors like strawberry, grape, or even tropical blends.
2. Can I Make This Cheesecake Ahead of Time?
Yes! It actually tastes better when made a day in advance, as the flavors have more time to meld.
3. How Long Does It Last in the Fridge?
Terrazzo Cheesecake stays fresh for up to four days if stored in an airtight container in the refrigerator.
4. Can I Freeze It?
While possible, freezing can alter the texture of the jello pieces, making them slightly rubbery. It’s best enjoyed fresh from the fridge.
5. What If My Cheesecake Doesn’t Set?
This usually happens if the gelatin wasn’t dissolved properly or if the cream cheese mixture was too warm. Ensure proper chilling time and use full-fat ingredients for the best set.
Final Thoughts: A Dessert That Sparks Joy
Terrazzo Cheesecake is more than just a dessert—it’s a celebration of color, texture, and flavor. Whether you’re making it for a special occasion or just to brighten up an ordinary day, this cheesecake is guaranteed to bring a little extra joy to the table.
The beauty of this recipe lies in its simplicity. Despite its stunning appearance, it doesn’t require elaborate decorating skills, making it accessible to both beginners and experienced bakers alike.
So, the next time you’re looking for a show-stopping treat, why not try Terrazzo Cheesecake? With its playful colors, rich flavor, and creamy texture, it’s a dessert that truly stands out in every way.

Terrazzo Cheesecake: A Work of Edible Art
- Total Time: 4 hours 30 minutes
- Yield: 10-12 servings
Description
Indulge in a stunning and refreshing Terrazzo Delight Cheesecake, a no-bake masterpiece featuring a buttery biscuit base, a velvety creamy filling, and vibrant jello gems. This eye-catching dessert is not only a feast for the eyes but also a delightful fusion of fruity and creamy textures. Perfect for special occasions or when you want to impress with a colorful, elegant treat!
Ingredients
For the Jello Gems:
- ½ pack kiwi jello
- ½ pack lemon jello
- ½ pack blueberry jello
- ½ pack raspberry jello
For the Biscuit Base:
- 200 g digestive biscuits
- 75 g butter
- 1 tbsp brown sugar
For the Creamy Filling:
- 6 gelatin sheets
- 100 g sugar
- 1 dl pineapple juice
- 300 g sour cream (35% fat)
- 200 g cream cheese
- 3 dl heavy cream
- 1 lemon (juice)
Instructions
Step 1: Prepare the Jello Gems
- Follow the package instructions to make the jello.
- Let it set in separate containers (preferably overnight).
Step 2: Build the Buttery Biscuit Base
- Line a 22 cm springform pan with baking paper.
- Crush digestive biscuits into fine crumbs.
- Melt butter and mix it with brown sugar and biscuit crumbs.
- Press the mixture firmly into the pan and refrigerate.
Step 3: Create the Creamy Filling
- Soak gelatin sheets in cold water.
- Heat pineapple juice and sugar in a saucepan until it boils.
- Remove from heat, add gelatin, and stir until dissolved. Let it cool slightly.
- Whisk together sour cream, heavy cream, and cream cheese until fluffy.
- Gradually mix in the pineapple juice mixture.
- Add lemon juice to taste.
Step 4: Assemble the Terrazzo Effect
- Cut the set jello into varied-sized pieces.
- Gently fold them into the creamy filling.
- Pour the mixture over the biscuit base.
Step 5: Let It Set
- Refrigerate for at least four hours before serving.
Notes
- For the best presentation, use different-sized jello pieces to achieve the terrazzo effect.
- Prefer a crunchier base? Add crushed nuts to the biscuit mixture.
- Make it even more vibrant by using more jello colors or flavors.
- Store leftovers in the fridge for up to 3 days in an airtight container.
- Prep Time: 30 minutes
- Cook Time: 4 hours
- Category: Dessert
- Method: No-Bake
- Cuisine: European