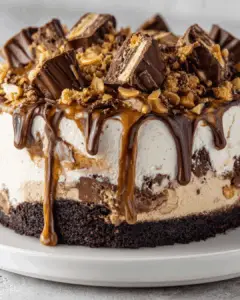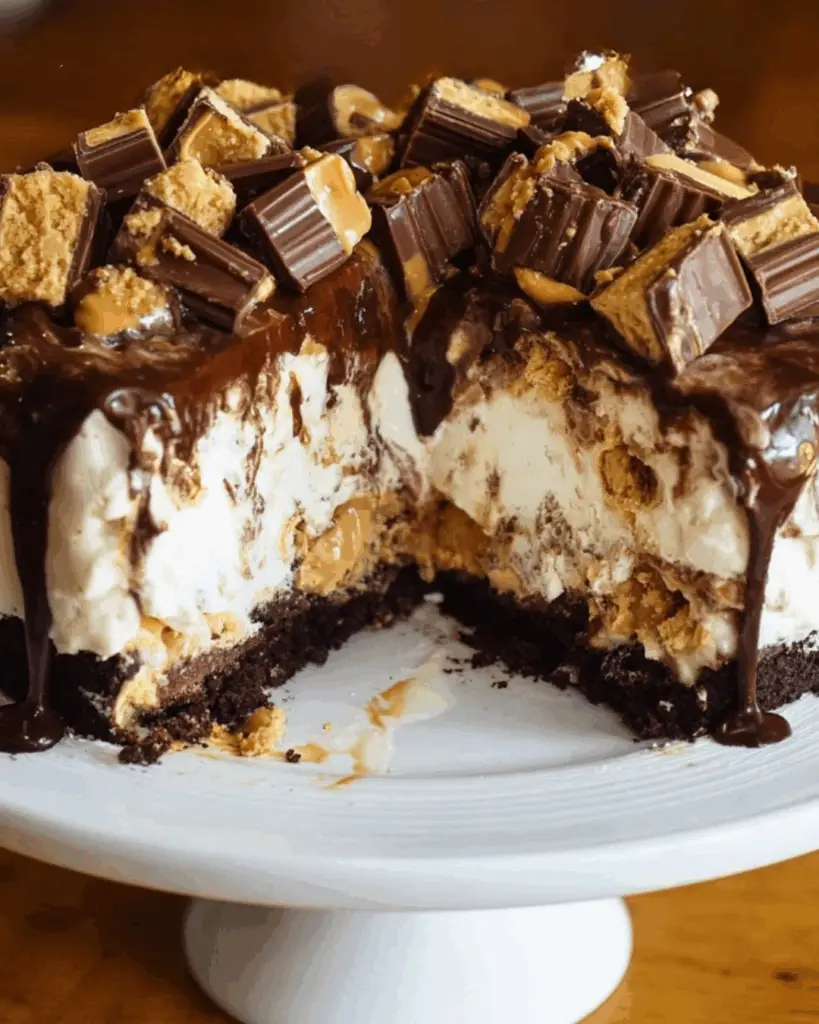
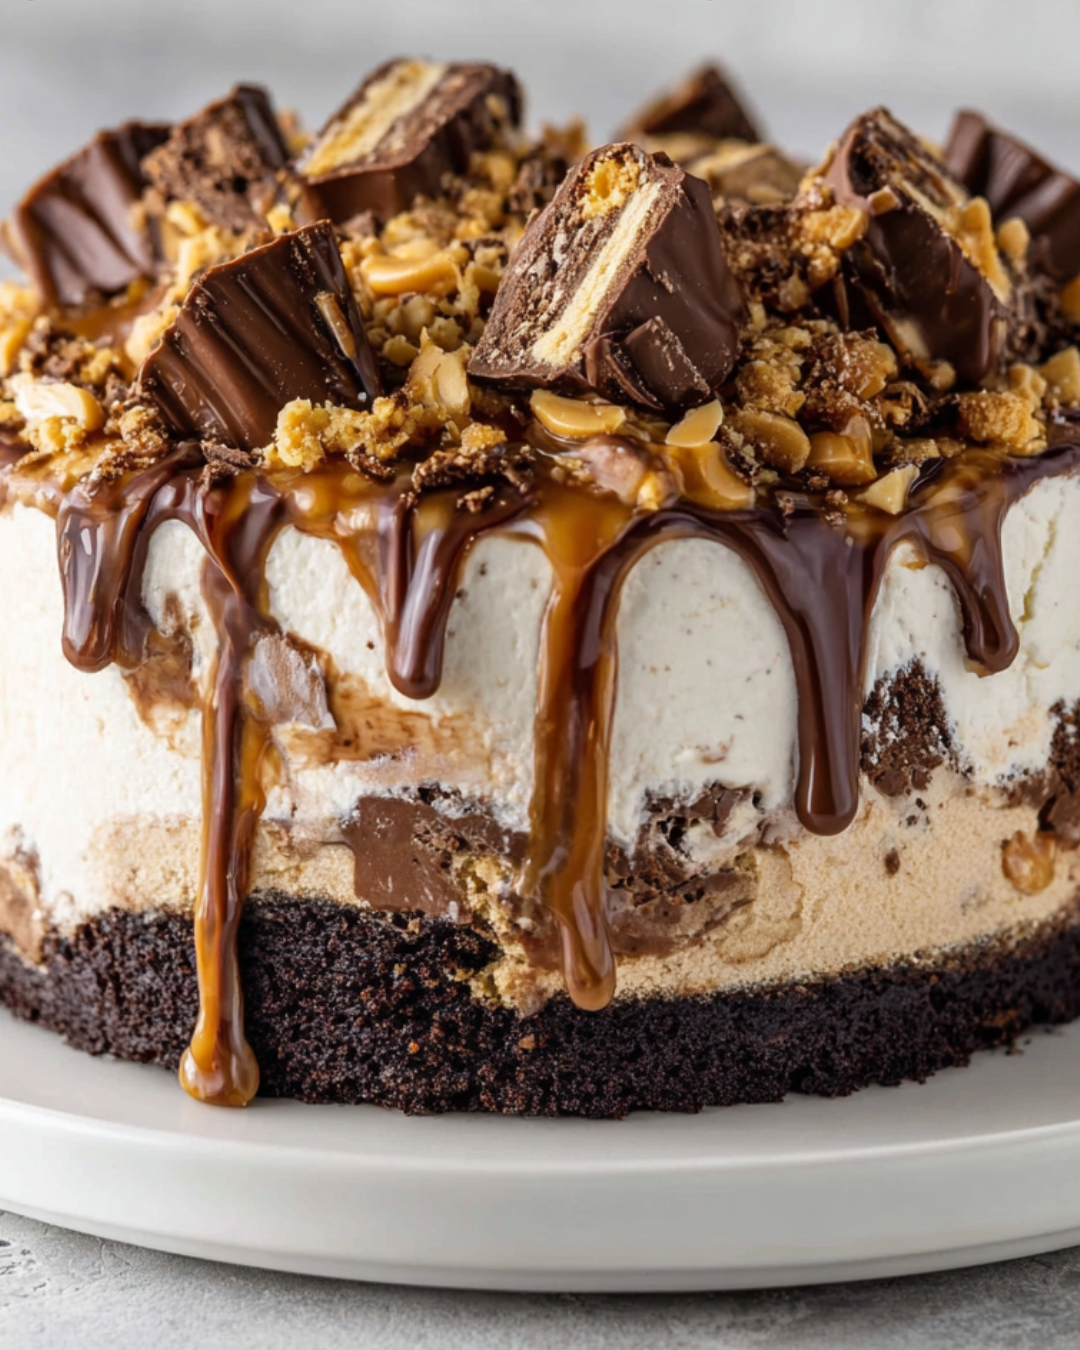
Introduction to Trifle Fudge Peanut Butter Cup Ice Cream Cake
There’s something magical about desserts that bring back childhood memories, isn’t there? The Trifle Fudge Peanut Butter Cup Ice Cream Cake is one of those delightful treats that can transport you back to simpler times. It’s a quick solution for a busy day or a showstopper for gatherings with friends and family. With layers of creamy peanut butter ice cream, a crunchy chocolate cookie crust, and a drizzle of fudge, this dessert is sure to impress. Trust me, once you serve this, you’ll be the hero of the kitchen!
Why You’ll Love This Trifle Fudge Peanut Butter Cup Ice Cream Cake
This Trifle Fudge Peanut Butter Cup Ice Cream Cake is a dream come true for anyone who loves dessert but craves simplicity. It’s no-bake, which means less time in the kitchen and more time enjoying life. The combination of rich flavors and textures will have your taste buds dancing. Plus, it’s perfect for any occasion, whether it’s a family gathering or a cozy night in. You’ll find yourself making this again and again!
Ingredients for Trifle Fudge Peanut Butter Cup Ice Cream Cake
Gathering the right ingredients is the first step to creating this delicious Trifle Fudge Peanut Butter Cup Ice Cream Cake. Here’s what you’ll need:
- Chocolate cookie crumbs: These form the base of your cake, providing a crunchy texture that contrasts beautifully with the creamy layers.
- Unsalted butter: Melted butter binds the cookie crumbs together, ensuring a firm crust that holds up under the weight of the ice cream.
- Vanilla ice cream: Softened vanilla ice cream serves as the creamy canvas for the peanut butter layer, adding sweetness and richness.
- Creamy peanut butter: This ingredient brings that irresistible nutty flavor, making every bite a delight.
- Powdered sugar: A touch of sweetness that helps stabilize the whipped cream, ensuring it holds its shape.
- Heavy whipping cream: Whipped to perfection, this adds a light and airy layer that balances the denser ice cream.
- Vanilla extract: A splash of vanilla enhances the overall flavor, making it even more indulgent.
- Mini peanut butter cups: Chopped and folded into the whipped cream, these little gems add bursts of flavor and texture.
- Fudge sauce: Warmed and drizzled on top, it’s the finishing touch that ties all the flavors together.
For those looking to mix things up, consider using chocolate ice cream instead of vanilla for an extra chocolatey twist. You can also add layers of crushed Oreos or other toppings like whipped cream or chocolate shavings for added texture and flavor. Exact quantities for each ingredient can be found at the bottom of the article, ready for printing!
How to Make Trifle Fudge Peanut Butter Cup Ice Cream Cake
Step 1: Prepare the Cookie Crust
Start by preheating your oven to 350°F. In a medium bowl, combine the chocolate cookie crumbs with the melted butter. Mix them together until the crumbs are fully coated. This mixture should feel like damp sand. Next, press it firmly into the bottom of a 9×13-inch baking dish. Make sure it’s even and compact. Bake the crust for about 10 minutes, then let it cool completely. This step is crucial for a sturdy base that can hold all those delicious layers!
Step 2: Make the Peanut Butter Ice Cream Layer
Once your crust has cooled, it’s time to create the peanut butter ice cream layer. In a large mixing bowl, beat together the softened vanilla ice cream and creamy peanut butter. Mix until the two are well combined and smooth. The peanut butter should blend seamlessly into the ice cream, creating a luscious texture. Pour this delightful mixture over the cooled cookie crust, spreading it evenly. Pop it in the freezer for at least 2 hours, or until it’s firm enough to hold the next layer.
Step 3: Whip the Cream
Now, let’s whip up some cream! In another bowl, pour in the heavy whipping cream, powdered sugar, and vanilla extract. Using a hand mixer or stand mixer, whip the mixture until stiff peaks form. This means it should hold its shape when you lift the beaters. Gently fold in the chopped mini peanut butter cups, ensuring they’re evenly distributed. This whipped cream layer adds a lightness that perfectly balances the denser ice cream. It’s a game-changer for texture!
Step 4: Assemble the Cake
With your layers ready, it’s time to assemble the cake. Carefully spread the whipped cream mixture over the frozen peanut butter ice cream layer. Make sure it’s even and smooth. Then, take your warmed fudge sauce and drizzle it generously over the whipped cream. The warmth of the fudge will create a beautiful contrast with the cold layers beneath. This step not only adds flavor but also makes the cake look irresistible!
Step 5: Freeze and Serve
After assembling, cover the dish with plastic wrap and return it to the freezer. Let it freeze for an additional 2 hours, or until you’re ready to serve. When it’s time to indulge, take it out and let it sit for a few minutes to soften slightly. Cut into squares, and serve this decadent Trifle Fudge Peanut Butter Cup Ice Cream Cake to your eager guests. Trust me, they’ll be coming back for seconds!
Tips for Success
- Make sure your ice cream is softened for easy mixing.
- Press the cookie crust firmly to avoid crumbling when serving.
- Use a warm knife to cut through the frozen layers smoothly.
- Feel free to customize with your favorite toppings or flavors.
- Let the cake sit at room temperature for a few minutes before serving for the best texture.
Equipment Needed
- 9×13-inch baking dish: A standard size for this recipe; any similar-sized dish will work.
- Mixing bowls: Use a large bowl for the ice cream and a medium one for the crust.
- Hand mixer or stand mixer: Essential for whipping cream; a whisk can work too, but it’ll take longer.
- Spatula: Perfect for spreading layers evenly.
- Plastic wrap: To cover the dish while freezing.
Variations
- For a chocolate lover’s dream, swap the vanilla ice cream for chocolate ice cream.
- Try adding a layer of crushed Oreos between the ice cream and whipped cream for extra crunch.
- For a healthier twist, use Greek yogurt instead of heavy whipping cream in the whipped layer.
- Make it gluten-free by using gluten-free chocolate cookies for the crust.
- Add a layer of fresh fruit, like sliced bananas or strawberries, for a refreshing contrast.
Serving Suggestions
- Pair with a scoop of vanilla or chocolate ice cream for an extra indulgent treat.
- Serve alongside a rich cup of coffee or a chilled glass of milk.
- Garnish with additional mini peanut butter cups for a fun presentation.
- Top with fresh berries for a pop of color and freshness.
FAQs about Trifle Fudge Peanut Butter Cup Ice Cream Cake
Can I make this Trifle Fudge Peanut Butter Cup Ice Cream Cake ahead of time?
Absolutely! This dessert is perfect for making ahead. Just assemble it and freeze it for up to a week. It’s a great way to save time for parties or family gatherings.
What if I don’t have chocolate cookie crumbs?
No worries! You can use graham cracker crumbs or even crushed Oreos as a substitute. Each option will give a unique flavor to your crust.
Can I use crunchy peanut butter instead of creamy?
Definitely! Crunchy peanut butter will add a delightful texture to the ice cream layer. Just keep in mind that it will change the overall creaminess.
How do I store leftovers?
Store any leftovers in an airtight container in the freezer. Just remember to let it sit at room temperature for a few minutes before serving again, so it softens up nicely.
Is this dessert suitable for vegetarians?
Yes! The Trifle Fudge Peanut Butter Cup Ice Cream Cake is vegetarian-friendly, making it a great option for those who don’t eat meat. Enjoy without worry!
Final Thoughts
Creating the Trifle Fudge Peanut Butter Cup Ice Cream Cake is more than just following a recipe; it’s about crafting a moment of joy. Each layer tells a story, from the crunchy cookie base to the creamy peanut butter ice cream, and the luscious whipped cream on top. This dessert is perfect for sharing, sparking laughter, and making memories with loved ones. Whether it’s a birthday celebration or a simple family dinner, this cake brings smiles and satisfaction. So, roll up your sleeves, dive into this delightful creation, and let the sweet moments unfold!
PrintTrifle Fudge Peanut Butter Cup Ice Cream Cake Recipe You’ll Love!
- Total Time: 4 hours 40 minutes
- Yield: 12 servings
- Diet: Vegetarian
Description
A delicious layered dessert combining chocolate cookie crust, creamy peanut butter ice cream, and whipped cream topped with fudge sauce and mini peanut butter cups.
Ingredients
- 2 cups chocolate cookie crumbs
- 1/2 cup unsalted butter, melted
- 1 quart vanilla ice cream, softened
- 1 cup creamy peanut butter
- 1 cup powdered sugar
- 1 cup heavy whipping cream
- 1 teaspoon vanilla extract
- 1 cup mini peanut butter cups, chopped
- 1 cup fudge sauce, warmed
Instructions
- Preheat your oven to 350°F. In a medium bowl, combine chocolate cookie crumbs and melted butter. Mix until well combined. Press the mixture firmly into the bottom of a 9×13-inch baking dish to form a crust. Bake for 10 minutes, then let it cool completely.
- In a large mixing bowl, beat together the softened vanilla ice cream and peanut butter until smooth and creamy. Pour the mixture over the cooled cookie crust and spread it evenly. Freeze for at least 2 hours or until firm.
- In another bowl, whip the heavy cream with the powdered sugar and vanilla extract until stiff peaks form. Gently fold in the chopped mini peanut butter cups.
- Once the ice cream layer is firm, spread the whipped cream mixture over the top. Drizzle the warmed fudge sauce over the whipped cream layer.
- Cover the dish with plastic wrap and freeze for an additional 2 hours or until ready to serve.
- To serve, cut into squares and enjoy!
Notes
- For a chocolate lover’s twist, use chocolate ice cream instead of vanilla.
- Add layers of crushed Oreos or additional toppings like whipped cream or chocolate shavings for extra texture and flavor.
- Prep Time: 30 minutes
- Cook Time: 10 minutes
- Category: Dessert
- Method: No-Bake
- Cuisine: American
Nutrition
- Serving Size: 1 square
- Calories: 350
- Sugar: 15g
- Sodium: 150mg
- Fat: 22g
- Saturated Fat: 10g
- Unsaturated Fat: 8g
- Trans Fat: 0g
- Carbohydrates: 28g
- Fiber: 1g
- Protein: 5g
- Cholesterol: 30mg