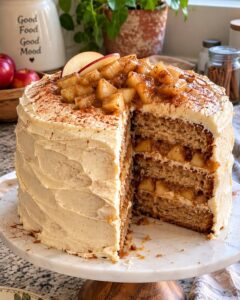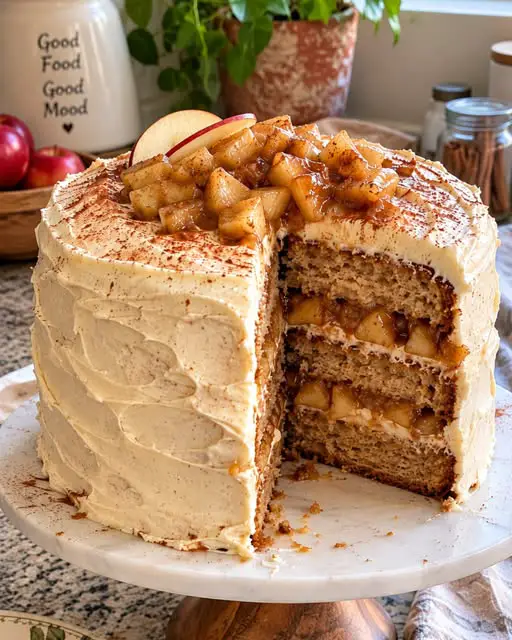
Introduction to Apple Pie Layer Cake with Brown Butter Cream Cheese Frosting
There’s something magical about the aroma of freshly baked apple pie wafting through the house. It takes me back to my childhood, where every family gathering meant a slice of that warm, spiced goodness. Now, I’ve taken that nostalgia and transformed it into an Apple Pie Layer Cake with Brown Butter Cream Cheese Frosting. This delightful dessert is not just a treat; it’s a showstopper for any occasion. Whether you’re looking to impress guests or simply indulge yourself, this cake is the perfect solution. Trust me, your taste buds will thank you!
Why You’ll Love This Apple Pie Layer Cake with Brown Butter Cream Cheese Frosting
This Apple Pie Layer Cake is a delightful blend of flavors and textures that will make your taste buds dance. It’s surprisingly easy to whip up, even on a busy weeknight. The moist apple cake paired with the rich brown butter cream cheese frosting creates a heavenly combination. Plus, it’s a fantastic way to impress family and friends without spending all day in the kitchen. Who wouldn’t love that?
Ingredients for Apple Pie Layer Cake with Brown Butter Cream Cheese Frosting
Gathering the right ingredients is the first step to creating this delicious Apple Pie Layer Cake with Brown Butter Cream Cheese Frosting. Here’s what you’ll need:
- All-purpose flour: The backbone of the cake, providing structure and texture.
- Baking powder and baking soda: These leavening agents help the cake rise, making it light and fluffy.
- Salt: A pinch enhances the flavors, balancing the sweetness.
- Ground cinnamon and nutmeg: These spices add warmth and that classic apple pie flavor.
- Unsalted butter: Softened butter creates a rich base for the cake, while unsalted allows you to control the saltiness.
- Granulated sugar and brown sugar: A mix of sugars adds depth of flavor and moisture to the cake.
- Large eggs: They bind the ingredients together and add moisture.
- Vanilla extract: A splash of vanilla brings a lovely aroma and flavor to the cake.
- Peeled and diced apples: Fresh apples are the star of this cake, providing sweetness and texture.
- Buttermilk: This adds moisture and a slight tang, making the cake tender.
- Cream cheese: Essential for the frosting, it adds creaminess and a slight tang.
- Browned butter: This nutty, rich butter elevates the frosting to a whole new level.
- Powdered sugar: Used in the frosting, it sweetens and thickens to create a smooth texture.
For those looking to customize, consider adding nuts for crunch or using different spices to suit your taste. You can find the exact measurements for each ingredient at the bottom of the article, ready for printing!
How to Make Apple Pie Layer Cake with Brown Butter Cream Cheese Frosting
Now that you have all your ingredients ready, let’s dive into the fun part: making this Apple Pie Layer Cake with Brown Butter Cream Cheese Frosting! Follow these steps, and you’ll be on your way to a delicious dessert that will wow everyone.
Step 1: Preheat and Prepare
First things first, preheat your oven to 350°F (175°C). This is crucial for baking success. While the oven warms up, grease three 9-inch round cake pans. I like to use a bit of butter or cooking spray to ensure the cakes slide out easily later.
Step 2: Mix Dry Ingredients
In a large bowl, whisk together the all-purpose flour, baking powder, baking soda, salt, ground cinnamon, and nutmeg. This step is essential for evenly distributing the flavors throughout the cake. Plus, it helps to aerate the flour, making your cake light and fluffy.
Step 3: Cream Butter and Sugars
In another mixing bowl, cream together the softened unsalted butter, granulated sugar, and brown sugar until the mixture is light and fluffy. This process creates a rich base for your cake. It’s like giving your cake a warm hug before it even goes in the oven!
Step 4: Add Eggs and Vanilla
Next, add the eggs one at a time, mixing well after each addition. Then, stir in the vanilla extract. This step adds moisture and a lovely flavor to the cake. You’ll notice the batter becoming richer and more inviting.
Step 5: Combine Wet and Dry Ingredients
Now, it’s time to bring it all together. Gradually mix the dry ingredients into the wet mixture, alternating with the buttermilk. This helps achieve the perfect cake texture. Be careful not to overmix; just combine until you see no dry flour.
Step 6: Fold in Apples
Gently fold in the diced apples. This is where the magic happens! The apples will add that signature flavor and moisture to your cake. Make sure they’re evenly distributed throughout the batter for a delightful bite in every slice.
Step 7: Bake the Cake
Divide the batter evenly among the prepared cake pans and smooth the tops. Bake in your preheated oven for 25-30 minutes. You’ll know they’re done when a toothpick inserted in the center comes out clean. This is where the magic happens, and your kitchen will smell heavenly!
Step 8: Cool the Cakes
Once baked, let the cakes cool in the pans for about 10 minutes. Then, transfer them to wire racks to cool completely. This step is crucial; if you frost them too soon, the frosting will melt and slide right off!
Step 9: Make the Frosting
While the cakes cool, let’s whip up that delicious frosting. In a mixing bowl, beat the browned butter and cream cheese together until smooth. Gradually add the powdered sugar and a splash of vanilla extract until you reach your desired consistency. This frosting is rich and creamy, perfect for our cake!
Step 10: Assemble the Cake
Once the cakes are completely cool, it’s time to assemble! Place one layer on a serving plate and frost the top. Add the second layer, frost again, and repeat with the third layer. Don’t forget to frost the top and sides of the cake. Get creative with your decoration—this is your chance to shine!
Tips for Success
- Use room temperature ingredients for better mixing and texture.
- Don’t skip the cooling time; it prevents melting the frosting.
- For a more intense apple flavor, use a mix of sweet and tart apples.
- Keep an eye on the baking time; ovens can vary.
- Feel free to experiment with spices to customize the flavor.
Equipment Needed
- Three 9-inch round cake pans (or two pans if you prefer to bake in batches).
- Mixing bowls of various sizes for dry and wet ingredients.
- Whisk for mixing dry ingredients.
- Electric mixer for creaming butter and sugars.
- Spatula for folding in apples and frosting.
Variations
- Nutty Delight: Add chopped walnuts or pecans to the batter for a crunchy texture.
- Spiced Up: Experiment with additional spices like ginger or allspice for a unique flavor twist.
- Gluten-Free Option: Substitute all-purpose flour with a gluten-free blend for a celiac-friendly version.
- Vegan Version: Replace eggs with flax eggs and use plant-based butter and cream cheese.
- Caramel Drizzle: Drizzle caramel sauce over the frosted cake for an extra layer of sweetness.
Serving Suggestions
- Pair with a scoop of vanilla ice cream for a classic dessert experience.
- Serve with a dollop of whipped cream for added creaminess.
- Complement with a warm cup of spiced chai or coffee.
- Garnish with fresh apple slices or a sprinkle of cinnamon for a beautiful presentation.
FAQs about Apple Pie Layer Cake with Brown Butter Cream Cheese Frosting
Can I make this Apple Pie Layer Cake in advance?
Absolutely! This cake can be made a day in advance. Just store it in the refrigerator after frosting. The flavors will meld beautifully overnight, making it even more delicious!
What type of apples work best for this cake?
I recommend using a mix of sweet and tart apples, like Granny Smith and Honeycrisp. This combination gives the cake a balanced flavor and great texture.
Can I freeze the Apple Pie Layer Cake?
Yes, you can freeze the cake! Just wrap it tightly in plastic wrap and aluminum foil. It can be frozen for up to three months. Thaw it in the fridge before serving.
How do I store leftovers?
Store any leftover cake in an airtight container in the refrigerator. It should stay fresh for about 3-4 days, but I doubt it will last that long!
Can I use a different frosting?
Of course! While the brown butter cream cheese frosting is divine, you can swap it for a classic buttercream or even a whipped cream frosting if you prefer something lighter.
Final Thoughts
Creating this Apple Pie Layer Cake with Brown Butter Cream Cheese Frosting is more than just baking; it’s about crafting memories. Each layer tells a story, from the warm spices that fill your kitchen to the smiles around the table as you serve it. This cake is a celebration of flavors, a perfect blend of nostalgia and creativity. Whether it’s a special occasion or a simple family dinner, this dessert brings joy and warmth to any gathering. So, roll up your sleeves, embrace the process, and enjoy every delicious bite. Your taste buds—and your loved ones—will thank you!
PrintApple Pie Layer Cake with Brown Butter Cream Cheese Frosting delights your taste buds!
- Total Time: 1 hour
- Yield: 12 servings
- Diet: Vegetarian
Description
A delicious Apple Pie Layer Cake featuring layers of moist apple cake and rich brown butter cream cheese frosting.
Ingredients
- 2 cups all-purpose flour
- 1 1/2 teaspoons baking powder
- 1 teaspoon baking soda
- 1/2 teaspoon salt
- 1 teaspoon ground cinnamon
- 1/2 teaspoon ground nutmeg
- 1 cup unsalted butter, softened
- 1 cup granulated sugar
- 1 cup brown sugar, packed
- 4 large eggs
- 1 teaspoon vanilla extract
- 2 cups peeled and diced apples
- 1 cup buttermilk
- 1 cup cream cheese, softened
- 1/2 cup unsalted butter, browned
- 4 cups powdered sugar
- 1 teaspoon vanilla extract (for frosting)
Instructions
- Preheat the oven to 350°F (175°C) and grease three 9-inch round cake pans.
- In a bowl, whisk together flour, baking powder, baking soda, salt, cinnamon, and nutmeg.
- In a large mixing bowl, cream together the softened butter, granulated sugar, and brown sugar until light and fluffy.
- Add the eggs one at a time, mixing well after each addition, then stir in the vanilla extract.
- Gradually add the dry ingredients to the wet mixture, alternating with buttermilk, and mix until just combined.
- Fold in the diced apples gently.
- Divide the batter evenly among the prepared cake pans and smooth the tops.
- Bake for 25-30 minutes or until a toothpick inserted in the center comes out clean.
- Let the cakes cool in the pans for 10 minutes, then transfer to wire racks to cool completely.
- For the frosting, beat the browned butter and cream cheese together until smooth, then gradually add powdered sugar and vanilla extract until desired consistency is reached.
- Once the cakes are completely cool, frost the top of one layer, add the second layer, and repeat. Frost the top and sides of the cake.
- Decorate as desired and serve.
Notes
- Ensure the apples are well-drained to avoid excess moisture in the cake.
- For a richer flavor, let the browned butter cool slightly before adding it to the frosting.
- This cake can be made a day in advance and stored in the refrigerator.
- Prep Time: 30 minutes
- Cook Time: 30 minutes
- Category: Dessert
- Method: Baking
- Cuisine: American
Nutrition
- Serving Size: 1 slice
- Calories: 450
- Sugar: 35g
- Sodium: 250mg
- Fat: 20g
- Saturated Fat: 10g
- Unsaturated Fat: 8g
- Trans Fat: 0g
- Carbohydrates: 60g
- Fiber: 2g
- Protein: 4g
- Cholesterol: 80mg