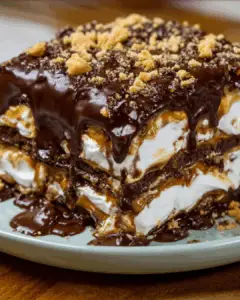
Introduction to Butterfinger Bomb Cake
There’s something magical about a dessert that combines nostalgia with indulgence. The Butterfinger Bomb Cake does just that, bringing together rich chocolate cake and the delightful crunch of Butterfinger candy bars. Whether you’re looking to impress friends at a gathering or simply want to treat yourself after a long day, this cake is your go-to solution. It’s easy to whip up, and the result is a showstopper that will have everyone asking for seconds. Trust me, once you take a bite, you’ll understand why this cake deserves a spot in your recipe collection!
Why You’ll Love This Butterfinger Bomb Cake
This Butterfinger Bomb Cake is a dream come true for any chocolate lover. It’s not just about the taste; it’s about the ease of making it. With simple ingredients and straightforward steps, you can whip this up in no time. Plus, the combination of creamy whipped cream and crunchy Butterfinger pieces creates a delightful texture that will have your taste buds dancing. It’s a dessert that’s sure to impress without the fuss!
Ingredients for Butterfinger Bomb Cake
Gathering the right ingredients is the first step to creating your Butterfinger Bomb Cake masterpiece. Here’s what you’ll need:
- All-purpose flour: The backbone of your cake, providing structure and texture.
- Granulated sugar: Sweetens the cake and helps it rise, giving that perfect fluffy bite.
- Unsweetened cocoa powder: Adds rich chocolate flavor, making every slice a chocolate lover’s dream.
- Baking powder and baking soda: These leavening agents ensure your cake rises beautifully.
- Salt: A pinch enhances the flavors, balancing the sweetness.
- Large eggs: They bind the ingredients together and add moisture.
- Whole milk: Contributes to a moist cake and rich flavor.
- Vegetable oil: Keeps the cake tender and adds moisture without heaviness.
- Vanilla extract: A must-have for that warm, aromatic flavor that complements chocolate.
- Boiling water: This secret ingredient helps to intensify the chocolate flavor and creates a smooth batter.
- Crushed Butterfinger candy bars: The star of the show! These add a delightful crunch and caramel flavor.
- Heavy whipping cream: Essential for making the light and fluffy whipped cream frosting.
- Powdered sugar: Sweetens the whipped cream and helps it hold its shape.
- Additional crushed Butterfinger bars: For topping, adding that extra crunch and visual appeal.
For those looking to switch things up, consider substituting half of the boiling water with brewed coffee for a richer flavor. You can also layer in some chocolate ganache between the cake layers for an extra indulgent touch. Exact measurements for these ingredients can be found at the bottom of the article, ready for printing!
How to Make Butterfinger Bomb Cake
Now that you have all your ingredients ready, let’s dive into the fun part—making the Butterfinger Bomb Cake! Follow these simple steps, and you’ll have a decadent dessert that will wow everyone.
Step 1: Preheat and Prepare
Start by preheating your oven to 350°F (175°C). This ensures your cake bakes evenly. While the oven warms up, grease and flour two 9-inch round cake pans. This will help your cakes release easily once they’re baked.
Step 2: Mix Dry Ingredients
In a large mixing bowl, combine the all-purpose flour, granulated sugar, cocoa powder, baking powder, baking soda, and salt. Whisk them together until they’re well mixed. This step is crucial for an even distribution of flavors and texture.
Step 3: Add Wet Ingredients
Next, add the eggs, whole milk, vegetable oil, and vanilla extract to the dry ingredients. Beat everything together on medium speed for about 2 minutes until the mixture is smooth. This is where the magic begins, as the batter starts to come together!
Step 4: Combine with Boiling Water
Carefully stir in the boiling water. This step might seem odd, but it’s key to achieving that moist, rich chocolate flavor. Don’t worry if the batter looks thin; that’s exactly how it should be!
Step 5: Fold in Butterfinger
Now, gently fold in the crushed Butterfinger bars. This is where the fun really kicks in! The candy pieces will add a delightful crunch and caramel flavor to your cake.
Step 6: Bake the Cake
Pour the batter evenly into your prepared cake pans. Bake in the preheated oven for 30-35 minutes. To check if they’re done, insert a toothpick into the center. If it comes out clean, your cakes are ready!
Step 7: Cool the Cakes
Once baked, allow the cakes to cool in the pans for about 10 minutes. Then, transfer them to a wire rack to cool completely. This step is important; frosting a warm cake can lead to a melty mess!
Step 8: Prepare Whipped Cream
While the cakes cool, it’s time to whip up some delicious frosting. In a mixing bowl, beat the heavy whipping cream, powdered sugar, and vanilla extract until stiff peaks form. This will create a light and fluffy topping that pairs perfectly with the cake.
Step 9: Assemble the Cake
Once the cakes are completely cool, place one layer on a serving plate. Spread a generous layer of whipped cream on top, then add the second cake layer. Frost the top and sides of the cake with the remaining whipped cream. Don’t forget to sprinkle additional crushed Butterfinger bars on top for that extra crunch!
Step 10: Chill Before Serving
Finally, chill the cake in the refrigerator for at least 30 minutes before serving. This allows the flavors to meld beautifully, making each bite even more delightful. Trust me, the wait will be worth it!
Tips for Success
- Measure your ingredients accurately for the best results.
- Use room temperature eggs and milk for a smoother batter.
- Don’t skip the chilling step; it enhances the flavors.
- For a richer taste, try adding a splash of brewed coffee to the batter.
- Keep an eye on the baking time; ovens can vary.
Equipment Needed
- Mixing bowls: A large bowl for mixing ingredients; a medium bowl for whipped cream.
- Electric mixer: For beating the batter and whipping cream; a whisk works too.
- Measuring cups and spoons: Essential for accurate ingredient measurements.
- 9-inch round cake pans: If you don’t have these, use square pans instead.
- Wire rack: For cooling the cakes; a plate can work in a pinch.
Variations
- Gluten-Free Option: Substitute all-purpose flour with a gluten-free flour blend for a delicious gluten-free Butterfinger Bomb Cake.
- Nutty Twist: Add chopped walnuts or pecans to the batter for an extra crunch and flavor.
- Peanut Butter Frosting: Swap the whipped cream for a creamy peanut butter frosting for a delightful twist on the classic.
- Mini Cakes: Bake the batter in muffin tins for individual Butterfinger Bomb Cakes, perfect for parties!
- Vegan Version: Use flax eggs and a plant-based milk alternative to create a vegan-friendly version of this cake.
Serving Suggestions
- Pair with Coffee: A rich cup of coffee complements the chocolate flavors beautifully.
- Ice Cream Delight: Serve with a scoop of vanilla or chocolate ice cream for extra indulgence.
- Fresh Berries: Add a side of fresh strawberries or raspberries for a refreshing contrast.
- Presentation: Garnish with chocolate shavings or a drizzle of chocolate sauce for a stunning look.
FAQs about Butterfinger Bomb Cake
Can I make Butterfinger Bomb Cake ahead of time?
Absolutely! This cake can be made a day in advance. Just store it in the refrigerator after chilling. The flavors will meld beautifully overnight, making it even more delicious!
What can I use instead of Butterfinger bars?
If you’re looking for alternatives, try using crushed Reese’s Peanut Butter Cups or Snickers bars. They’ll add a different flavor but still keep that delightful crunch!
How should I store leftover Butterfinger Bomb Cake?
Store any leftovers in an airtight container in the refrigerator. It should stay fresh for up to 3 days, but trust me, it won’t last that long!
Can I freeze Butterfinger Bomb Cake?
Yes, you can freeze the cake! Wrap it tightly in plastic wrap and then in aluminum foil. It can be frozen for up to 3 months. Just thaw it in the fridge before serving.
Is Butterfinger Bomb Cake suitable for special diets?
This cake is vegetarian-friendly, but for gluten-free or vegan options, check out the variations section for tips on how to adapt the recipe!
Final Thoughts
Creating the Butterfinger Bomb Cake is more than just baking; it’s about crafting a moment of joy. Each slice is a delightful blend of rich chocolate and crunchy Butterfinger, evoking memories of childhood treats and carefree days. Whether you’re celebrating a special occasion or simply indulging on a quiet evening, this cake brings smiles and satisfaction. The ease of preparation means you can focus on what truly matters—sharing delicious moments with loved ones. So, roll up your sleeves, embrace the process, and let this cake become a cherished part of your dessert repertoire!
PrintButterfinger Bomb Cake: A Decadent Treat You Must Try!
- Total Time: 1 hour 25 minutes
- Yield: 12 servings
- Diet: Vegetarian
Description
Butterfinger Bomb Cake is a decadent dessert that combines rich chocolate cake with crushed Butterfinger candy bars and whipped cream, making it a must-try treat for any chocolate lover.
Ingredients
- 2 cups all-purpose flour
- 1 ½ cups granulated sugar
- ½ cup unsweetened cocoa powder
- 1 ½ teaspoons baking powder
- 1 ½ teaspoons baking soda
- 1 teaspoon salt
- 2 large eggs
- 1 cup whole milk
- ½ cup vegetable oil
- 2 teaspoons vanilla extract
- 1 cup boiling water
- 1 cup crushed Butterfinger candy bars (about 4–5 bars)
- 1 cup heavy whipping cream
- ½ cup powdered sugar
- 1 teaspoon vanilla extract (for whipped cream)
- Additional crushed Butterfinger bars for topping
Instructions
- Preheat your oven to 350°F (175°C). Grease and flour two 9-inch round cake pans.
- In a large mixing bowl, combine the flour, granulated sugar, cocoa powder, baking powder, baking soda, and salt. Whisk together until well mixed.
- Add the eggs, milk, vegetable oil, and vanilla extract to the dry ingredients. Beat on medium speed for 2 minutes until smooth.
- Carefully stir in the boiling water until the batter is well combined (the batter will be thin).
- Fold in the crushed Butterfinger bars.
- Pour the batter evenly into the prepared cake pans. Bake for 30-35 minutes or until a toothpick inserted in the center comes out clean.
- Allow the cakes to cool in the pans for 10 minutes, then transfer them to a wire rack to cool completely.
- While the cakes are cooling, prepare the whipped cream. In a mixing bowl, beat the heavy whipping cream, powdered sugar, and vanilla extract until stiff peaks form.
- Once the cakes are completely cooled, place one layer on a serving plate. Spread a generous layer of whipped cream on top, then add the second cake layer.
- Frost the top and sides of the cake with the remaining whipped cream. Sprinkle additional crushed Butterfinger bars on top for decoration.
- Chill the cake in the refrigerator for at least 30 minutes before serving to allow the flavors to meld.
Notes
- For a richer flavor, substitute half of the boiling water with brewed coffee.
- You can add a layer of chocolate ganache between the cake layers for extra decadence.
- Prep Time: 20 minutes
- Cook Time: 35 minutes
- Category: Dessert
- Method: Baking
- Cuisine: American
Nutrition
- Serving Size: 1 slice
- Calories: 320
- Sugar: 25g
- Sodium: 300mg
- Fat: 15g
- Saturated Fat: 7g
- Unsaturated Fat: 8g
- Trans Fat: 0g
- Carbohydrates: 38g
- Fiber: 1g
- Protein: 4g
- Cholesterol: 50mg