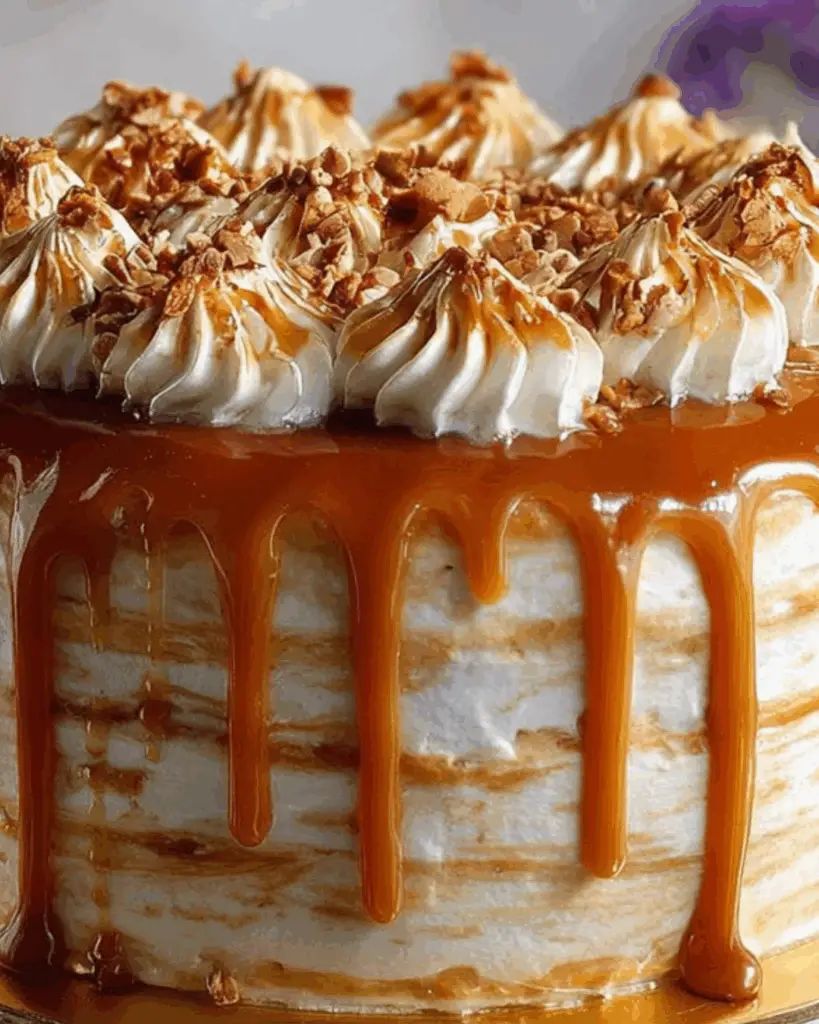
Introduction to Caramel Cloud Cake
There’s something magical about a dessert that feels like a warm hug, and that’s exactly what Caramel Cloud Cake delivers. This delightful treat combines fluffy cake layers with rich caramel and whipped cream, creating a heavenly experience for your taste buds. Whether you’re looking to impress guests at a dinner party or simply want to indulge after a long day, this cake is your go-to solution. It’s easy to whip up, making it perfect for busy weeknights or special occasions. Trust me, once you try it, you’ll be dreaming of this cake long after the last slice is gone!
Why You’ll Love This Caramel Cloud Cake
This Caramel Cloud Cake is not just a dessert; it’s an experience. It’s incredibly easy to make, even for those who might feel intimidated in the kitchen. The fluffy layers paired with luscious caramel create a taste sensation that’s hard to resist. Plus, it comes together in under an hour, making it a quick yet impressive treat. Perfect for any occasion, it’s sure to leave your friends and family asking for seconds!
Ingredients for Caramel Cloud Cake
Gathering the right ingredients is the first step to creating your Caramel Cloud Cake masterpiece. Here’s what you’ll need:
- All-purpose flour: This is the backbone of your cake, providing structure and fluffiness.
- Granulated sugar: Sweetness is key! It helps create that delightful caramel flavor.
- Unsalted butter: Softened butter adds richness and moisture to the cake.
- Whole milk: This keeps the cake tender and adds a creamy texture.
- Large eggs: Eggs help bind everything together and contribute to the cake’s rise.
- Baking powder: This leavening agent ensures your cake rises beautifully.
- Vanilla extract: A splash of vanilla enhances the overall flavor, making it more aromatic.
- Salt: Just a pinch balances the sweetness and elevates the flavors.
- Heavy cream: Essential for whipping into fluffy clouds that will layer your cake.
- Caramel sauce: You can use store-bought or homemade for that rich, gooey goodness.
- Powdered sugar: A light dusting on top adds a touch of elegance and sweetness.
For those looking to experiment, consider adding a teaspoon of espresso powder to the batter for a deeper flavor. If you’re feeling adventurous, swap the caramel sauce for chocolate ganache for a decadent twist. Exact measurements for these ingredients can be found at the bottom of the article, ready for printing!
How to Make Caramel Cloud Cake
Now that you have your ingredients ready, let’s dive into the fun part: making your Caramel Cloud Cake! Follow these simple steps, and you’ll be on your way to creating a dessert that will wow everyone.
Step 1: Preheat and Prepare
Start by preheating your oven to 350°F (175°C). This ensures your cake bakes evenly. While the oven warms up, grease and flour two 9-inch round cake pans. This step is crucial; it prevents your cake from sticking and makes for an easy release.
Step 2: Cream the Butter and Sugar
In a large mixing bowl, cream together the softened butter and granulated sugar. Use an electric mixer on medium speed until the mixture is light and fluffy. This process incorporates air, giving your cake that delightful texture. It should take about 3-5 minutes.
Step 3: Add Eggs and Vanilla
Next, add the eggs one at a time, mixing well after each addition. This step is important because it helps the eggs blend smoothly into the batter. Don’t forget to add the vanilla extract at this stage; it enhances the flavor beautifully!
Step 4: Combine Dry Ingredients
In another bowl, whisk together the all-purpose flour, baking powder, and salt. This ensures that the leavening agent is evenly distributed throughout the flour, which is key for a well-risen cake. Set this mixture aside for now.
Step 5: Mix Wet and Dry Ingredients
Now, it’s time to combine the wet and dry ingredients. Gradually add the flour mixture to the butter mixture, alternating with the whole milk. Start and end with the flour mixture. Mix until just combined; overmixing can lead to a dense cake, and we want it light and fluffy!
Step 6: Bake the Cakes
Divide the batter evenly between the prepared cake pans. Bake in your preheated oven for 25-30 minutes. To check for doneness, insert a toothpick into the center of the cakes. If it comes out clean, they’re ready!
Step 7: Cool the Cakes
Once baked, allow the cakes to cool in the pans for about 10 minutes. Then, carefully transfer them to wire racks to cool completely. This step is essential; if you frost the cakes while they’re warm, the frosting will melt!
Step 8: Whip the Cream
While the cakes cool, whip the heavy cream in a mixing bowl until soft peaks form. This means the cream should hold its shape but still be smooth. Be careful not to overwhip, or you’ll end up with butter!
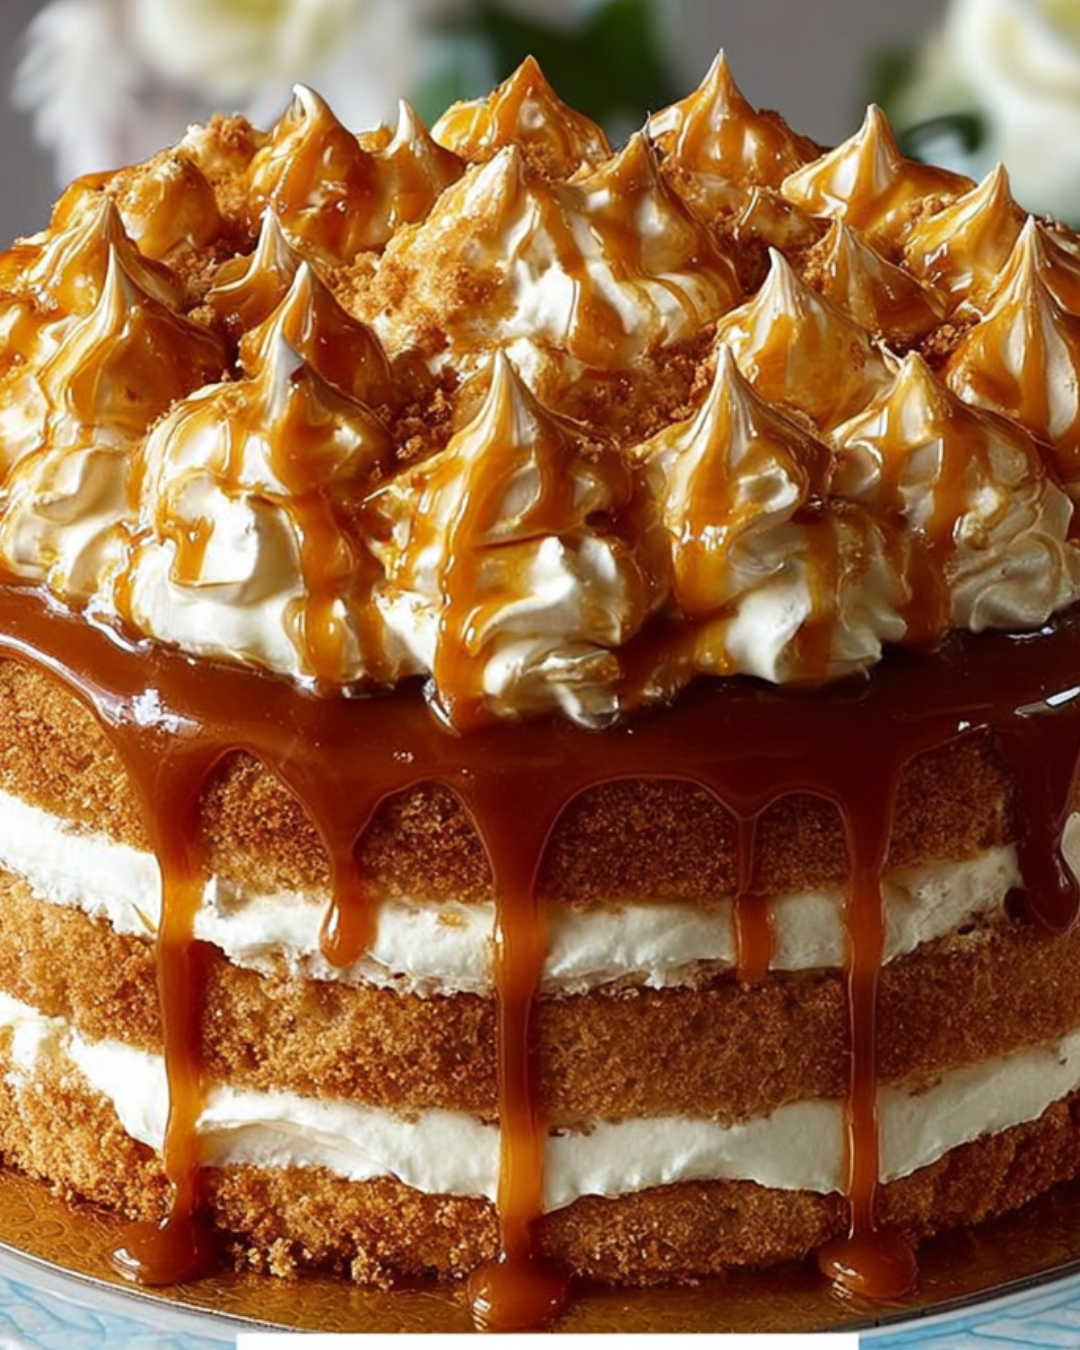
Step 9: Assemble the Cake
Once the cakes are completely cool, place one layer on a serving plate. Spread a generous layer of whipped cream on top, then drizzle with caramel sauce. Place the second cake layer on top and repeat the process. More whipped cream and caramel make everything better!
Step 10: Final Touches
To finish, dust the top of your Caramel Cloud Cake with powdered sugar. This adds a lovely touch of sweetness and makes it look extra special. Now, step back and admire your creation before diving in!
Tips for Success
- Make sure your butter is softened for easy creaming with sugar.
- Use room temperature eggs and milk for a smoother batter.
- Don’t overmix when combining wet and dry ingredients; it keeps the cake light.
- Let the cakes cool completely before frosting to avoid melting.
- For a fun twist, try adding a pinch of sea salt to the caramel sauce.
Equipment Needed
- Mixing bowls: A set of various sizes is handy; you can also use any large bowl you have.
- Electric mixer: A stand mixer works great, but a hand mixer will do just fine.
- Measuring cups and spoons: Essential for accuracy; you can use any standard kitchen measuring tools.
- 9-inch round cake pans: If you don’t have these, any similar-sized pans will work.
- Wire racks: Perfect for cooling; a plate can substitute in a pinch.
Variations of Caramel Cloud Cake
- Chocolate Caramel Cloud Cake: Substitute half of the all-purpose flour with cocoa powder for a rich chocolate flavor.
- Nutty Delight: Add chopped nuts like pecans or walnuts between the layers for a crunchy texture.
- Fruit Fusion: Layer fresh berries or sliced bananas with the whipped cream for a fruity twist.
- Gluten-Free Option: Use a gluten-free flour blend in place of all-purpose flour for a gluten-free version.
- Vegan Adaptation: Replace eggs with flaxseed meal and use plant-based butter and milk for a vegan-friendly cake.
Serving Suggestions for Caramel Cloud Cake
- Pair with a scoop of vanilla ice cream for a delightful contrast in temperature.
- Serve alongside fresh berries to add a pop of color and tartness.
- Drizzle extra caramel sauce on the plate for an elegant presentation.
- Enjoy with a cup of coffee or tea to balance the sweetness.
- Garnish with mint leaves for a fresh touch and visual appeal.
FAQs about Caramel Cloud Cake
Can I make Caramel Cloud Cake ahead of time?
Absolutely! You can bake the cake layers a day in advance. Just store them in an airtight container at room temperature. Assemble the cake with whipped cream and caramel sauce on the day you plan to serve it for the best texture.
What can I substitute for heavy cream in the whipped cream?
If you’re looking for a lighter option, you can use coconut cream or a non-dairy whipped topping. Just keep in mind that the flavor will change slightly, but it can still be delicious!
How do I store leftover Caramel Cloud Cake?
Store any leftovers in the refrigerator, covered with plastic wrap or in an airtight container. It should stay fresh for about 3-4 days. Just be aware that the whipped cream may lose some of its fluffiness over time.
Can I freeze Caramel Cloud Cake?
Yes, you can freeze the cake layers! Wrap them tightly in plastic wrap and then in aluminum foil. They can be frozen for up to three months. Just thaw them in the fridge before assembling with whipped cream and caramel.
What’s the best way to serve Caramel Cloud Cake?
For a stunning presentation, slice the cake and serve it on individual plates. Drizzle with extra caramel sauce and garnish with fresh berries or mint leaves. This adds a lovely touch and elevates the dessert experience!
Final Thoughts
Creating a Caramel Cloud Cake is more than just baking; it’s about crafting a moment of joy. Each fluffy layer, drizzled with rich caramel and topped with whipped cream, brings a smile to faces young and old. This cake is perfect for celebrations or simply to brighten a regular day. The aroma wafting through your kitchen will have everyone eagerly awaiting a slice. So, roll up your sleeves and dive into this delightful recipe. Trust me, the happiness it brings is worth every minute spent in the kitchen. Enjoy every bite, and share the love with those around you!
PrintCaramel Cloud Cake: Discover This Indulgent Recipe!
- Total Time: 50 minutes
- Yield: 8 servings
- Diet: Vegetarian
Description
Caramel Cloud Cake is a delightful dessert that combines fluffy cake layers with rich caramel and whipped cream, creating a heavenly treat.
Ingredients
- 2 cups all-purpose flour
- 1 ½ cups granulated sugar
- ½ cup unsalted butter, softened
- 1 cup whole milk
- 3 large eggs
- 2 teaspoons baking powder
- 1 teaspoon vanilla extract
- ½ teaspoon salt
- 1 cup heavy cream
- ½ cup caramel sauce (store-bought or homemade)
- 1 teaspoon powdered sugar (for dusting)
Instructions
- Preheat your oven to 350°F (175°C). Grease and flour two 9-inch round cake pans.
- In a large mixing bowl, cream together the softened butter and granulated sugar until light and fluffy.
- Add the eggs one at a time, mixing well after each addition. Stir in the vanilla extract.
- In another bowl, whisk together the flour, baking powder, and salt. Gradually add this dry mixture to the wet ingredients, alternating with the milk. Mix until just combined.
- Divide the batter evenly between the prepared cake pans. Bake for 25-30 minutes, or until a toothpick inserted into the center comes out clean.
- Allow the cakes to cool in the pans for 10 minutes before transferring them to wire racks to cool completely.
- While the cakes are cooling, whip the heavy cream in a mixing bowl until soft peaks form.
- Once the cakes are completely cool, place one layer on a serving plate. Spread a layer of whipped cream on top and drizzle with caramel sauce.
- Place the second cake layer on top and repeat the process with more whipped cream and caramel sauce.
- Dust the top with powdered sugar before serving.
Notes
- For a richer flavor, try adding a teaspoon of espresso powder to the batter.
- You can also substitute the caramel sauce with chocolate ganache for a different twist.
- Prep Time: 20 minutes
- Cook Time: 30 minutes
- Category: Dessert
- Method: Baking
- Cuisine: American
Nutrition
- Serving Size: 1 slice
- Calories: 350
- Sugar: 25g
- Sodium: 200mg
- Fat: 18g
- Saturated Fat: 10g
- Unsaturated Fat: 8g
- Trans Fat: 0g
- Carbohydrates: 40g
- Fiber: 1g
- Protein: 4g
- Cholesterol: 80mg