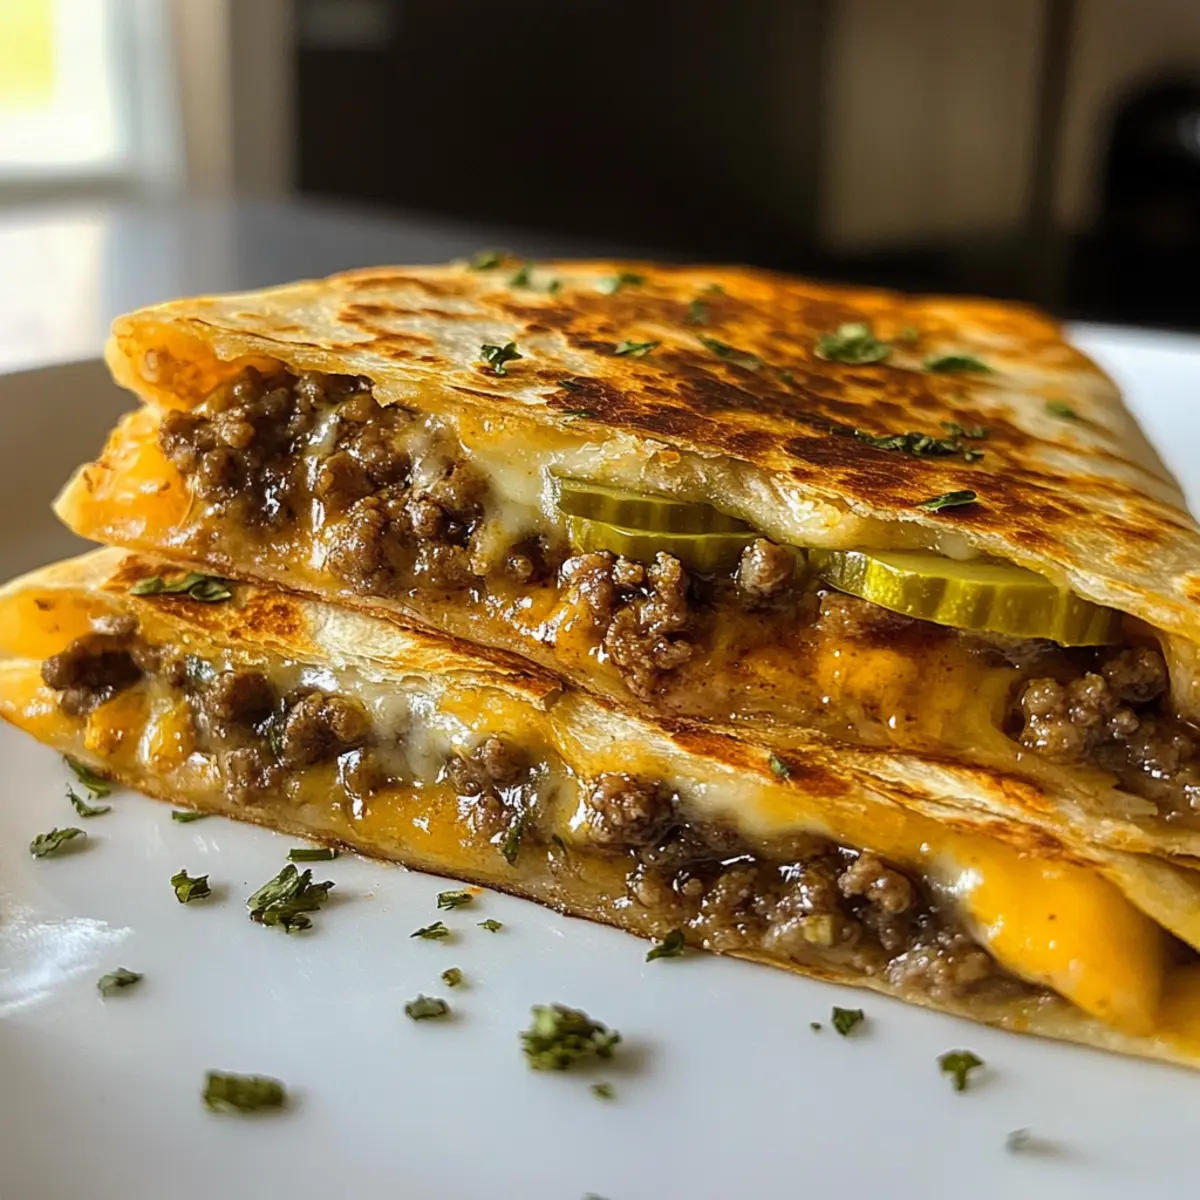
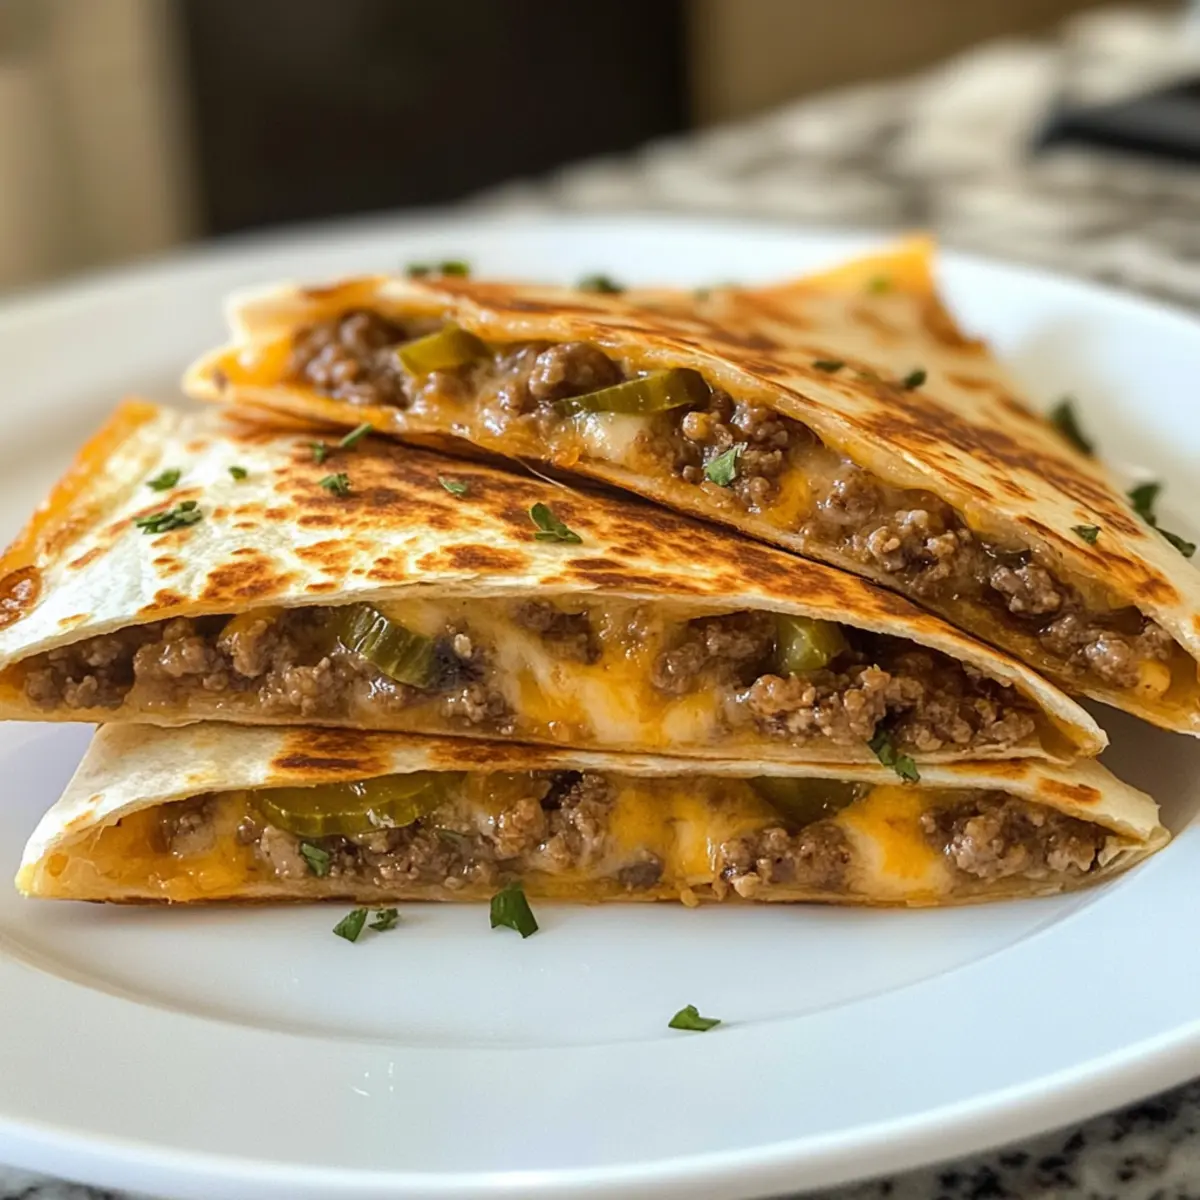
As I stood in the kitchen, the savory aroma of sizzling beef danced through the air, signaling the start of an unforgettable meal. These 20-Minute Crispy Cheeseburger Quesadillas transform the classic flavors of a juicy cheeseburger into a fun, handheld delight. Not only are they incredibly quick to whip up—perfect for busy weeknights—but they also allow for endless customization, letting you tailor each quesadilla to your family’s taste preferences. Whether you’re in the mood for a spicy kick or a classic, comforting flavor, this recipe is a win-win! Ready to bring this delicious twist to your table? Dive in, and let’s cook up some happiness!
Why are Cheeseburger Quesadillas a Crowd Favorite?
Quick and Easy: In just 20 minutes, you can whip up these tantalizing quesadillas that everyone will love! Perfect for busy weeknights, it’s a time-saver for those evenings when you crave comfort food but are short on time.
Customizable Goodness: Feel free to get creative! Add your favorite ingredients, like bacon, jalapeños, or even extra veggies, to make each batch uniquely yours.
Kid-Approved Flavor: With their cheesy filling and crispy exterior, these quesadillas will quickly become a family favorite, ensuring even picky eaters are satisfied.
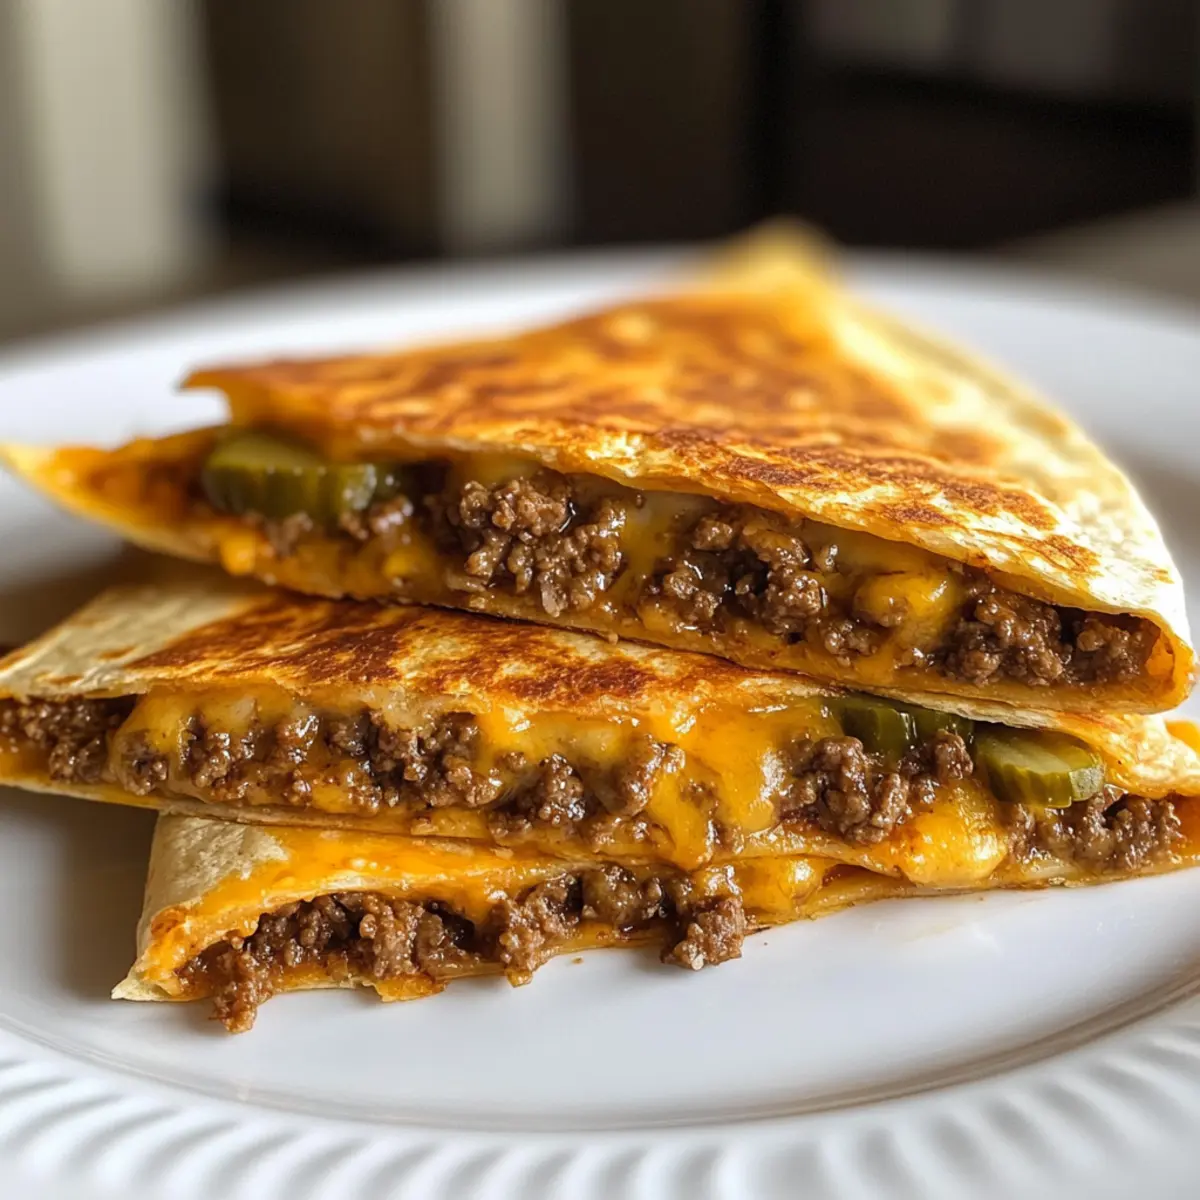
Epic Texture: Experience a delightful contrast with every bite—a crispy tortilla encasing gooey cheese and flavorful beef, reminiscent of both burgers and classic quesadillas.
Perfect for Leftovers: Turn any leftover filling into quick lunches or nachos, adding versatility to your meal prep routine. These Cheeseburger Quesadillas will keep your weekday meals exciting and delicious!
Cheeseburger Quesadillas Ingredients
• Dive into effortless cooking with the essential components for your delectable cheesy creation!
-
For the Filling:
-
Lean Ground Beef – Provides protein and classic cheeseburger flavor; substitute with lean ground turkey or chicken for a lighter option.
-
Yellow Onion – Adds sweetness and depth; use shallots or omit for a milder taste.
-
Ketchup – Contributes tangy sweetness and moisture; BBQ sauce can be a delightful twist.
-
Yellow Mustard – Enhances that classic cheeseburger tang; try Dijon mustard for an extra kick.
-
Worcestershire Sauce – Adds umami and depth; soy sauce can work well too.
-
Garlic Powder – Offers robust flavor with minimal prep; fresh garlic can be used in half the amount.
-
Onion Powder – Builds an additional layer of flavor; can be omitted if using fresh onion.
-
Smoked Paprika – Introduces a subtle smoky taste; regular paprika is a fine alternative.
-
Kosher Salt & Black Pepper – Essential for seasoning; adjust to your preference.
-
For the Quesadilla:
-
Shredded Cheddar Cheese – Melts beautifully for creaminess; consider a cheddar-Monterey Jack blend for extra flavor.
-
Flour Tortillas – Encase the filling; use corn tortillas for a gluten-free option.
-
Optional Additions:
-
Chopped Dill Pickles – Adds crunch and tang; a fun addition to enhance that burger experience.
-
Cooked Bacon – Brings a crispy texture and extra flavor; omit for a lighter dish.
-
Neutral Oil or Butter – For toasting quesadillas; use olive oil for a flavorful twist.
-
Burger Sauce/Ketchup for Serving – Optional condiments help elevate the enjoyment of your Cheeseburger Quesadillas.
Step‑by‑Step Instructions for Cheeseburger Quesadillas
Step 1: Cook the Beef Filling
Heat a large skillet over medium-high heat. Add 1 pound of lean ground beef and 1 diced yellow onion, cooking for about 5-7 minutes or until the beef is browned and the onion is translucent. Break up the meat as it cooks. Once browned, drain any excess grease, leaving about 1 tablespoon in the pan for added flavor.
Step 2: Season and Simmer
Stir in ¼ cup of ketchup, 2 tablespoons of yellow mustard, 1 tablespoon of Worcestershire sauce, and season with ½ teaspoon of garlic powder, ½ teaspoon of onion powder, ¼ teaspoon of smoked paprika, and salt and pepper to taste. Cook the mixture for 1-2 minutes until it’s saucy and well blended, allowing the rich flavors of the Cheeseburger Quesadillas to meld perfectly.
Step 3: Assemble Quesadillas
Lay out 4 flour tortillas on a clean surface. On half of each tortilla, layer a generous amount of shredded cheddar cheese, followed by the beef mixture, additional cheese, and chopped dill pickles or cooked bacon if desired. Fold each tortilla in half to encase the delicious filling and create a semi-circle.
Step 4: Toast Until Golden
Return the skillet to medium heat and add a tablespoon of neutral oil or butter to coat the bottom. Place the folded quesadillas in the skillet, cooking for 2-3 minutes on each side until golden brown and crispy. Keep an eye on them, ensuring the cheese melts beautifully within while achieving that satisfying crunch on the outside.
Step 5: Slice and Serve
After crisping each quesadilla, allow them to rest for about 1-2 minutes before slicing into wedges. Serve hot with your favorite burger sauce or ketchup for dipping, enhancing the experience of your flavorful Cheeseburger Quesadillas, perfect for a quick and satisfying meal!

What to Serve with Cheeseburger Quesadillas
Savoring luscious cheeseburger flavors tucked inside crispy tortillas is just the beginning—let’s create a well-rounded meal!
-
Crispy French Fries: The classic side adds a satisfying crunch, perfectly complementing the soft and gooey quesadillas. Dip them in your favorite sauce for an indulgent treat.
-
Fresh Garden Salad: A light, refreshing salad balances the richness of the quesadillas, bringing bright flavors and crisp textures to your plate. Add a tangy vinaigrette to enhance your experience.
-
Creamy Ranch Dip: This cool, creamy dip pairs beautifully, adding a zesty touch that elevates the cheeseburger theme while keeping every bite fun and flavorful.
-
Sweet Potato Wedges: For a wholesome twist, try sweet potato wedges; their subtle sweetness complements the savory quesadillas and brings extra color to your meal.
-
Guacamole with Tortilla Chips: The creamy, rich guacamole enhances the quesadillas’ flavors, and the crunch of the chips creates a delightful contrast.
-
Iced Tea or Root Beer Float: Refresh yourself with a cold drink to wash it all down. Iced tea offers a light finish, while a root beer float adds a nostalgic, dessert-like touch.
-
Chocolate Chip Cookies: For dessert, these warm, gooey cookies provide the perfect sweet ending to a savory meal, making it an all-around family favorite.
Make Ahead Options
These Cheeseburger Quesadillas are ideal for meal prep, making your busy weeknights a breeze! You can prepare the beef filling up to 3 days in advance; simply cook the ground beef mixture and allow it to cool before refrigerating in an airtight container. Additionally, you can shred the cheese and chop any desired vegetables ahead of time (also up to 3 days). When you’re ready to enjoy your quesadillas, assemble them with the chilled filling and cheese, then toast them in a skillet until golden and crispy. This way, you’ll have a delicious, satisfying meal with minimal effort, all while keeping that scrumptious flavor intact!
Tips for the Best Cheeseburger Quesadillas
-
Grease Management: Always drain excess grease from the beef to avoid soggy quesadillas. This ensures a crispy texture and keeps them manageable to eat.
-
Cheese Choice: Opt for freshly shredded cheese for the best melt and creamy texture. Pre-shredded cheese often contains anti-caking agents that can prevent melting.
-
Filling Variations: Get adventurous with your fillings! Spice it up with jalapeños, or if you prefer a milder taste, toss in finely chopped bell peppers for added nutrition.
-
Cooking Temperature: Maintain medium heat while cooking the quesadillas. Too high of a temperature can burn the tortillas before the cheese melts completely.
-
Resting Time: Allow the quesadillas to rest for a couple of minutes after cooking. This step helps the filling set slightly, making them easier to slice and serve without spilling out the savory goodness.
Storage Tips for Cheeseburger Quesadillas
-
Room Temperature: Cheeseburger Quesadillas are best enjoyed hot and fresh. If left out, they can be stored for up to 2 hours at room temperature before they should be refrigerated.
-
Fridge: Store leftover cheeseburger quesadillas in an airtight container in the fridge for up to 3 days. For best results, place a piece of parchment paper between layers to prevent sticking.
-
Freezer: For longer storage, freeze the quesadillas in an airtight container or freezer bag for up to 2 months. To reheat, thaw overnight in the fridge before cooking.
-
Reheating: To reheat, place quesadillas in a skillet over medium heat until warmed through and crispy, about 3-4 minutes per side. This will maintain their crunchy texture and delicious flavor!
Cheeseburger Quesadillas: Variations & Substitutions
Feel free to get creative and personalize your Cheeseburger Quesadillas with these fun ideas!
-
Lean Protein: Use ground turkey or chicken instead of beef for a lighter but still delicious filling.
It’s a great way to enjoy the same flavors while cutting down on fat. -
Cheese Variety: Explore different cheeses like pepper jack for a spicy twist, or gouda for creamier flavor.
The key is to embrace your cheesy side and savor every bite! -
Veggie Boost: Add finely chopped bell peppers, mushrooms, or spinach to the beef mixture for a nutritional upgrade.
This not only enhances the flavor but also boosts the health factor of your meal! -
Spicy Kick: Toss in diced jalapeños or a dash of hot sauce for those who enjoy some heat in their quesadillas.
It’s a delightful way to take your cheesy comfort food to the next level! -
Vegan Option: Swap beef for a plant-based alternative like lentils or black beans, and use vegan cheese.
You can enjoy all these comforting flavors while keeping it plant-based and delicious! -
Pickle Lovers Unite: Add extra chopped dill pickles or even relish to the filling for that classic burger tang.
This little addition will bring a delightful crunch that will brighten up your quesadilla experience! -
Crunchy Texture: For added texture, consider topping the quesadillas with crispy fried onions or crushed tortilla chips before serving.
The extra crunch will elevate your meal, making it even more enjoyable to eat! -
Pasta Mash-Up: Use leftover mac and cheese as a filling for a fun twist. It’ll create a comforting, kid-friendly twist on traditional quesadillas.
This will surely be a hit with the little ones, adding variety to your weekly meals!
Explore these variations and make your Cheeseburger Quesadillas perfectly tailored to your taste. Whether you’re inspired by our ideas or develop your own twists, these flavorful quesadillas will surely become a beloved staple.
Cheeseburger Quesadillas Recipe FAQs
What type of ground meat works best for Cheeseburger Quesadillas?
Absolutely! Lean ground beef is the classic choice, providing that rich cheeseburger flavor. However, you can also use ground turkey or chicken for a healthier alternative. Just be sure to season it well to keep the flavor profile intact.
How should I store leftover Cheeseburger Quesadillas?
For best results, store your leftover quesadillas in an airtight container in the fridge for up to 3 days. If you’re worried about them sticking together, I often place a piece of parchment paper between layers, and this keeps them from becoming one gooey mess!
Can I freeze Cheeseburger Quesadillas?
Yes! To freeze, let them cool completely, then place them in an airtight container or a freezer bag. They can be stored in the freezer for up to 2 months. When ready to enjoy, thaw overnight in the refrigerator, then reheat in a skillet over medium heat until crispy and heated through, about 3-4 minutes per side.
What if my quesadillas are soggy?
To prevent sogginess, ensure you drain any excess grease from the beef after cooking, leaving just enough for flavor. Using freshly shredded cheese also helps with achieving that perfect melt. If your quesadillas do turn out soggy, you can try reheating them in a skillet to crisp them back up—a little patience goes a long way!
Are Cheeseburger Quesadillas safe for those with dietary restrictions?
Yes, but always double-check your ingredients. You can easily customize the filling to accommodate allergies by opting for gluten-free tortillas and leaving out any problematic ingredients like onions or pickles. If you have furry friends, remember to keep any leftovers away from pets—especially those rich in cheese and spices!
How long can I store the cheeseburger filling?
If you have leftover cheeseburger filling, you can keep it in the fridge for up to 3 days. It’s a lifesaver for preparing quick lunches or even nachos later on! Just reheat it in the microwave or skillet before using.
Cheeseburger Quesadillas: Quick, Crispy Comfort in 20 Minutes
Ingredients
Equipment
Method
- Heat a large skillet over medium-high heat. Add ground beef and diced onion, cooking for about 5-7 minutes until browned. Drain excess grease, leaving 1 tablespoon in the pan.
- Stir in ketchup, yellow mustard, Worcestershire sauce, garlic powder, onion powder, smoked paprika, salt, and pepper. Cook the mixture for 1-2 minutes until saucy and well blended.
- Lay out tortillas. On one half of each tortilla, layer shredded cheese, beef mixture, more cheese, and optional pickles or bacon. Fold each tortilla in half.
- Return skillet to medium heat, add oil or butter. Cook folded quesadillas 2-3 minutes each side until golden brown and crispy.
- Allow to rest for 1-2 minutes before slicing into wedges. Serve hot with burger sauce or ketchup.