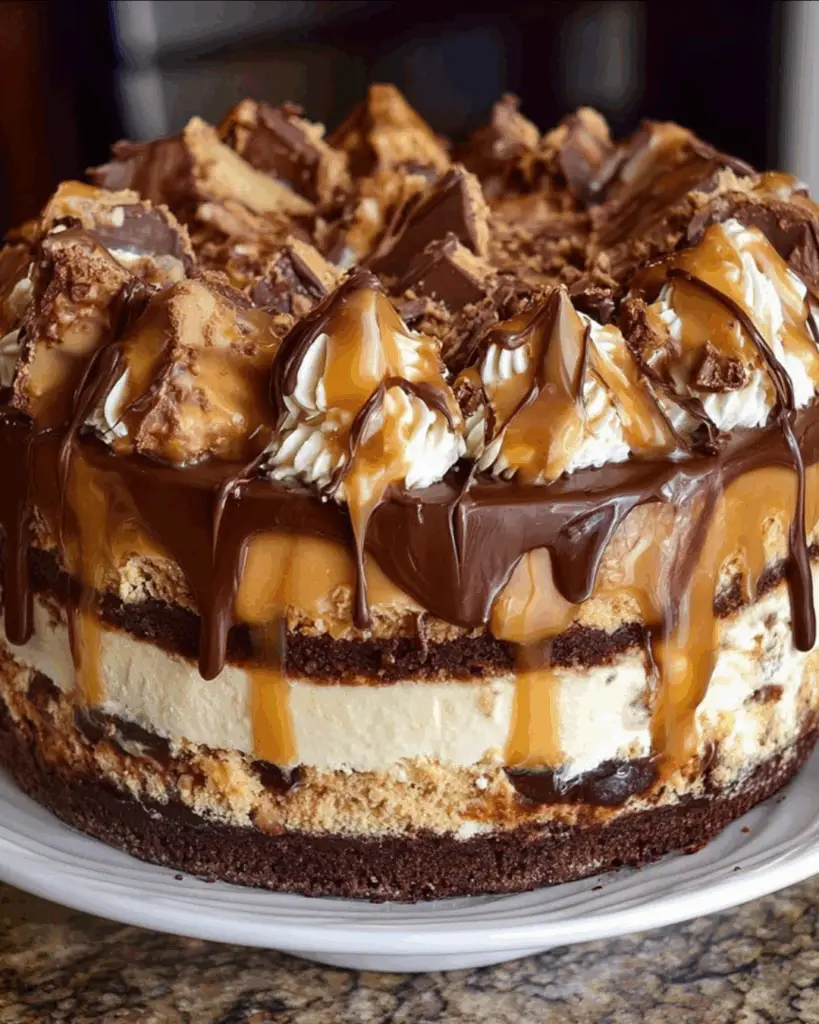
Introduction to Chocolate Caramel Layered Ice Cream Cake
There’s something magical about dessert that brings people together, isn’t there? The Chocolate Caramel Layered Ice Cream Cake is a delightful treat that does just that. It’s the kind of dessert that can turn an ordinary evening into a celebration. Whether you’re hosting friends for game night or simply want to indulge after a long day, this cake is your go-to solution. With its rich chocolate, creamy vanilla, and a drizzle of caramel, every slice is a sweet escape. Trust me, this cake will impress your loved ones and leave them asking for seconds!
Why You’ll Love This Chocolate Caramel Layered Ice Cream Cake
This Chocolate Caramel Layered Ice Cream Cake is a dream come true for busy home cooks. It’s incredibly easy to whip up, requiring no baking at all! Just layer, freeze, and serve. The combination of rich chocolate and creamy vanilla ice cream, topped with luscious caramel, creates a flavor explosion that’s hard to resist. Plus, it’s perfect for any occasion, making it a versatile dessert that everyone will adore.
Ingredients for Chocolate Caramel Layered Ice Cream Cake
Gathering the right ingredients is the first step to creating this indulgent Chocolate Caramel Layered Ice Cream Cake. Here’s what you’ll need:
- Chocolate sandwich cookies: These form the crunchy base of your cake. They add a rich chocolate flavor and a satisfying crunch.
- Unsalted butter: This binds the cookie crumbs together, creating a sturdy crust. Unsalted is best to control the overall saltiness.
- Chocolate ice cream: The star of the show! Choose a high-quality chocolate ice cream for a rich, creamy layer.
- Vanilla ice cream: This adds a smooth contrast to the chocolate. You can opt for homemade or store-bought, whichever you prefer.
- Caramel sauce: Drizzling this over the layers adds a sweet, gooey element. You can use store-bought or make your own for a personal touch.
- Whipped topping: This lightens up the dessert and adds a fluffy finish. You can use homemade whipped cream for an extra special touch.
- Chocolate chips: These are perfect for sprinkling on top, adding a little extra chocolatey goodness and texture.
For those looking to mix things up, consider adding chopped nuts or toffee bits for a delightful crunch. If you want a refreshing twist, swap the chocolate ice cream for mint chocolate chip. The exact quantities for each ingredient are listed at the bottom of the article, ready for printing!
How to Make Chocolate Caramel Layered Ice Cream Cake
Creating this Chocolate Caramel Layered Ice Cream Cake is a breeze! Follow these simple steps, and you’ll have a stunning dessert that’s sure to impress. Let’s dive into the deliciousness!
Step 1: Prepare the Cookie Crust
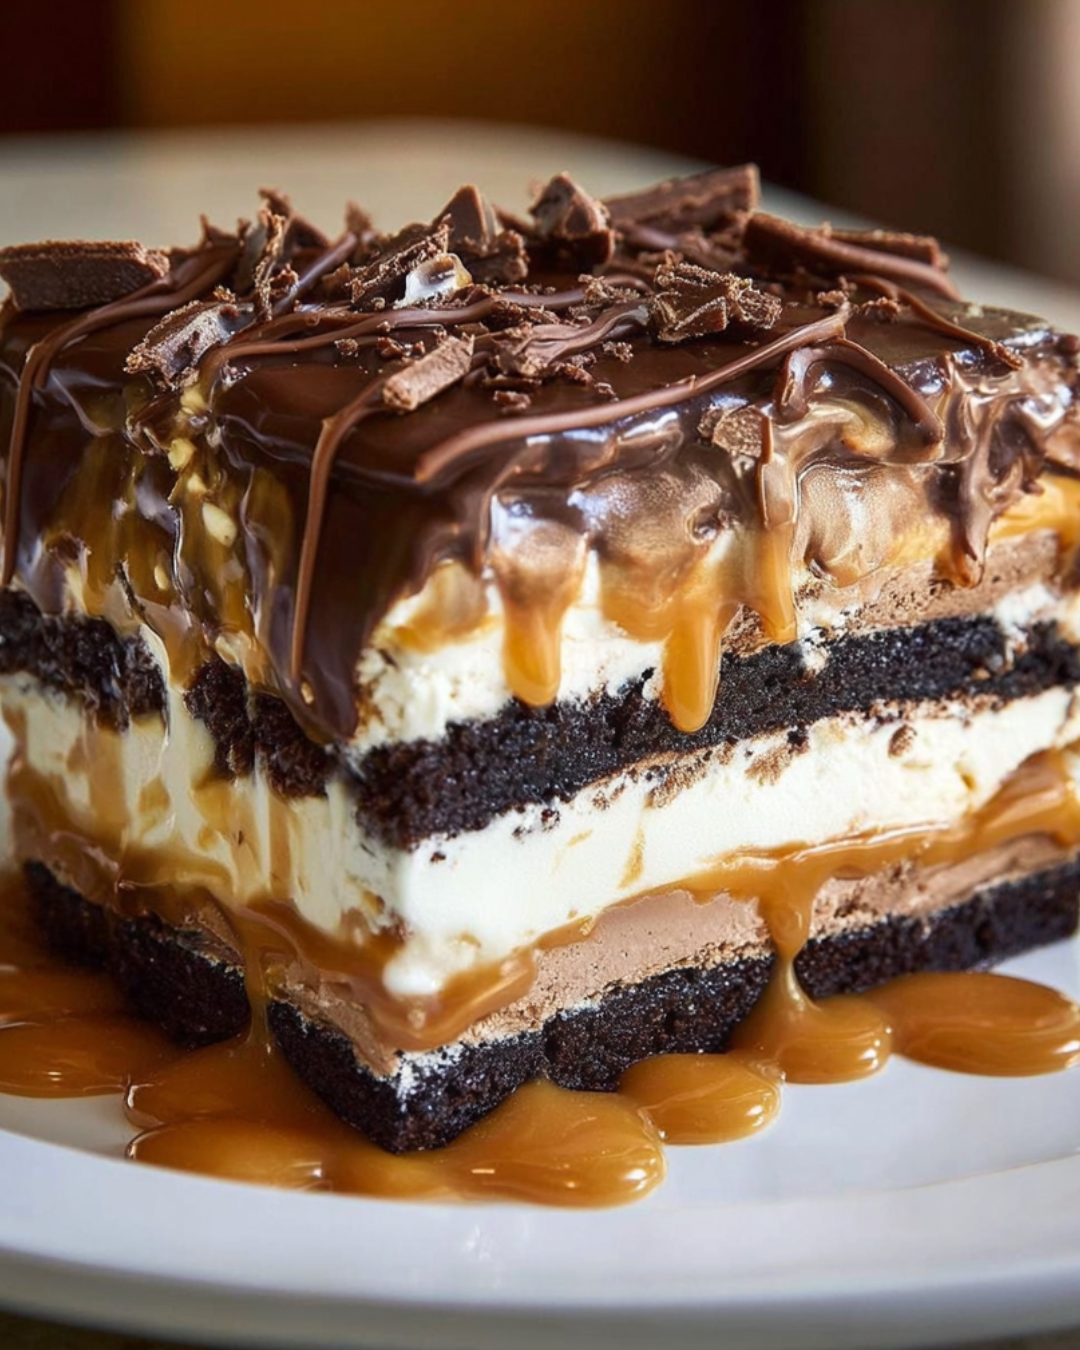
Start by combining the crushed chocolate sandwich cookies with melted butter in a medium bowl. Mix them until the crumbs are evenly coated. This mixture will form the base of your cake. Next, press the cookie mixture firmly into the bottom of a 9×13 inch baking dish. Make sure it’s compact to create a sturdy crust. Pop it in the freezer for about 15 minutes to set. This step is crucial for a solid foundation!
Step 2: Add the Chocolate Ice Cream Layer
Once the crust is set, it’s time for the chocolate ice cream! Take your softened chocolate ice cream and spread it evenly over the cookie crust. Use a spatula to smooth it out, ensuring every corner is filled. This layer is where the magic begins! After spreading, return the dish to the freezer for about 30 minutes. This helps the chocolate layer firm up nicely before adding the next layer.
Step 3: Drizzle with Caramel Sauce
After the chocolate ice cream has set, it’s time to drizzle! Take half of your caramel sauce and gently drizzle it over the chocolate layer. This adds a sweet, gooey surprise that complements the rich chocolate perfectly. Don’t be shy—let that caramel flow!
Step 4: Add the Vanilla Ice Cream Layer
Now, let’s bring in the vanilla ice cream! Spread the softened vanilla ice cream over the caramel layer, smoothing it out just like you did with the chocolate. This layer adds a creamy contrast that balances the flavors beautifully. Once it’s evenly spread, return the cake to the freezer for another 30 minutes. This will help the layers meld together, creating a delightful treat.
Step 5: Finish with Toppings
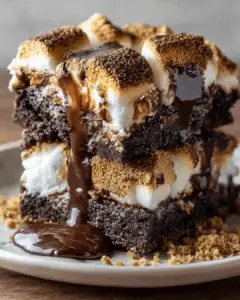
It’s time for the finishing touches! Remove the cake from the freezer and spread the whipped topping over the vanilla ice cream layer. This adds a light, fluffy texture that’s irresistible. Next, sprinkle chocolate chips on top for that extra chocolatey goodness. Finally, drizzle the remaining caramel sauce over everything. This is where the cake really shines, making it look as good as it tastes!
Step 6: Freeze and Serve
Cover the dish with plastic wrap and freeze the cake for at least 4 hours, or until it’s firm. Before serving, let the cake sit at room temperature for about 10 minutes. This will soften it slightly, making slicing a breeze. Now, you’re ready to enjoy a slice of this heavenly Chocolate Caramel Layered Ice Cream Cake!
Tips for Success
- Make sure your ice cream is softened before spreading; it makes layering much easier.
- For a cleaner slice, use a warm knife to cut through the cake.
- Feel free to customize with your favorite toppings, like nuts or sprinkles.
- Let the cake sit out for a few minutes before serving for the best texture.
- Store leftovers in an airtight container to keep it fresh.
Equipment Needed
- 9×13 inch baking dish: A standard size for this cake. You can use a glass or metal dish.
- Medium mixing bowl: For combining the cookie crust ingredients. Any bowl will do!
- Spatula: Essential for spreading ice cream layers evenly.
- Plastic wrap: To cover the cake while it freezes.
- Knife: For slicing the cake when it’s ready to serve.
Variations
- Mint Chocolate Chip Twist: Swap the chocolate ice cream for mint chocolate chip for a refreshing flavor that’s perfect for summer.
- Nutty Delight: Add chopped nuts or toffee bits between the layers for an extra crunch and flavor boost.
- Fruit Fusion: Layer in some fresh berries or banana slices for a fruity contrast that brightens up the dessert.
- Vegan Option: Use dairy-free ice cream and coconut whipped cream to create a delicious vegan version of this cake.
- Chocolate Lovers’ Dream: Incorporate chocolate fudge sauce between the layers for an even richer chocolate experience.
Serving Suggestions
- Pair with a scoop of vanilla ice cream for an extra creamy experience.
- Serve alongside fresh berries for a pop of color and freshness.
- Drizzle additional caramel sauce on individual slices for a decadent touch.
- Enjoy with a hot cup of coffee or a cold glass of milk.
FAQs about Chocolate Caramel Layered Ice Cream Cake
Can I make this Chocolate Caramel Layered Ice Cream Cake ahead of time?
Absolutely! This cake is perfect for making ahead. Just prepare it, freeze it, and it will be ready when you are. It can be stored in the freezer for up to a week.
What can I substitute for chocolate sandwich cookies?
If you’re not a fan of chocolate sandwich cookies, you can use graham crackers or vanilla wafers. Both will create a delicious crust, just with a different flavor profile.
How do I store leftovers of the ice cream cake?
Store any leftovers in an airtight container in the freezer. This will keep it fresh and ready for your next sweet craving!
Can I use homemade ice cream for this recipe?
Definitely! Homemade ice cream can add a personal touch and unique flavors to your Chocolate Caramel Layered Ice Cream Cake. Just ensure it’s softened before layering.
Is this dessert suitable for special diets?
Yes! You can easily adapt this recipe for various diets. Use dairy-free ice cream and whipped topping for a vegan version, or swap in gluten-free cookies for a gluten-free treat.
Final Thoughts
Creating this Chocolate Caramel Layered Ice Cream Cake is more than just a cooking project; it’s an experience filled with joy and indulgence. Each layer tells a story, from the crunchy cookie crust to the creamy ice cream and luscious caramel drizzle. It’s a dessert that brings smiles and sparks conversations, perfect for gatherings or quiet nights at home. As you slice into this delightful cake, you’ll find that every bite is a celebration of flavors. So, gather your loved ones, serve up a slice, and relish the sweet moments that come with it!
PrintChocolate Caramel Layered Ice Cream Cake: Delight in Every Slice!
- Total Time: 4 hours 30 minutes
- Yield: Serves 12
- Diet: Vegetarian
Description
A delicious and indulgent Chocolate Caramel Layered Ice Cream Cake that combines rich chocolate and creamy vanilla ice cream with a crunchy cookie crust and drizzled caramel.
Ingredients
- 1 box (15.5 oz) chocolate sandwich cookies, crushed
- 1/2 cup unsalted butter, melted
- 1 quart chocolate ice cream, softened
- 1 quart vanilla ice cream, softened
- 1 cup caramel sauce, plus extra for drizzling
- 1 cup whipped topping
- 1/2 cup chocolate chips
Instructions
- In a medium bowl, combine the crushed chocolate sandwich cookies and melted butter. Mix until the crumbs are evenly coated.
- Press the cookie mixture into the bottom of a 9×13 inch baking dish to form a crust. Freeze for 15 minutes to set.
- Spread the softened chocolate ice cream evenly over the crust. Return to the freezer for 30 minutes.
- Drizzle half of the caramel sauce over the chocolate ice cream layer.
- Spread the softened vanilla ice cream over the caramel layer. Freeze for another 30 minutes.
- Remove the cake from the freezer and spread the whipped topping over the vanilla ice cream layer.
- Sprinkle chocolate chips on top and drizzle with remaining caramel sauce.
- Cover the dish with plastic wrap and freeze for at least 4 hours or until firm.
- Before serving, let the cake sit at room temperature for about 10 minutes to soften slightly for easier slicing.
Notes
- For a crunchier texture, add chopped nuts or toffee bits to the layers.
- Substitute the chocolate ice cream with mint chocolate chip for a refreshing twist.
- Prep Time: 30 minutes
- Cook Time: 0 minutes
- Category: Dessert
- Method: Freezing
- Cuisine: American
Nutrition
- Serving Size: 1 slice
- Calories: 320
- Sugar: 24g
- Sodium: 150mg
- Fat: 18g
- Saturated Fat: 10g
- Unsaturated Fat: 8g
- Trans Fat: 0g
- Carbohydrates: 38g
- Fiber: 1g
- Protein: 4g
- Cholesterol: 30mg