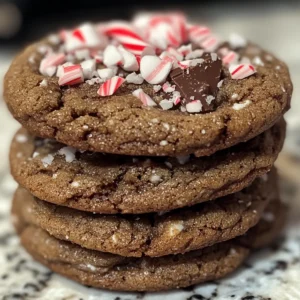
As the holiday season approaches, the scent of chocolate and peppermint wafts through my kitchen, instantly transporting me to cozy winter nights filled with laughter and warmth. Today, I’m excited to share my favorite recipe for Chocolate Peppermint Cookies with Ghirardelli Bark. These delightful treats are not only incredibly easy to whip up, but they’re also a surefire crowd-pleaser at any festive gathering. The chewy texture, combined with the rich chocolate and refreshing mint notes, makes every bite a joyous celebration of flavor. Plus, they’re versatile enough to showcase your favorite chocolate mix-ins or toppings, allowing you to personalize each batch. Ready to dive into a world of holiday baking bliss? Let’s get those cookie sheets ready!

Why are these cookies so special?
Chewy Delight: Each Chocolate Peppermint Cookie boasts a chewy texture that melts in your mouth, making them irresistible. Festive Flavors: The rich Ghirardelli peppermint bark paired with refreshing mint creates a holiday flavor explosion. Easy to Personalize: With options to mix in your favorite chocolates or toppings, each batch can reflect your style. Quick Bake Time: These cookies come together in just minutes and bake in around 10-12, perfect for last-minute gatherings. Crowd Favorite: They’re a surefire hit at holiday parties and make a delightful pairing with hot cocoa or coffee.
Chocolate Peppermint Cookie Ingredients
Get ready to bake the most delightful holiday treats!
For the Cookie Base
- Flour – Ensures the cookies hold their shape; measure carefully to avoid density.
- Sugar – Adds sweetness; brown sugar works wonders for chewier cookies.
- Butter – Use unsalted and let it soften for a creamy mixture.
- Egg – Binds the ingredients and adds moisture; room temperature is best for smooth blending.
- Baking Soda – Acts as a leavening agent; make sure it’s fresh for perfect rise.
For the Flavor
- Chocolate Peppermint Bark – The star ingredient that infuses the cookies with holiday cheer; you can swap it for any favorite chocolate if desired.
- Crushed Candy Canes – Adds a festive crunch and vibrant color; optional for those who prefer a simpler treat.
These delicious Chocolate Peppermint Cookies are sure to delight your friends and family this season!
Step‑by‑Step Instructions for Chocolate Peppermint Cookies
Step 1: Preheat the Oven
Begin your baking journey by preheating your oven to 350°F (175°C). This ensures that your Chocolate Peppermint Cookies bake evenly and achieve that perfect chewy texture. While the oven warms up, gather all your ingredients and line a baking sheet with parchment paper to prepare for those delightful cookie dough balls.
Step 2: Cream the Butters and Sugars
In a large mixing bowl, combine softened unsalted butter with both granulated and brown sugars. Using an electric mixer, beat on medium speed for about 2-3 minutes, until the mixture is light and fluffy—a key step for the perfect texture. Make sure everything is well incorporated before moving to the next step.
Step 3: Incorporate the Egg
Add one room temperature egg to your mixture, beating on low speed just until blended. This step is crucial as the egg will bind your ingredients together and contribute moisture. Don’t worry if the mixture appears slightly curdled; it will smooth out as you continue.
Step 4: Mix in the Dry Ingredients
Gradually add the all-purpose flour and baking soda to the wet ingredients, mixing on low speed just until the dough comes together. Avoid overmixing to ensure your Chocolate Peppermint Cookies remain light and tender rather than dense. This is where your beautiful cookie dough starts to take shape!
Step 5: Fold in the Peppermint Bark
Gently fold in the chopped Ghirardelli peppermint bark using a spatula, ensuring that the rich chocolate and mint flavors are evenly distributed throughout the dough. This step is all about enhancing the festive spirit of your cookies, so take care to mix without breaking the delightful chunks.
Step 6: Portion the Dough
Using a cookie scoop, portion out the dough onto your prepared baking sheet, spacing them about 2 inches apart. This gives your cookies room to spread while baking. For an extra festive touch, generously sprinkle the tops of each cookie dough ball with crushed candy canes, adding color and crunch.
Step 7: Bake the Cookies
Pop the baking sheet into your preheated oven and bake for 10-12 minutes. You’ll know they’re ready when the edges are set, yet the centers still appear soft and slightly underbaked. This timing is crucial for achieving that delightful chewy texture characteristic of Chocolate Peppermint Cookies.
Step 8: Cool and Transfer
After baking, remove the cookies from the oven and allow them to cool on the baking sheet for about 5 minutes. This resting time helps set them while making them easy to transfer without falling apart. Once a bit firmer, gently move them to a wire rack to cool completely and let those festive aromas fill your kitchen!

Expert Tips for Chocolate Peppermint Cookies
-
Measure Ingredients Accurately: Proper measuring is crucial for cookie success. Too much flour can lead to dense cookies, while too little makes them overly sticky.
-
Room Temperature Ingredients: Ensure your butter and egg are at room temperature. This helps create a smooth batter that leads to the perfect chewy texture in your Chocolate Peppermint Cookies.
-
Don’t Overmix: Once you add the flour, mix just until combined. Overmixing can toughen the dough and result in cookies that are less tender.
-
Even Baking: Use a cookie scoop for uniformly sized dough balls. This ensures even baking and helps each cookie achieve that delightful chewy goodness.
-
Cool Properly: Allow cookies to cool on the baking sheet before transferring them to a wire rack. This helps them set perfectly without crumbling.
-
Storage Tips: Store leftover cookies in an airtight container for up to 3 days. For longer freshness, freeze cookie dough balls for a quick treat whenever the craving strikes.
What to Serve with Chocolate Peppermint Cookies
Imagine a cozy holiday gathering filled with laughter, warm drinks, and the sweet aroma of baked goodies wafting through the air.
-
Hot Cocoa: A rich, creamy cup complements the minty freshness and enhances the chocolatey goodness of the cookies. It’s a classic winter pairing.
-
Peppermint Bark Ice Cream: This cool and creamy treat echoes the peppermint in the cookies, creating a refreshing dessert experience that’s hard to resist.
-
Spiced Chai Latte: The warm spices in chai balance the sweetness of the cookies. Sipping this is like wrapping up in a warm blanket on a chilly day.
-
Chocolate Fondue: Dip chunks of cookie in melted chocolate for a decadent twist. This interactive dessert brings fun and flavor to your gathering.
-
Milk: A simple glass of cold milk provides a classic finish to your cookie experience, balancing the rich flavors beautifully.
-
Gingerbread Cookies: Offering a ginger-spiced contrast, gingerbread brings a delightful variety to your dessert table during the festive season.
Make Ahead Options
These Chocolate Peppermint Cookies are perfect for meal prep enthusiasts! You can prepare the cookie dough up to 24 hours in advance, allowing you to enjoy a festive treat without the last-minute rush. Simply mix the dough, portion it onto a parchment-lined baking sheet, and then cover it tightly and refrigerate. To maintain their delightful texture, avoid overmixing and ensure they are stored in an airtight container. When you’re ready to bake, simply preheat your oven and bake the cookies for 10-12 minutes. The end result will be just as delicious, ensuring you savor those rich chocolate and refreshing peppermint flavors with ease during the busy holiday season!
Chocolate Peppermint Cookie Variations
Mixing things up with your cookies can be a delightful adventure in the kitchen!
-
White Chocolate: Swap out peppermint bark for creamy white chocolate chips for a sweeter twist.
-
Dark Chocolate: Substitute with rich dark chocolate chunks to intensify the chocolate flavor and create a decadent treat.
-
Nutty Addition: Toss in some chopped walnuts or pecans for added crunch and a nutty nuance that pairs beautifully with the mint.
-
Caramel Surprise: Incorporate bits of caramel or toffee pieces for a chewy and sweet unexpected surprise in each bite.
-
Spicy Kick: Add a pinch of cayenne pepper or chili powder for a warm, spicy flavor that enhances the sweetness and peppermint.
-
Gluten-Free: Use a 1:1 gluten-free flour blend to make these cookies safe for your gluten-sensitive friends while keeping them delicious.
-
Mint Extract: Boost the minty flavor with an extra splash of peppermint extract in the dough, perfect for mint lovers!
For more sweet inspiration, check out these Chocolate Pumpkin Cookies, or if you’re craving something creamy, try the Sugar Cookie Cheesecake. Happy baking!
How to Store and Freeze Chocolate Peppermint Cookies
Room Temperature: Keep baked cookies in an airtight container at room temperature for up to 3 days to maintain freshness and chewy texture.
Fridge: If you prefer to stretch their shelf life, store cookies in the fridge for up to a week. Just remember to bring them to room temperature before serving for the best flavor experience.
Freezer: Freeze unbaked cookie dough balls for up to 3 months. Place them on a baking sheet to freeze individually, then transfer to a zip-top bag. Bake from frozen, adding an extra minute or two to the baking time.
Reheating: To enjoy baked cookies warm, microwave them briefly for about 10-15 seconds until just warmed through. This revitalizes their delightful chocolate and peppermint flavor.

Chocolate Peppermint Cookies Recipe FAQs
How do I choose the best chocolate peppermint bark for this recipe?
Absolutely! When selecting chocolate peppermint bark, look for quality brands like Ghirardelli that use real chocolate and natural peppermint oils for the best flavor. Aim for a bark with a good balance of chocolate and mint to ensure your cookies have that delightful holiday taste. Avoid barks that contain artificial flavors or excessive fillers.
How should I store my Chocolate Peppermint Cookies?
For optimal freshness, store your baked Chocolate Peppermint Cookies in an airtight container at room temperature for up to 3 days. If you’d like to extend their shelf life, you can refrigerate them for up to a week. Just remember to let them come to room temperature before enjoying to refresh their flavors and textures!
Can I freeze the cookie dough, and if so, how?
Certainly! Freezing cookie dough is a fantastic way to ensure you have fresh Chocolate Peppermint Cookies anytime. Start by scooping the dough into individual balls on a parchment-lined baking sheet. Freeze them for about 1 to 2 hours until solid. Once frozen, transfer the dough balls to a zip-top bag, and they can be stored for up to 3 months. When you’re ready to bake, simply place the frozen dough on a baking sheet and add an extra minute or two to the baking time.
What should I do if my cookies spread out too much while baking?
Very! If your cookies spread excessively, a few adjustments can help. First, check if you measured your flour accurately; too little flour can cause spreading. Also, ensure your butter was not too soft initially. If the dough feels too warm before baking, chill it in the fridge for 20-30 minutes to firm it up before scooping and baking.
Are these cookies safe for pets or people with allergies?
It’s wise to be cautious! Chocolate and peppermint can be toxic to dogs, so make sure to keep these cookies away from your furry friends. Additionally, if you or your guests have any allergies, always verify ingredient labels, especially concerning flour, eggs, and butter. You could also explore gluten-free flour options to accommodate gluten sensitivities.

Irresistibly Chewy Chocolate Peppermint Cookie Recipe
Ingredients
Equipment
Method
- Preheat your oven to 350°F (175°C) and line a baking sheet with parchment paper.
- In a large mixing bowl, combine softened unsalted butter with both granulated and brown sugars. Beat on medium speed for about 2-3 minutes until light and fluffy.
- Add one room temperature egg to the mixture, beating on low speed just until blended.
- Gradually mix in the all-purpose flour and baking soda until the dough comes together. Avoid overmixing.
- Gently fold in the chopped Ghirardelli peppermint bark using a spatula.
- Using a cookie scoop, portion out the dough onto the prepared baking sheet, spacing them about 2 inches apart. Optionally, sprinkle with crushed candy canes.
- Bake for 10-12 minutes until edges are set and centers appear soft.
- Allow cookies to cool on the baking sheet for about 5 minutes before transferring to a wire rack to cool completely.