As the aroma of freshly baked cookies wafts through the air, it instantly evokes the warmth of holiday gatherings and cherished memories. These Christmas Crinkle Cookies bring both joy and ease to your festive baking with their delightful combination of soft and chewy textures, all while being surprisingly simple to make. Using a base of white cake mix, a splash of vibrant food colorings, and a dusting of powdered sugar, this quick and easy recipe makes it a breeze to whip up a batch that will dazzle your guests. Not only do these cookies add a colorful touch to your dessert table, but they also fill your kitchen with that magical, nostalgic holiday spirit. Curious about how to create a batch full of holiday cheer? Let’s dive into this fun and festive baking adventure!
Why Are Christmas Crinkle Cookies So Adored?
Simplicity is Key: This recipe utilizes basic pantry staples, making it approachable for bakers of any skill level.
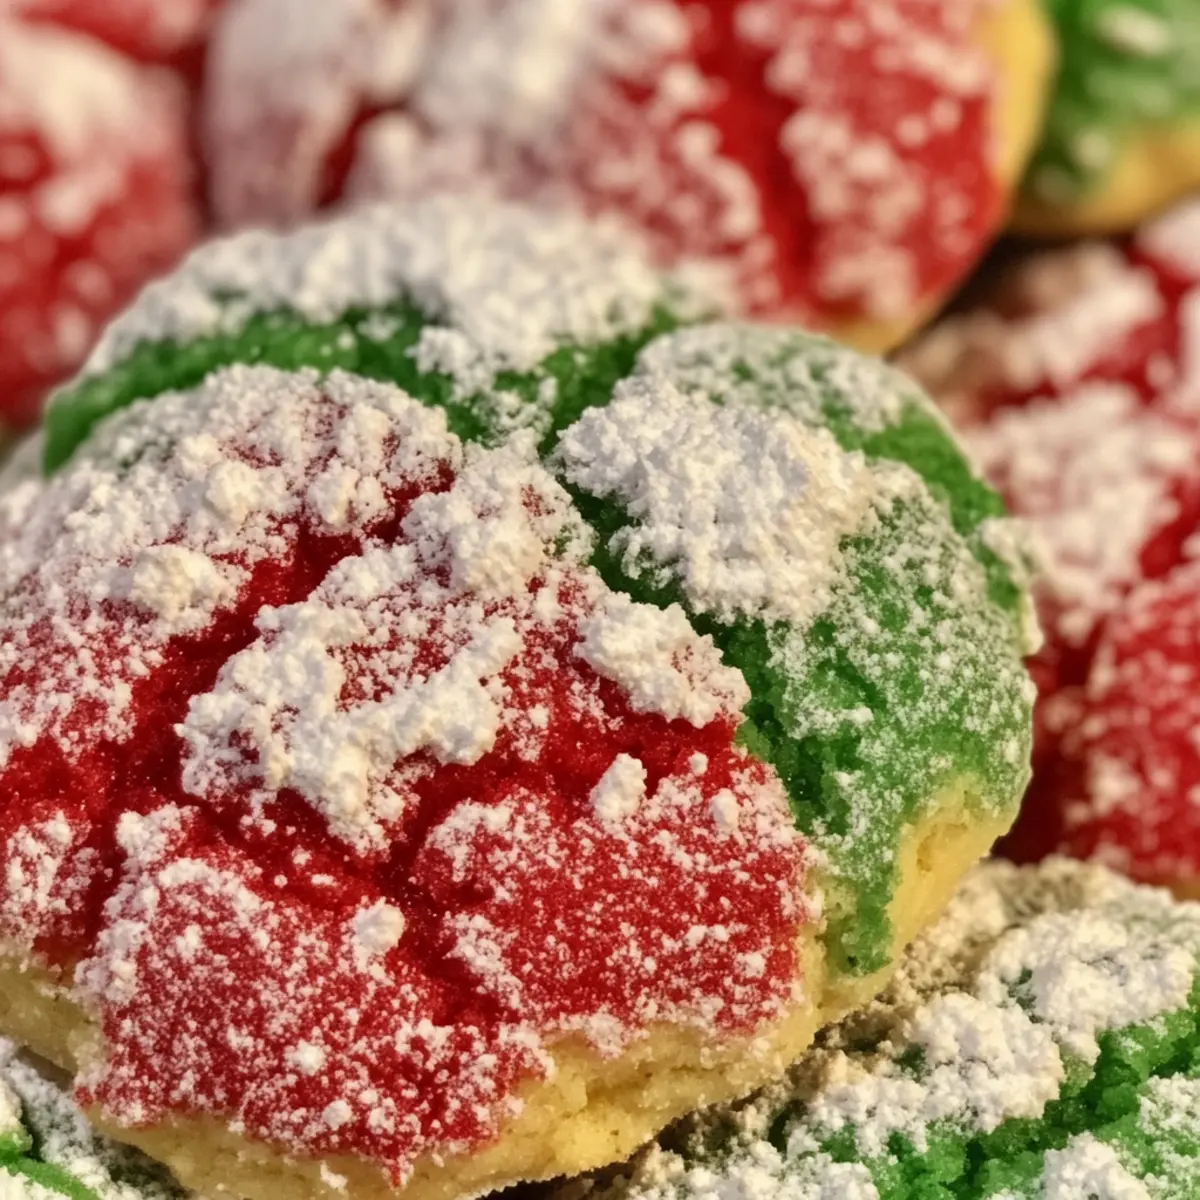
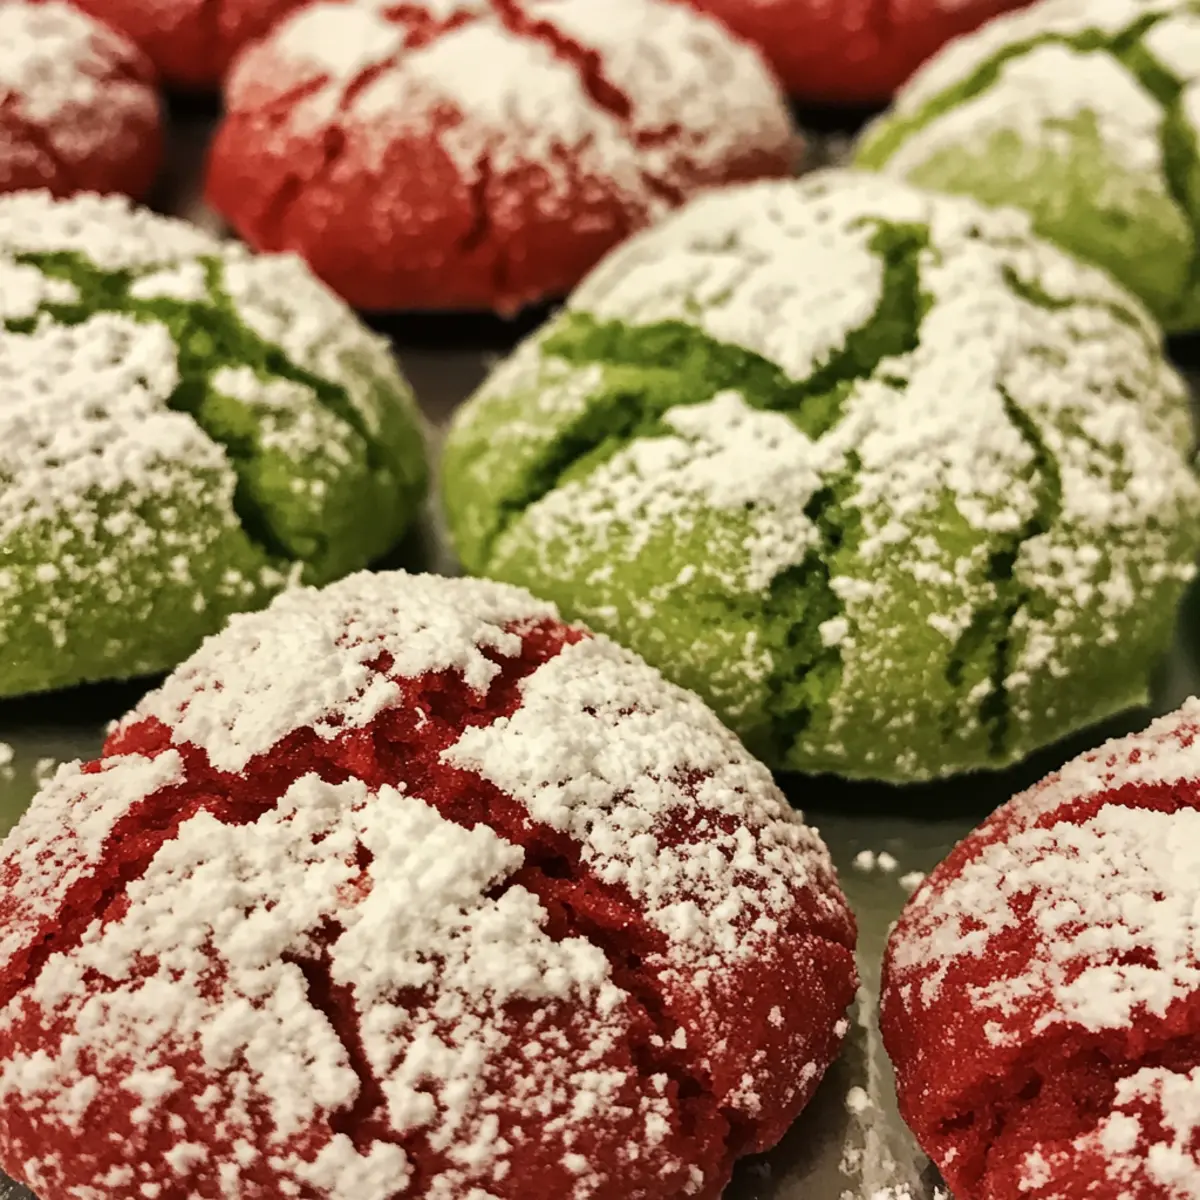
Vibrant Holiday Colors: The festive hues from food coloring create stunning visual appeal, perfect for spreading holiday cheer.
Soft and Chewy Texture: With a soft, cake-like consistency and a delightful crackle, each bite is an indulgent treat.
Quick Prep Time: In just half an hour, you can have a fresh batch hot from the oven, saving you valuable time during the busy holiday season.
Crowd-Pleasing Delight: These cookies are sure to impress at gatherings or cookie exchanges, easily becoming a favorite among friends and family.
If you’re looking to explore more festive baking ideas, check out my Making Christmas Crack or try some Festive Cookies Sweet recipes for a complete holiday experience!
Christmas Crinkle Cookies Ingredients
• Ready to create these cheerful treats? Here’s what you’ll need!
For the Dough
- White Cake Mix – This forms the base, giving your cookies that soft and delightful texture.
- Eggs – Essential for binding, adding moisture and structure to your cookies.
- Vanilla Extract – Elevates flavor, providing a rich sweetness that complements the cookie.
- Vegetable Oil – Keeps the cookies moist; feel free to substitute with melted butter for added flavor.
For the Color
- Red Food Coloring Gel – Ensures vibrant Christmas colors without altering the dough’s consistency.
- Green Food Coloring Gel – Adds festive flair, creating an eye-catching look for your cookies.
For the Finish
- Powdered Sugar – Creates that iconic snowy topping, adding sweetness and preventing cookies from sticking.
These Christmas Crinkle Cookies are not just a treat; they embody the spirit of the holiday season with every delicious bite!
Step‑by‑Step Instructions for Christmas Crinkle Cookies
Step 1: Preheat and Prepare
First, preheat your oven to 375°F (190°C) to ensure it’s ready for baking. While the oven warms, line a baking sheet with parchment paper or a silicone mat, which helps prevent sticking. This step is essential as it sets the stage for your delightful Christmas Crinkle Cookies to bake evenly and come out perfectly crispy on the edges yet soft in the center.
Step 2: Mix the Dough
In a large mixing bowl, combine the eggs, vegetable oil, and vanilla extract before adding the cake mix. Use a sturdy spatula or wooden spoon to stir until all ingredients are well blended, ensuring there are no dry pockets of cake mix. The dough should be thick and slightly sticky, ready to be transformed into colorful holiday treats!
Step 3: Color the Dough
Once your dough is ready, divide it into two equal portions, placing each in separate bowls. Add red food coloring gel to one bowl and green food coloring gel to the other, stirring until the colors are vibrant and evenly distributed. This creates the cheerful and festive look of your Christmas Crinkle Cookies, making them stunning for any holiday gathering.
Step 4: Chill the Dough
To make handling the dough easier and enhance the crinkle effect during baking, chill both dough portions in the refrigerator for about 30 minutes. This short rest helps the dough firm up, allowing you to scoop, roll, and coat your cookies with powdered sugar without any sticky hassles.
Step 5: Form and Coat the Cookies
After chilling, take the dough out and use a cookie scoop to portion out balls. Roll each ball in powdered sugar to achieve that classic snowy appearance, making sure they’re well-coated. Place them on the prepared baking sheet, leaving enough space between each cookie to allow for spreading during baking, ensuring they keep their beautiful shape.
Step 6: Bake the Cookies
Slide the baking sheet into the preheated oven and bake for 9-11 minutes. Keep an eye on the cookies; they should have set edges while the centers remain soft and puffy. You’ll see the characteristic cracks forming as they bake. Once ready, remove them from the oven and let them sit for a minute before transferring to a wire rack to cool completely and further develop their enticing flavor.
Step 7: Serve and Enjoy
Once your Christmas Crinkle Cookies have cooled, they’re ready to serve! Arrange them on a festive platter or gift them in decorative jars to share with friends and family. The combination of soft, chewy texture and a touch of holiday color will surely spread joy and delight wherever they go.
How to Store and Freeze Christmas Crinkle Cookies
Room Temperature: Store your cookies in an airtight container at room temperature for up to 1 week, ensuring they stay soft and chewy.
Fridge: If you prefer to keep them slightly longer, you can refrigerate the cookies in a sealed container for up to 2 weeks, but they may become a bit firmer.
Freezer: For longer storage, freeze the cookies in a single layer, then transfer them to a freezer-safe bag. They’ll stay fresh for up to 3 months.
Reheating: To enjoy warm cookies, pop frozen ones in a preheated oven at 350°F for about 5 minutes. The magic of Christmas Crinkle Cookies will fill your kitchen once again!
Expert Tips for Christmas Crinkle Cookies
-
Use Gel Coloring: Gel food coloring is ideal; liquid kinds can change the dough’s texture, affecting the final look and taste of your Christmas Crinkle Cookies.
-
Chill Thoroughly: Don’t skip chilling the dough! This step improves handling and enhances the signature crackling effect when baking.
-
Watch the Timer: Ovens vary, so keep an eye on your cookies. Start checking for doneness around the 9-minute mark to avoid overbaking.
-
Tackle Stickiness: If your dough feels too sticky while scooping, mix in a tablespoon of flour to achieve the right consistency for your Christmas Crinkle Cookies.
-
Store Properly: To maintain freshness, store cooled cookies in an airtight container at room temperature for up to a week, ensuring they stay chewy and delicious.
Make Ahead Options
These Christmas Crinkle Cookies are perfect for busy home cooks looking to save time during the holiday season! You can prepare the cookie dough up to 24 hours in advance by mixing it as per the recipe, chilling it, and then covering it tightly with plastic wrap before refrigerating. This helps maintain the moisture and prevents the dough from drying out. When you’re ready to bake, simply scoop, roll in powdered sugar, and place on a baking sheet. Alternatively, you can also freeze the formed cookie dough balls for up to 3 months. Just thaw them in the refrigerator overnight before baking for the freshest results. Enjoy hassle-free baking and delightful cookies all season long!
What to Serve with Christmas Crinkle Cookies
As you prepare to enjoy these delightful cookies, think about how to create a complete festive experience for you and your loved ones.
-
Rich Hot Chocolate: A warm, velvety cup complements the sweetness of the cookies, setting a cozy mood for holiday gatherings. Surprise your guests with a sprinkle of marshmallows for an indulgent touch!
-
Vanilla Ice Cream: The creamy, cold treat creates a delightful contrast to the warm cookies, transforming each bite into a decadent dessert experience. Plus, the melt-in-your-mouth texture paired with vibrant cookies is simply irresistible.
-
Peppermint Bark: This crunchy, minty delight shares a festive flavor profile that wonderfully complements the soft, chewy cookies. The combination of chocolate and peppermint also brings a nostalgic taste to holiday celebrations.
-
Fresh Berries Salad: A light and refreshing berry mix balances the richness of your Christmas Crinkle Cookies. The tartness of the berries enhances the sweetness of the cookies, adding a vibrant, colorful burst on the plate.
-
Spiced Eggnog: Embrace the holiday spirit with a glass of creamy eggnog. Its rich spices and creamy texture pair beautifully with the cookies, making each sip a nostalgic journey to festive times past.
-
Coffee or Espresso: The warm notes of coffee contrast the sweetness of the cookies, making for a delightful after-dinner treat. A splash of cream can enhance the experience, bringing an added layer of flavor to your gathering.
-
Gingerbread House Kit: If you’re looking for a fun food experience, pair these cookies with a gingerbread house kit for a creative and festive activity! Decorating together can be a joyful bonding time for family and friends.
Christmas Crinkle Cookies Variations & Substitutions
Feel free to put your own spin on these delightful cookies, using creativity and flavors that speak to you!
-
Colorful Twist: Use different gel colors for holidays like pastel shades for Easter or autumn hues for Thanksgiving. It’s a fun way to make these cookies fit any celebration!
-
Flavor Boost with Citrus: Incorporate a teaspoon of lemon or orange zest into the dough for a refreshing citrus kick that brightens every bite. This twist brings a fragrant note to your festive treat.
-
Dairy-Free Delight: Swap eggs for flax eggs (1 tablespoon of ground flaxseed mixed with 2.5 tablespoons of water) to make a vegan version of these cookies without losing any of that magic!
-
Chocolate Lover’s Version: Use chocolate cake mix instead of white for a rich, chocolatey crinkle cookie that still gets that gorgeous crackly finish. If you close your eyes, it almost tastes like brownie heaven!
-
Candy Coated: Mix in holiday-themed sprinkles or mini chocolate chips before rolling in powdered sugar to add an extra layer of deliciousness and festive flair that draws excitement from anyone who sees them!
-
Crunchy Topping: Replace powdered sugar with crushed candy canes or walnuts for an exciting texture contrast. The crunch adds an unexpected dimension to these sweet cookies that can surprise and delight.
-
Adjusted Sweetness: For a less sugary treat, reduce the amount of powdered sugar used for coating. You can even try rolling them in finely shredded coconut for a tropical vibe!
If you’re feeling adventurous, why not explore more fun and festive baking options by checking out my Fun Christmas Candy or try some mouthwatering Double Chocolate Pumpkin Cookies to expand your holiday menu? The possibilities are endless!

Christmas Crinkle Cookies Recipe FAQs
What type of cake mix should I use for Christmas Crinkle Cookies?
I recommend using a standard white cake mix, specifically a 13.25-ounce box, for the best results. It provides that tender and fluffy texture that makes these cookies a delight, ensuring a cake-like consistency.
How should I store Christmas Crinkle Cookies?
Store your cookies in an airtight container at room temperature for up to 1 week. This will help retain their soft and chewy texture. If you’re looking to keep them fresh for a longer period, refrigerating them in a sealed container can extend their lifespan to about 2 weeks, although they may become firmer.
Can I freeze Christmas Crinkle Cookies?
Absolutely! To freeze, start by placing the cookies in a single layer on a baking sheet and freeze until solid. Then, transfer them to a freezer-safe bag or container. They’ll keep well for up to 3 months. When you’re ready to enjoy them, just pop them in a preheated oven at 350°F for about 5 minutes to restore their warmth and delightful texture.
What if my cookie dough is too sticky?
If you find that the dough is overly sticky, don’t worry! Simply incorporate a tablespoon of flour at a time until you reach a manageable consistency. This will make it easier to scoop and roll the dough into balls for coating in powdered sugar.
Is there a way to make Christmas Crinkle Cookies gluten-free or dairy-free?
Yes, you can make these cookies gluten-free by substituting the white cake mix with a gluten-free alternative. Additionally, to make them dairy-free, use a dairy-free cake mix and substitute vegetable oil with melted coconut oil or another non-dairy option. Always check label ingredients to ensure they meet your dietary needs!
How do I achieve the perfect crinkle effect on my cookies?
To get that beautiful crinkle on your Christmas Crinkle Cookies, it’s important to chill the dough for about 30 minutes before baking. This solidifies the fat and helps create those lovely cracks as the cookies bake. Also, remember to roll the dough balls in powdered sugar generously before baking, as this contributes to the classic snowy appearance!
Delightful Christmas Crinkle Cookies Made Easy at Home
Ingredients
Equipment
Method
- Preheat your oven to 375°F (190°C) and line a baking sheet with parchment paper or a silicone mat.
- In a large mixing bowl, combine the eggs, vegetable oil, and vanilla extract before adding the cake mix. Stir until well blended.
- Divide the dough into two equal portions, adding red food coloring gel to one and green food coloring gel to the other.
- Chill both dough portions in the refrigerator for about 30 minutes.
- Use a cookie scoop to portion out balls from the chilled dough and roll each ball in powdered sugar.
- Place the coated balls on the prepared baking sheet, leaving enough space between them.
- Bake for 9-11 minutes, until the edges are set and the centers are soft. Let them cool on a wire rack.
- Arrange on a festive platter or gift them in decorative jars.