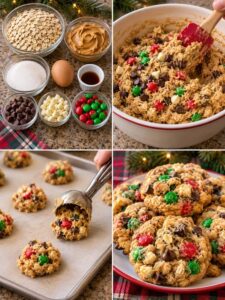
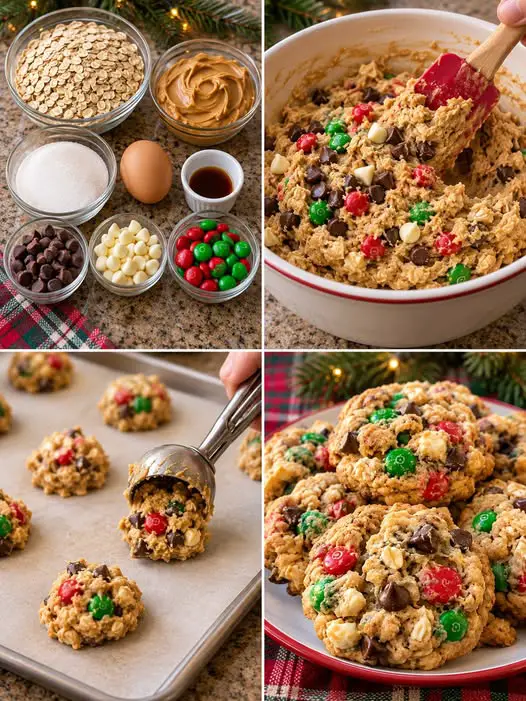
Introduction to Christmas Monster Cookies
The holiday season brings a whirlwind of joy, laughter, and, of course, delicious treats. Among the festive favorites, Christmas Monster Cookies stand out as a delightful way to spread cheer. These cookies are not just a quick solution for a busy day; they’re a fun project that the whole family can enjoy. With vibrant M&M’s, creamy peanut butter, and a sprinkle of holiday magic, they’re perfect for impressing loved ones or simply indulging yourself. Let’s dive into this joyful baking adventure that will fill your home with warmth and sweet aromas!
Why You’ll Love This Christmas Monster Cookies
Christmas Monster Cookies are the ultimate holiday treat that combines ease and flavor in every bite. They come together quickly, making them perfect for busy schedules. The delightful mix of M&M’s, chocolate chips, and sprinkles creates a festive explosion of taste and color. Plus, they’re a hit with kids and adults alike, ensuring smiles all around. Baking these cookies is not just about the end result; it’s about creating joyful memories in the kitchen!
Ingredients for Christmas Monster Cookies
Gathering the right ingredients is the first step to creating these festive delights. Here’s what you’ll need:
- Unsalted butter: Adds richness and helps create a soft texture.
- Creamy peanut butter: Provides a nutty flavor and chewy consistency.
- Brown sugar: Brings moisture and a hint of caramel sweetness.
- Granulated sugar: Balances the flavors and contributes to the cookie’s crisp edges.
- Large eggs: Acts as a binder, giving structure to the cookies.
- Vanilla extract: Enhances the overall flavor with a warm, sweet aroma.
- Old-fashioned rolled oats: Adds chewiness and a wholesome touch.
- All-purpose flour: The base for the cookie dough, providing stability.
- Baking soda: Helps the cookies rise and become fluffy.
- Salt: Balances sweetness and enhances flavors.
- Red and green M&M’s: Adds festive color and a chocolatey crunch.
- White chocolate chips: Offers a creamy sweetness that complements the other flavors.
- Mini chocolate chips: For an extra burst of chocolate in every bite.
- Christmas sprinkles: A fun, decorative touch that makes these cookies truly festive.
Feel free to customize your cookies! You can swap in different types of nut butters or chocolates based on your preferences. For exact measurements, check the bottom of the article where you can find everything available for printing.
How to Make Christmas Monster Cookies
Step 1: Preheat and Prepare
Start by preheating your oven to 350°F. This ensures your cookies bake evenly. While the oven warms up, line two baking sheets with parchment paper. This simple step prevents sticking and makes cleanup a breeze. Trust me, your future self will thank you for this little effort!
Step 2: Cream the Butters and Sugars
In a large mixing bowl, combine softened unsalted butter and creamy peanut butter. Add brown sugar and granulated sugar to the mix. Beat everything together until it’s creamy and smooth. This step is crucial for achieving that delightful texture in your Christmas Monster Cookies. The aroma will start to fill your kitchen!
Step 3: Add Eggs and Vanilla
Next, crack in two large eggs and pour in the vanilla extract. Mix until everything is well combined and smooth. The eggs act as a binder, giving your cookies structure. The vanilla adds a warm, inviting flavor that makes these cookies irresistible. You’ll want to sneak a taste!
Step 4: Combine Dry Ingredients
In a separate bowl, whisk together old-fashioned rolled oats, all-purpose flour, baking soda, and salt. This step ensures that your dry ingredients are evenly distributed. It’s like creating a secret blend that will elevate your cookies. The oats will add a delightful chewiness that everyone will love!
Step 5: Mix Wet and Dry Ingredients
Gradually add the dry mixture to the wet ingredients. Mix until a thick cookie dough forms. Don’t rush this step; it’s where the magic happens! The dough should be thick enough to hold its shape when scooped. If it feels too sticky, a little extra flour can help!
Step 6: Fold in the Fun
Now comes the fun part! Gently fold in the red and green M&M’s, white chocolate chips, mini chocolate chips, and Christmas sprinkles. This is where your cookies get their festive flair. Each bite will be a delightful surprise, bursting with color and flavor. It’s hard not to smile at this stage!
Step 7: Scoop and Shape
Scoop about two tablespoons of dough for each cookie and place them on the prepared baking sheets. Leave about two inches between each scoop. Gently flatten each dough ball and press a few extra M&M’s and sprinkles on top. This little touch makes them look extra festive and inviting!
Step 8: Bake to Perfection
Pop the baking sheets into the oven and bake for 10-12 minutes. Keep an eye on them! You want the edges to be lightly golden while the centers remain soft. This balance is key to achieving that perfect cookie texture. The smell wafting through your home will be heavenly!
Step 9: Cool and Enjoy
Once baked, allow the cookies to cool on the baking sheet for about five minutes. This helps them set before transferring them to a wire rack. Let them cool completely before diving in. Trust me, the wait will be worth it when you take that first bite of your Christmas Monster Cookies!
Tips for Success
- Use room temperature butter for easier creaming with sugars.
- Don’t overmix the dough; it should be thick but not dry.
- For chewier cookies, slightly underbake them.
- Experiment with different mix-ins like nuts or dried fruit.
- Chill the dough for 30 minutes if it feels too sticky.
Equipment Needed
- Mixing bowls: A large bowl for mixing and a smaller one for dry ingredients. Any size works!
- Electric mixer: A hand mixer or stand mixer makes creaming easier, but a whisk will do.
- Baking sheets: Use any flat baking tray; just line with parchment paper.
- Scoop or spoon: A cookie scoop ensures uniform sizes, but a tablespoon works too.
- Wire rack: For cooling cookies; a plate can substitute in a pinch.
Variations
- Nutty Delight: Swap out peanut butter for almond or cashew butter for a different nutty flavor.
- Gluten-Free Option: Use gluten-free flour instead of all-purpose flour to make these cookies gluten-free.
- Dark Chocolate Lovers: Replace white chocolate chips with dark chocolate chips for a richer taste.
- Fruit Twist: Add dried cranberries or chopped dried apricots for a fruity burst in every bite.
- Vegan Version: Substitute eggs with flaxseed meal mixed with water and use a plant-based butter alternative.
Serving Suggestions
- Milk: Pair your Christmas Monster Cookies with a cold glass of milk for a classic combo.
- Hot Cocoa: Serve alongside a warm mug of hot cocoa topped with whipped cream for extra coziness.
- Festive Platter: Arrange cookies on a colorful holiday platter for a beautiful presentation.
- Gift Idea: Package cookies in festive bags as homemade gifts for friends and family.
FAQs about Christmas Monster Cookies
As you embark on your baking journey with Christmas Monster Cookies, you might have a few questions. Here are some common queries that can help you along the way:
Can I make Christmas Monster Cookies ahead of time?
Absolutely! You can prepare the dough in advance and refrigerate it for up to 3 days. Just scoop and bake when you’re ready for fresh cookies!
How should I store my cookies?
Store your Christmas Monster Cookies in an airtight container at room temperature. They’ll stay fresh for up to a week, but I doubt they’ll last that long!
Can I freeze these cookies?
Yes, you can freeze the baked cookies! Just place them in a freezer-safe container. They’ll keep well for up to 3 months. Thaw them at room temperature before enjoying.
What can I substitute for peanut butter?
If you need a nut-free option, try sunflower seed butter or a creamy soy nut butter. Both will give you a similar texture without the nuts!
Are there any dietary modifications I can make?
Definitely! You can make these cookies gluten-free by using a gluten-free flour blend. For a vegan version, substitute eggs with flaxseed meal mixed with water and use plant-based butter.
Final Thoughts
Baking Christmas Monster Cookies is more than just a recipe; it’s a delightful experience that brings joy to your kitchen. The vibrant colors and sweet aromas create a festive atmosphere that fills your home with warmth. Each bite is a celebration of flavors, reminding us of the joy of sharing treats with loved ones. Whether you’re making them for a holiday gathering or simply indulging yourself, these cookies are sure to spark smiles and create lasting memories. So, roll up your sleeves, gather your ingredients, and let the holiday spirit shine through your baking!
PrintChristmas Monster Cookies: Bake Joyful Holiday Treats!
- Total Time: 27 minutes
- Yield: 24 cookies
- Diet: Vegetarian
Description
Delicious and festive Christmas Monster Cookies filled with M&M’s, chocolate chips, and sprinkles, perfect for holiday celebrations.
Ingredients
- ½ cup unsalted butter, softened
- ½ cup creamy peanut butter
- ¾ cup brown sugar, packed
- ½ cup granulated sugar
- 2 large eggs
- 1 teaspoon vanilla extract
- 1½ cups old-fashioned rolled oats
- 1 cup all-purpose flour
- ½ teaspoon baking soda
- ½ teaspoon salt
- 1 cup red and green M&M’s candies
- ½ cup white chocolate chips
- ½ cup mini chocolate chips
- ¼ cup Christmas sprinkles
Instructions
- Preheat oven to 350°F. Line two baking sheets with parchment paper.
- In a large bowl, beat softened butter, peanut butter, brown sugar, and granulated sugar until creamy.
- Add eggs and vanilla extract. Beat until smooth and fully combined.
- In a separate bowl, whisk together rolled oats, flour, baking soda, and salt.
- Gradually add the dry ingredients to the wet mixture. Mix until a thick cookie dough forms.
- Fold in the red and green M&M’s, white chocolate chips, mini chocolate chips, and Christmas sprinkles.
- Scoop about 2 tablespoons of dough for each cookie and place on the prepared baking sheets, leaving 2 inches between each cookie.
- Gently flatten each dough ball and press a few extra M&M’s and sprinkles on top.
- Bake for 10–12 minutes, until the edges are lightly golden and the centers look slightly soft.
- Allow cookies to cool on the baking sheet for 5 minutes before transferring to a wire rack.
- Let cool completely before serving.
Notes
- Store cookies in an airtight container for up to a week.
- Feel free to customize with different types of chocolate or candies.
- For a chewier cookie, do not overbake.
- Prep Time: 15 minutes
- Cook Time: 12 minutes
- Category: Dessert
- Method: Baking
- Cuisine: American
Nutrition
- Serving Size: 1 cookie
- Calories: 150
- Sugar: 10g
- Sodium: 100mg
- Fat: 7g
- Saturated Fat: 3g
- Unsaturated Fat: 4g
- Trans Fat: 0g
- Carbohydrates: 20g
- Fiber: 1g
- Protein: 3g
- Cholesterol: 20mg