Introduction to Christmas White Chocolate Mousse Domes
The holiday season brings a whirlwind of joy, laughter, and, of course, delicious treats. Among the festive delights, Christmas White Chocolate Mousse Domes stand out as a showstopper. These elegant little desserts are not just a feast for the eyes; they’re a delightful way to impress your loved ones without spending hours in the kitchen. With a creamy texture and a hint of sweetness, they’re perfect for holiday gatherings or cozy family dinners. Trust me, once you serve these, you’ll be the star of the dessert table!
Why You’ll Love This Christmas White Chocolate Mousse Domes
These Christmas White Chocolate Mousse Domes are a dream come true for any home cook. They’re surprisingly easy to whip up, making them perfect for busy holiday schedules. The rich, velvety mousse melts in your mouth, leaving a sweet, lingering taste that will have everyone asking for seconds. Plus, their stunning appearance adds a touch of elegance to your festive table, ensuring you’ll impress family and friends alike!
Ingredients for Christmas White Chocolate Mousse Domes
Gathering the right ingredients is the first step to creating these delightful Christmas White Chocolate Mousse Domes. Here’s what you’ll need:
- White Chocolate: The star of the show! Finely chopped for easy melting, it gives the mousse its creamy texture and sweet flavor.
- Heavy Whipping Cream: This adds richness and volume to the mousse. Dividing it helps achieve the perfect light and airy consistency.
- Vanilla Extract: A splash of this enhances the overall flavor, making each bite even more delightful.
- Unflavored Gelatin: Essential for setting the mousse, it ensures your domes hold their shape beautifully.
- Cold Water: Used to bloom the gelatin, allowing it to dissolve properly.
- Powdered Sugar: This sweetens the whipped cream without adding graininess, keeping the texture smooth.
- Finely Crushed Vanilla Cookies or Graham Crackers: These create a delicious base for the domes, adding a crunchy contrast to the creamy mousse.
- Unsalted Butter: Helps bind the cookie crumbs together, creating a sturdy base for your domes.
- Sweetened Condensed Milk: Adds a rich sweetness to the mirror glaze, making it glossy and irresistible.
- Granulated Sugar: Balances the flavors in the glaze, ensuring it’s perfectly sweet.
- White Gel Food Coloring: Optional, but it can enhance the visual appeal of your glaze, making it look even more festive.
- Red and Green Edible Sprinkles: These add a pop of color and holiday cheer to your finished domes.
- Edible Gold Dust: For a touch of luxury, this optional ingredient makes your desserts sparkle.
- Fresh Rosemary Sprigs: Optional, but they add a lovely aromatic touch and a hint of green.
- Small Sugar Pearls: These can be used for decoration, adding a whimsical touch to your festive treats.
For exact measurements, check the bottom of the article where you can find everything listed for easy printing!
How to Make Christmas White Chocolate Mousse Domes
Creating these Christmas White Chocolate Mousse Domes is a delightful journey. Follow these steps, and you’ll have a stunning dessert that’s sure to impress!
Prepare the Gelatin
Start by sprinkling 2 teaspoons of unflavored gelatin over 3 tablespoons of cold water. Let it sit for about 5 minutes. This blooming process is crucial for the gelatin to work its magic later.
Melt the White Chocolate
Next, place 10 ounces of finely chopped white chocolate in a heatproof bowl. Heat ½ cup of heavy cream until it’s steaming, then pour it over the chocolate. Let it sit for a minute before stirring until smooth. This creates a luscious base for your mousse.
Dissolve the Gelatin
Gently warm the bloomed gelatin until it’s completely dissolved. Stir this into your melted white chocolate mixture along with 1 teaspoon of vanilla extract. Allow it to cool to room temperature, ensuring it doesn’t set too soon.
Whip the Cream
In a chilled mixing bowl, whip the remaining 1½ cups of heavy cream with 2 tablespoons of powdered sugar. Beat until soft peaks form. This step adds the lightness that makes the mousse so airy and delightful.
Make the Mousse
Now, gently fold the whipped cream into the cooled white chocolate mixture in batches. Be careful not to deflate the cream; you want it light and fluffy. This is where the magic happens!
Fill the Molds
Spoon or pipe the mousse into silicone half-sphere dome molds. Smooth the tops and gently tap the molds to release any air bubbles. This ensures your domes will have a beautiful finish.
Freeze the Domes
Place the filled molds in the freezer for at least 4–6 hours, or overnight if you can wait. This step is essential for achieving that perfect dome shape.
Prepare the Cookie Bases
While the mousse is freezing, combine 1½ cups of finely crushed vanilla cookies or graham crackers with 5 tablespoons of melted unsalted butter. Mix until the crumbs resemble wet sand. Press this mixture into small round bases on a parchment-lined tray. Refrigerate until firm.
Prepare the Mirror Glaze
For the glaze, sprinkle 2 teaspoons of gelatin over ¼ cup of cold water and let it bloom for 5 minutes. This will give your glaze that glossy finish.
Heat the Glaze Ingredients
In a saucepan, combine ½ cup of water, ½ cup of granulated sugar, and ½ cup of sweetened condensed milk. Heat gently until the sugar dissolves, but avoid boiling. This mixture will create a sweet, creamy glaze.
Add the Chocolate
Remove the saucepan from the heat and stir in 8 ounces of finely chopped white chocolate until melted and smooth. Add the bloomed gelatin and mix until completely dissolved. If you want a festive touch, add white gel food coloring at this stage.
Cool the Glaze
Let the glaze cool to about 90°F before pouring. It should be smooth and fluid but not hot. This temperature is key to ensuring it doesn’t melt your beautiful mousse domes.
Unmold the Domes
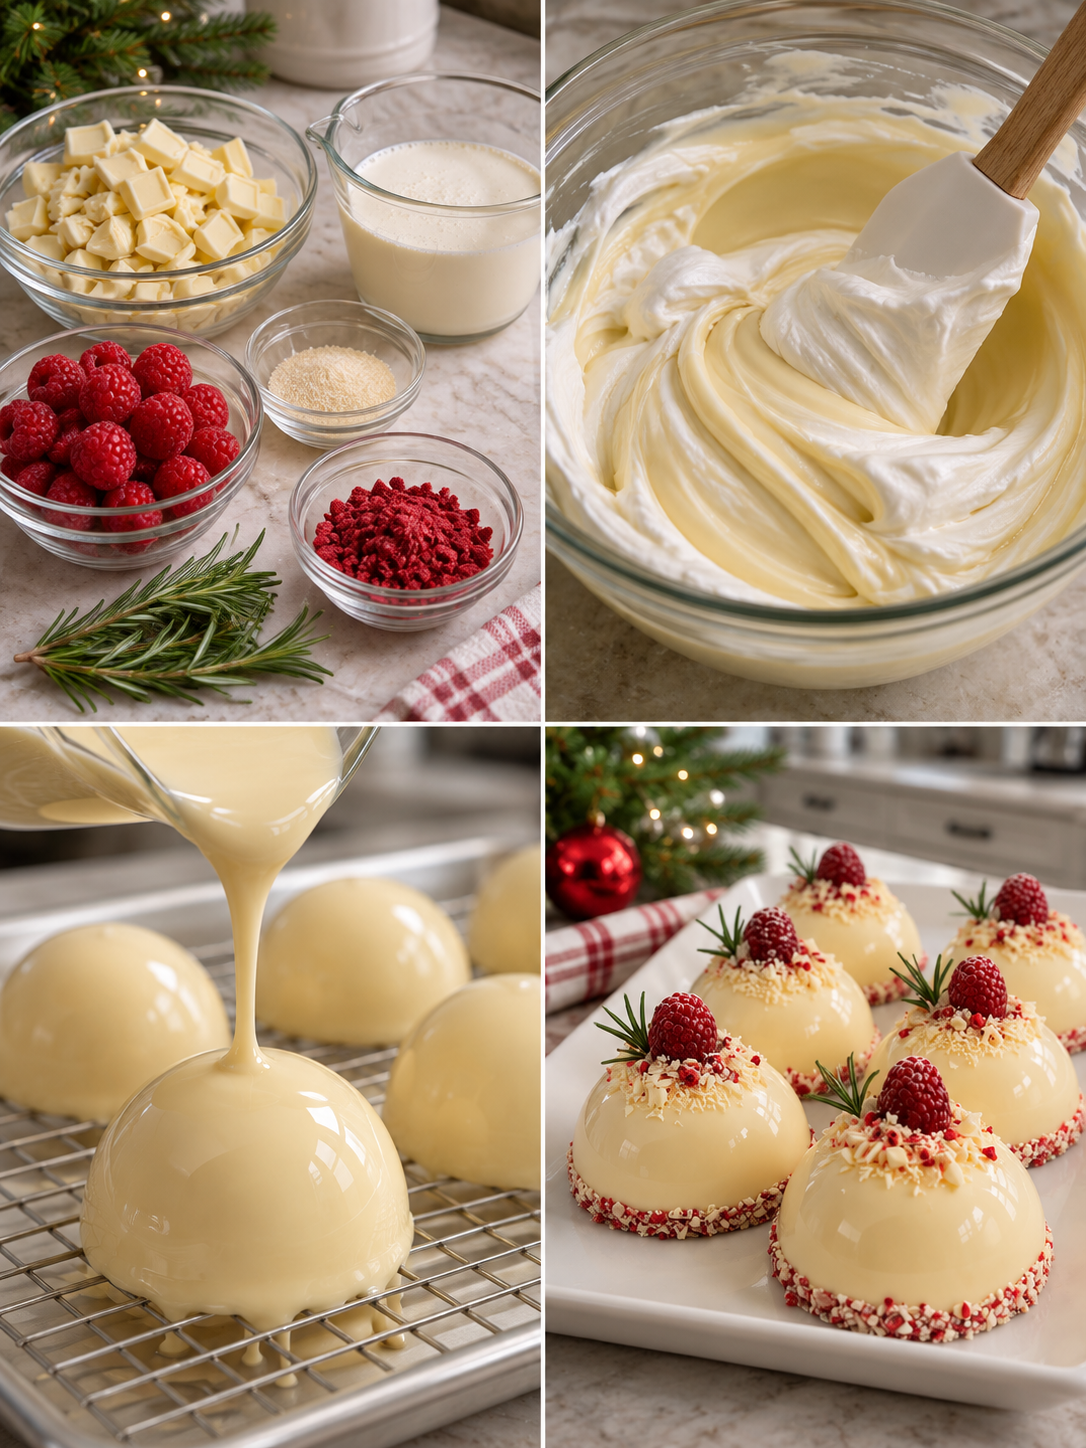
Once frozen, carefully remove the mousse domes from the silicone molds. Place them on a wire rack over a tray to catch any drips from the glaze.
Glaze the Domes
Slowly pour the white chocolate glaze over each frozen dome, allowing the excess to drip away. This creates a stunning, shiny finish that’s simply irresistible.
Add the Cookie Bases
Carefully transfer each glazed dome onto a chilled cookie base. This adds a delightful crunch that complements the creamy mousse.
Decorate
Finish off your domes with festive decorations! Use red and green edible sprinkles, sugar pearls, or even a sprinkle of edible gold dust for that extra touch of elegance.
Thaw and Serve
Finally, refrigerate the finished domes for about 3–4 hours to thaw before serving. This will ensure they’re perfectly creamy and ready to delight your guests!
Tips for Success
- Always use high-quality white chocolate for the best flavor and texture.
- Chill your mixing bowl and beaters before whipping the cream for better volume.
- Be gentle when folding the whipped cream into the chocolate mixture to maintain airiness.
- Ensure the glaze cools adequately to avoid melting the mousse.
- Experiment with different decorations to personalize your domes!
Equipment Needed
- Silicone Half-Sphere Molds: These make it easy to pop out your mousse domes. If you don’t have them, use muffin tins lined with plastic wrap.
- Mixing Bowls: A set of various sizes is handy. Glass or stainless steel works best.
- Electric Mixer: For whipping cream quickly. A whisk can work, but it takes more effort.
- Spatula: Essential for folding ingredients gently.
- Saucepan: Needed for heating the glaze ingredients.
Variations
- Dark Chocolate Mousse: Swap out white chocolate for dark chocolate for a richer flavor. This adds a delightful contrast to the sweetness.
- Fruit-Infused Mousse: Incorporate pureed fruits like raspberry or passion fruit into the mousse for a fruity twist. This adds a refreshing zing!
- Nutty Crunch: Add finely chopped nuts, like pistachios or almonds, to the cookie base for an extra layer of texture and flavor.
- Dairy-Free Option: Use dairy-free white chocolate and coconut cream to create a vegan version of these domes.
- Flavor Extracts: Experiment with different extracts, such as almond or peppermint, to give your mousse a unique flavor profile.
Serving Suggestions
- Pair with Coffee: A rich espresso or creamy latte complements the sweetness of the mousse.
- Fresh Berries: Serve with a side of mixed berries for a refreshing contrast.
- Elegant Plating: Arrange the domes on a festive platter, garnished with mint leaves.
- Chocolate Sauce: Drizzle some chocolate sauce on the plate for an extra touch of indulgence.
FAQs about Christmas White Chocolate Mousse Domes
Can I make these Christmas White Chocolate Mousse Domes ahead of time?
Absolutely! These domes can be made a day or two in advance. Just keep them stored in the refrigerator after glazing. This allows the flavors to meld beautifully, making them even more delightful when served.
What can I substitute for white chocolate?
If you’re looking for a different flavor, dark chocolate is a great alternative. Just remember, it will change the overall sweetness and color of your mousse domes.
How do I store leftover mousse domes?
Store any leftovers in an airtight container in the refrigerator. They should stay fresh for up to three days. Just be sure to keep them separated to maintain their beautiful glaze!
Can I use a different type of gelatin?
Yes! If you prefer a vegetarian option, you can use agar-agar instead of unflavored gelatin. Just follow the package instructions for blooming and dissolving.
What’s the best way to serve these domes?
For a stunning presentation, serve the domes on a decorative platter with fresh berries and a drizzle of chocolate sauce. This adds a pop of color and enhances the festive feel!
Final Thoughts
Creating Christmas White Chocolate Mousse Domes is more than just a cooking project; it’s an experience filled with joy and creativity. Each dome is a little masterpiece, bringing a touch of elegance to your holiday celebrations. The smiles on your loved ones’ faces as they savor these delightful treats are priceless. Plus, the process of making them can be a fun family activity, sparking laughter and memories in the kitchen. So, roll up your sleeves, embrace the holiday spirit, and let these mousse domes be the sweet highlight of your festive gatherings!
PrintChristmas White Chocolate Mousse Domes: Delightful Recipe!
- Total Time: 6 hours 45 minutes
- Yield: 8 servings
- Diet: Vegetarian
Description
A delightful recipe for Christmas White Chocolate Mousse Domes, perfect for festive celebrations.
Ingredients
- 10 oz white chocolate, finely chopped
- 2 cups heavy whipping cream, divided
- 1 teaspoon vanilla extract
- 2 teaspoons unflavored gelatin
- 3 tablespoons cold water
- 2 tablespoons powdered sugar
- 1½ cups finely crushed vanilla cookies or graham crackers
- 5 tablespoons unsalted butter, melted
- 8 oz white chocolate, finely chopped
- ½ cup sweetened condensed milk
- ½ cup granulated sugar
- ½ cup water
- 2 teaspoons unflavored gelatin
- ¼ cup cold water
- White gel food coloring, optional
- Red and green edible sprinkles
- Edible gold dust, optional
- Fresh rosemary sprigs, optional
- Small sugar pearls
Instructions
- Prepare the Gelatin: Sprinkle 2 teaspoons of gelatin over 3 tablespoons of cold water. Let stand for 5 minutes until bloomed.
- Melt the White Chocolate: Place the chopped white chocolate in a heatproof bowl. Heat ½ cup of heavy cream until steaming, then pour over the chocolate. Let stand for 1 minute and stir until smooth.
- Dissolve the Gelatin: Gently warm the bloomed gelatin until completely dissolved. Stir it into the melted white chocolate mixture along with the vanilla extract. Allow to cool to room temperature.
- Whip the Cream: In a chilled mixing bowl, beat the remaining 1½ cups of heavy cream with powdered sugar until soft peaks form.
- Make the Mousse: Gently fold the whipped cream into the cooled white chocolate mixture in batches until light and fluffy.
- Fill the Molds: Spoon or pipe the mousse into silicone half-sphere dome molds. Smooth the tops and gently tap the molds to remove air bubbles.
- Freeze the Domes: Place the molds in the freezer for at least 4–6 hours, or overnight, until completely firm.
- Prepare the Cookie Bases: Combine the crushed vanilla cookies with melted butter. Mix until the crumbs resemble wet sand. Press into eight small round bases on a parchment-lined tray. Refrigerate until firm.
- Prepare the Mirror Glaze: Sprinkle 2 teaspoons of gelatin over ¼ cup cold water and let bloom for 5 minutes.
- Heat the Glaze Ingredients: In a saucepan, combine the remaining ½ cup water, granulated sugar, and condensed milk. Heat gently until the sugar dissolves. Do not boil vigorously.
- Add the Chocolate: Remove the saucepan from the heat. Stir in the white chocolate until melted and smooth. Add the bloomed gelatin and mix until completely dissolved. Add white gel food coloring if desired.
- Cool the Glaze: Let the glaze cool to approximately 90°F before pouring. It should be smooth and fluid but not hot.
- Unmold the Domes: Remove the frozen mousse domes from the silicone molds and place them on a wire rack over a tray.
- Glaze the Domes: Slowly pour the white chocolate glaze over each frozen dome, allowing the excess to drip away. Let the coating set.
- Add the Cookie Bases: Carefully transfer each glazed dome onto a chilled cookie base.
- Decorate: Finish with red and green sprinkles, sugar pearls, edible gold dust, or other festive decorations.
- Thaw and Serve: Refrigerate the finished domes for approximately 3–4 hours to thaw before serving.
Notes
- Ensure the white chocolate is finely chopped for easier melting.
- Use silicone molds for easy removal of the mousse domes.
- Allow the glaze to cool adequately before pouring to avoid melting the mousse.
- Prep Time: 30 minutes
- Cook Time: 15 minutes
- Category: Dessert
- Method: Chilling and Glazing
- Cuisine: American
Nutrition
- Serving Size: 1 dome
- Calories: 350
- Sugar: 25g
- Sodium: 50mg
- Fat: 22g
- Saturated Fat: 14g
- Unsaturated Fat: 6g
- Trans Fat: 0g
- Carbohydrates: 30g
- Fiber: 1g
- Protein: 4g
- Cholesterol: 60mg