Introduction to Coconut Almond Snowball Truffles
There’s something magical about a sweet treat that feels indulgent yet healthy. Coconut Almond Snowball Truffles are just that! These delightful bites are perfect for those busy days when you crave a quick pick-me-up or want to impress your loved ones with minimal effort. With their rich chocolate coating and nutty flavor, they’re sure to satisfy any sweet tooth. Plus, they’re no-bake, making them a breeze to whip up. Trust me, once you try these truffles, they’ll become your go-to dessert for any occasion!
Why You’ll Love This Coconut Almond Snowball Truffles
These Coconut Almond Snowball Truffles are a game-changer in the dessert world. They come together in just 15 minutes, making them perfect for those last-minute cravings. The combination of creamy almond butter and sweet coconut creates a flavor explosion that’s hard to resist. Plus, they’re gluten-free and packed with wholesome ingredients, so you can indulge without the guilt. Trust me, once you taste them, you’ll be hooked!
Ingredients for Coconut Almond Snowball Truffles
Gathering the right ingredients is the first step to creating these delightful Coconut Almond Snowball Truffles. Here’s what you’ll need:
- Unsweetened shredded coconut: This adds a chewy texture and tropical flavor, making each bite feel like a mini vacation.
- Almond flour: A gluten-free alternative to regular flour, it gives the truffles a nutty base and helps bind everything together.
- Almond butter: Creamy and rich, it provides healthy fats and a delicious almond flavor. You can swap it for peanut butter if you prefer.
- Honey or maple syrup: These natural sweeteners add just the right amount of sweetness. Choose maple syrup for a vegan option.
- Vanilla extract: A splash of this enhances the overall flavor, making the truffles taste even more indulgent.
- Salt: Just a pinch balances the sweetness and elevates the flavors.
- Dark chocolate chips: For coating, they provide a rich, decadent finish. Opt for dairy-free chocolate if you’re avoiding animal products.
- Coconut oil: This helps melt the chocolate smoothly and gives it a glossy finish when set.
For those looking to get creative, consider adding a tablespoon of lime zest for a zesty twist. All ingredient quantities are listed at the bottom of the article for easy reference and printing!
How to Make Coconut Almond Snowball Truffles
Creating these Coconut Almond Snowball Truffles is a straightforward process that anyone can master. Follow these simple steps, and you’ll have a batch of delicious truffles ready to impress!
Step 1: Combine Ingredients
Start by grabbing a mixing bowl. Toss in the unsweetened shredded coconut, almond flour, almond butter, honey or maple syrup, vanilla extract, and salt. Use a spatula or your hands to mix everything together until it forms a cohesive dough. It should be sticky but manageable. If it feels too dry, add a splash of almond milk.
Step 2: Roll into Balls
Once your mixture is ready, it’s time to get your hands a little messy! Take small portions of the dough and roll them into balls about one inch in diameter. Don’t worry about making them perfect; a little variation adds character. Place each ball on a parchment-lined baking sheet, leaving some space between them.
Step 3: Chill the Truffles
Now, pop the baking sheet into the refrigerator. Let the truffles chill for at least 30 minutes. This step is crucial as it helps them firm up, making them easier to coat later. While you wait, you can daydream about how delicious they’ll be!
Step 4: Melt the Chocolate
While the truffles are chilling, it’s time to melt the dark chocolate. In a microwave-safe bowl, combine the dark chocolate chips and coconut oil. Heat in 30-second intervals, stirring in between until the mixture is smooth and glossy. Be careful not to overheat; burnt chocolate is a sad fate!
Step 5: Coat the Truffles
Once the truffles are firm, take them out of the fridge. Dip each truffle into the melted chocolate, ensuring it’s fully coated. Let any excess chocolate drip off before placing them back on the parchment-lined sheet. This step is where the magic happens—watch them transform into decadent treats!
Step 6: Set the Chocolate
After coating all the truffles, return them to the refrigerator for another 15-20 minutes. This allows the chocolate to set properly. Once they’re ready, you can serve them chilled or at room temperature. Either way, they’re bound to be a hit!
Tips 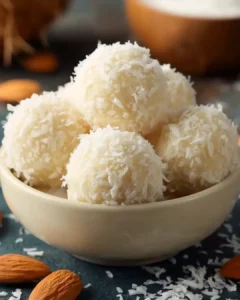 Success
- Use fresh ingredients for the best flavor—especially the coconut and almond butter.
- Don’t skip the chilling step; it’s key for easy handling and coating.
- Experiment with different nut butters for unique flavors.
- For a smoother chocolate coating, ensure the chocolate is fully melted and glossy.
- Store truffles in an airtight container in the fridge to keep them fresh.
Equipment Needed
- Mixing bowl: A standard bowl works, but a large one makes mixing easier.
- Spatula: Use a rubber spatula for easy mixing and scraping.
- Parchment paper: Essential for lining your baking sheet; aluminum foil can be a substitute.
- Microwave-safe bowl: Any heatproof bowl will do for melting chocolate.
- Refrigerator: A must for chilling the truffles; a cooler can work in a pinch.
Variations
- Chocolate Drizzle: After coating, drizzle some melted white chocolate on top for a beautiful contrast and extra sweetness.
- Nutty Crunch: Add chopped nuts like almonds or hazelnuts to the mixture for added texture and flavor.
- Spiced Up: Incorporate a pinch of cinnamon or nutmeg for a warm, spiced flavor that complements the coconut.
- Fruit Fusion: Mix in dried fruits like cranberries or apricots for a chewy surprise in every bite.
- Vegan Delight: Ensure all ingredients are plant-based, using maple syrup and dairy-free chocolate for a fully vegan treat.
Serving Suggestions
- Pair these truffles with a cup of rich coffee or a creamy latte for a delightful afternoon treat.
- Serve them on a decorative platter, garnished with fresh mint leaves for a pop of color.
- For a festive touch, dust with extra shredded coconut or cocoa powder before serving.
- Include a side of fresh fruit, like strawberries or pineapple, to balance the sweetness.
FAQs about Coconut Almond Snowball Truffles
Can I make Coconut Almond Snowball Truffles ahead of time?
Absolutely! These truffles store well in the fridge for up to a week. Just keep them in an airtight container to maintain their freshness. They also freeze beautifully, so you can make a batch and enjoy them later!
What can I substitute for almond flour?
If you don’t have almond flour on hand, you can use finely ground oats or sunflower seed flour as alternatives. Just keep in mind that the flavor and texture may vary slightly.
Are these truffles suitable for a gluten-free diet?
<pYes, these Coconut Almond Snowball Truffles are naturally gluten-free! Just ensure that all your ingredients, especially the chocolate, are certified gluten-free to avoid any cross-contamination.
Can I use a different nut butter?
Definitely! While almond butter gives a lovely flavor, feel free to swap it with peanut butter, cashew butter, or even sunflower seed butter for a nut-free option. Each will bring its unique twist to the truffles!
How can I make these truffles sweeter?
If you prefer a sweeter treat, simply add a bit more honey or maple syrup to the mixture. You can also sprinkle a little powdered sugar on top after coating them in chocolate for an extra touch of sweetness!
Final Thoughts
Creating Coconut Almond Snowball Truffles is more than just whipping up a dessert; it’s about crafting a moment of joy. Each bite is a delightful blend of flavors and textures that transports you to a tropical paradise. Whether you’re sharing them with friends or savoring them solo, these truffles bring a sense of satisfaction that’s hard to beat. Plus, the no-bake aspect means you can enjoy them without the fuss. So, roll up your sleeves, get mixing, and let these little bites of happiness brighten your day. Trust me, they’ll quickly become a cherished favorite!
PrintCoconut Almond Snowball Truffles to Delight Your Tastebuds
- Total Time: 55 minutes
- Yield: 12 servings
- Diet: Gluten Free
Description
Coconut Almond Snowball Truffles are delightful bite-sized treats made with shredded coconut, almond flour, and almond butter, coated in rich dark chocolate.
Ingredients
- 1 cup unsweetened shredded coconut
- 1 cup almond flour
- 1/2 cup almond butter
- 1/4 cup honey or maple syrup
- 1 teaspoon vanilla extract
- 1/4 teaspoon salt
- 1/2 cup dark chocolate chips (for coating)
- 1 tablespoon coconut oil (for melting chocolate)
Instructions
- In a mixing bowl, combine shredded coconut, almond flour, almond butter, honey (or maple syrup), vanilla extract, and salt. Mix until well combined and a dough forms.
- Using your hands, roll the mixture into small balls, about 1 inch in diameter. Place the balls on a parchment-lined baking sheet.
- Refrigerate the truffles for at least 30 minutes to firm up.
- While the truffles are chilling, melt the dark chocolate chips and coconut oil together in a microwave-safe bowl in 30-second intervals, stirring in between until smooth.
- Remove the truffles from the refrigerator. Dip each truffle into the melted chocolate, allowing any excess to drip off. Return the coated truffles to the parchment-lined baking sheet.
- Once all truffles are coated, refrigerate them for another 15-20 minutes to set the chocolate.
- Serve chilled or at room temperature.
Notes
- For a tropical twist, add a tablespoon of lime zest to the mixture before rolling into balls.
- You can also substitute the almond butter with peanut butter for a different flavor profile.
- Prep Time: 15 minutes
- Cook Time: 10 minutes
- Category: Dessert
- Method: No-bake
- Cuisine: American
Nutrition
- Serving Size: 1 truffle
- Calories: 150
- Sugar: 5g
- Sodium: 50mg
- Fat: 12g
- Saturated Fat: 4g
- Unsaturated Fat: 8g
- Trans Fat: 0g
- Carbohydrates: 6g
- Fiber: 2g
- Protein: 4g
- Cholesterol: 0mg