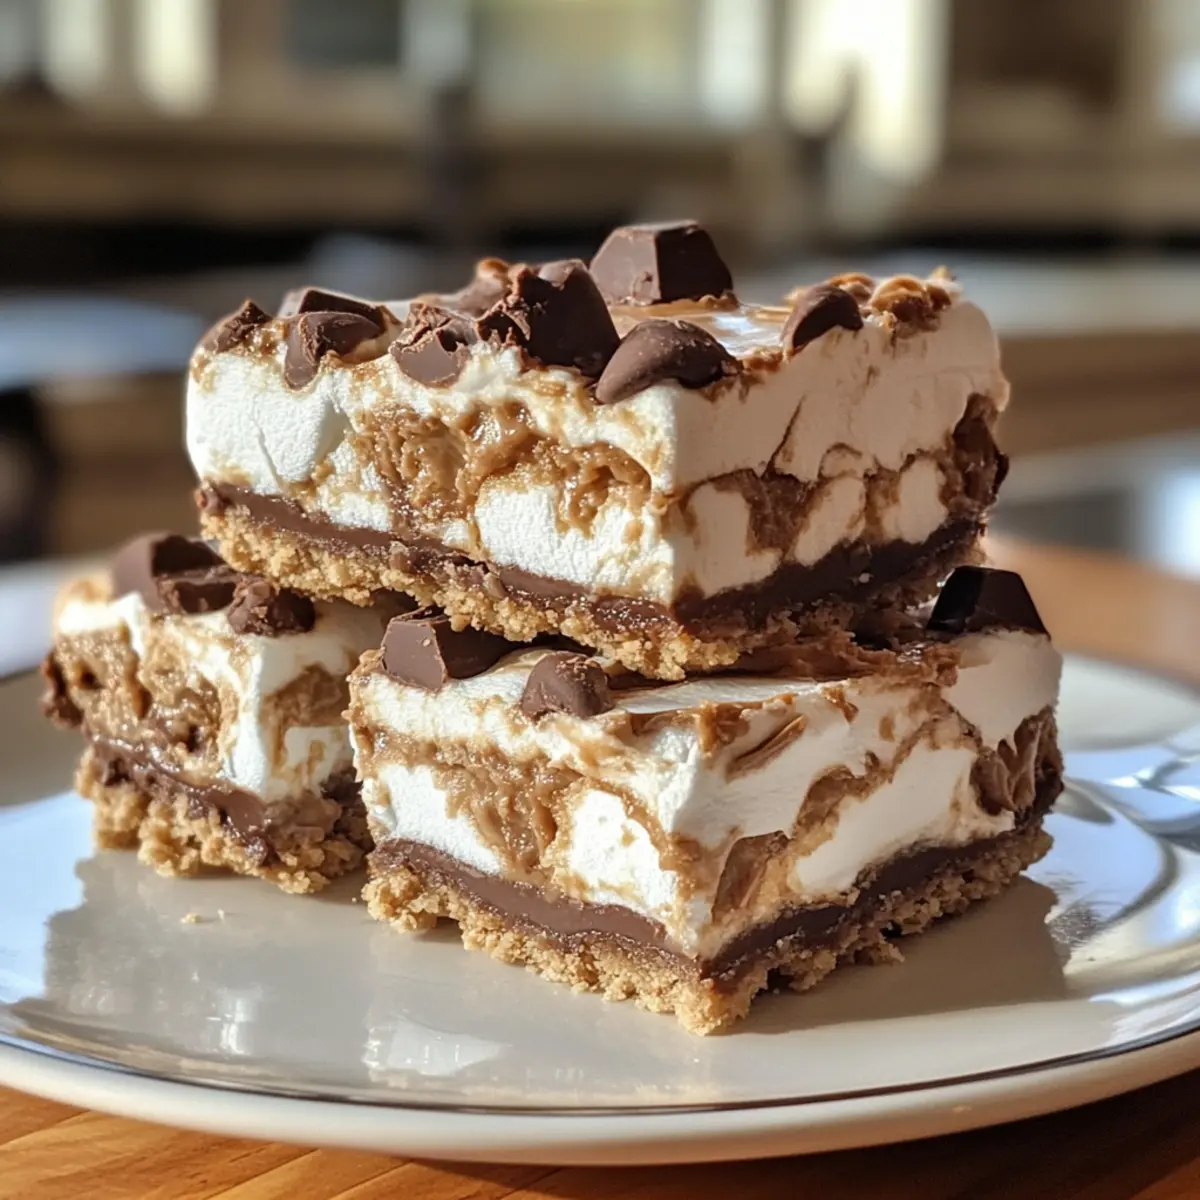
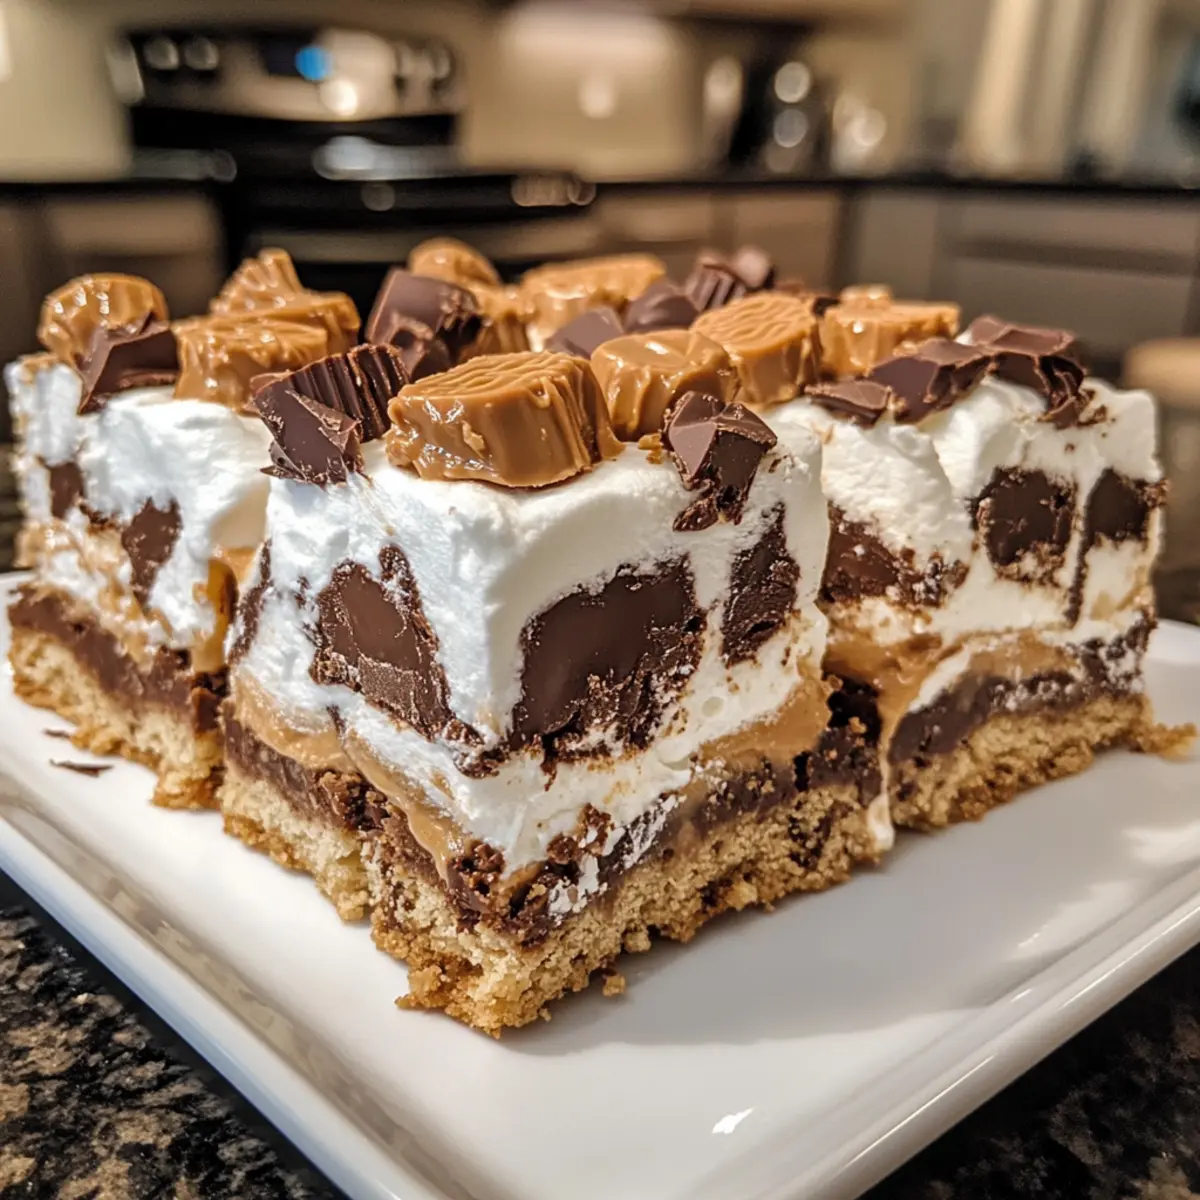
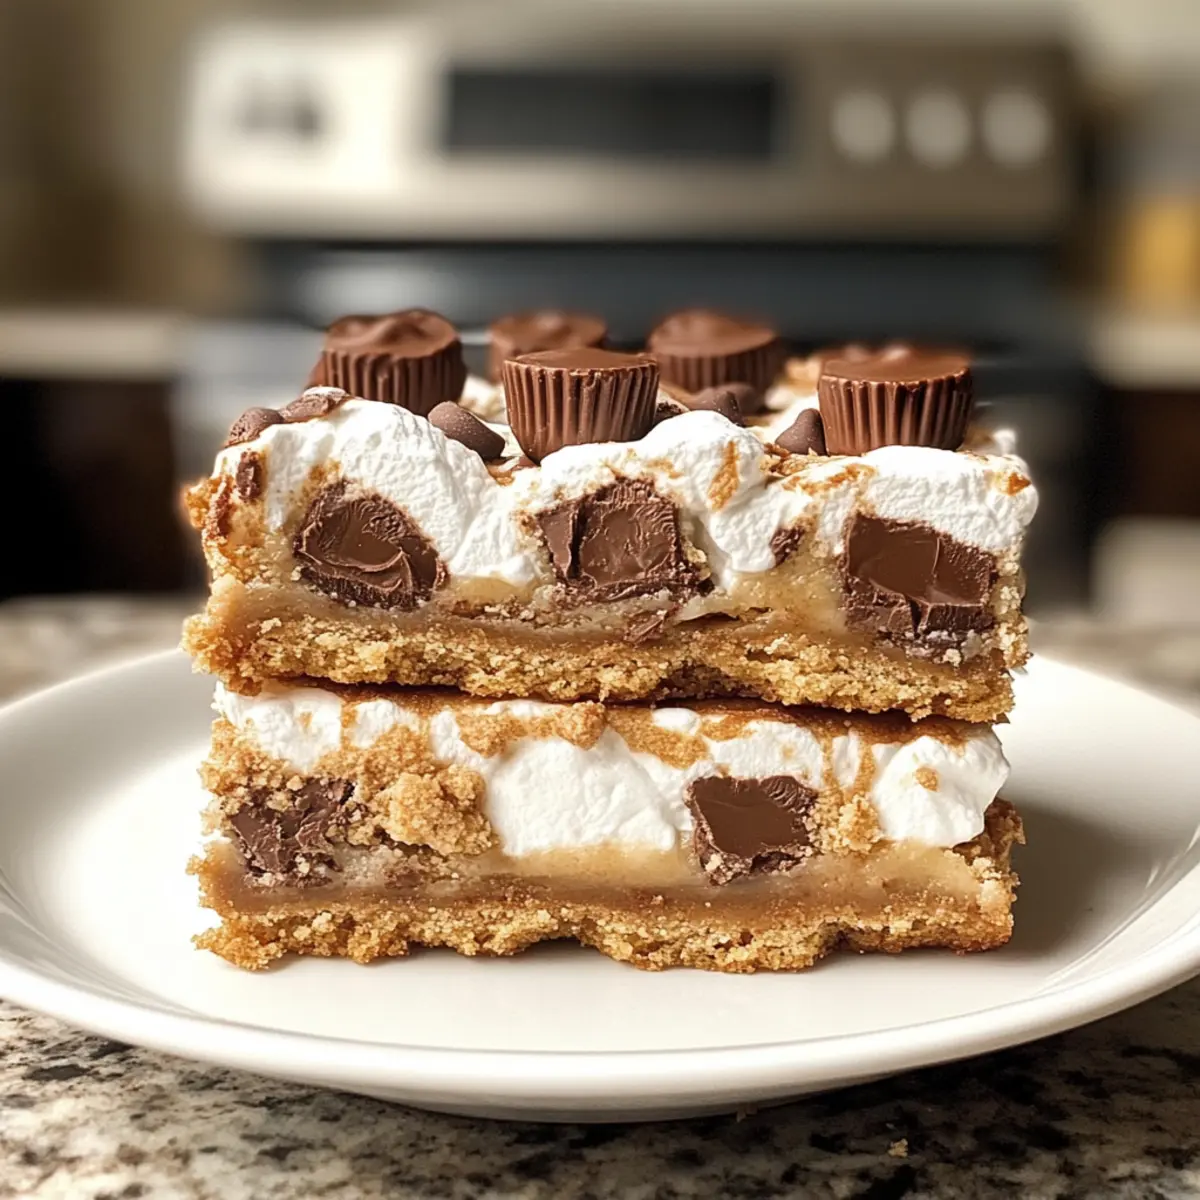
As I stood in my kitchen, the sweet aroma of melting chocolate and peanut butter engulfed me like a comforting hug. Today, I’m thrilled to share my take on Fluffernutter Bars, a delightful dessert that marries rich layers of luscious peanut butter cups, cloud-like marshmallow fluff, and chewy cookie dough into one irresistible treat. Not only are these bars a crowd-pleaser at family gatherings, but they also come together in a snap, making them perfect for those last-minute cravings when you want something homemade yet delightful. With each bite, you’ll experience the perfect balance of indulgent sweetness and texture—no one will resist reaching for another! Are you ready to bring a bit of nostalgia and a whole lot of joy into your kitchen?
Why Are Fluffernutter Bars So Irresistible?
Decadent layers of gooey marshmallow and rich chocolate transform these Fluffernutter Bars into a heavenly dessert. Quick and easy to whip up, they require just a handful of ingredients. Kid-approved and fun for adults, they’re perfect for any gathering. Plus, you can easily switch up flavors—I recommend trying Brulee Cheesecake Bars for more decadent treats! Comforting and nostalgic, each bite takes you back to those sweet childhood moments, ensuring everyone will be asking for seconds.
Fluffernutter Bars Ingredients
• Satisfy your sweet tooth with these delightful Fluffernutter Bars!
For the Cookie Base
- Butter – Adds richness and moisture to the cookie base.
- Peanut Butter – Binds ingredients together and infuses a delightful flavor; avoid natural varieties that can separate.
- Brown Sugar – Contributes essential sweetness and enhances the bars’ chewiness.
- Egg – Serves as a binding agent for structure.
- Vanilla Extract – Enhances flavor and adds aromatic qualities.
- All-Purpose Flour – Provides necessary structure for the base.
For the Layers
- Peanut Butter Cups – Offer a sweet and chocolaty surprise within the bars; ensure regular-sized cups are used for the best outcome.
- Chocolate Chips – Elevate the chocolate flavor and richness.
- Marshmallow Creme/Fluff – Creates that signature fluffy and gooey texture these Fluffernutter Bars are known for.
Step‑by‑Step Instructions for Fluffernutter Bars
Step 1: Preheat the Oven
Begin by preheating your oven to 350°F (175°C). This temperature will ensure that your Fluffernutter Bars bake evenly and develop a perfect golden-brown crust. While the oven heats, prepare an 8 x 11 inch baking pan by lining it with parchment paper, which will make removing the bars hassle-free after baking.
Step 2: Cream the Butter and Sugar
In a large mixing bowl, add softened butter and brown sugar, then cream them together using a hand mixer or stand mixer. Beat for about 3 minutes until the mixture becomes light and fluffy in texture. This aeration is key for achieving the right consistency for your cookie base, setting the stage for those delicious Fluffernutter Bars.
Step 3: Incorporate Eggs and Peanut Butter
Next, add in the egg, peanut butter, and vanilla extract to the creamed mixture. Beat everything together until fully combined, taking care to scrape down the sides of the bowl as needed. This step ensures your Fluffernutter Bars will have a rich peanut butter flavor and a smooth consistency throughout.
Step 4: Add the Dry Ingredients
Gradually mix in the all-purpose flour until just combined, being careful not to overmix—this will keep your bars tender. Once the flour is incorporated, gently fold in the chocolate chips, allowing them to distribute evenly throughout the dough. Your dough will be ready to transform into the delightful base layer of the Fluffernutter Bars.
Step 5: Press the Dough into the Pan
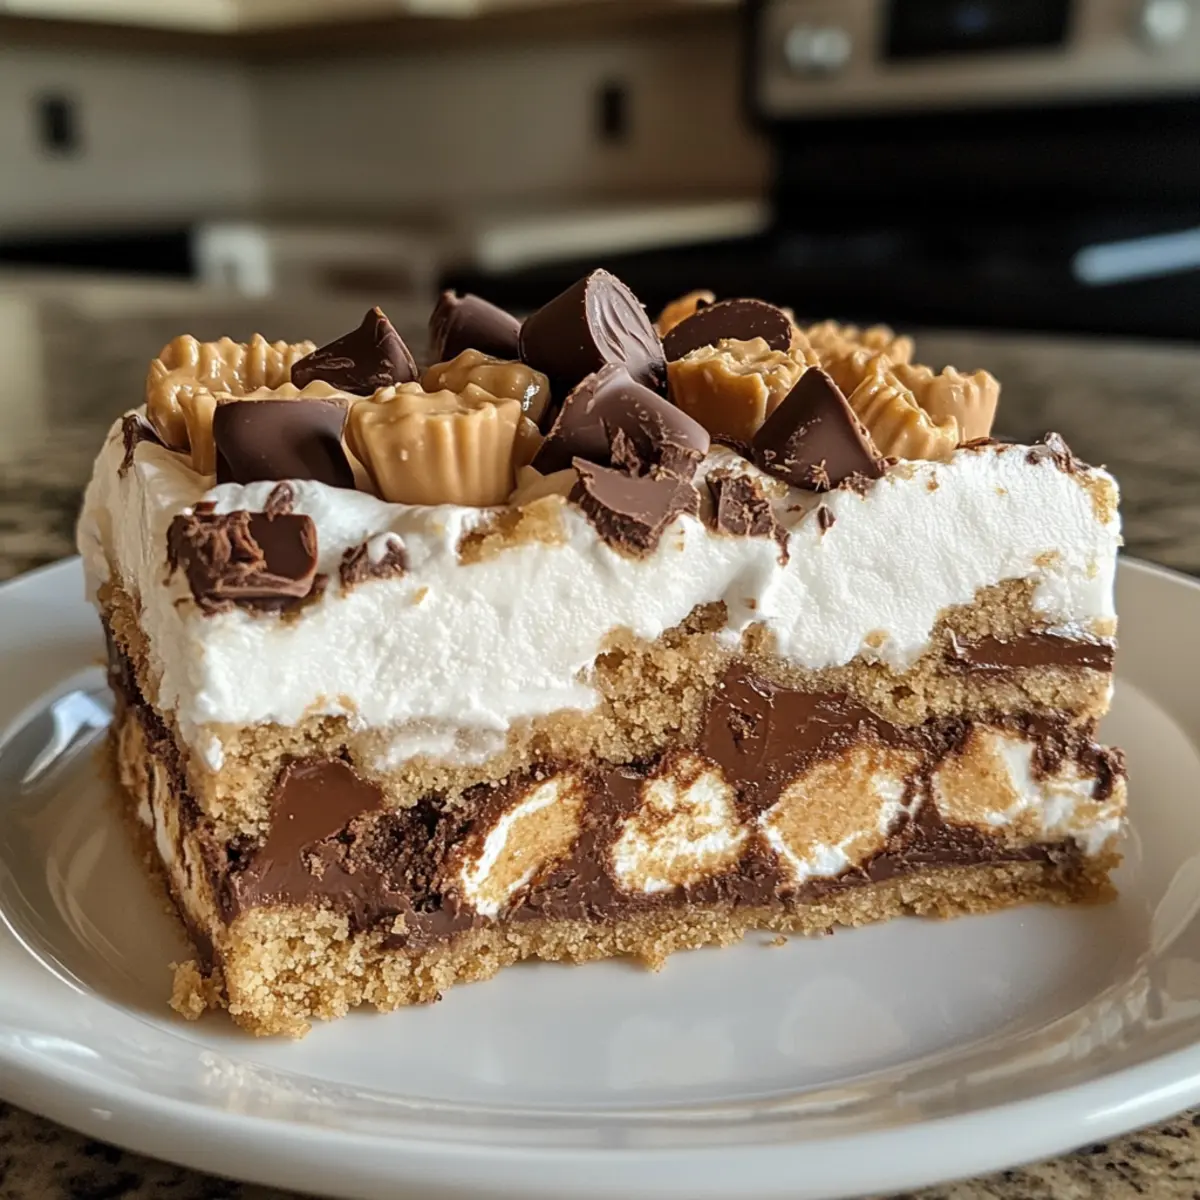
Take approximately two-thirds of the cookie dough and press it evenly into the bottom of your prepared baking pan. Use a rubber spatula or your hands to create a smooth base, ensuring it reaches all corners of the pan. This will form the delicious foundation for your gooey marshmallow and peanut butter cups.
Step 6: Layer with Peanut Butter Cups
Now it’s time to layer on the peanut butter cups. Arrange them evenly across the cookie dough base, pressing them down slightly to ensure they adhere during baking. This step adds a sweet and chocolaty layer to your Fluffernutter Bars that pairs perfectly with the creamy marshmallow fluff to come.
Step 7: Spread the Marshmallow Fluff
Using a spatula, gently spread a layer of marshmallow fluff over the peanut butter cups. Ensure the fluff is distributed evenly to cover all the candy, creating a deliciously gooey layer. This marshmallow goodness is what makes your Fluffernutter Bars truly irresistible and will give each bite a delightful sweetness.
Step 8: Add the Final Layer of Dough
Take the remaining cookie dough and crumble it over the marshmallow fluff layer. Lightly press down on the dough to flatten it without squeezing out the marshmallow. This top layer will bake into a beautiful golden crust while protecting the gooey layers underneath, resulting in perfectly baked Fluffernutter Bars.
Step 9: Bake to Perfection
Place the pan in the preheated oven and bake for about 25 minutes. Keep an eye on the bars; they are done when the top is golden brown, and a toothpick inserted in the center comes out clean. This is the moment when the kitchen fills with the delightful aroma of baking cookies and melting chocolate.
Step 10: Cool and Slice the Bars
Once baked, remove the pan from the oven and let the bars cool in the pan for about an hour. Once cooled, carefully transfer the bars to a cooling rack to cool completely before slicing. Waiting for this step is crucial, as it allows the layers to set properly, ensuring your Fluffernutter Bars are delightfully chewy and easy to cut.
Expert Tips for Fluffernutter Bars
-
Spread Evenly: Ensure your dough is evenly spread in the pan to promote consistent baking and avoid soggy sections.
-
Avoid Overmixing: Mix the dough until just combined; this keeps your Fluffernutter Bars light and tender instead of tough.
-
Cooling Time: Allow the bars to cool completely before slicing to prevent them from crumbling and to maintain the perfect gooey texture.
-
Storage Tips: Store uneaten bars in an airtight container at room temperature for 2-3 days; they stay delicious and fresh!
-
Layering Trick: Press the peanut butter cups and marshmallow fluff gently into the dough—this ensures every bite is as indulgent as the last.
How to Store and Freeze Fluffernutter Bars
Room Temperature: Keep uneaten Fluffernutter Bars in an airtight container at room temperature for up to 3 days to maintain their soft, chewy texture.
Fridge: If you prefer firmer bars, refrigerate them in an airtight container for up to a week. Let them sit at room temperature for a few minutes before enjoying.
Freezer: For longer storage, wrap individual bars tightly in plastic wrap, then place them in a freezer-safe bag or container. These bars can be frozen for up to 3 months.
Reheating: To enjoy them warm, microwave the bars for about 15-20 seconds on low power. Just enough to melt the chocolate—pure bliss!
What to Serve with Fluffernutter Bars
Ready to elevate your dessert experience with a delightful spread that complements the mouthwatering sweetness of Fluffernutter Bars?
- Vanilla Ice Cream: A scoop of vanilla ice cream adds creaminess, balancing the rich flavors and providing a delightful temperature contrast.
- Chocolate Drizzle: A warm chocolate drizzle brings an extra layer of indulgence, turning each bite into a decadent experience worthy of dessert perfection.
- Fresh Strawberries: The tartness of fresh strawberries brightens the sweetness of the bars, offering a refreshing crunch that’s irresistibly delicious.
- Peanut Butter Milkshake: Pair your Fluffernutter Bars with a creamy peanut butter milkshake for a nostalgic treat that enhances their flavors and adds extra nostalgia.
- Milk or Almond Milk: A chilled glass of milk or smooth almond milk is the classic pairing, cutting through the richness and making each bite feel indulgently satisfying.
- Coffee: A cup of hot coffee provides a warm contrast to the cool sweetness, bringing out the nutty flavors of the peanut butter in every bite.
- Salted Caramel Sauce: Drizzling salted caramel adds a sophisticated touch, enhancing the sweetness while introducing a delightful salty finish that elevates the texture.
- Fruit Salad: A light fruit salad with a mix of berries and melons balances the richness of the bars, bringing a refreshing element to your dessert table.
- Nutty Biscotti: For an added crunch, serve alongside nutty biscotti that matches the flavors of the bars and adds a delightful texture contrast.
Make Ahead Options
These Fluffernutter Bars are perfect for busy home cooks looking to save time! You can prepare the cookie dough up to 24 hours in advance; simply mix it according to the instructions and store it tightly wrapped in the refrigerator. The marshmallow fluff and peanut butter cups can also be layered and kept in the baking pan, covered, for up to 3 days. When you’re ready to bake, just press the final layer of dough on top, pop it in the oven, and enjoy the delightful aroma filling your kitchen. This way, you’ll have deliciously gooey Fluffernutter Bars with minimal effort, making them just as irresistible fresh out of the oven!
Fluffernutter Bars: Creative Twists
Feel free to let your creativity flow with these delicious variations that will add an exciting twist to your Fluffernutter Bars!
- White Chocolate: Swap out chocolate chips for creamy white chocolate for a sweet, buttery flavor that enhances the bars’ richness.
- Nutty Delight: Add chopped nuts, like walnuts or pecans, to the dough for a delightful crunch that contrasts wonderfully with the gooey layers.
- Dairy-Free: Substitute coconut oil for butter and almond or cashew butter for peanut butter to whip up a dairy-free version that retains indulgence.
- Salted Caramel: Drizzle caramel sauce over the marshmallow fluff before adding the top layer of dough for a decadent layer of sweetness and salty contrast.
- Spicy Kick: For a fun twist, sprinkle a pinch of cayenne pepper or chili powder into the cookie dough to create a surprising heat that complements the sweetness.
- S’mores Style: Substitute marshmallow fluff with toasted marshmallows and add crushed graham crackers in the layers for a fun campfire-inspired variation.
- Peanut Butter Swirls: Create swirls of creamy or crunchy peanut butter atop the dough before baking for an extra peanut buttery experience—pure bliss!
For even more delightful dessert inspirations, don’t miss my take on Cranberry Crumble Bars. You can explore variations and additions that can turn your baking adventures from ordinary to extraordinary!
Fluffernutter Bars Recipe FAQs
How do I select the right peanut butter for Fluffernutter Bars?
Absolutely! For the best results, use regular creamy peanut butter rather than natural varieties, which can separate and affect the texture. Look for brands that list peanuts and salt as the only ingredients for optimal flavor and consistency.
How should I store leftover Fluffernutter Bars?
I often recommend keeping uneaten Fluffernutter Bars in an airtight container at room temperature for 2-3 days. This will help maintain their delightful chewy texture. If you prefer a firmer bite, you can refrigerate them for up to a week—just let them sit at room temperature for a few minutes before enjoying.
Can I freeze Fluffernutter Bars, and if so, how?
Definitely! To freeze your Fluffernutter Bars, first wrap each bar tightly in plastic wrap, then place them in a freezer-safe bag or container. They can be frozen for up to 3 months. When you’re ready to enjoy them, allow them to thaw in the refrigerator overnight, or microwave them on low power for about 15-20 seconds to warm them slightly.
Why did my bars turn out too dry?
Very! If your Fluffernutter Bars are dry, it may be due to overmixing the dough or baking for too long. Ensure you mix just until combined and keep an eye on them in the oven. They should be golden brown on top but still slightly soft in the center when you take them out; they will firm up as they cool.
Are there any dietary considerations for Fluffernutter Bars?
Yes! If you’re making these bars for someone with allergies, you might want to consider using gluten-free flour and checking that your chocolate chips and peanut butter are also allergen-free. Additionally, if you’re making them for pets, please refrain from giving any chocolate or peanut butter that contains xylitol, as these can be harmful to animals.
Can I substitute any ingredients in Fluffernutter Bars?
Absolutely! If you want a twist, try substituting the chocolate chips with white chocolate or butterscotch chips. Additionally, if you’re not a fan of peanut butter, you can use almond or cashew butter for a unique flavor profile. Just keep in mind that this will alter the taste slightly—however, the result will still be scrumptious!
Irresistible Fluffernutter Bars with Gooey Marshmallow Delight
Ingredients
Equipment
Method
- Preheat your oven to 350°F (175°C) and prepare an 8 x 11 inch baking pan with parchment paper.
- In a large bowl, cream together softened butter and brown sugar for about 3 minutes until light and fluffy.
- Add the egg, peanut butter, and vanilla extract to the mixture and beat until fully combined.
- Gradually mix in the flour until just combined. Fold in the chocolate chips.
- Press two-thirds of the dough evenly into the prepared baking pan.
- Layer the peanut butter cups evenly across the cookie base.
- Spread marshmallow fluff over the peanut butter cups evenly.
- Crumble the remaining cookie dough over the marshmallow fluff and press down lightly.
- Bake for about 25 minutes until the top is golden brown and a toothpick comes out clean.
- Let the bars cool in the pan for an hour before transferring to a cooling rack.