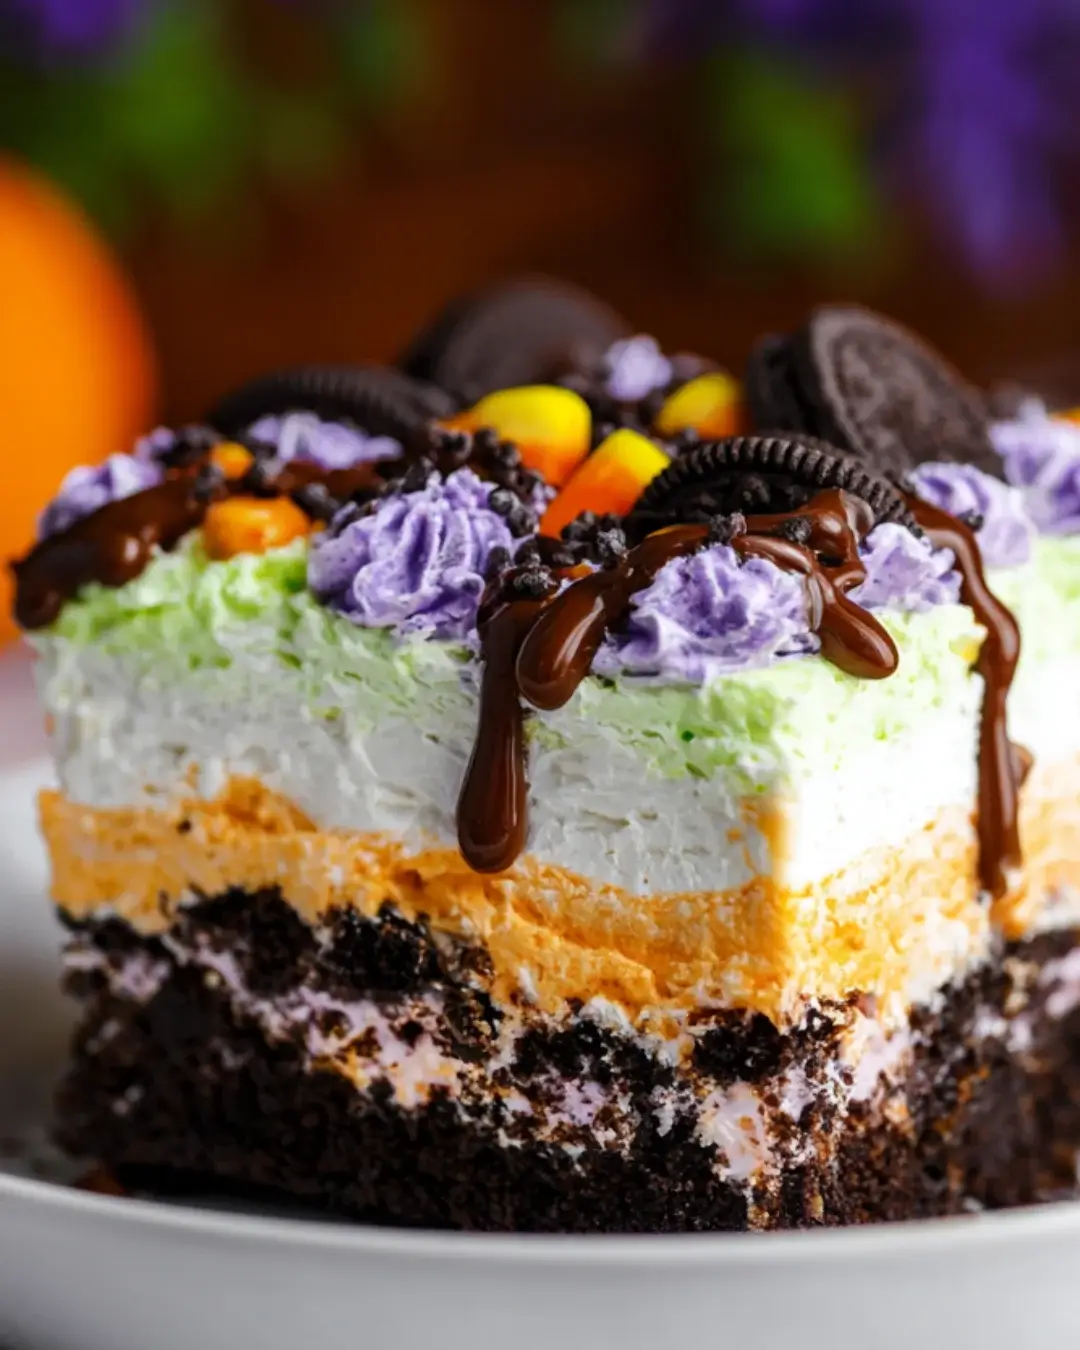
Introduction to Halloween Lush Dessert
As the leaves turn and the air gets crisp, I can’t help but think of Halloween. It’s that magical time when creativity meets indulgence, and what better way to celebrate than with a Halloween Lush Dessert? This delightful treat layers creamy fillings and festive toppings, making it a showstopper for any gathering.
Whether you’re hosting a spooky soirée or just want to impress your family, this easy recipe is your go-to solution. It’s quick to whip up, and trust me, your guests will be coming back for seconds. Let’s dive into this delicious adventure together!
Why You’ll Love This Halloween Lush Dessert
This Halloween Lush Dessert is a game-changer for busy cooks.
It’s incredibly easy to make, requiring no baking and minimal effort.
The layers of creamy goodness create a taste sensation that’s hard to resist.
Plus, it’s visually stunning, making it perfect for impressing guests.
With just a few simple ingredients, you can whip up a festive treat that will have everyone raving.
What’s not to love?
Ingredients for Halloween Lush Dessert
Creating this Halloween Lush Dessert is a breeze, thanks to its simple yet delightful ingredients. Here’s what you’ll need:
- Graham cracker crumbs: These form the base of your dessert, providing a sweet and crunchy crust.
- Unsalted butter: Melted butter binds the crumbs together, adding richness to the crust.
- Cream cheese: Softened cream cheese gives a creamy texture and a slight tang to the dessert.
- Powdered sugar: This sweetens the cream cheese layer, making it smooth and luscious.
- Whipped topping: Thawed whipped topping adds lightness and fluffiness to the layers.
- Instant vanilla pudding mix: This thickens the vanilla layer, enhancing the dessert’s creaminess.
- Milk: Essential for preparing the pudding mixes, it helps achieve the right consistency.
- Instant chocolate pudding mix: This adds a rich chocolate layer, balancing the sweetness of the vanilla.
- Halloween-themed candy: Think candy corn or chocolate pumpkins for a festive touch on top.
- Chocolate syrup: A drizzle of chocolate syrup elevates the dessert’s sweetness and visual appeal.
- Whipped cream: Optional, but a dollop on top adds an extra layer of indulgence.
For those looking to mix things up, consider substituting the Halloween-themed candy with seasonal fruits like pumpkin puree or orange slices for a healthier twist.
You can find the exact quantities for each ingredient at the bottom of the article, ready for printing. Happy cooking!
How to Make Halloween Lush Dessert
Step 1: Prepare the Crust
Start by preheating your oven to 350°F (175°C).
In a medium bowl, combine the graham cracker crumbs with the melted butter.
Mix until the crumbs are evenly coated.
Then, press this mixture firmly into the bottom of a 9×13-inch baking dish.
This will form a solid crust.
Bake it for 10 minutes, then let it cool completely.
The crust is the foundation of your Halloween Lush Dessert, so make sure it’s nice and firm!
Step 2: Make the Cream Cheese Layer
In a mixing bowl, beat the softened cream cheese and powdered sugar together until smooth and creamy.
This step is crucial for achieving that luscious texture.
Once combined, fold in half of the whipped topping gently.
Spread this creamy mixture evenly over the cooled crust.
This layer adds a delightful richness that balances the sweetness of the dessert.
Step 3: Prepare the Vanilla Pudding Layer
In another bowl, whisk together the instant vanilla pudding mix and 2 cups of milk.
Keep whisking until it thickens up nicely.
Pour the vanilla pudding over the cream cheese layer, spreading it evenly.
This layer brings a light, sweet flavor that complements the other layers perfectly.
Step 4: Prepare the Chocolate Pudding Layer
Now, grab a separate bowl and whisk the instant chocolate pudding mix with 2 cups of milk.
Again, whisk until it thickens.
Carefully spread the chocolate pudding over the vanilla pudding layer.
This rich layer adds a decadent touch to your Halloween Lush Dessert.
Step 5: Assemble the Dessert
Top the chocolate pudding with the remaining whipped topping.
Smooth it out evenly for a polished look.
Now, sprinkle your Halloween-themed candy on top for that festive flair.
This is where the fun begins!
Feel free to get creative with your toppings.
Step 6: Chill and Serve
Drizzle chocolate syrup over the top for added sweetness and visual appeal.
Cover the dish with plastic wrap and refrigerate for at least 4 hours, or overnight for the best results.
This chilling time allows the flavors to meld beautifully.
When you’re ready to serve, add a dollop of whipped cream on top if desired.
Cut into squares and enjoy this delightful Halloween Lush Dessert with friends and family!
Tips for Success
- Make sure your cream cheese is softened for easy mixing.
- Use a spatula to spread layers evenly for a professional look.
- Chill the dessert overnight for the best flavor and texture.
- Feel free to customize toppings based on your favorite Halloween candies.
- For a fun twist, add a layer of crushed Oreos for a ‘dirt’ effect.
Equipment Needed
- 9×13-inch baking dish: A standard size for this dessert; any similar-sized dish works.
- Mixing bowls: Use any size you have on hand for mixing ingredients.
- Whisk: A hand whisk is perfect, but an electric mixer speeds things up.
- Spatula: Great for spreading layers evenly; a spoon can work in a pinch.
- Plastic wrap: Essential for covering the dessert while it chills.
Variations
- For a fruity twist, substitute the Halloween-themed candy with fresh berries or sliced bananas.
- Try using pumpkin spice pudding mix instead of vanilla for a seasonal flavor boost.
- For a gluten-free option, use gluten-free graham crackers for the crust.
- Make it a chocolate lover’s dream by using chocolate graham crackers for the crust.
- For a vegan version, swap cream cheese with a plant-based alternative and use coconut whipped cream.
Serving Suggestions
- Pair your Halloween Lush Dessert with a warm cup of spiced apple cider for a cozy touch.
- Serve alongside a platter of fresh fruit for a refreshing contrast to the creamy layers.
- For a festive presentation, use Halloween-themed plates and napkins to enhance the spooky vibe.
- Consider adding a scoop of vanilla ice cream on the side for extra indulgence.
- Garnish with mint leaves for a pop of color and freshness.
FAQs about Halloween Lush Dessert
Can I make Halloween Lush Dessert ahead of time?
Absolutely! This dessert is perfect for making a day in advance. Just prepare it, chill it overnight, and it will be ready to impress your guests the next day.
What can I substitute for the whipped topping?
If you prefer a homemade touch, you can whip heavy cream with a bit of sugar and vanilla extract. This will give you a fresh, fluffy topping that’s just as delightful.
How long can I store leftovers?
Leftovers can be stored in the refrigerator for up to 3 days. Just make sure to cover it well to keep it fresh!
Can I use different flavors of pudding?
Definitely! Feel free to experiment with different pudding flavors like butterscotch or pumpkin spice to create your own unique Halloween Lush Dessert.
Is this dessert suitable for vegetarians?
Yes, this Halloween Lush Dessert is vegetarian-friendly! Just check the pudding mix and whipped topping for any non-vegetarian ingredients if you’re concerned.
Final Thoughts
Creating this Halloween Lush Dessert is more than just whipping up a treat; it’s about bringing joy to your gatherings.
The layers of creamy goodness and festive toppings create a delightful experience that sparks smiles and laughter.
Whether you’re sharing it with family or friends, this dessert is sure to become a favorite.
It’s easy, fun, and perfect for any Halloween celebration.
So, roll up your sleeves, gather your ingredients, and let the magic unfold in your kitchen.
Trust me, the joy of serving this dessert will be as sweet as the first bite!
PrintHalloween Lush Dessert: Easy Recipe to Delight Guests!
- Total Time: 4 hours 30 minutes
- Yield: 12 servings
- Diet: Vegetarian
Description
A delightful and easy Halloween Lush Dessert that layers creamy fillings and festive toppings, perfect for entertaining guests.
Ingredients
- 2 cups graham cracker crumbs
- 1/2 cup unsalted butter, melted
- 1 (8-ounce) package cream cheese, softened
- 1 cup powdered sugar
- 1 (12-ounce) container whipped topping, thawed
- 1 (3.4-ounce) package instant vanilla pudding mix
- 2 cups milk
- 1 (3.4-ounce) package instant chocolate pudding mix
- 1 cup Halloween-themed candy (like candy corn or chocolate pumpkins)
- 1/2 cup chocolate syrup (for drizzling)
- Whipped cream (for topping, optional)
Instructions
- Preheat your oven to 350°F (175°C). In a medium bowl, combine the graham cracker crumbs and melted butter. Mix until the crumbs are evenly coated. Press the mixture firmly into the bottom of a 9×13-inch baking dish to form the crust. Bake for 10 minutes, then let it cool completely.
- In a mixing bowl, beat the softened cream cheese and powdered sugar together until smooth and creamy. Fold in half of the whipped topping until well combined. Spread this mixture evenly over the cooled crust.
- In another bowl, whisk together the instant vanilla pudding mix and 2 cups of milk until it thickens. Pour the vanilla pudding over the cream cheese layer and spread it evenly.
- Next, whisk the instant chocolate pudding mix with 2 cups of milk in a separate bowl until it thickens. Carefully spread the chocolate pudding over the vanilla pudding layer.
- Top the chocolate pudding with the remaining whipped topping, smoothing it out evenly. Sprinkle the Halloween-themed candy on top for decoration.
- Drizzle chocolate syrup over the top for added sweetness and visual appeal. Cover the dish with plastic wrap and refrigerate for at least 4 hours, or overnight for best results.
- Before serving, add a dollop of whipped cream on top if desired. Cut into squares and enjoy!
Notes
- For a spookier look, add crushed Oreos on top of the whipped topping for a ‘dirt’ effect.
- Substitute the Halloween-themed candy with seasonal fruits like pumpkin puree or orange slices for a healthier twist.
- Prep Time: 20 minutes
- Cook Time: 10 minutes
- Category: Dessert
- Method: No-Bake
- Cuisine: American
Nutrition
- Serving Size: 1 square
- Calories: 250
- Sugar: 15g
- Sodium: 200mg
- Fat: 12g
- Saturated Fat: 7g
- Unsaturated Fat: 3g
- Trans Fat: 0g
- Carbohydrates: 30g
- Fiber: 1g
- Protein: 3g
- Cholesterol: 30mg