Introduction to Honey Bun Cheesecake
There’s something magical about desserts that remind us of simpler times. Honey Bun Cheesecake is one of those delightful treats that combines nostalgia with indulgence. This recipe is perfect for anyone looking to impress loved ones or simply satisfy a sweet tooth after a long day. With its creamy texture and hints of cinnamon, it’s like a warm hug on a plate. Plus, it’s surprisingly easy to whip up, making it a quick solution for busy days. Trust me, once you try this Honey Bun Cheesecake, it’ll become a staple in your dessert repertoire!
Why You’ll Love This Honey Bun Cheesecake
This Honey Bun Cheesecake is a game-changer for dessert lovers. It’s incredibly easy to make, even for those who might feel intimidated in the kitchen. The flavors are a delightful blend of creamy cheesecake and sweet cinnamon, reminiscent of your favorite honey bun. Plus, it’s perfect for any occasion, whether it’s a family gathering or a cozy night in. You’ll impress everyone without spending hours in the kitchen!
Ingredients for Honey Bun Cheesecake
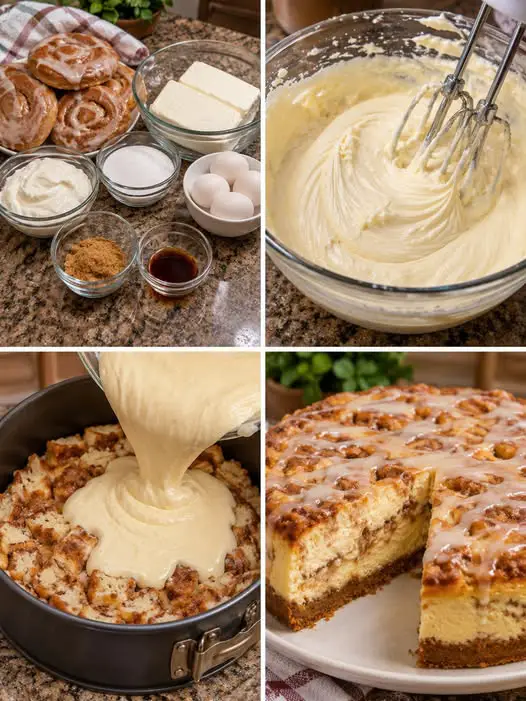
Gathering the right ingredients is the first step to creating your Honey Bun Cheesecake masterpiece. Here’s what you’ll need:
- Graham cracker crumbs: These form the base of your cheesecake crust, providing a sweet and crunchy texture.
- Unsalted butter: Melted butter binds the crust together and adds richness. Unsalted is best to control the saltiness.
- Granulated sugar: This sweetens both the crust and the filling, balancing the flavors beautifully.
- Ground cinnamon: A key player in this recipe, cinnamon adds warmth and that signature honey bun flavor.
- Cream cheese: The star of the show! Softened cream cheese creates a smooth and creamy filling.
- Eggs: These help set the cheesecake, giving it structure and a rich texture.
- Sour cream: Adds a tangy flavor and creaminess, making the cheesecake even more luscious.
- Vanilla extract: A splash of vanilla enhances the overall flavor, making it more aromatic.
- All-purpose flour: This helps stabilize the filling, ensuring it holds together nicely.
- Brown sugar: Packed brown sugar adds a deeper sweetness and a hint of molasses flavor.
- Powdered sugar: Used for the glaze, it creates a smooth finish that complements the cheesecake.
- Milk: A little milk in the glaze helps achieve the perfect drizzling consistency.
- Honey: This adds a touch of natural sweetness and ties back to the honey bun theme.
For exact measurements, check the bottom of the article where you can find everything listed for easy printing. Feel free to get creative with substitutions, like using gluten-free graham crackers or low-fat cream cheese if you’re looking for lighter options!
How to Make Honey Bun Cheesecake
Creating your Honey Bun Cheesecake is a delightful journey. Follow these simple steps, and you’ll have a dessert that’s sure to impress. Let’s dive in!
Step 1: Prepare the Pan
Start by preheating your oven to 325°F. Greasing a 9-inch springform pan is essential. This ensures your cheesecake releases easily after baking. Trust me, you don’t want to wrestle with a stuck cheesecake!
Step 2: Make the Crust
In a mixing bowl, combine graham cracker crumbs, melted butter, granulated sugar, and ground cinnamon. Stir until everything is well mixed. This mixture should resemble wet sand. Press it firmly into the bottom of your prepared pan. A solid crust is key to holding all that creamy goodness!
Step 3: Bake the Crust
Pop the crust into the oven and bake for 8–10 minutes. You want it to be lightly golden. Once done, remove it and let it cool slightly. This step helps the crust firm up, making it easier to layer the filling.
Step 4: Prepare the Filling
In a large mixing bowl, beat the softened cream cheese and granulated sugar together until smooth and creamy. This is where the magic begins! Make sure there are no lumps; a smooth filling is crucial for that perfect cheesecake texture.
Step 5: Mix in the Ingredients
Add the eggs one at a time, mixing on low speed after each addition. Then, mix in the sour cream, vanilla extract, and flour until just combined. Overmixing can lead to cracks, so be gentle here. You want a luscious filling that’s not too airy.
Step 6: Make the Cinnamon Swirl
In a separate bowl, stir together melted butter, brown sugar, ground cinnamon, and flour until smooth. This cinnamon swirl is what gives your cheesecake that signature honey bun flavor. It’s like a sweet surprise in every bite!
Step 7: Layer the Cheesecake
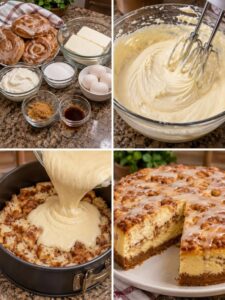
Pour half of the cheesecake filling over the cooled crust. Drizzle half of the cinnamon mixture over it. Then, add the remaining cheesecake filling and drizzle the rest of the cinnamon mixture on top. Use a knife to gently swirl the mixtures together. This creates beautiful marbling!
Step 8: Bake the Cheesecake
Place the springform pan in the oven and bake for 55–65 minutes. The edges should be set, but the center should still have a slight jiggle. This is crucial for that creamy texture we all love. Remember, it will continue to set as it cools!
Step 9: Cool the Cheesecake
Once baked, turn off the oven and crack the door open. Let the cheesecake cool inside for about an hour. This gradual cooling helps prevent cracks. After that, remove it and refrigerate for at least 6 hours, preferably overnight. Patience is key here!
Step 10: Prepare the Glaze
While your cheesecake chills, whisk together powdered sugar, milk, vanilla extract, and honey until smooth. This glaze adds a sweet finishing touch. Drizzle it over the chilled cheesecake just before slicing. It’s the cherry on top of your delicious creation!
Tips for Success
- Always use room temperature ingredients for a smoother batter.
- Don’t overmix the filling; it can lead to cracks.
- Let the cheesecake cool gradually in the oven to prevent cracking.
- For a cleaner slice, use a hot knife to cut through the cheesecake.
- Refrigerate overnight for the best flavor and texture.
Equipment Needed
- 9-inch springform pan: Essential for easy removal. A regular cake pan works, but it may be trickier to serve.
- Mixing bowls: Use a large bowl for the filling and a smaller one for the cinnamon swirl.
- Electric mixer: A hand mixer is perfect for this recipe, but a whisk can work if you’re feeling adventurous!
- Spatula: Great for scraping down the sides of the bowl and layering the cheesecake.
- Whisk: Handy for mixing the glaze smoothly.
Variations
- Chocolate Chip Honey Bun Cheesecake: Add semi-sweet chocolate chips to the filling for a decadent twist.
- Nutty Crunch: Incorporate chopped pecans or walnuts into the crust for added texture and flavor.
- Fruit-Infused: Swirl in some fruit preserves, like raspberry or blueberry, for a fruity contrast to the creamy cheesecake.
- Gluten-Free Option: Substitute graham cracker crumbs with gluten-free cookies or almond flour for a gluten-free version.
- Low-Sugar Version: Use a sugar substitute in the filling and glaze to reduce the overall sugar content.
Serving Suggestions
- Pair your Honey Bun Cheesecake with a dollop of whipped cream for extra creaminess.
- Serve alongside fresh berries for a pop of color and tartness.
- A hot cup of coffee or tea complements the sweetness beautifully.
- For a festive touch, garnish with a drizzle of caramel sauce.
- Present slices on a decorative plate for an elegant look.
FAQs about Honey Bun Cheesecake
Curious about Honey Bun Cheesecake? Here are some common questions I often hear, along with answers to help you navigate this delicious dessert.
Can I make Honey Bun Cheesecake ahead of time?
Absolutely! In fact, making it a day in advance enhances the flavors. Just be sure to refrigerate it overnight for the best results.
What can I substitute for cream cheese?
If you’re looking for a lighter option, you can use Neufchâtel cheese. It has a similar texture but less fat. Greek yogurt can also work, but it will change the flavor slightly.
How do I store leftovers?
Store any leftover Honey Bun Cheesecake in an airtight container in the refrigerator. It should stay fresh for about 4–5 days, though I doubt it will last that long!
Can I freeze Honey Bun Cheesecake?
Yes, you can freeze it! Wrap individual slices tightly in plastic wrap and then place them in a freezer-safe container. It can last up to 2 months in the freezer.
What’s the best way to serve Honey Bun Cheesecake?
For the best experience, serve it chilled with a drizzle of the glaze on top. A dollop of whipped cream or fresh fruit can elevate it even more!
Final Thoughts
Making Honey Bun Cheesecake is more than just baking; it’s about creating memories and sharing joy. Each slice offers a delightful blend of creamy cheesecake and sweet cinnamon, reminiscent of those cherished honey buns from childhood. Whether you’re celebrating a special occasion or simply treating yourself, this dessert brings warmth and happiness to any table. Plus, the ease of preparation means you can focus on what truly matters—enjoying time with loved ones. So, roll up your sleeves, embrace the process, and let this Honey Bun Cheesecake become a beloved addition to your dessert repertoire!
PrintHoney Bun Cheesecake: A Deliciously Easy Recipe to Try!
- Total Time: 7 hours
- Yield: 12 servings
- Diet: Vegetarian
Description
A deliciously easy recipe for Honey Bun Cheesecake that combines the flavors of a classic honey bun with a creamy cheesecake.
Ingredients
- 2 cups graham cracker crumbs
- ½ cup unsalted butter, melted
- ¼ cup granulated sugar
- ½ tsp ground cinnamon
- 24 oz cream cheese, softened
- 1 cup granulated sugar
- 3 large eggs
- 1 cup sour cream
- 2 tsp vanilla extract
- 2 tbsp all-purpose flour
- ½ cup unsalted butter, melted
- ½ cup brown sugar, packed
- 1 tbsp ground cinnamon
- 1 tbsp all-purpose flour
- 1 cup powdered sugar
- 2 tbsp milk
- ½ tsp vanilla extract
- 1 tbsp honey
Instructions
- Prepare the pan: Preheat the oven to 325°F. Grease a 9-inch springform pan.
- Make the crust: Combine graham cracker crumbs, melted butter, sugar, and cinnamon. Press firmly into the bottom of the pan.
- Bake the crust for 8–10 minutes. Remove and let cool slightly.
- Prepare the filling: Beat cream cheese and sugar until smooth and creamy.
- Add eggs one at a time, mixing on low speed after each addition.
- Mix in sour cream, vanilla extract, and flour until just combined.
- Make the cinnamon swirl: Stir together melted butter, brown sugar, cinnamon, and flour until smooth.
- Pour half of the cheesecake filling over the crust. Drizzle half of the cinnamon mixture over it.
- Add the remaining cheesecake filling, then drizzle the rest of the cinnamon mixture on top. Use a knife to gently swirl.
- Bake: Place the springform pan in the oven and bake for 55–65 minutes, until the edges are set and the center still has a slight jiggle.
- Turn off the oven, crack the door open, and let the cheesecake cool inside for 1 hour.
- Remove and refrigerate for at least 6 hours, preferably overnight.
- Prepare the glaze: Whisk powdered sugar, milk, vanilla, and honey until smooth.
- Drizzle the glaze over the chilled cheesecake before slicing.
Notes
- For best results, refrigerate the cheesecake overnight.
- Ensure all ingredients are at room temperature before mixing.
- Adjust the sweetness of the glaze to your preference.
- Prep Time: 30 minutes
- Cook Time: 65 minutes
- Category: Dessert
- Method: Baking
- Cuisine: American
Nutrition
- Serving Size: 1 slice
- Calories: 350
- Sugar: 25g
- Sodium: 250mg
- Fat: 20g
- Saturated Fat: 10g
- Unsaturated Fat: 8g
- Trans Fat: 0g
- Carbohydrates: 35g
- Fiber: 1g
- Protein: 5g
- Cholesterol: 80mg