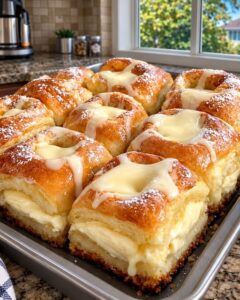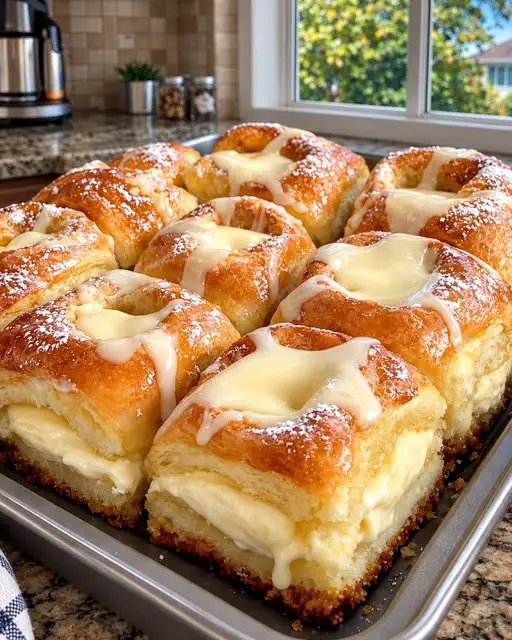
Introduction to King’s Hawaiian Cheesecake Danish
There’s something magical about the combination of sweet rolls and creamy cheesecake, isn’t there?
The King’s Hawaiian Cheesecake Danish brings that magic right to your kitchen.
This delightful dessert is not just a treat; it’s a quick solution for those busy days when you want to impress your loved ones without spending hours in the kitchen.
With just a handful of ingredients and a little love, you can whip up a batch that will have everyone asking for seconds.
Let’s dive into this sweet adventure together!
Why You’ll Love This King’s Hawaiian Cheesecake Danish
This King’s Hawaiian Cheesecake Danish is a game-changer for dessert lovers.
It’s incredibly easy to make, taking just 40 minutes from start to finish.
The sweet, fluffy rolls paired with a creamy cheesecake filling create a taste sensation that’s hard to resist.
Whether you’re hosting a brunch or just treating yourself, this dessert is sure to impress without the fuss.
Trust me, your taste buds will thank you!
Ingredients for King’s Hawaiian Cheesecake Danish
Creating the King’s Hawaiian Cheesecake Danish is a breeze with these simple ingredients.
Here’s what you’ll need:
- King’s Hawaiian Original Hawaiian Sweet Rolls: These rolls are the star of the show, bringing a sweet, fluffy base to your dessert.
- Cream Cheese: Softened cream cheese gives that rich, creamy texture to the cheesecake filling.
- Granulated Sugar: This sweetener balances the tanginess of the cream cheese, making it deliciously sweet.
- Large Egg: The egg helps bind the filling together, giving it a smooth consistency.
- Vanilla Extract: A splash of vanilla adds warmth and depth to the flavor profile.
- All-Purpose Flour: Just a tablespoon helps stabilize the filling, ensuring it sets perfectly.
- Strawberry or Raspberry Preserves: These fruity preserves add a burst of flavor and a lovely color contrast.
- Unsalted Butter: Brushing the tops with melted butter gives a golden, crispy finish.
- Cinnamon and Sugar Mixture: A sprinkle of this mix on top adds a delightful sweetness and warmth.
- Powdered Sugar: For the glaze, powdered sugar creates a smooth, sweet drizzle.
- Milk: A little milk helps achieve the perfect drizzling consistency for the glaze.
Feel free to get creative!
For an extra indulgent version, consider adding finely diced fresh strawberries over the cheesecake filling before baking.
All ingredient quantities are listed at the bottom of the article for easy reference and printing.
How to Make King’s Hawaiian Cheesecake Danish
Making the King’s Hawaiian Cheesecake Danish is a delightful journey that’s as simple as it is rewarding.
Follow these steps, and you’ll have a sweet treat that’s sure to impress.
Step 1: Preheat the Oven
Start by preheating your oven to 350°F.
This step is crucial as it sets the stage for perfect baking.
While the oven warms up, lightly grease a 9×13-inch baking dish to prevent sticking.
Step 2: Prepare the Rolls
Next, place the King’s Hawaiian rolls in the baking dish.
Using a small knife, cut a shallow rectangle or circle into the top of each roll.
Be careful not to cut all the way through; you want to create a pocket for that luscious cheesecake filling.
Step 3: Make the Cheesecake Filling
In a mixing bowl, beat the softened cream cheese and granulated sugar until smooth.
Add in the egg, vanilla extract, and flour, then beat until creamy and well combined.
This mixture is the heart of your Danish, so make sure it’s nice and fluffy!
Step 4: Fill the Rolls
Gently press down the center of each roll to create a small well.
Spoon the cheesecake mixture into each roll, filling them generously but not overflowing.
This is where the magic happens!
Step 5: Add Preserves
Now, it’s time to add a touch of fruity goodness.
Top each filled roll with about 1 teaspoon of strawberry or raspberry preserves.
Swirl lightly with a toothpick or small spoon for an extra burst of flavor.
Step 6: Brush and Sprinkle
Brush the tops of the rolls with melted butter.
Then, mix the sugar and cinnamon together and sprinkle it evenly over the rolls.
This step adds a delicious topping that enhances the overall flavor.
Step 7: Bake
Place the baking dish in the preheated oven and bake for 20–25 minutes.
You’ll know they’re done when the cheesecake filling is set and the tops are lightly golden.
The aroma will fill your kitchen, making it hard to resist!
Step 8: Prepare the Glaze
While the Danish cools, whisk together the powdered sugar, milk, and vanilla extract in a small bowl.
Adjust the milk as needed to reach a smooth, drizzling consistency.
This glaze will add a sweet finish to your creation.
Step 9: Cool and Drizzle
Let the Danish cool for about 10 minutes before drizzling generously with the glaze.
This cooling time allows the flavors to meld beautifully.
Serve warm or chilled, and enjoy every bite of your King’s Hawaiian Cheesecake Danish!
Tips for Success
- Make sure your cream cheese is softened for easy mixing.
- Don’t overfill the rolls; leave a little space for the filling to expand.
- For a golden top, keep an eye on the baking time.
- Experiment with different fruit preserves for unique flavors.
- Let the Danish cool slightly before drizzling for a neater finish.
Equipment Needed
- Baking Dish: A 9×13-inch dish works best, but any similar-sized dish will do.
- Mixing Bowl: Use a medium bowl for mixing the cheesecake filling; a stand mixer can save time.
- Small Knife: A paring knife is perfect for cutting the rolls.
- Whisk: A whisk helps achieve a smooth glaze; a fork can work in a pinch.
- Measuring Cups and Spoons: Essential for accurate ingredient measurements.
Variations
- Fruit Swaps: Try using peach or apricot preserves for a different fruity twist.
- Nutty Crunch: Add chopped nuts like pecans or walnuts to the cheesecake filling for added texture.
- Chocolate Lovers: Mix in mini chocolate chips with the cheesecake filling for a decadent chocolate version.
- Gluten-Free Option: Substitute the all-purpose flour with a gluten-free blend to make it suitable for gluten-sensitive friends.
- Vegan Adaptation: Use a plant-based cream cheese and a flax egg to create a vegan-friendly version.
Serving Suggestions
- Fresh Berries: Serve with a side of fresh strawberries or raspberries for a pop of color and flavor.
- Coffee Pairing: A warm cup of coffee or espresso complements the sweetness perfectly.
- Presentation: Dust with powdered sugar before serving for an elegant touch.
- Whipped Cream: Add a dollop of whipped cream on top for extra indulgence.
- Brunch Delight: Perfect for brunch alongside a fruit salad or yogurt parfait.
FAQs about King’s Hawaiian Cheesecake Danish
Can I make King’s Hawaiian Cheesecake Danish ahead of time?
Absolutely! You can prepare the rolls and filling the night before. Just cover them and refrigerate. Bake them fresh in the morning for a delightful breakfast treat.
What can I substitute for cream cheese?
If you’re looking for a lighter option, you can use Greek yogurt or a dairy-free cream cheese alternative. Both will still give you that creamy texture.
How do I store leftovers?
Store any leftovers in an airtight container in the refrigerator. They’ll stay fresh for up to four days, but trust me, they won’t last that long!
Can I freeze the King’s Hawaiian Cheesecake Danish?
Yes, you can freeze them! Just wrap individual pieces tightly in plastic wrap and then in foil. They’ll keep well for up to three months. Thaw in the fridge before enjoying.
What other fruit preserves work well with this recipe?
Besides strawberry and raspberry, you can try blueberry, cherry, or even a mixed berry preserve for a delicious twist. The options are endless!
Final Thoughts
Creating the King’s Hawaiian Cheesecake Danish is more than just baking; it’s about sharing joy and deliciousness with those you love.
The sweet aroma wafting through your kitchen will draw everyone in, and the first bite will have them smiling from ear to ear.
This dessert is perfect for any occasion, whether it’s a cozy family brunch or a festive gathering with friends.
With its delightful combination of flavors and textures, it’s bound to become a favorite in your home.
So, roll up your sleeves and let the sweet adventure begin!
PrintKing’s Hawaiian Cheesecake Danish: A Sweet Delight Recipe
- Total Time: 40 minutes
- Yield: 12 servings
- Diet: Vegetarian
Description
A delightful dessert combining the sweetness of King’s Hawaiian rolls with a creamy cheesecake filling and a hint of fruit preserves.
Ingredients
- 1 package (12 count) King’s Hawaiian Original Hawaiian Sweet Rolls
- 8 oz cream cheese, softened
- ½ cup granulated sugar
- 1 large egg
- 1 tsp vanilla extract
- 1 tbsp all-purpose flour
- ½ cup strawberry or raspberry preserves
- 2 tbsp unsalted butter, melted
- 2 tbsp granulated sugar
- ½ tsp ground cinnamon
- ½ cup powdered sugar
- 1–2 tbsp milk
- ½ tsp vanilla extract
Instructions
- Preheat your oven to 350°F. Lightly grease a 9×13-inch baking dish.
- Place the King’s Hawaiian rolls in the baking dish. Using a small knife, cut a shallow rectangle or circle into the top of each roll, being careful not to cut all the way through.
- Beat the softened cream cheese and sugar until smooth. Add the egg, vanilla, and flour. Beat until creamy and well combined.
- Gently press down the center of each roll to create a small well. Spoon the cheesecake mixture into each roll.
- Add about 1 teaspoon of preserves on top of each cheesecake-filled roll. Swirl lightly with a toothpick or small spoon.
- Brush the tops of the rolls with melted butter. Mix the sugar and cinnamon together, then sprinkle evenly over the rolls.
- Bake for 20–25 minutes, or until the cheesecake filling is set and the tops are lightly golden.
- Whisk together the powdered sugar, milk, and vanilla until smooth. Add a little more milk if needed to reach a drizzling consistency.
- Let the Danish cool for about 10 minutes, then drizzle generously with the glaze.
- Serve warm or chilled. Refrigerate leftovers in an airtight container for up to 4 days.
Notes
- For an extra indulgent version, use strawberry preserves and add a few finely diced fresh strawberries over the cheesecake filling before baking.
- Prep Time: 15 minutes
- Cook Time: 25 minutes
- Category: Dessert
- Method: Baking
- Cuisine: American
Nutrition
- Serving Size: 1 Danish
- Calories: 250
- Sugar: 15g
- Sodium: 150mg
- Fat: 10g
- Saturated Fat: 5g
- Unsaturated Fat: 3g
- Trans Fat: 0g
- Carbohydrates: 35g
- Fiber: 1g
- Protein: 3g
- Cholesterol: 30mg