Introduction to Little Debbie Christmas Tree Cake Balls
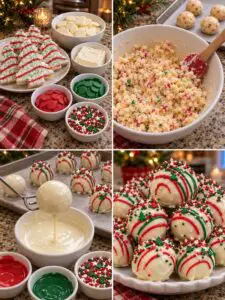
Every holiday season, I find myself reminiscing about the joy of unwrapping those iconic Little Debbie Christmas Tree Cakes. The vibrant green frosting and festive shape always brought a smile to my face. This year, I decided to take that nostalgia up a notch by transforming them into Little Debbie Christmas Tree Cake Balls. These delightful treats are not only a quick solution for busy days but also a fun way to impress family and friends at gatherings. With minimal effort and maximum flavor, you’ll be the star of any holiday party!
Why You’ll Love This Little Debbie Christmas Tree Cake Balls
These Little Debbie Christmas Tree Cake Balls are a game-changer for holiday baking. They’re incredibly easy to whip up, making them perfect for those of us who juggle busy schedules. Plus, the taste is pure nostalgia wrapped in a festive bite. With just a few ingredients and no baking required, you can create a delightful treat that will have everyone asking for seconds. Trust me, they’ll disappear faster than you can say “holiday cheer!”
Ingredients for Little Debbie Christmas Tree Cake Balls
Gathering the right ingredients is half the fun of making Little Debbie Christmas Tree Cake Balls. Here’s what you’ll need:
- Little Debbie Christmas Tree Cakes: The star of the show! These iconic cakes provide the base flavor and festive spirit.
- Cream Cheese: This adds a rich, creamy texture that binds everything together. Make sure it’s softened for easy mixing.
- Vanilla Extract: A splash of this enhances the sweetness and adds depth to the flavor profile.
- White Chocolate Chips or White Candy Melts: These create a smooth, sweet coating that makes the cake balls irresistible.
- Coconut Oil or Shortening: A little bit of this helps the chocolate melt smoothly and gives it a nice sheen.
- Red Candy Melts: Perfect for decorating! They add a pop of color and a festive touch to your cake balls.
- Green Christmas Sprinkles: These sprinkles bring the holiday spirit to life, making your treats look extra special.
- White Nonpareils (optional): These tiny white sprinkles add a delightful crunch and a touch of elegance.
For exact measurements, check the bottom of the article where you can find everything listed for easy printing. Happy baking!
How to Make Little Debbie Christmas Tree Cake Balls
Creating Little Debbie Christmas Tree Cake Balls is a delightful journey that’s as easy as pie. Follow these simple steps, and you’ll have a festive treat ready in no time!
Step 1: Crumble the Cakes
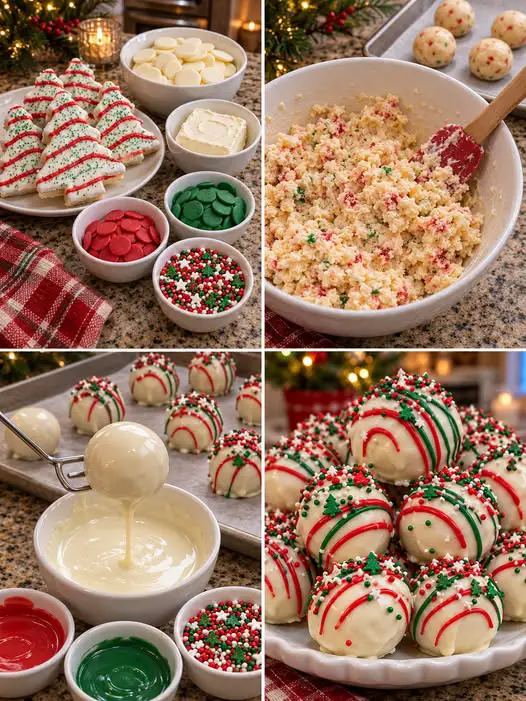
Start by unwrapping the Little Debbie Christmas Tree Cakes. Place them in a large mixing bowl. Use your hands or a fork to crumble them into fine pieces. The texture should resemble coarse crumbs. This step is crucial, as it sets the foundation for your cake balls.
Step 2: Add the Cream Cheese
Next, add the softened cream cheese and a teaspoon of vanilla extract to the crumbled cakes. Mix everything together until it forms a soft, moldable dough. I find using my hands works best here. The warmth from your fingers helps blend the ingredients smoothly.
Step 3: Shape the Balls
Now, scoop about one tablespoon of the mixture and roll it into a smooth ball. Place each ball on a parchment-lined baking sheet. This part is fun! You can even get the kids involved. Just make sure they’re all roughly the same size for even coating later.
Step 4: Chill
Once shaped, it’s time to chill. Refrigerate the cake balls for 1 to 2 hours until they’re firm. If you’re in a hurry, pop them in the freezer for about 20 to 30 minutes. Chilling is essential to prevent them from falling apart during dipping.
Step 5: Melt the Coating
While the cake balls chill, melt the white chocolate chips and coconut oil together. Use a microwave-safe bowl and heat in 20-second intervals, stirring in between. You want a smooth, glossy coating. If it’s too thick, add a bit more coconut oil to achieve the right consistency.
Step 6: Dip the Cake Balls
Once the cake balls are firm, it’s time to dip! Using a fork or a dipping tool, carefully dip each ball into the melted white chocolate. Allow any excess coating to drip off before placing them back on the parchment-lined sheet. This step is where the magic happens!
Step 7: Set the Coating
After dipping, let the coated cake balls sit on the baking sheet. This allows the chocolate to set properly. You can speed up the process by placing them back in the fridge for about 15 minutes.
Step 8: Decorate
Now comes the fun part—decorating! Melt the red candy melts and transfer them to a small piping bag or a zip-top bag with a tiny corner cut off. Drizzle thin red zigzag lines over each cake ball. Get creative! This is your chance to add a personal touch.
Step 9: Chill and Serve
Finally, sprinkle the green Christmas sprinkles and optional white nonpareils over the cake balls while the coating is still wet. Once decorated, chill them again for about 15 to 20 minutes until the coating is completely set. Then, they’re ready to serve!
Tips for Success
- Use softened cream cheese for easier mixing and a smoother filling.
- Chill the cake balls thoroughly before dipping to prevent them from falling apart.
- If the white chocolate is too thick, add a little more coconut oil for a smoother consistency.
- Decorate immediately after dipping so the sprinkles stick properly.
- For a festive presentation, place each cake ball in a mini cupcake liner.
Equipment Needed
- Mixing Bowl: A large bowl for combining ingredients. Any size will do!
- Fork or Hands: For crumbling and mixing. Your hands work wonders!
- Parchment Paper: To line your baking sheet. Wax paper can be a substitute.
- Microwave-Safe Bowl: For melting chocolate. A glass bowl is ideal.
- Piping Bag or Zip-Top Bag: For decorating. A simple plastic bag works too!
Variations
- Chocolate Cake Balls: Swap the Little Debbie Christmas Tree Cakes for chocolate versions for a rich twist.
- Gluten-Free Option: Use gluten-free cake mix and gluten-free cream cheese to accommodate dietary needs.
- Nutty Delight: Add crushed nuts like almonds or walnuts to the mixture for added crunch and flavor.
- Minty Fresh: Incorporate a few drops of peppermint extract into the cream cheese mixture for a refreshing holiday flavor.
- Colorful Sprinkles: Use different colored sprinkles to match your holiday theme or party decor.
Serving Suggestions
- Festive Platter: Arrange the cake balls on a decorative platter for a stunning presentation.
- Hot Cocoa Pairing: Serve alongside a warm cup of hot cocoa for a cozy treat.
- Mini Cupcake Liners: Use colorful liners to elevate the look and make serving easier.
- Holiday Gift: Package them in a festive box as a sweet homemade gift.
FAQs about Little Debbie Christmas Tree Cake Balls
Can I make Little Debbie Christmas Tree Cake Balls ahead of time?
Absolutely! These cake balls can be made a day or two in advance. Just store them in an airtight container in the refrigerator until you’re ready to serve. They’ll stay fresh and delicious!
What can I use instead of cream cheese?
If you’re looking for a dairy-free option, try using vegan cream cheese or a nut-based cream cheese alternative. Both will work well to bind the cake mixture.
How do I store leftover cake balls?
Store any leftover Little Debbie Christmas Tree Cake Balls in an airtight container in the fridge. They should last for about a week, but trust me, they won’t last that long!
Can I freeze these cake balls?
Yes, you can freeze them! Just make sure they’re fully set before placing them in a freezer-safe container. They can be frozen for up to three months. Thaw them in the fridge before serving.
What other decorations can I use?
Get creative! You can use colored sugar, edible glitter, or even crushed candy canes for a festive touch. The options are endless, so have fun with it!
Final Thoughts
Making Little Debbie Christmas Tree Cake Balls is more than just a recipe; it’s a delightful experience that brings joy to the holiday season. Each bite is a nostalgic reminder of childhood, wrapped in festive cheer. Whether you’re sharing them at a gathering or enjoying them with family, these treats create lasting memories. The simplicity of the recipe allows everyone to join in the fun, making it a perfect activity for all ages. So, roll up your sleeves, gather your loved ones, and let the holiday spirit shine through these delicious cake balls!
PrintLittle Debbie Christmas Tree Cake Balls: Easy & Fun Recipe!
- Total Time: 2 hours 30 minutes
- Yield: 20 cake balls
- Diet: Vegetarian
Description
A fun and festive recipe for Little Debbie Christmas Tree Cake Balls, perfect for holiday gatherings.
Ingredients
- 5 Little Debbie Christmas Tree Cakes (5-count package)
- 4 oz cream cheese, softened
- 1 teaspoon vanilla extract
- 2 cups white chocolate chips or white candy melts
- 1 tablespoon coconut oil or shortening
- ½ cup red candy melts, for decorating
- 2 tablespoons green Christmas sprinkles
- 2 tablespoons white nonpareils (optional)
Instructions
- Crumble the cakes: Remove the Christmas Tree Cakes from their wrappers and place them in a large mixing bowl. Crumble with your hands or a fork until finely broken down.
- Add the cream cheese: Add softened cream cheese and vanilla extract. Mix until everything is combined into a soft, moldable dough.
- Shape the balls: Scoop about 1 tablespoon of the mixture and roll into smooth balls. Place them on a parchment-lined baking sheet.
- Chill: Refrigerate for 1–2 hours, or until firm. For faster chilling, place in the freezer for about 20–30 minutes.
- Melt the coating: Combine white chocolate chips and coconut oil in a microwave-safe bowl. Microwave in 20-second intervals, stirring between each, until smooth.
- Dip the cake balls: Use a fork or dipping tool to dip each chilled cake ball into the melted white chocolate. Allow excess coating to drip off.
- Set the coating: Place the coated cake balls back onto the parchment-lined baking sheet.
- Decorate: Melt the red candy melts and transfer to a small piping bag or zip-top bag with a tiny corner cut off. Drizzle thin red zigzag lines over each cake ball.
- Add sprinkles: Sprinkle with green decorations and white nonpareils while the coating is still slightly wet.
- Chill and serve: Refrigerate for 15–20 minutes until the coating is completely set.
Notes
- Use softened cream cheese for easier mixing and a smoother filling.
- Chill the cake balls thoroughly before dipping to prevent them from falling apart.
- If the white chocolate is too thick, add a little more coconut oil.
- Use almond bark or white candy melts for a smoother coating.
- Decorate immediately after dipping so the sprinkles stick properly.
- For a more festive presentation, place each cake ball in a mini cupcake liner.
- Prep Time: 30 minutes
- Cook Time: 0 minutes
- Category: Dessert
- Method: No-Bake
- Cuisine: American
Nutrition
- Serving Size: 1 cake ball
- Calories: 150
- Sugar: 10g
- Sodium: 50mg
- Fat: 8g
- Saturated Fat: 5g
- Unsaturated Fat: 3g
- Trans Fat: 0g
- Carbohydrates: 18g
- Fiber: 0g
- Protein: 1g
- Cholesterol: 10mg