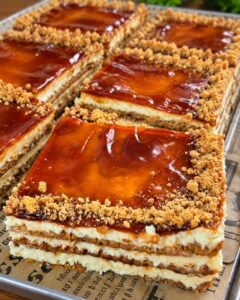
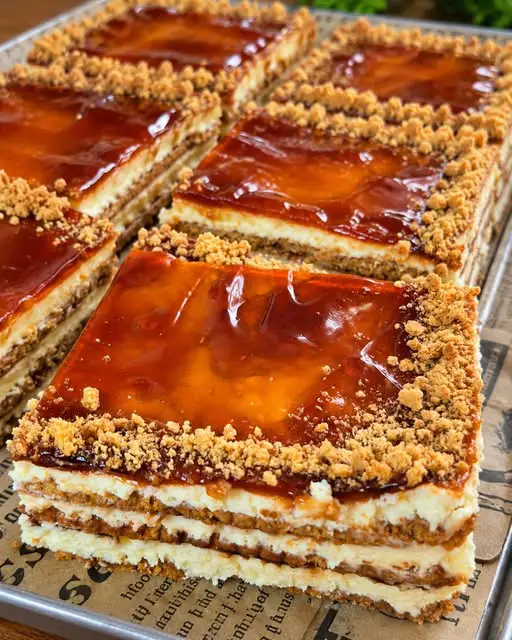
Introduction to No-Bake Caramel Biscuit Cake with Creamy Layers
There’s something magical about desserts that require no baking.
The No-Bake Caramel Biscuit Cake with Creamy Layers is one of those delightful creations that can turn an ordinary day into a special occasion.
Whether you’re looking to impress guests or simply treat yourself after a long week, this cake is your go-to solution.
With its rich layers of mascarpone and homemade caramel, it’s a sweet escape that doesn’t demand hours in the kitchen.
Trust me, once you try this recipe, you’ll wonder how you ever lived without it!
Why You’ll Love This No-Bake Caramel Biscuit Cake with Creamy Layers
This No-Bake Caramel Biscuit Cake with Creamy Layers is a game-changer for dessert lovers.
It’s incredibly easy to whip up, making it perfect for busy weeknights or last-minute gatherings.
The layers of creamy mascarpone and luscious caramel create a taste sensation that’s hard to resist.
Plus, there’s no oven required, so you can enjoy a delicious treat without the heat.
What’s not to love?
Ingredients for No-Bake Caramel Biscuit Cake with Creamy Layers
Creating this No-Bake Caramel Biscuit Cake with Creamy Layers is all about gathering the right ingredients.
Here’s what you’ll need:
- Plain tea biscuits, Petit Beurre biscuits, or graham crackers: These form the base of your cake, providing a delightful crunch.
- Whole milk: Used for dipping the biscuits, it adds moisture without making them soggy.
- Heavy whipping cream: This is essential for achieving that light, airy texture in the mascarpone cream.
- Mascarpone cheese: A rich, creamy cheese that elevates the flavor and texture of the filling.
- Powdered sugar: This sweetens the mascarpone cream and helps it hold its shape.
- Vanilla extract: A splash of this adds warmth and depth to the creamy layers.
- Caramel sauce: You’ll need some for drizzling and a bit for the filling. Homemade is best, but store-bought works too!
- Granulated sugar: The star of your homemade caramel sauce, it transforms into a golden delight.
- Water: Helps dissolve the sugar when making caramel.
- Unsalted butter: Adds richness to the caramel sauce, making it smooth and glossy.
- Salt: A pinch enhances the flavors in both the caramel and the cream.
- Lemon juice: Just a touch helps prevent the sugar from crystallizing while making caramel.
- Milk: You might need a bit to thin the caramel sauce if it gets too thick.
- Crushed tea biscuits: These are optional but add a nice texture on top.
- Chocolate shavings: White or dark, these are a delightful garnish that adds a touch of elegance.
- Flaky sea salt: A sprinkle on top can elevate the flavors, giving a sweet and salty contrast.
For exact measurements, check the bottom of the article where you can find everything listed for easy printing.
Gather these ingredients, and you’re on your way to creating a dessert that’s sure to impress!
How to Make No-Bake Caramel Biscuit Cake with Creamy Layers
Creating this No-Bake Caramel Biscuit Cake with Creamy Layers is a delightful journey.
Follow these simple steps, and you’ll have a stunning dessert that’s sure to impress.
Step 1: Make the Caramel Sauce
Start by combining sugar, water, and lemon juice in a saucepan.
Heat it over medium heat, stirring gently until the sugar dissolves.
Keep a close eye on it; you want that beautiful golden color without burning.
Once it reaches the right hue, slowly add the warmed cream.
This step is crucial—add it gradually to avoid splattering.
Then, whisk in the butter and salt until smooth.
Set it aside to cool while you prepare the other layers.
Step 2: Prepare the Mascarpone Cream
In a mixing bowl, beat the cold heavy cream with powdered sugar and vanilla extract.
Whip it until medium-stiff peaks form; this gives your cream a lovely texture.
Next, mix the mascarpone cheese until smooth.
Gently fold the whipped cream into the mascarpone.
You want a light, airy consistency that will hold its shape beautifully.
Step 3: Prepare the Biscuit Base
Take your biscuits and dip them quickly in the whole milk.
Don’t soak them; just a quick dip to keep them from getting mushy.
Arrange the dipped biscuits in a single layer at the bottom of your dish.
This crunchy base is essential for the cake’s structure.
Step 4: Add the First Creamy Layer
Spread one-third of the mascarpone filling over the biscuit layer.
Make sure to cover them evenly.
Then, drizzle some of your homemade caramel sauce on top.
This layering technique creates a delightful contrast of flavors.
Step 5: Repeat the Layers
Continue the process by adding another layer of dipped biscuits.
Follow it with another third of the mascarpone filling and more caramel.
Repeat until you’ve used all your ingredients, finishing with a layer of mascarpone.
This creates a beautiful, creamy tower of deliciousness.
Step 6: Add the Glossy Caramel Topping
Warm the reserved caramel sauce gently until it’s pourable.
Carefully pour it over the top layer of mascarpone.
For an extra touch, sprinkle crushed biscuits and chocolate shavings on top.
These little details make your cake look even more inviting.
Step 7: Chill Until Set
Cover your cake with plastic wrap and refrigerate it for at least six hours.
Overnight is even better!
This chilling time allows the layers to meld together, creating a perfect slice.
Step 8: Slice and Serve
When you’re ready to serve, let the cake sit for about five minutes at room temperature.
This makes slicing easier.
Cut it into squares and serve chilled.
For an added touch, sprinkle a pinch of flaky sea salt on top.
It’s the perfect finishing touch to elevate the flavors!
Tips for Success
- Keep a close eye on the caramel to prevent burning; it can go from perfect to burnt in seconds.
- Use cold cream and mascarpone for a fluffier texture in your creamy layers.
- Dip biscuits quickly in milk to maintain their crunch.
- Chill the cake overnight for the best flavor and texture.
- Feel free to customize with your favorite toppings or flavors!
Equipment Needed
- Mixing bowls: Use any size, but a large bowl is ideal for whipping cream.
- Whisk or electric mixer: A hand whisk works, but an electric mixer saves time.
- Saucepan: A medium-sized one for making caramel.
- Spatula: Essential for spreading the mascarpone cream evenly.
- Dish or cake pan: Any shallow dish works for layering your cake.
Variations of No-Bake Caramel Biscuit Cake with Creamy Layers
- Nutty Delight: Add chopped nuts like walnuts or pecans between the layers for a crunchy texture and nutty flavor.
- Fruit Fusion: Layer in fresh fruits like sliced bananas or strawberries for a refreshing twist.
- Chocolate Lovers: Incorporate cocoa powder into the mascarpone cream or use chocolate biscuits for the base.
- Vegan Option: Substitute mascarpone with coconut cream and use dairy-free biscuits and plant-based butter.
- Spiced Up: Add a pinch of cinnamon or nutmeg to the mascarpone cream for a warm, spiced flavor.
Serving Suggestions for No-Bake Caramel Biscuit Cake with Creamy Layers
- Fresh Berries: Serve with a side of mixed berries for a burst of freshness.
- Coffee or Tea: Pair with a strong cup of coffee or a soothing herbal tea.
- Elegant Presentation: Garnish with mint leaves or edible flowers for a stunning look.
- Ice Cream: A scoop of vanilla ice cream complements the cake’s richness beautifully.
- Chocolate Sauce: Drizzle extra chocolate or caramel sauce on the plate for added indulgence.
FAQs about No-Bake Caramel Biscuit Cake with Creamy Layers
Can I use different types of biscuits for this recipe?
Absolutely! While plain tea biscuits, Petit Beurre biscuits, or graham crackers work best, feel free to experiment with your favorites. Just ensure they have a similar texture for the best results.
How long can I store the No-Bake Caramel Biscuit Cake?
This cake can be stored in the refrigerator for up to 3 days. Just make sure to cover it well to keep it fresh and prevent it from absorbing any odors.
Can I make this cake ahead of time?
Yes! In fact, making it a day in advance is ideal. The flavors meld beautifully overnight, enhancing the overall taste of your No-Bake Caramel Biscuit Cake with Creamy Layers.
What can I substitute for mascarpone cheese?
If you can’t find mascarpone, cream cheese mixed with a bit of heavy cream can work as a substitute. It won’t be exactly the same, but it will still create a delicious creamy layer.
Is this dessert suitable for vegetarians?
Yes, this No-Bake Caramel Biscuit Cake with Creamy Layers is vegetarian-friendly! Just ensure that any biscuits you choose are also vegetarian.
Final Thoughts
Creating the No-Bake Caramel Biscuit Cake with Creamy Layers is more than just a cooking task; it’s an experience filled with joy and satisfaction.
Each layer tells a story, from the crunchy biscuits to the velvety mascarpone and rich caramel.
This dessert is perfect for gatherings, celebrations, or simply indulging yourself after a long day.
The best part? You don’t need to turn on the oven!
So, gather your ingredients, unleash your creativity, and enjoy the sweet rewards of your efforts.
Trust me, every bite will remind you why you love being in the kitchen!
PrintNo-Bake Caramel Biscuit Cake with Creamy Layers Delight!
- Total Time: 6 hours 45 minutes
- Yield: 9 servings
- Diet: Vegetarian
Description
A delightful No-Bake Caramel Biscuit Cake featuring creamy layers of mascarpone and a rich homemade caramel sauce, perfect for any occasion.
Ingredients
- 9 oz plain tea biscuits, Petit Beurre biscuits, or graham crackers
- ¾ cup whole milk, for dipping
- 1 cup heavy whipping cream, cold
- 8 oz mascarpone cheese, cold
- 3 tbsp powdered sugar
- 1 tsp vanilla extract
- 2 tbsp caramel sauce, cooled
- 1 cup granulated sugar
- ¼ cup water
- ¾ cup heavy cream, warmed
- 3 tbsp unsalted butter
- ½ tsp salt
- 1 tsp lemon juice
- 1–2 tbsp milk, if needed to thin the sauce
- ½ cup caramel sauce, reserved from the homemade batch
- ¼ cup crushed tea biscuits
- 2 tbsp white or dark chocolate shavings, optional
- A small pinch of flaky sea salt, optional
Instructions
- Make the Caramel Sauce: Combine sugar, water, and lemon juice in a saucepan. Heat until sugar dissolves and turns golden. Add warm cream slowly, then butter and salt. Whisk until smooth.
- Prepare the Mascarpone Cream: Beat heavy cream with powdered sugar and vanilla until medium-stiff peaks form. Mix mascarpone until smooth, then fold in whipped cream.
- Prepare the Biscuit Base: Dip biscuits in milk briefly and arrange in a single layer in a dish.
- Add the First Creamy Layer: Spread one-third of the mascarpone filling over the biscuits and drizzle with caramel.
- Repeat the Layers: Add another layer of biscuits, mascarpone filling, and caramel. Repeat until all ingredients are used, finishing with mascarpone.
- Add the Glossy Caramel Topping: Warm reserved caramel and pour over the top layer. Sprinkle with crushed biscuits and chocolate shavings if desired.
- Chill Until Set: Cover and refrigerate for at least 6 hours or overnight.
- Slice and Serve: Let stand for 5 minutes before slicing. Serve chilled with optional flaky sea salt.
Notes
- Watch the caramel carefully to prevent burning.
- Warm the cream before adding to caramel.
- Dip biscuits quickly to avoid mushiness.
- Use cold cream and mascarpone for better texture.
- Cool caramel before layering to maintain structure.
- Chill overnight for best results.
- Prep Time: 30 minutes
- Cook Time: 15 minutes
- Category: Dessert
- Method: No-Bake
- Cuisine: International
Nutrition
- Serving Size: 1 square
- Calories: 350
- Sugar: 25g
- Sodium: 150mg
- Fat: 20g
- Saturated Fat: 10g
- Unsaturated Fat: 8g
- Trans Fat: 0g
- Carbohydrates: 35g
- Fiber: 1g
- Protein: 4g
- Cholesterol: 50mg