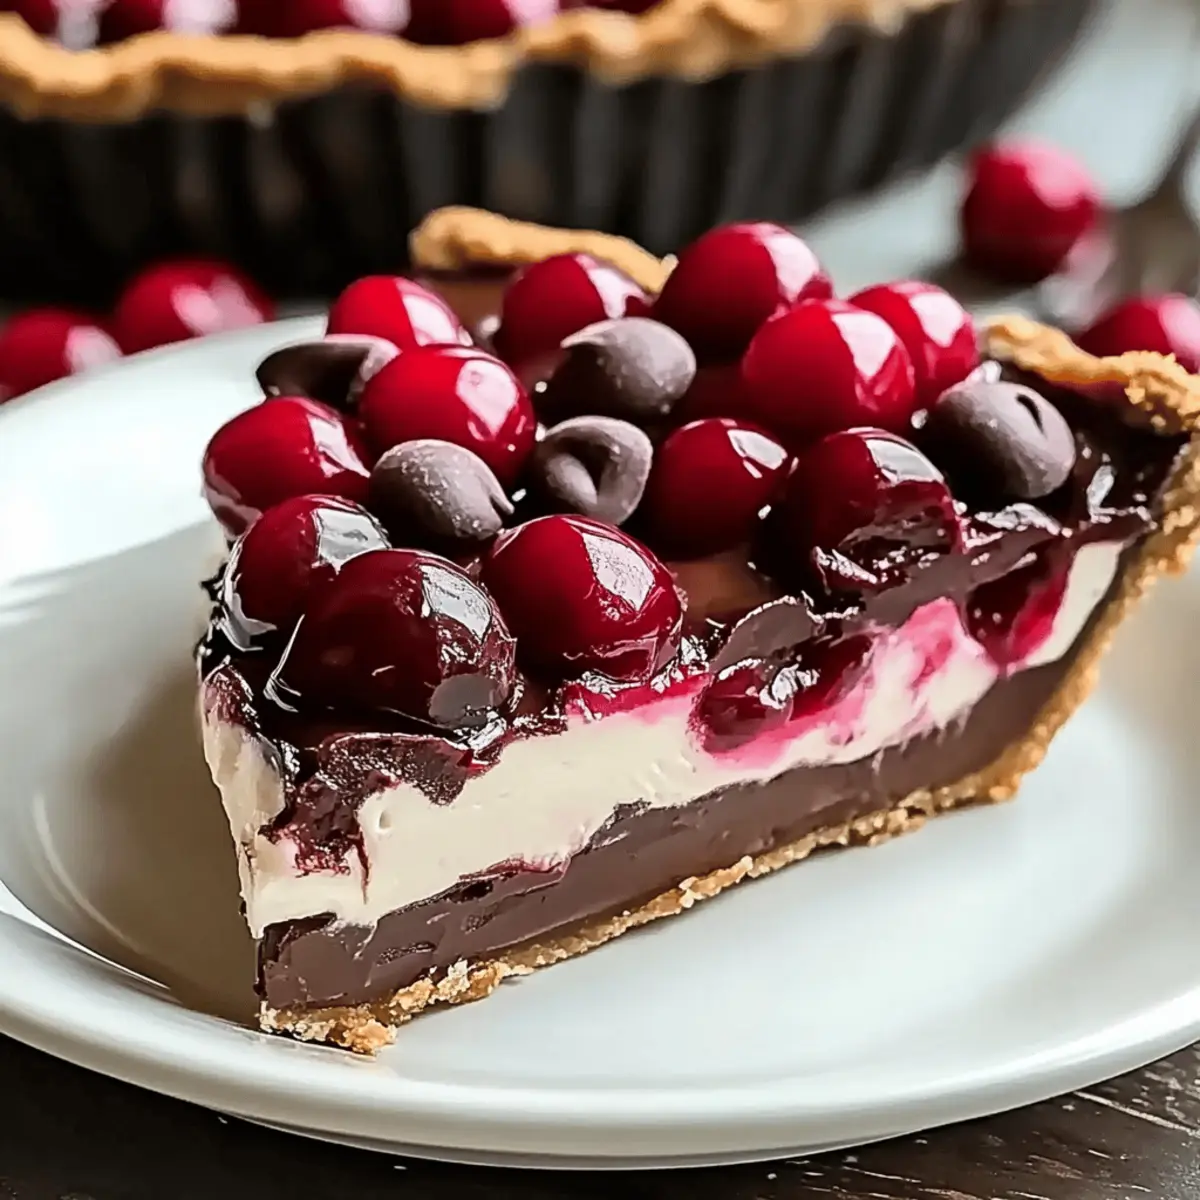
As I stood in the kitchen, I could feel the heat rising outside, a sticky reminder of summer’s grip. In moments like these, a No-Bake Chocolate Cherry Pie becomes my culinary savior. This easy dessert is a delightful fusion of luscious chocolate, sweet-tart cherries, and a creamy filling that comes together effortlessly—no oven required! Not only is it perfect for those sweltering days when you crave a cool treat, but it also serves as a wonderful centerpiece for gatherings, enticing everyone from vegans to chocolate lovers with its versatile dietary options. Intrigued? Let’s dive into creating this refreshing masterpiece that’s as beautiful as it is delicious!
Why is this pie a game changer?
No-Bake Convenience: This delicious pie requires no baking, making it perfect for hot days when turning on the oven is the last thing you want to do.
Rich, Decadent Layers: Indulge in the velvety chocolate and creamy filling that mingle perfectly with sweet-tart cherries for a treat everyone will adore.
Diet-Friendly Options: Vegetarian, gluten-free, and dairy-free variations ensure that everyone at your gathering can enjoy a slice!
Quick Assembly: With minimal prep time and easy-to-find ingredients, you’ll have this pie ready in no time. It’s a crowd-pleasure, just like my Homemade Apple Pie for family gatherings!
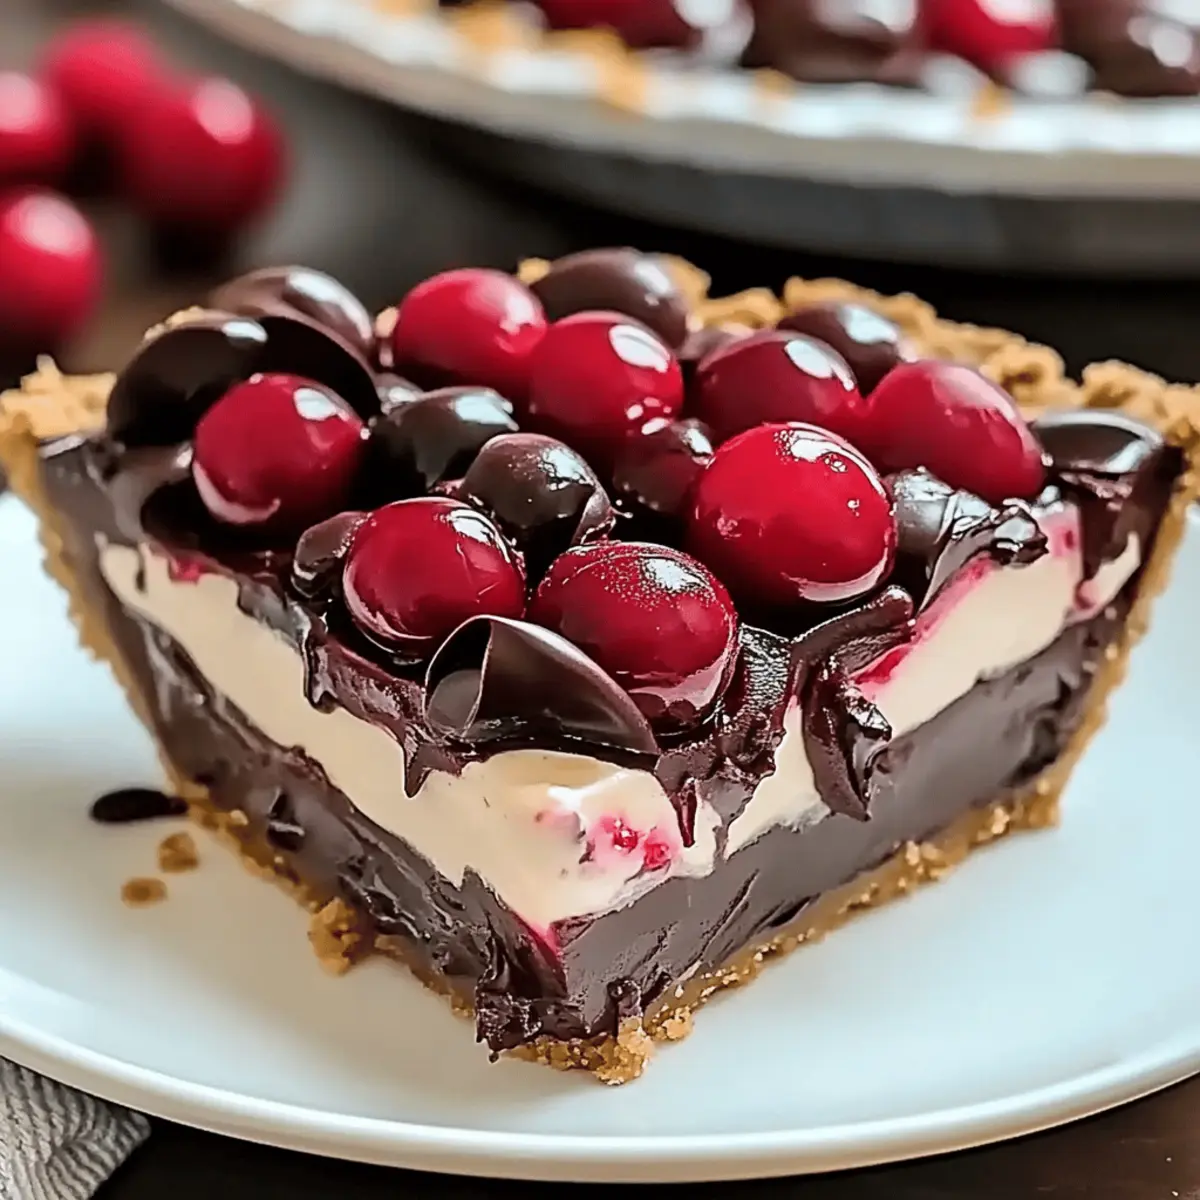
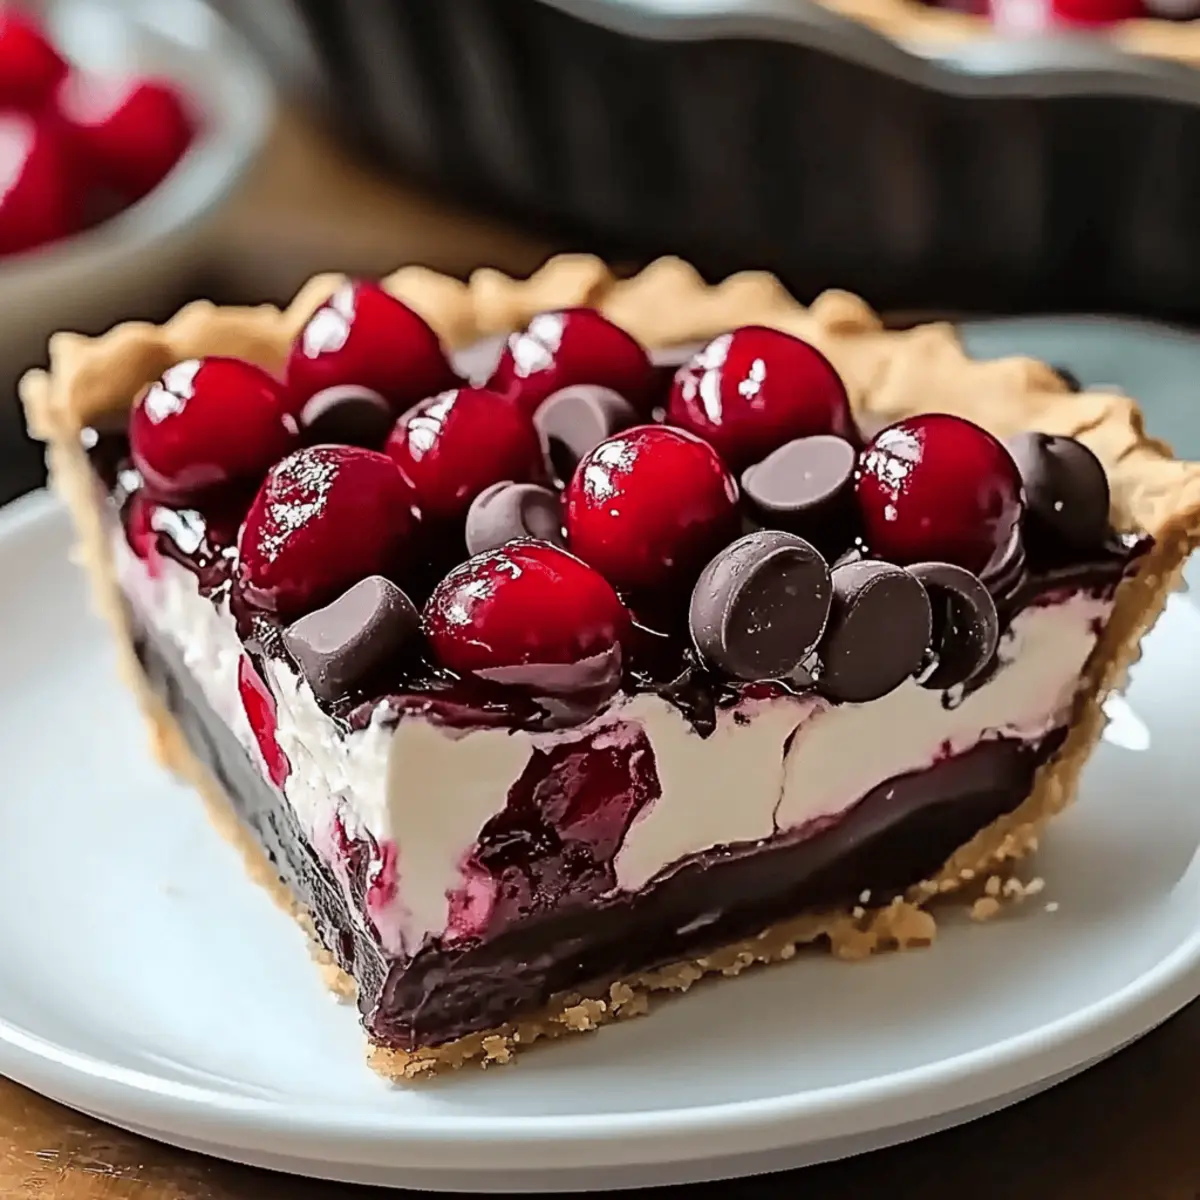
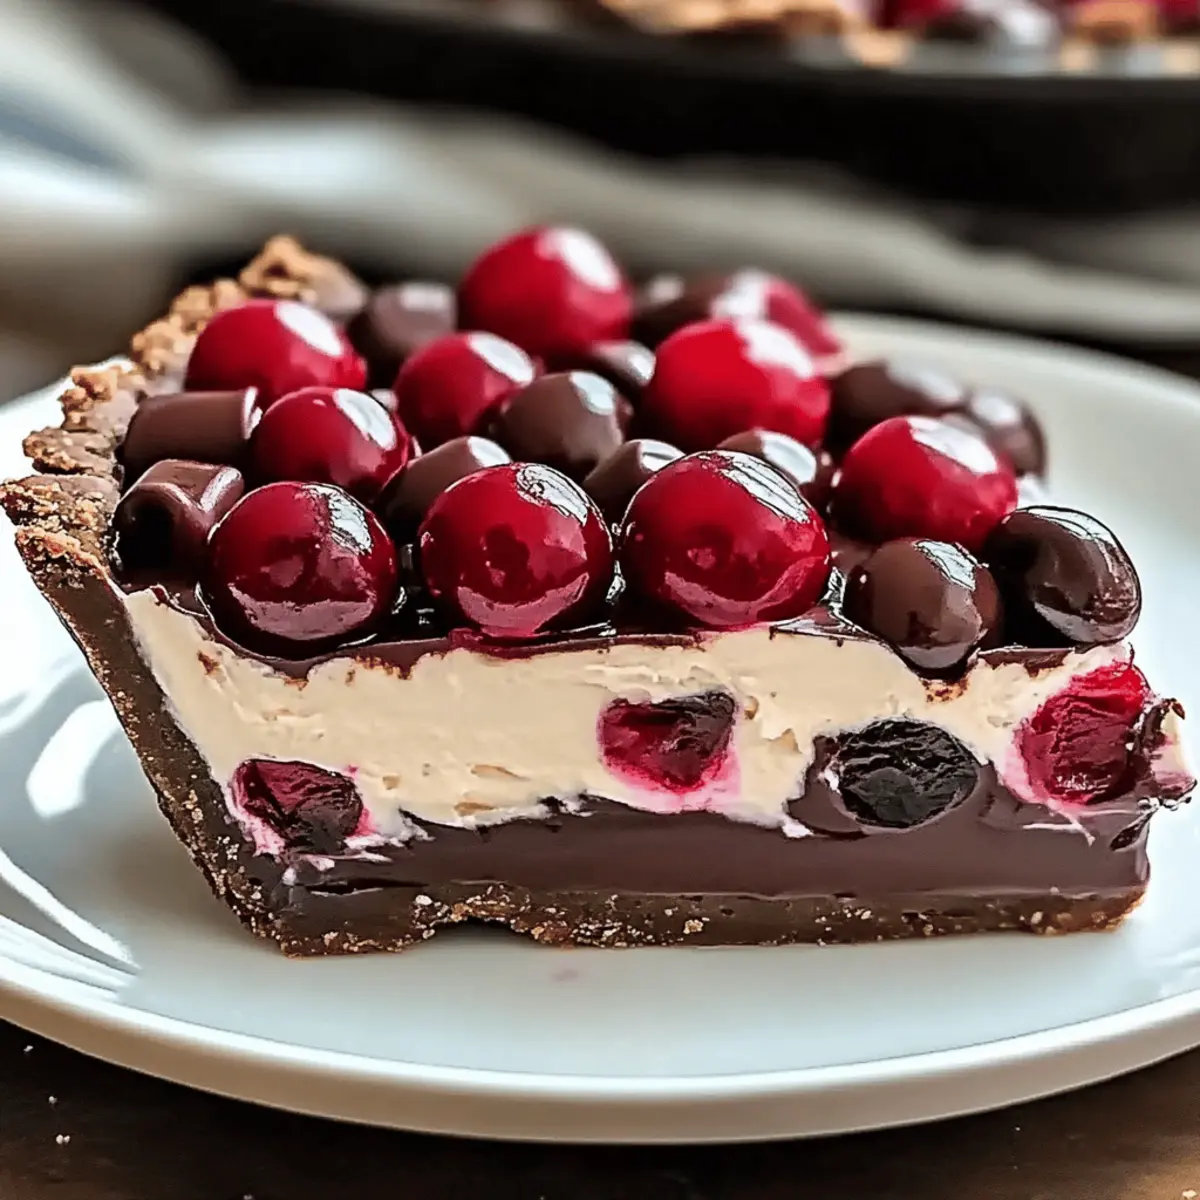
Visually Stunning: The contrast of the dark chocolate, creamy filling, and vibrant cherries makes for a show-stopping dessert, sure to impress any guest!
No-Bake Chocolate Cherry Pie Ingredients
-
For the Crust
• Pre-made graham cracker pie crust – This base structure saves time; swap it for a gluten-free crust for a gluten-free version. -
For the Chocolate Layer
• Dark chocolate chips (1 cup) – Provides intense chocolate flavor; semi-sweet chocolate is a great alternative if you like it sweeter.
• Heavy cream (1/2 cup) – Adds richness and helps melt the chocolate smoothly; use coconut cream for a dairy-free option.
• Granulated sugar (1/4 cup) – Sweetens the chocolate; reducing the amount makes for a less sweet pie.
• Vanilla extract (1/2 teaspoon) – Enhances the chocolate flavor; almond extract adds a unique twist. -
For the Cream Cheese Layer
• Cream cheese (1 cup, softened) – Provides a rich and creamy texture; substitute with vegan cream cheese for a dairy-free version.
• Powdered sugar (1 cup) – Sweetens and stabilizes the cream cheese; use less for a lighter touch. -
For the Cherry Layer
• Cherry pie filling (1 cup) – Offers a perfect balance of sweet and tart flavors; fresh cherries can be used for a more natural taste.
• Whole cherries (1 cup, fresh or canned) – Adds a garnish and a pop of color; fresh, pitted cherries are the best choice. -
For the Topping
• Extra chocolate chips (1/2 cup) – Enhances both the flavor and presentation; consider chocolate shavings for a decorative finish.
Dive into this easy-to-make No-Bake Chocolate Cherry Pie that everyone will rave about!
Step‑by‑Step Instructions for No-Bake Chocolate Cherry Pie
Step 1: Melt Chocolate
In a microwave-safe bowl, combine 1 cup of dark chocolate chips and 1/2 cup of heavy cream. Heat the mixture in 20-second intervals, stirring between each, until smooth and melted. This usually takes about 1-2 minutes. You’ll know it’s ready when it has a luscious, glossy appearance.
Step 2: Layer Chocolate
After melting, pour the silky chocolate mixture into the pre-made graham cracker pie crust. Use a spatula to spread it evenly across the base, ensuring every inch is covered for a consistent texture. Set this aside as you prepare for the next layer, relishing the rich chocolate aroma.
Step 3: Chill
Transfer the pie to the refrigerator and chill for about 30 minutes, or until the chocolate layer sets. This will create a firm base for your cream cheese layer. You should see it firm up, appearing somewhat solid yet still slightly glossy, ready for the next delicious addition.
Step 4: Prepare Cream Cheese Mixture
In a large mixing bowl, add 1 cup of softened cream cheese, 1 cup of powdered sugar, 1/4 cup of granulated sugar, and 1/2 teaspoon of vanilla extract. Beat the mixture with an electric mixer on medium speed for about 2-3 minutes, or until it becomes smooth and creamy, free of lumps.
Step 5: Add Cream Cheese Layer
Once the chocolate layer is set, gently spread half of the cream cheese mixture over the chilled chocolate layer. Use a spatula to smooth it out evenly, making sure to reach the edges. This creamy layer beautifully complements the rich chocolate and will create a delightful balance of flavors.
Step 6: Add Cherry Filling
Spoon 1 cup of cherry pie filling onto the cream cheese layer, spreading it evenly with the back of your spoon. The vibrant cherries will add a sweet and tart flavor, complementing the creamy and chocolatey layers beneath them. This bright addition makes the No-Bake Chocolate Cherry Pie visually appealing as well.
Step 7: Complete Layering
Layer the remaining cream cheese mixture over the cherries, carefully spreading it evenly. This final layer will not only enhance the pie’s richness but also create a beautiful contrast with the layers beneath. Make sure to smooth out the top for a polished look.
Step 8: Garnish
To finish, top your No-Bake Chocolate Cherry Pie with 1 cup of whole cherries and 1/2 cup of extra chocolate chips. If you prefer, you can also use chocolate shavings. This step adds visual appeal and extra indulgence, drawing everyone’s eye and adding a delightful texture.
Step 9: Final Chill
Refrigerate your completed pie for at least 2 hours to allow all the layers to set properly. This chilling time will ensure that when you slice it, the layers hold together beautifully while maintaining a cool and creamy texture. The wait will be worth it for the luscious experience that awaits!
What to Serve with No-Bake Chocolate Cherry Pie
As you prepare to serve this luscious dessert, consider complementing it with dishes that enhance its delightful flavors and textures.
-
Whipped Cream: A dollop of freshly whipped cream adds lightness and creaminess, balancing the rich chocolate and cherry flavors perfectly.
-
Fresh Berries: A medley of raspberries, strawberries, or blueberries offers a tart and juicy contrast, enhancing the pie’s sweetness while brightening the presentation.
-
Chocolate-Covered Strawberries: These bite-sized treats echo the pie’s flavor profile and provide a fun, indulgent nod to dessert that guests will love.
-
Vanilla Ice Cream: A scoop of creamy vanilla ice cream provides a soothing, cool accompaniment that pairs beautifully with the pie’s layers and adds a touch of nostalgia.
-
Soda or Sparkling Water: Serve with a refreshing citrus soda or sparkling water to cleanse the palate between bites, letting the flavors of the pie shine.
-
Coffee or Espresso: A cup of rich coffee or espresso enhances the chocolate notes and adds a sophisticated touch to your dessert experience, perfect for ending a meal on a high note.
Expert Tips for No-Bake Chocolate Cherry Pie
-
Perfect Cream Cheese Texture: Softening the cream cheese before mixing is crucial; it prevents lumps and guarantees a smooth filling.
-
Chill Timing: Allow ample chilling time between layers—30 minutes for the chocolate layer and at least 2 hours after assembly—to achieve the best texture in your No-Bake Chocolate Cherry Pie.
-
Flavor Variations: You can easily customize the flavor by swapping dark chocolate for milk or white chocolate, catering to different taste preferences.
-
Graham Cracker Substitutes: For a gluten-free version, opt for a gluten-free graham cracker crust; many stores offer delicious alternatives!
-
Fresh Cherry Upgrade: While cherry pie filling is convenient, using fresh pitted cherries enhances flavor and adds a lovely visual touch to your pie.
-
Storage Solution: Keep leftovers in an airtight container in the fridge for up to three days—this pie tastes even better as the flavors meld together!
Make Ahead Options
The No-Bake Chocolate Cherry Pie is perfect for meal prepping, allowing busy cooks to enjoy its deliciousness without the last-minute rush. You can prepare the chocolate layer and the cream cheese filling up to 24 hours in advance—just refrigerate them separately. For best results, cover the chocolate layer to prevent it from drying out and let the cream cheese mixture sit at room temperature for a bit before spreading. When you’re ready to serve, simply assemble the pie by layering the components, topped with cherry pie filling and the garnishes. Allowing the pie to chill for at least 2 hours before slicing ensures a firm and impressive presentation, making this dessert just as delightful as if it were freshly made!
No-Bake Chocolate Cherry Pie Variations
Feel free to explore these delightful twists and substitutions to make your pie truly your own!
- Dairy-Free: Substitute heavy cream with coconut cream and use vegan cream cheese for a luscious dairy-free treat.
- Gluten-Free: Use a gluten-free graham cracker crust to ensure this pie meets dietary needs without sacrificing flavor.
- Nutty Crunch: Add crushed almonds or walnuts into the crust for a delightful texture and added depth of flavor.
- Flavor Boost: Mix in a splash of almond or hazelnut extract into the cream cheese layer for a surprise aromatic twist.
- Sweetness Adjustment: Reduce the granulated sugar for a less sweet version, letting the natural flavors of the chocolate and cherries shine.
- Fresh Fruit Alternative: Swap cherry pie filling for fresh berries like strawberries or raspberries to brighten up your dessert visually and flavor-wise.
- Spicy Kick: Add a pinch of cayenne pepper or cinnamon to the chocolate mixture for an exciting heat that complements the sweetness.
- Extra Layer: For a luxurious touch, layer in some whipped cream between the chocolate layer and cream cheese layer to make it even richer.
No matter how you choose to customize your pie, it’s sure to become a family favorite! If you love chocolate delights, be sure to check out my Double Chocolate Pumpkin cookies for another divine treat!
How to Store and Freeze No-Bake Chocolate Cherry Pie
Fridge: Store leftover slices in an airtight container for up to 3 days. This keeps the pie fresh and maintains its creamy texture.
Freezer: If you want to save the pie for later, wrap it tightly in plastic wrap and aluminum foil, freezing for up to 2 months. Thaw in the fridge before serving.
Reheating: For best flavor and texture, serve chilled. No reheating is needed, as this is a refreshing no-bake dessert. Enjoy its cool layers straight from the fridge!
Pre-Assembly Storage: You can prepare the No-Bake Chocolate Cherry Pie a day in advance; just be sure to keep it well-covered in the fridge until ready to serve.
No-Bake Chocolate Cherry Pie Recipe FAQs
How do I choose ripe cherries for the filling?
When selecting cherries, look for those that are firm, glossy, and free of blemishes. A dark red color generally indicates ripeness, while any sign of wrinkling can suggest overripeness. If possible, I often prefer fresh cherries over pie filling as they enhance the flavor profile wonderfully!
What’s the best way to store leftover No-Bake Chocolate Cherry Pie?
Absolutely! Store any leftovers in an airtight container in the fridge for up to 3 days. This will keep the pie fresh while maintaining its creamy texture, ensuring you can enjoy that decadent pie even after a day or two!
Can I freeze No-Bake Chocolate Cherry Pie?
You sure can! To freeze, wrap the pie tightly with plastic wrap followed by aluminum foil to prevent freezer burn. It can be frozen for up to 2 months. When you’re ready to enjoy it, simply thaw it in the fridge overnight before serving.
What can I do if my cream cheese mixture is lumpy?
If you find your cream cheese is lumpy, it’s likely because it wasn’t soft enough. Be sure to let it sit at room temperature for at least 30 minutes before mixing. If you still encounter lumps while mixing, use an electric mixer on medium speed for a couple more minutes until smooth. It’s essential for that perfect, creamy texture in your No-Bake Chocolate Cherry Pie!
Is this dessert suitable for my gluten-intolerant friends?
Very! To ensure your No-Bake Chocolate Cherry Pie is gluten-free, simply use a gluten-free graham cracker crust. Many brands make delicious alternatives that will keep the texture and flavor just as delightful!
Can I make this recipe dairy-free?
Absolutely! For a dairy-free version of the No-Bake Chocolate Cherry Pie, substitute the heavy cream with coconut cream and the cream cheese with vegan cream cheese. This way, everyone can indulge without any dietary restrictions!
Indulge in Easy No-Bake Chocolate Cherry Pie Bliss
Ingredients
Equipment
Method
- Step 1: Melt Chocolate - In a microwave-safe bowl, combine dark chocolate chips and heavy cream. Heat in 20-second intervals until smooth and melted, about 1-2 minutes.
- Step 2: Layer Chocolate - Pour the melted chocolate into the graham cracker pie crust and spread evenly.
- Step 3: Chill - Refrigerate for 30 minutes or until the chocolate layer sets.
- Step 4: Prepare Cream Cheese Mixture - In a large bowl, mix softened cream cheese, powdered sugar, granulated sugar, and vanilla extract until smooth and creamy.
- Step 5: Add Cream Cheese Layer - Spread half of the cream cheese mixture over the chocolate layer.
- Step 6: Add Cherry Filling - Spoon cherry pie filling onto the cream cheese layer evenly.
- Step 7: Complete Layering - Spread the remaining cream cheese mixture over the cherries.
- Step 8: Garnish - Top with whole cherries and extra chocolate chips.
- Step 9: Final Chill - Refrigerate for at least 2 hours before serving.