A Childhood Favorite Turned Into Dessert Magic
There’s something special about childhood cereals. They aren’t just breakfast—they’re a symbol of carefree Saturday mornings, cartoon marathons, and the simple joys of being a kid. For me, Lucky Charms was always a treat. I’d wake up early, pour a generous bowl, and carefully pick out the marshmallows to save for last. Those colorful little shapes were like tiny treasures, making each bite a little more magical.
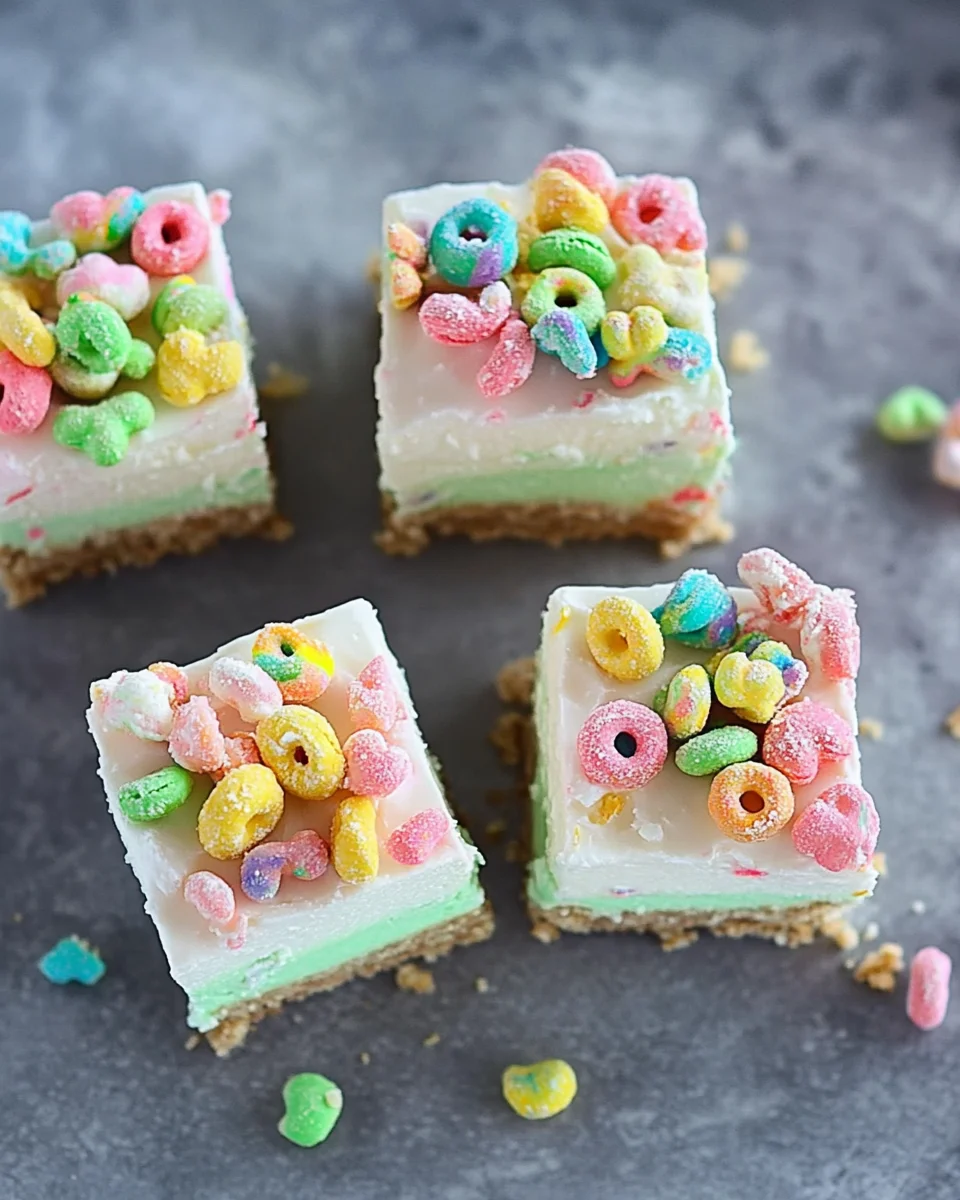
Fast forward to adulthood, and while my breakfast choices have matured, my love for nostalgic flavors hasn’t faded. That’s where these No-Bake Lucky Charms Cheesecake Bars come in. They take everything I loved about that childhood favorite—the crunch, the sweetness, and the playful colors—and transform it into an indulgent, creamy dessert that brings out the inner child in all of us.
This recipe is a perfect fusion of crispy, chewy, and velvety smooth textures, wrapped up in a dessert that requires no baking at all. Whether you’re making it for St. Patrick’s Day, a birthday party, or just because you need a little whimsy in your life, these bars are guaranteed to bring smiles.
Now, let’s dive into everything you need to know about this magical dessert, from creative variations to frequently asked questions and storage tips.
Why You’ll Love These Cheesecake Bars
Creative Variations to Try
If you love the idea of these cheesecake bars but want to experiment with different flavors and styles, here are some fun variations:
1. Chocolate Charm Bars
Replace the classic Lucky Charms cereal with Chocolate Lucky Charms for a richer, cocoa-infused twist. You can also drizzle melted chocolate over the top before serving.
2. Rainbow Unicorn Cheesecake Bars
Skip the green food coloring and use pastel shades of pink, blue, and purple to create a dreamy, unicorn-inspired dessert. Perfect for kids’ parties or whimsical celebrations.
3. Fruity Pebbles Cheesecake Bars
Swap Lucky Charms for Fruity Pebbles to get a vibrant, citrusy flavor with an extra crunchy base.
4. Peanut Butter Bliss Bars
Melt ½ cup peanut butter into the marshmallow mixture for a nutty, salty-sweet contrast. A sprinkle of crushed peanuts on top adds even more texture.
5. Mint Chocolate Chip Bars
If you’re a fan of minty desserts, add a touch of peppermint extract to the cheesecake filling and top with mini chocolate chips for a refreshing twist.
Tips for Perfect No-Bake Cheesecake Bars
While this recipe is simple, a few tips can make your cheesecake bars turn out even better:
- Pack the Cereal Base Firmly – Pressing the cereal mixture tightly into the pan ensures the bars hold their shape. A greased spatula or the back of a spoon works great.
- Chill for Maximum Firmness – The bars will be much easier to slice and serve if they’ve had at least 4 hours in the freezer. Overnight is even better.
- Use Full-Fat Cream Cheese – For the creamiest, richest texture, avoid low-fat cream cheese.
- Add Toppings Just Before Serving – Lucky Charms marshmallows can get sticky if left in the fridge, so sprinkle them on right before serving for the best texture.
Whimsical Ingredients
- ¼ cup butter
- 4 cups mini marshmallows
- 4 cups Lucky Charms cereal
- 16 oz cream cheese (room temperature)
- 2 teaspoons lemon juice
- 2 cups heavy whipping cream
- ⅓ cup granulated sugar
- Green food coloring (as desired)
- Lucky Charms marshmallows (for topping)
- Sprinkles (optional, for extra fun)
Spellbinding Directions
- Prepare the Pan
- Line a 9×9 square pan with parchment paper for easy removal.
- Create the Magical Base
- Melt butter in a large saucepan over low heat.
- Stir in marshmallows until fully melted and well combined. Cook for 2 minutes, stirring constantly, then remove from heat.
- Mix in the Lucky Charms cereal until evenly coated.
- Transfer the mixture into the prepared pan and press it down firmly to create an even base.
- Let the base fully cool before adding the cheesecake layer.
- Whip Up the Enchanting Cheesecake
- Beat cream cheese and lemon juice together until soft and smooth.
- Using an electric mixer, whip in the heavy cream until thick.
- Add granulated sugar and continue beating until the mixture becomes stiff.
- Stir in green food coloring until the desired shade is achieved.
- Evenly spread the cheesecake mixture over the cooled cereal base.
- Freeze for the Perfect Texture
- Place the cheesecake bars in the freezer for at least 4 hours, ideally overnight, for the best consistency.
- Sprinkle on Some Magic
- Just before serving, top with Lucky Charms marshmallows and sprinkles for a festive touch.
- Cut into squares and serve chilled.
Nutritional Pixie Dust (Estimated per Serving)
- Calories: ~320
- Fat: 22g
- Carbohydrates: 28g
- Sugar: 20g
- Protein: 4g
These bars are the perfect mix of nostalgia and indulgence—perfect for St. Patrick’s Day or any time you crave a magically sweet treat!
FAQs: Everything You Need to Know
1. Can I store these cheesecake bars in the fridge instead of the freezer?
Yes! If you prefer a softer, creamier texture, refrigerate them instead of freezing. However, the base will be chewier rather than crunchy. If you like a firmer bite, the freezer is the way to go.
2. How long do they last?
These bars can be stored in an airtight container in the freezer for up to two weeks or in the refrigerator for about five days. If frozen, let them sit at room temperature for 5-10 minutes before serving for the best texture.
3. Can I make this recipe ahead of time?
Absolutely! These bars actually taste better after sitting for a few hours, making them a perfect make-ahead dessert. Just wait until the last minute to add the marshmallow toppings to keep them crisp.
4. What’s the best way to cut them cleanly?
For neat, even slices, use a sharp knife dipped in warm water and wipe it clean between each cut. This helps prevent the cheesecake from sticking.
5. Can I use a different cereal?
Definitely! If you don’t have Lucky Charms or want to experiment, Golden Grahams, Cap’n Crunch, or Rice Krispies would all work beautifully.
6. Is this dessert gluten-free?
Lucky Charms cereal is made with oats, which can be cross-contaminated with gluten. If you need a gluten-free version, look for a certified gluten-free cereal alternative.
7. Can I make this into a full cheesecake instead of bars?
Yes! Simply use a round springform pan instead of a square one, and follow the same steps. You’ll end up with a stunning, sliceable no-bake cheesecake.
A Sweet Conclusion: The Magic of a Simple Dessert
There’s something truly special about a dessert that blends nostalgia, creativity, and indulgence all in one bite. These No-Bake Lucky Charms Cheesecake Bars aren’t just delicious—they’re a fun, colorful reminder of the simple joys of childhood.
Whether you’re making them for a holiday, a party, or just to bring a little magic to an ordinary day, this dessert is guaranteed to delight both kids and adults alike. It’s a reminder that sometimes, the best treats aren’t the ones that require hours in the kitchen—they’re the ones that bring a smile with every bite.
So go ahead—whip up a batch, share them with loved ones, and enjoy a little taste of childhood with a creamy, crunchy, and utterly delightful twist.
Print
No-Bake Lucky Charms Cheesecake Bars: A Nostalgic Treat with a Magical Twist
- Total Time: 4 hours 20 minutes (including freezing)
- Yield: 9-12 bars
Description
Indulge in the ultimate no-bake treat with these whimsical cheesecake bars! A crunchy Lucky Charms base topped with a creamy, dreamy cheesecake filling makes for a nostalgic yet indulgent dessert. Perfect for St. Patrick’s Day or any time you want a little magic in your life!
Ingredients
- ¼ cup butter
- 4 cups mini marshmallows
- 4 cups Lucky Charms cereal
- 16 oz cream cheese (room temperature)
- 2 teaspoons lemon juice
- 2 cups heavy whipping cream
- ⅓ cup granulated sugar
- Green food coloring (as desired)
- Lucky Charms marshmallows (for topping)
- Sprinkles (optional, for extra fun)
Instructions
- Prepare the Pan
- Line a 9×9 square pan with parchment paper for easy removal.
- Create the Magical Base
- Melt butter in a large saucepan over low heat.
- Stir in marshmallows until fully melted and well combined. Cook for 2 minutes, stirring constantly, then remove from heat.
- Mix in the Lucky Charms cereal until evenly coated.
- Transfer the mixture into the prepared pan and press it down firmly to create an even base.
- Let the base fully cool before adding the cheesecake layer.
- Whip Up the Enchanting Cheesecake
- Beat cream cheese and lemon juice together until soft and smooth.
- Using an electric mixer, whip in the heavy cream until thick.
- Add granulated sugar and continue beating until the mixture becomes stiff.
- Stir in green food coloring until the desired shade is achieved.
- Evenly spread the cheesecake mixture over the cooled cereal base.
- Freeze for the Perfect Texture
- Place the cheesecake bars in the freezer for at least 4 hours, ideally overnight, for the best consistency.
- Sprinkle on Some Magic
- Just before serving, top with Lucky Charms marshmallows and sprinkles for a festive touch.
- Cut into squares and serve chilled.
Notes
- Store leftovers in an airtight container in the refrigerator for up to 5 days.
- Swap the Lucky Charms base with graham crackers or crushed cookies for a different texture.
- For a fluffier texture, let the bars sit at room temperature for 10 minutes before serving.
- Prep Time: 15 minutes
- Cook Time: 5 minutes
- Category: Dessert
- Method: No-Bake
- Cuisine: American