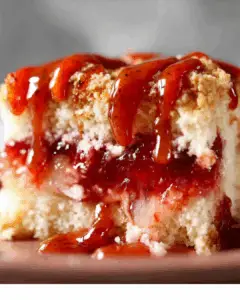
Introduction to Peanut Butter Strawberry Jelly Poke Cake
There’s something magical about a dessert that combines nostalgia with simplicity. The Peanut Butter Strawberry Jelly Poke Cake is just that—a delightful treat that whisks me back to carefree childhood days. This cake is not only easy to whip up, but it also impresses friends and family alike. Whether you’re looking for a quick solution for a busy day or a sweet centerpiece for a gathering, this poke cake delivers. With its rich peanut butter flavor and fruity jelly infusion, it’s a dessert that brings smiles and satisfied taste buds to the table.
Why You’ll Love This Peanut Butter Strawberry Jelly Poke Cake
This Peanut Butter Strawberry Jelly Poke Cake is a game-changer for dessert lovers. It’s incredibly easy to make, requiring minimal effort and time. The combination of creamy peanut butter and sweet strawberry jelly creates a flavor explosion that’s hard to resist. Plus, it’s a crowd-pleaser, perfect for parties or family gatherings. You’ll love how quickly it comes together, leaving you more time to enjoy the company of your loved ones.
Ingredients for Peanut Butter Strawberry Jelly Poke Cake
Gathering the right ingredients is the first step to creating this delightful Peanut Butter Strawberry Jelly Poke Cake. Here’s what you’ll need:
- All-purpose flour: The backbone of your cake, providing structure and texture.
- Granulated sugar: Sweetens the cake and helps it rise, giving it that perfect fluffy texture.
- Baking powder: A leavening agent that ensures your cake rises beautifully.
- Salt: Just a pinch enhances the flavors and balances the sweetness.
- Unsalted butter: Adds richness and moisture; make sure it’s softened for easy mixing.
- Milk: Contributes to the cake’s tenderness and helps create a smooth batter.
- Large eggs: Bind the ingredients together and add moisture; they’re essential for a light texture.
- Vanilla extract: A splash of this adds warmth and depth to the flavor profile.
- Creamy peanut butter: The star of the show! It brings that rich, nutty flavor that pairs perfectly with jelly.
- Strawberry jelly: Adds sweetness and fruity goodness, creating a delightful contrast with the peanut butter.
- Whipped topping: This light and airy layer on top makes the cake feel indulgent and refreshing.
- Fresh strawberries (optional): For garnish, they add a pop of color and freshness to your dessert.
For those looking to mix things up, consider using chocolate pudding instead of whipped topping for a decadent twist. You can also swap out the strawberry jelly for raspberry or grape jelly to explore different flavor profiles. Exact measurements for these ingredients can be found at the bottom of the article, ready for printing!
How to Make Peanut Butter Strawberry Jelly Poke Cake
Creating this Peanut Butter Strawberry Jelly Poke Cake is a delightful journey. Follow these simple steps, and you’ll have a dessert that’s sure to impress. Let’s dive in!
Step 1: Preheat and Prepare
Start by preheating your oven to 350°F (175°C). This is crucial for a perfect bake. While the oven warms up, grease and flour a 9×13-inch baking dish. This ensures your cake won’t stick, making it easier to serve later.
Step 2: Mix Dry Ingredients
In a large mixing bowl, combine the all-purpose flour, granulated sugar, baking powder, and salt. Whisk them together until well blended. This dry mix is the foundation of your cake, so make sure it’s evenly combined.
Step 3: Combine Wet Ingredients
Now, it’s time to add the wet ingredients. Toss in the softened unsalted butter, milk, large eggs, and vanilla extract. Beat everything together with an electric mixer on medium speed for about 2 minutes. You want a smooth batter that’s well combined.
Step 4: Bake the Cake
Pour the batter into your prepared baking dish, spreading it evenly. Pop it into the oven and bake for 30-35 minutes. The magic happens here! Keep an eye on it, and when a toothpick inserted in the center comes out clean, it’s done.
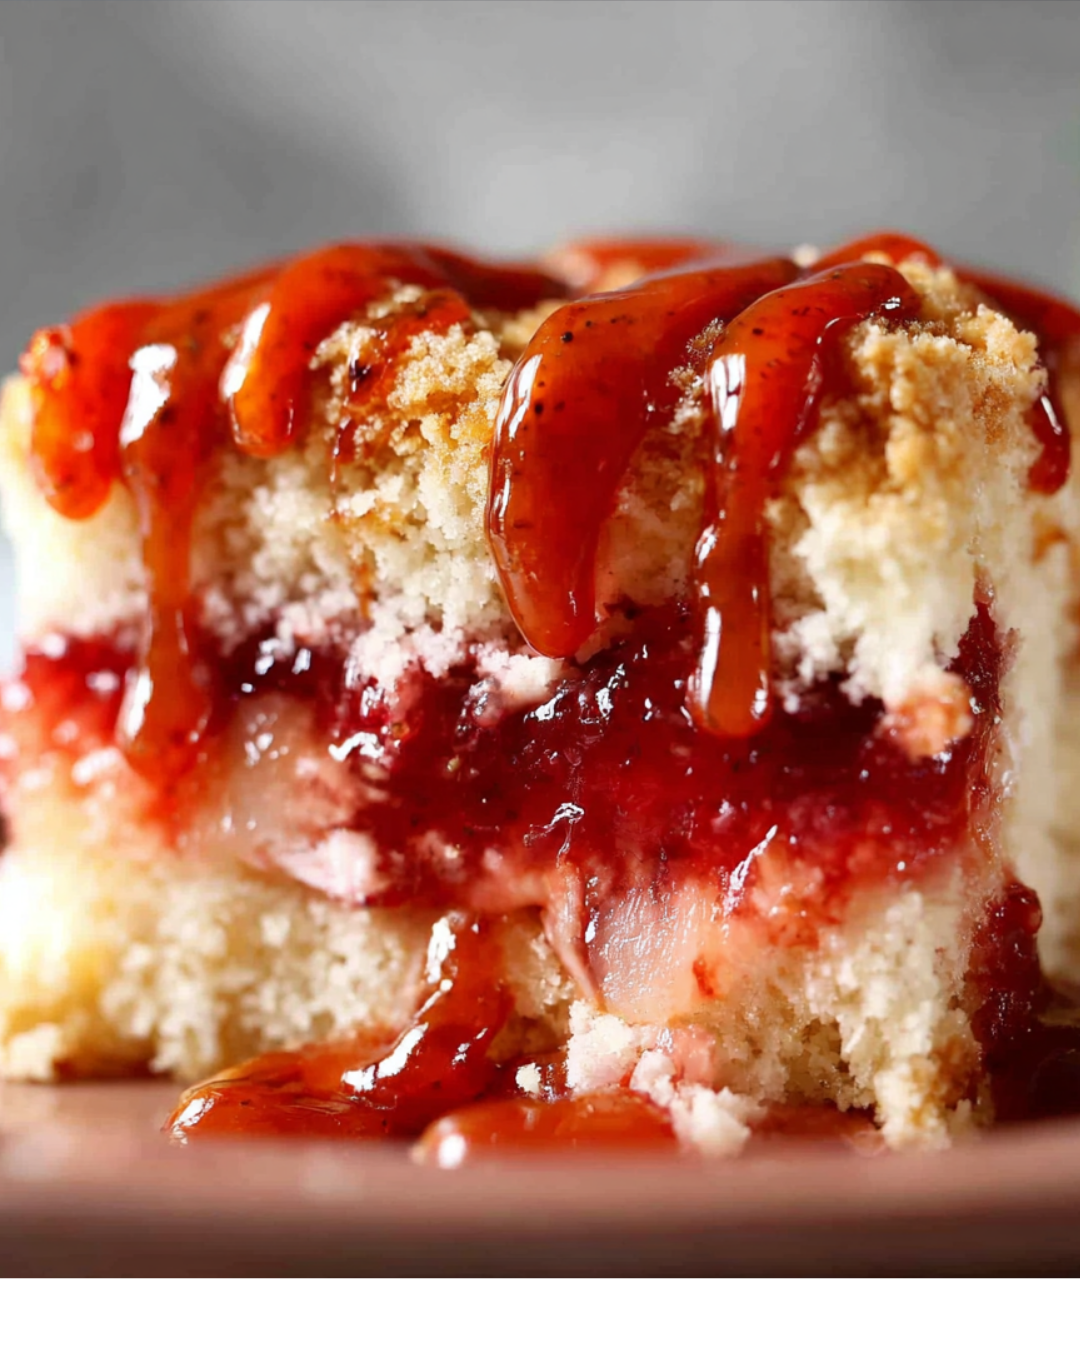
Step 5: Poke Holes
Once the cake is out of the oven, let it cool in the pan for about 15 minutes. Then, using the handle of a wooden spoon or a fork, poke holes all over the top of the cake, about 1 inch apart. This step is essential as it allows the peanut butter and jelly mixture to seep in, infusing the cake with flavor.
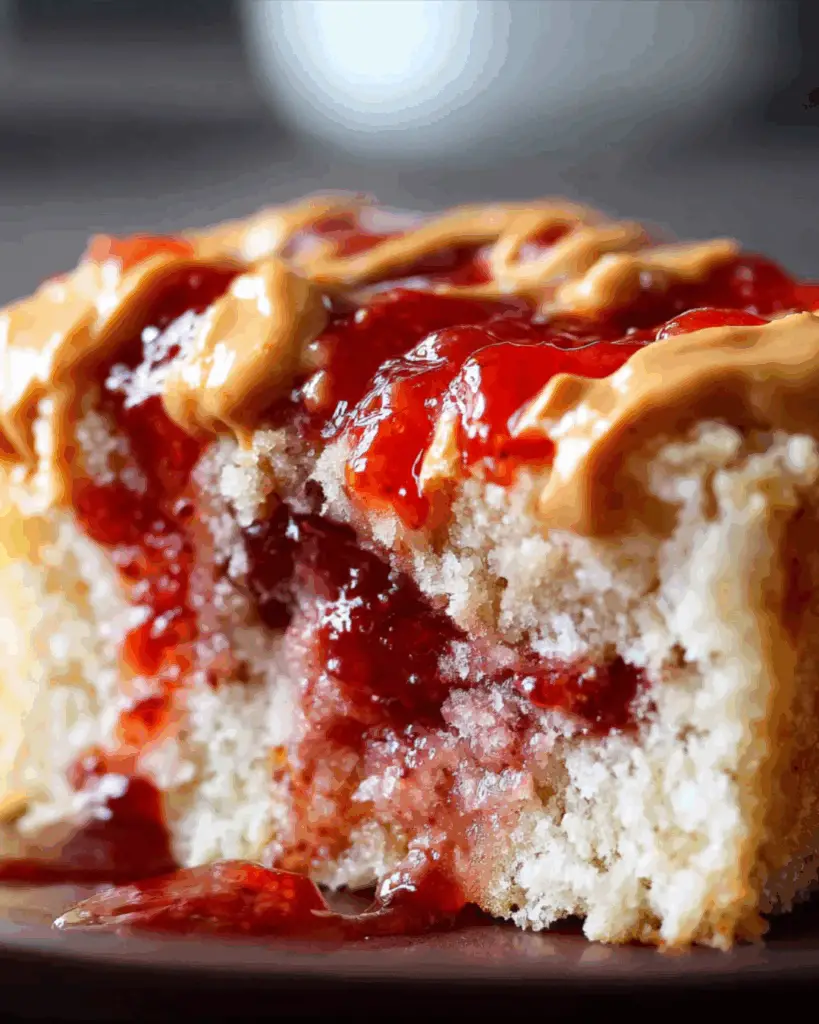
Step 6: Add Peanut Butter and Jelly Mixture
In a small bowl, mix the creamy peanut butter and strawberry jelly until smooth. Spoon this delicious mixture evenly over the top of the cake, ensuring it seeps into those holes. This is where the flavor infusion happens, and trust me, it’s worth it!
Step 7: Cool and Top
Let the cake cool completely. Once it’s cool, spread the whipped topping over the top. This light and airy layer adds a delightful finish to your cake, making it look as good as it tastes.
Step 8: Chill Before Serving
Finally, refrigerate the cake for at least 2 hours before serving. This chilling time helps the flavors meld beautifully, creating a dessert that’s not only tasty but also refreshing. When you’re ready to serve, slice it up and enjoy!
Tips for Success
- Make sure your butter is softened for easy mixing; it helps create a smooth batter.
- Don’t skip the chilling step; it enhances the flavors and makes the cake more refreshing.
- Use a toothpick to check for doneness; it should come out clean when the cake is ready.
- Feel free to experiment with different jellies for unique flavor combinations.
- For a richer taste, add a pinch of cinnamon to the dry ingredients.
Equipment Needed
- 9×13-inch baking dish: A standard size for this cake; you can use any similar-sized dish.
- Mixing bowls: A couple of medium-sized bowls will do the trick.
- Electric mixer: A hand mixer works great, but a whisk can suffice if you’re feeling strong!
- Wooden spoon or fork: Essential for poking holes in the cake.
- Measuring cups and spoons: Accurate measurements ensure the best results.
Variations
- For a chocolate lover’s dream, swap the peanut butter for Nutella and use chocolate pudding instead of whipped topping.
- Try using almond butter for a nutty twist that pairs beautifully with the strawberry jelly.
- For a healthier option, substitute half the sugar with honey or maple syrup.
- Make it gluten-free by using a gluten-free all-purpose flour blend.
- Add crushed nuts on top for a delightful crunch and extra flavor.
Serving Suggestions
- Pair with a scoop of vanilla ice cream for a delightful contrast of temperatures.
- Serve alongside fresh fruit salad for a refreshing side.
- Drizzle chocolate sauce over the top for an extra indulgent touch.
- Enjoy with a cup of coffee or iced tea for a perfect afternoon treat.
- Garnish with mint leaves for a pop of color and freshness.
FAQs about Peanut Butter Strawberry Jelly Poke Cake
Curious about this delightful dessert? Here are some frequently asked questions that might help you on your culinary journey with the Peanut Butter Strawberry Jelly Poke Cake.
Can I make this cake ahead of time?
Absolutely! This cake actually tastes better after chilling in the fridge for a few hours. You can prepare it a day in advance and let the flavors meld overnight.
What can I substitute for peanut butter?
If you have nut allergies or prefer a different flavor, almond butter or sunflower seed butter work well. Just keep in mind that the taste will change slightly.
How long will leftovers last?
Stored in an airtight container in the fridge, your Peanut Butter Strawberry Jelly Poke Cake will stay fresh for about 3-4 days. Just be sure to keep it chilled!
Can I use a different type of jelly?
Definitely! While strawberry jelly is a classic choice, feel free to experiment with raspberry, grape, or even apricot jelly for a unique twist on this poke cake.
Is this cake suitable for special diets?
This Peanut Butter Strawberry Jelly Poke Cake is vegetarian-friendly. For gluten-free options, simply swap the all-purpose flour for a gluten-free blend. Enjoy the deliciousness without worry!
Final Thoughts
Creating this Peanut Butter Strawberry Jelly Poke Cake is more than just baking; it’s about crafting memories. Each slice is a delightful blend of flavors that transports me back to simpler times, where dessert was the highlight of the day. The joy of sharing this cake with family and friends is unmatched, as laughter and smiles fill the room. Whether it’s a casual weeknight or a special occasion, this cake brings a sense of warmth and happiness. I hope you find as much joy in making and sharing this dessert as I do. Happy baking!
PrintPeanut Butter Strawberry Jelly Poke Cake Recipe You’ll Love!
- Total Time: 2 hours 55 minutes
- Yield: 12 servings
- Diet: Vegetarian
Description
A delicious and easy-to-make Peanut Butter Strawberry Jelly Poke Cake that combines the rich flavors of peanut butter and strawberry jelly, topped with whipped cream and fresh strawberries.
Ingredients
- 2 cups all-purpose flour
- 1 ½ cups granulated sugar
- 1 tablespoon baking powder
- ½ teaspoon salt
- ½ cup unsalted butter, softened
- 1 cup milk
- 3 large eggs
- 1 teaspoon vanilla extract
- 1 cup creamy peanut butter
- 1 cup strawberry jelly
- 1 cup whipped topping (like Cool Whip)
- Fresh strawberries, for garnish (optional)
Instructions
- Preheat your oven to 350°F (175°C). Grease and flour a 9×13-inch baking dish.
- In a large mixing bowl, combine the flour, sugar, baking powder, and salt. Mix well.
- Add the softened butter, milk, eggs, and vanilla extract to the dry ingredients. Beat with an electric mixer on medium speed for about 2 minutes until well combined.
- Pour the batter into the prepared baking dish and spread it evenly. Bake for 30-35 minutes, or until a toothpick inserted in the center comes out clean.
- Once baked, remove the cake from the oven and let it cool in the pan for about 15 minutes.
- Using the handle of a wooden spoon or a fork, poke holes all over the top of the cake, about 1 inch apart.
- In a small bowl, mix the peanut butter and strawberry jelly until smooth. Spoon the mixture evenly over the top of the cake, allowing it to seep into the holes.
- Let the cake cool completely, then spread the whipped topping over the top.
- Garnish with fresh strawberries if desired. Refrigerate for at least 2 hours before serving to allow the flavors to meld.
Notes
- For a chocolate twist, substitute chocolate pudding for the whipped topping and drizzle melted chocolate over the top.
- You can use raspberry or grape jelly instead of strawberry for a different flavor profile.
- Prep Time: 20 minutes
- Cook Time: 35 minutes
- Category: Dessert
- Method: Baking
- Cuisine: American
Nutrition
- Serving Size: 1 slice
- Calories: 290
- Sugar: 20g
- Sodium: 200mg
- Fat: 12g
- Saturated Fat: 3g
- Unsaturated Fat: 9g
- Trans Fat: 0g
- Carbohydrates: 38g
- Fiber: 1g
- Protein: 6g
- Cholesterol: 50mg