
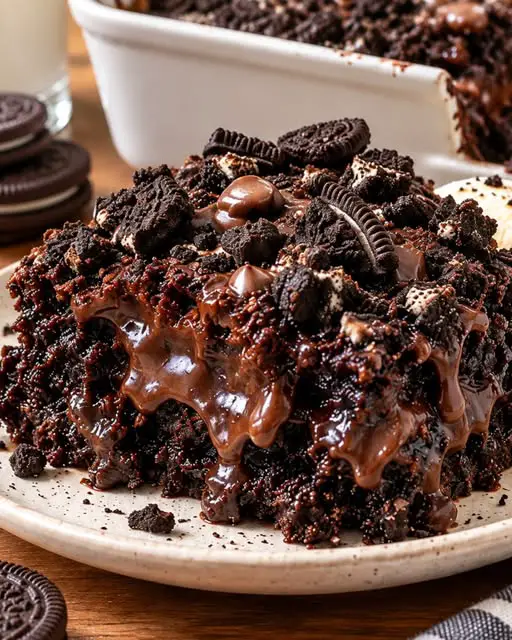
Introduction to Rich Chocolate Oreo Dump Cake
There’s something magical about a dessert that combines simplicity with indulgence. The Rich Chocolate Oreo Dump Cake is just that—a delightful treat that’s perfect for any occasion. Whether you’re hosting friends or just need a quick solution for a busy weeknight, this cake delivers. With layers of chocolate goodness and crunchy Oreos, it’s a guaranteed crowd-pleaser. Plus, it requires minimal effort, making it ideal for those of us who love to cook but don’t always have hours to spare. Let’s dive into this decadent delight that will surely impress your loved ones!
Why You’ll Love This Rich Chocolate Oreo Dump Cake
This Rich Chocolate Oreo Dump Cake is a game-changer for dessert lovers. It’s incredibly easy to whip up, taking just about an hour from start to finish. The layers of chocolate and Oreos create a flavor explosion that will satisfy any sweet tooth. Plus, it’s perfect for gatherings or a cozy night in. You’ll love how effortlessly it comes together, leaving you more time to enjoy the sweet moments with family and friends.
Ingredients for Rich Chocolate Oreo Dump Cake
Gathering the right ingredients is the first step to creating this mouthwatering Rich Chocolate Oreo Dump Cake. Here’s what you’ll need:
- Chocolate cake mix: This is the foundation of your cake, providing that rich chocolate flavor.
- Instant chocolate pudding mix: This adds moisture and a creamy texture, making every bite decadent.
- Cold milk: Essential for mixing with the pudding, it helps achieve that luscious consistency.
- Oreo cookies: Crushed Oreos create a delightful crust and add a crunchy texture that contrasts beautifully with the soft cake.
- Semisweet chocolate chips: These little morsels melt into the cake, enhancing the chocolate experience.
- Unsalted butter: Melted butter ensures a moist cake and adds richness to the overall flavor.
- Sour cream: This ingredient contributes creaminess and a slight tang, balancing the sweetness.
- Vanilla extract: A splash of vanilla elevates the flavor profile, making it even more irresistible.
- Optional toppings: Consider adding crushed Oreos, whipped cream, chocolate syrup, or vanilla ice cream for an extra special touch.
For exact measurements, check the bottom of the article where you can find everything listed for easy printing. Each ingredient plays a vital role in crafting this delightful dessert, so make sure to gather them all before you start!
How to Make Rich Chocolate Oreo Dump Cake
Creating this Rich Chocolate Oreo Dump Cake is a breeze! Follow these simple steps, and you’ll have a decadent dessert ready to impress. Let’s get started!
Step 1: Preheat and Prepare
First things first, preheat your oven to 350°F. This is crucial for a perfect bake. While that’s heating up, lightly grease a 9 × 13-inch baking dish. A well-prepared dish ensures your cake won’t stick, making cleanup a snap!
Step 2: Mix the Pudding
In a large bowl, whisk together the instant chocolate pudding mix with cold milk for about 2 minutes. You want it to thicken up nicely. This rich base is what makes your cake so moist and delicious!
Step 3: Combine with Sour Cream
Next, stir in the sour cream and vanilla extract until the mixture is smooth. This step adds a creamy texture and a hint of flavor that elevates your cake to the next level.
Step 4: Layer the Oreos
Now, spread the crushed Oreo cookies evenly across the bottom of your prepared baking dish. This forms a delightful crust that contrasts beautifully with the soft cake above.
Step 5: Add the Pudding Mixture
Pour the chocolate pudding mixture over the Oreo layer and spread it evenly. This is where the magic begins! The layers will meld together beautifully as they bake.
Step 6: Sprinkle the Cake Mix
Sprinkle the dry chocolate cake mix evenly over the pudding. Remember, don’t prepare the cake mix according to the box directions. This unique approach creates a wonderfully textured cake!
Step 7: Drizzle with Butter
Slowly drizzle the melted butter over the dry cake mix, covering as much of the surface as possible. This ensures a moist cake that’s rich and satisfying.
Step 8: Top with Chocolate Chips
For an extra chocolatey finish, sprinkle the chocolate chips over the top. They’ll melt into the cake, adding even more deliciousness!
Step 9: Bake
Now it’s time to bake! Place your dish in the oven and bake uncovered for 40–45 minutes. You’ll know it’s done when the top looks set and the edges are bubbling. Some areas may remain soft and fudgy, which is just perfect!
Step 10: Rest and Serve
Once baked, let the cake rest for 15–20 minutes before serving. This allows the layers to settle and enhances the flavors. Trust me, the wait will be worth it!
Tips for Success
- Use room temperature ingredients for better mixing and texture.
- Don’t skip the resting time; it helps the layers meld together.
- For a richer flavor, opt for dark chocolate cake mix.
- Experiment with different toppings like caramel sauce or nuts.
- Store leftovers in an airtight container to keep them fresh.
Equipment Needed
- 9 × 13-inch baking dish: A standard size for this cake; a glass or metal dish works well.
- Mixing bowls: Use a large bowl for mixing the pudding and a smaller one for combining ingredients.
- Whisk: Essential for mixing the pudding; a fork can work in a pinch.
- Spatula: Great for spreading the layers evenly.
- Measuring cups: Handy for accurate ingredient measurements.
Variations
- Peanut Butter Swirl: Add dollops of peanut butter to the pudding mixture for a delicious twist.
- Mint Chocolate: Use mint-flavored Oreos and add a few drops of peppermint extract for a refreshing flavor.
- Gluten-Free Option: Substitute the chocolate cake mix with a gluten-free version to accommodate dietary needs.
- Fruit Additions: Layer in some fresh raspberries or sliced strawberries for a fruity contrast to the chocolate.
- Nutty Crunch: Sprinkle chopped nuts, like walnuts or pecans, on top for added texture and flavor.
Serving Suggestions
- Pair with a scoop of vanilla ice cream for a classic combination.
- Drizzle with chocolate syrup for an extra indulgent touch.
- Serve alongside fresh berries to balance the richness.
- Top with whipped cream and crushed Oreos for a stunning presentation.
- Enjoy with a cup of coffee or milk for a comforting treat.
FAQs about Rich Chocolate Oreo Dump Cake
Got questions about this decadent dessert? You’re not alone! Here are some common queries I’ve encountered about the Rich Chocolate Oreo Dump Cake, along with helpful answers.
Can I make this cake ahead of time?
Absolutely! You can prepare the cake a day in advance. Just store it in the refrigerator after it cools. When you’re ready to serve, let it sit at room temperature for a bit or warm it slightly in the oven.
What if I don’t have sour cream?
No worries! You can substitute sour cream with plain Greek yogurt or even buttermilk. Both options will keep your cake moist and delicious.
Can I use different flavors of Oreos?
Definitely! Feel free to experiment with different Oreo flavors like mint or peanut butter. Each variation will give your Rich Chocolate Oreo Dump Cake a unique twist!
How do I store leftovers?
Store any leftovers in an airtight container in the refrigerator. This cake can last for about 3-4 days, but trust me, it won’t last that long!
Can I freeze this cake?
Yes, you can freeze the cake! Just wrap it tightly in plastic wrap and then foil. It should keep well for up to three months. Thaw it in the fridge before serving for the best texture.
Final Thoughts
Creating the Rich Chocolate Oreo Dump Cake is more than just baking; it’s about sharing joy and indulgence with those you love. Each layer tells a story, from the crunchy Oreos to the rich chocolate pudding that melds together in the oven. This cake is perfect for celebrations or a cozy night in, bringing smiles with every bite. Whether you serve it warm with a scoop of ice cream or chilled with a dollop of whipped cream, it’s bound to become a favorite. So, roll up your sleeves and dive into this delightful adventure of flavors!
PrintRich Chocolate Oreo Dump Cake: A Decadent Delight!
- Total Time: 1 hour
- Yield: 12 servings
- Diet: Vegetarian
Description
A decadent chocolate cake layered with crushed Oreos and topped with chocolate chips, perfect for chocolate lovers.
Ingredients
- 1 box (15.25 oz) chocolate cake mix
- 1 package (3.9 oz) instant chocolate pudding mix
- 2 cups cold milk
- 20 Oreo cookies, roughly crushed
- 1 cup semisweet chocolate chips
- ¾ cup unsalted butter, melted
- ½ cup sour cream
- 1 teaspoon vanilla extract
- Optional toppings: 8 Oreo cookies, crushed; whipped cream; chocolate syrup; vanilla ice cream
Instructions
- Preheat your oven to 350°F. Lightly grease a 9 × 13-inch baking dish.
- In a large bowl, whisk the instant chocolate pudding mix with the cold milk for about 2 minutes, until it begins to thicken.
- Stir in the sour cream and vanilla extract until smooth.
- Spread the crushed Oreo cookies evenly across the bottom of the prepared baking dish.
- Pour the chocolate pudding mixture over the Oreo layer and spread it evenly.
- Sprinkle the dry chocolate cake mix evenly over the pudding. Do not prepare the cake mix according to the box directions.
- Slowly drizzle the melted butter over the dry cake mix, covering as much of the surface as possible. Sprinkle the chocolate chips over the top.
- Bake uncovered for 40–45 minutes, until the top looks set and the edges are bubbling. Some areas may remain soft and fudgy.
- Let the cake rest for 15–20 minutes before serving so the layers can settle.
- Sprinkle with additional crushed Oreos and serve warm with whipped cream or a scoop of vanilla ice cream.
Notes
- For a richer flavor, use dark chocolate cake mix.
- Store leftovers in an airtight container in the refrigerator.
- This cake can be served warm or cold.
- Prep Time: 15 minutes
- Cook Time: 45 minutes
- Category: Dessert
- Method: Baking
- Cuisine: American
Nutrition
- Serving Size: 1 slice
- Calories: 350
- Sugar: 25g
- Sodium: 300mg
- Fat: 18g
- Saturated Fat: 10g
- Unsaturated Fat: 5g
- Trans Fat: 0g
- Carbohydrates: 45g
- Fiber: 2g
- Protein: 4g
- Cholesterol: 30mg