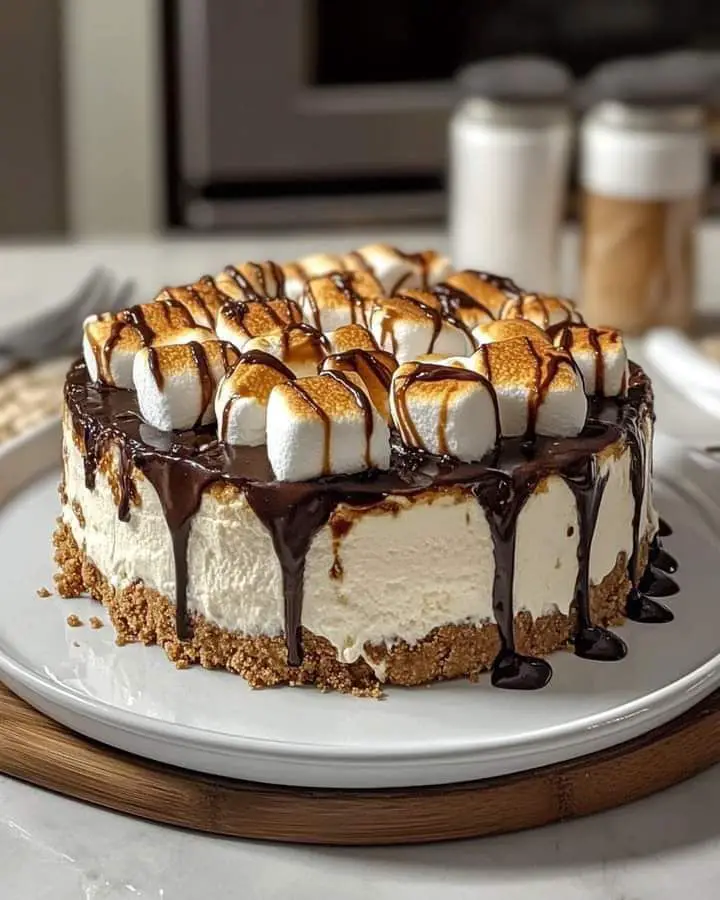
Introduction to Campfire Dream S’mores Cheesecake
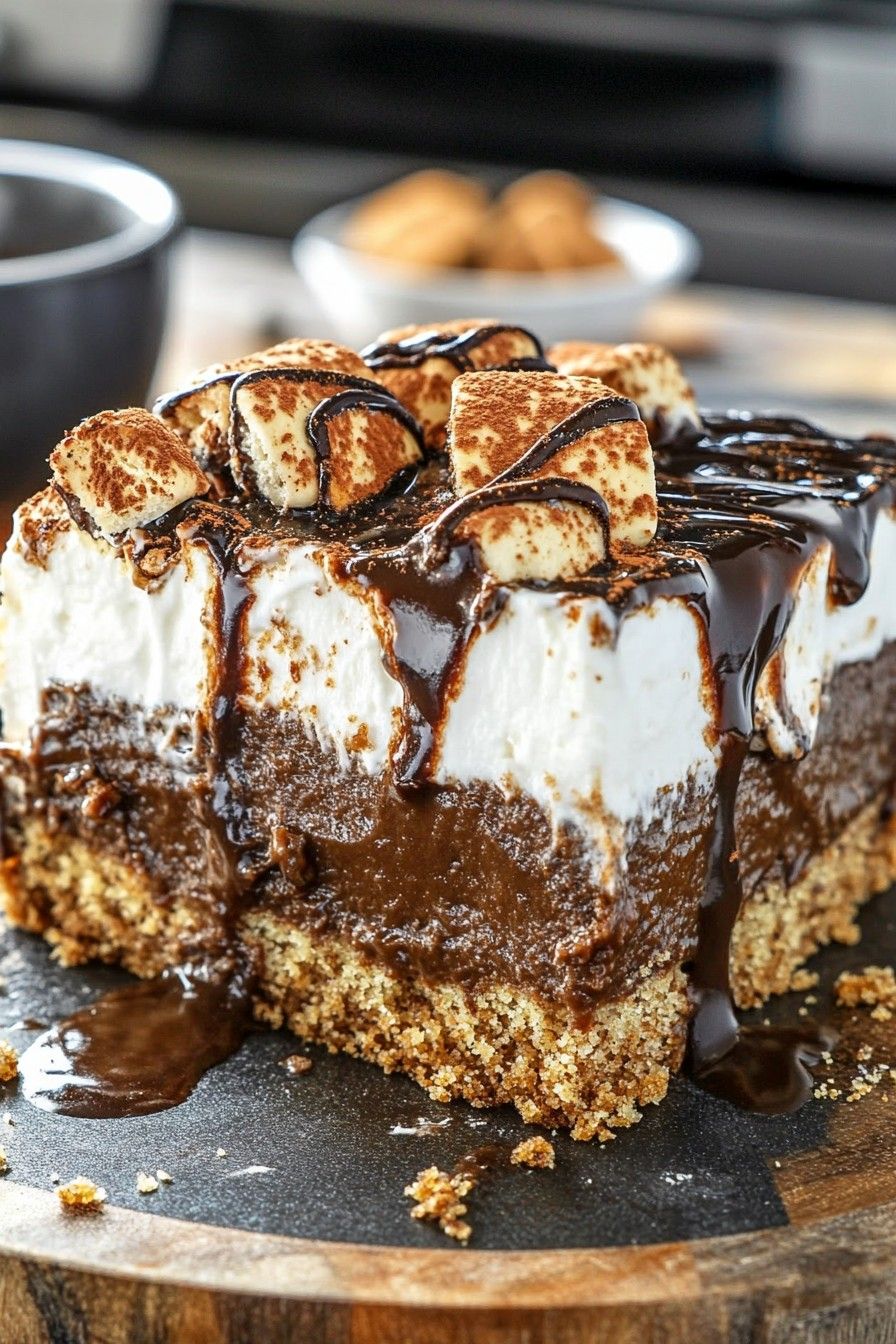
There’s something magical about the combination of chocolate, marshmallows, and graham crackers. It takes me back to summer nights spent around a crackling campfire, roasting marshmallows and sharing stories. That’s why I’m excited to introduce you to my Campfire Dream S’mores Cheesecake. This dessert captures all those nostalgic flavors in a creamy, decadent cheesecake that’s surprisingly easy to make. Whether you’re looking to impress friends at a gathering or simply treat yourself after a long day, this recipe is your ticket to a sweet escape. Trust me, your taste buds will thank you!
Why You’ll Love This Campfire Dream S’mores Cheesecake
This Campfire Dream S’mores Cheesecake is a dessert that checks all the boxes. It’s incredibly easy to whip up, making it perfect for busy weeknights or last-minute gatherings. The rich, chocolatey flavor combined with the nostalgic taste of s’mores will have everyone coming back for seconds. Plus, it’s a showstopper that looks as good as it tastes, ensuring you’ll impress your friends and family without breaking a sweat!
Ingredients for Campfire Dream S’mores Cheesecake
Gathering the right ingredients is the first step to creating this delightful Campfire Dream S’mores Cheesecake. Here’s what you’ll need:
- Graham cracker crumbs: These form the base of your cheesecake, giving it that classic s’mores flavor.
- Granulated sugar: Sweetens the crust and filling, balancing the rich chocolate.
- Unsalted butter: Adds richness and helps bind the crust together.
- Salt: Just a pinch enhances the flavors and balances the sweetness.
- Cream cheese: The star of the show! It creates that creamy texture we all love in cheesecakes.
- Cocoa powder: For that deep chocolate flavor, making this cheesecake a true indulgence.
- Eggs: They help set the cheesecake, giving it structure and creaminess.
- Vanilla extract: A splash of vanilla adds warmth and depth to the flavor profile.
- Sour cream: This adds a tangy note and creaminess, enhancing the overall texture.
- Semisweet chocolate: Melted and mixed in for an extra layer of chocolate goodness.
- Mini marshmallows: These are the iconic topping that brings the s’mores experience to life.
- Chocolate chips: For added chocolatey goodness, sprinkle them on top.
- Crushed graham crackers: A finishing touch that adds crunch and reinforces that s’mores vibe.
- Whole graham crackers: Broken into pieces for a decorative touch on top.
For exact measurements, check the bottom of the article where you can find everything listed for easy printing. Feel free to get creative with your ingredients—dark chocolate can be a great substitute for semisweet if you’re craving a richer flavor!
How to Make Campfire Dream S’mores Cheesecake
Creating this Campfire Dream S’mores Cheesecake is a delightful journey. Each step brings you closer to that creamy, chocolatey goodness. Let’s dive into the process!
Step 1: Prepare the Crust
Start by mixing the graham cracker crumbs, sugar, salt, and melted butter in a bowl. The mixture should resemble wet sand. Press it firmly into the bottom of a springform pan. This crust is the foundation of your cheesecake, so make sure it’s even and compact.
Step 2: Bake the Crust
Preheat your oven to 350°F (175°C). Once it’s ready, pop the crust in for about 8–10 minutes. You want it to be lightly golden. After baking, let it cool slightly. This step ensures a sturdy base for your cheesecake.
Step 3: Make the Cheesecake Filling
In a large mixing bowl, beat the softened cream cheese and sugar until smooth. Add the cocoa powder and mix until combined. The chocolatey aroma will fill your kitchen! Then, add the eggs one at a time, mixing on low speed. This helps keep the filling light and fluffy.
Step 4: Combine and Pour
Next, stir in the vanilla extract, sour cream, and melted chocolate. Mix until everything is well combined. Pour this luscious filling over your cooled crust, smoothing the top with a spatula. It’s starting to look like a dream already!
Step 5: Bake the Cheesecake
Carefully place the cheesecake in the oven and bake for 50–60 minutes. The edges should be set, but the center will still jiggle slightly. This is key for that creamy texture. Once done, turn off the oven, crack the door open, and let it sit for an hour. This gentle cooling helps prevent cracks.
Step 6: Cool and Refrigerate
After an hour, remove the cheesecake from the oven and let it cool completely at room temperature. Once cooled, refrigerate it for at least 6 hours, preferably overnight. This allows the flavors to meld beautifully.
Step 7: Toast the Toppings
When you’re ready to serve, arrange the mini marshmallows, chocolate chips, and graham cracker pieces on top of the cheesecake. Place it under the broiler for 30–90 seconds, keeping a close eye on it. You want those marshmallows to be golden and toasted, just like a campfire treat!
Step 8: Serve and Enjoy
For the final touch, sprinkle with additional crushed graham crackers and drizzle with melted chocolate if desired. Slice with a warm, sharp knife for clean cuts. Serve chilled or slightly softened, and watch everyone’s faces light up with joy!
Tips for Success
- Make sure your cream cheese is at room temperature for a smooth filling.
- Don’t overmix the batter; it can lead to cracks in your cheesecake.
- Use a water bath for even baking if you want to be extra cautious.
- Let the cheesecake cool gradually to prevent cracking.
- For best flavor, make it a day ahead and let it chill overnight.
Equipment Needed
- Springform pan: Essential for easy removal; a regular cake pan works in a pinch.
- Mixing bowls: Use a large bowl for the filling and a smaller one for the crust.
- Electric mixer: A hand mixer is great, but a stand mixer can save time.
- Spatula: Perfect for smoothing the cheesecake filling.
- Measuring cups and spoons: Accurate measurements ensure the best results.
Variations
- Nutty Delight: Add crushed nuts like pecans or walnuts to the crust for an extra crunch.
- Fruit Fusion: Top with fresh berries or banana slices for a fruity twist.
- Gluten-Free Option: Use gluten-free graham crackers to make the crust suitable for gluten-sensitive friends.
- Vegan Version: Substitute cream cheese with a vegan alternative and use flax eggs for a plant-based treat.
- Minty Fresh: Incorporate peppermint extract into the filling for a refreshing mint chocolate flavor.
Serving Suggestions
- Pair with Coffee: A rich cup of coffee complements the sweetness perfectly.
- Fresh Berries: Serve with a side of strawberries or raspberries for a refreshing contrast.
- Presentation: Garnish with chocolate shavings or a drizzle of caramel for an elegant touch.
- Ice Cream: A scoop of vanilla ice cream adds a delightful creaminess.
FAQs about Campfire Dream S’mores Cheesecake
Can I make Campfire Dream S’mores Cheesecake ahead of time?
Absolutely! In fact, making it a day in advance enhances the flavors. Just keep it refrigerated until you’re ready to serve.
What can I use instead of cream cheese?
If you’re looking for a dairy-free option, try using a vegan cream cheese alternative. It works surprisingly well in this recipe!
How do I store leftovers?
Store any leftover cheesecake in an airtight container in the fridge. It should stay fresh for about 3-4 days.
Can I freeze this cheesecake?
Yes, you can freeze it! Just wrap it tightly in plastic wrap and then foil. Thaw it in the fridge before serving.
What’s the best way to slice the cheesecake?
For clean slices, use a warm, sharp knife. Wipe the knife with a damp cloth between cuts for the best results!
Final Thoughts
Creating this Campfire Dream S’mores Cheesecake is more than just baking; it’s about crafting memories. Each slice brings a taste of nostalgia, reminiscent of summer nights spent around the fire. The rich chocolate and toasted marshmallows create a delightful harmony that’s hard to resist. Whether you’re sharing it with friends or savoring it solo, this cheesecake is sure to spark joy. It’s a sweet reminder that life’s simple pleasures often come from the kitchen. So, roll up your sleeves, embrace the process, and let this dessert transport you to those cherished campfire moments!
PrintCampfire Dream S’mores Cheesecake is a must-try delight!
- Total Time: 7 hours 30 minutes
- Yield: 12 servings
- Diet: Vegetarian
Description
Campfire Dream S’mores Cheesecake is a must-try delight that combines the rich flavors of chocolate cheesecake with the classic s’mores experience.
Ingredients
- 2 cups (200 g) graham cracker crumbs
- ¼ cup (50 g) granulated sugar
- ½ cup (115 g) unsalted butter, melted
- ¼ teaspoon (1.25 mL) salt
- 680 g cream cheese, softened
- ¾ cup (150 g) granulated sugar
- ½ cup (45 g) unsweetened cocoa powder
- 3 large eggs
- 1 teaspoon (5 mL) vanilla extract
- ½ cup (120 mL) sour cream
- 115 g semisweet chocolate, melted and slightly cooled
- 2 cups (100 g) mini marshmallows
- ½ cup (85 g) milk or semisweet chocolate chips
- ½ cup (50 g) crushed graham crackers
- 2–3 full graham crackers, broken into pieces
Instructions
- Preheat the oven to 350°F (175°C). Mix the graham cracker crumbs, sugar, salt, and melted butter until evenly combined. Press firmly into the bottom of a 23 cm springform pan.
- Bake for 8–10 minutes. Remove from the oven and let cool slightly.
- Beat the softened cream cheese and sugar until smooth. Add the cocoa powder and mix until combined.
- Beat in the eggs one at a time, mixing on low speed just until incorporated. Add vanilla and sour cream.
- Pour in the melted chocolate and mix until smooth and evenly combined. Avoid overmixing.
- Pour the filling over the crust and smooth the top. Bake for 50–60 minutes, until the edges are set but the center still has a slight jiggle.
- Turn off the oven, crack the door open, and leave the cheesecake inside for 1 hour. Remove and cool completely.
- Refrigerate for at least 6 hours, preferably overnight, until fully set.
- Arrange the mini marshmallows, chocolate chips, and graham cracker pieces over the cheesecake.
- Place under the broiler for 30–90 seconds, watching constantly, until the marshmallows are golden and toasted. Alternatively, use a kitchen torch for more control.
- Sprinkle with additional crushed graham crackers and drizzle with melted chocolate if desired.
- Slice with a warm, sharp knife and serve chilled or slightly softened.
Notes
- The cheesecake can be made a day in advance for better flavor.
- For a more intense chocolate flavor, use dark chocolate instead of semisweet.
- Be careful when toasting the marshmallows to avoid burning.
- Prep Time: 30 minutes
- Cook Time: 1 hour
- Category: Dessert
- Method: Baking
- Cuisine: American
Nutrition
- Serving Size: 1 slice
- Calories: 350
- Sugar: 25 g
- Sodium: 200 mg
- Fat: 22 g
- Saturated Fat: 12 g
- Unsaturated Fat: 8 g
- Trans Fat: 0 g
- Carbohydrates: 30 g
- Fiber: 1 g
- Protein: 5 g
- Cholesterol: 80 mg