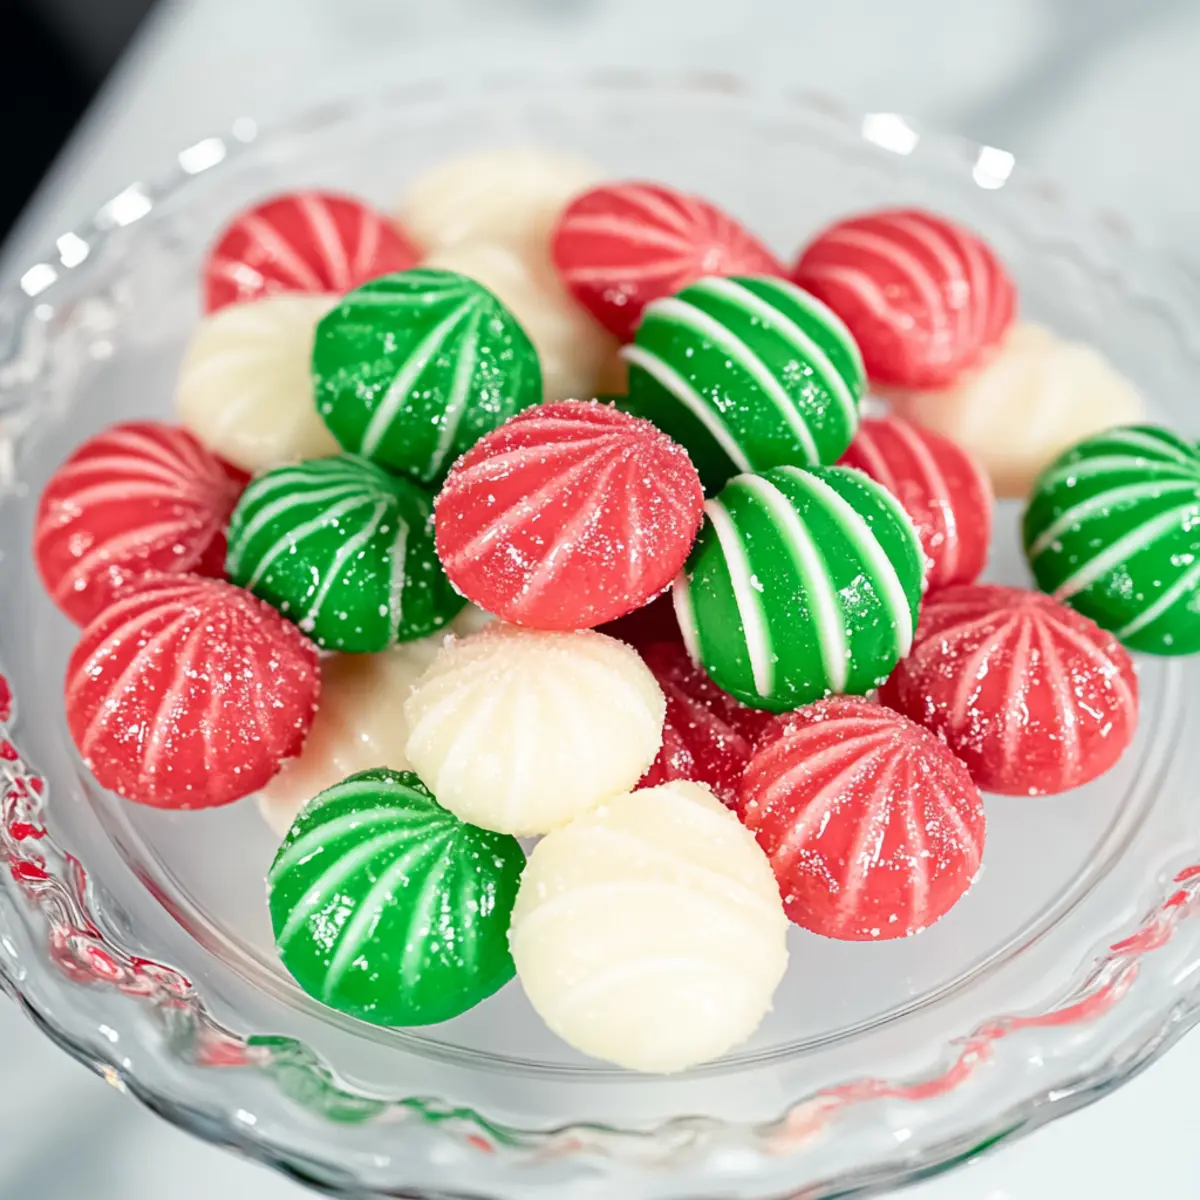
As I stood in my kitchen, the warm scent of peppermint wafted through the air, instantly transporting me to a cozy holiday celebration. This Christmas Mint Candy recipe is about to become your go-to for festive occasions, blending just five simple ingredients into melt-in-your-mouth creamy delights. With their vibrant red and green colors, these no-bake treats not only add a cheerful touch to dessert tables but also make for thoughtful gifts during the holidays. Plus, they’re quick to prepare, so you can whip up a batch even on the busiest of days! Are you ready to impress your guests and family with these delightful creamy confections? Let’s dive in!

Why Is Christmas Mint Candy a Must-Try?
Simplicity at Its Best: With just five ingredients, you’ll find this no-bake recipe incredibly easy to whip up, making it perfect for last-minute holiday preparations.
Vibrant and Festive: The striking red and green colors not only brighten your dessert table but also bring the holiday spirit into your home.
Versatile Treat: Customize your mint flavor or colors to suit any occasion, from festive Christmas gatherings to delightful Easter celebrations. You can even explore variations with your favorite extracts, making it a year-round favorite.
Perfect Gift Idea: Whether in a decorative tin or a pretty jar, these candies make thoughtful, homemade gifts that friends and family will treasure.
Crowd-Pleasing Flavor: The combination of creamy, buttery notes with fresh peppermint offers a melt-in-your-mouth indulgence that everyone will love. Try pairing them with your favorite holiday treats or serving alongside other goodies like Making Christmas Crack for an unforgettable dessert spread!
Christmas Mint Candy Ingredients
-
For the Candy Mixture
• Cream Cheese – Provides a creamy texture that melts in your mouth; ensure it’s softened for easy mixing.
• Butter – Adds a rich, buttery flavor; use softened butter to achieve the best consistency.
• Powdered Sugar (8 cups, separated) – Sweetens and gives structure to your candies; substitute with a sugar alternative if needed.
• Peppermint Extract (1/2 tsp) – Intensifies the minty flavor of the Christmas Mint Candy; try substituting with other extracts like almond for a twist. -
For Festive Coloring
• Food Coloring (green & red gel) – Adds vibrant festive colors to your mints; you can use different colors based on other celebrations, like pastels for spring events.
Elevate your holiday celebrations with these simple yet delicious ingredients!
Step‑by‑Step Instructions for Christmas Mint Candy
Step 1: Prepare the Creamy Base
In a stand mixer, combine 8 ounces of softened cream cheese and 4 ounces of softened butter. Beat on medium speed until the mixture is smooth and well blended, about 2 to 3 minutes. You want a creamy texture that’s easy to work with. This delightful base will give your Christmas Mint Candy a rich and creamy foundation.
Step 2: Sweeten the Mixture
Gradually add 1 cup of powdered sugar to the cream mixture, mixing on low speed until fully incorporated. Continue adding the remaining 6 ½ cups of powdered sugar, ensuring a smooth texture. This step should take about 3 to 5 minutes. Don’t forget to scrape down the sides of the bowl occasionally to ensure everything is mixed well and looks beautifully thick and creamy.
Step 3: Add Flavor
Once your candy base is well-mixed, incorporate ½ teaspoon of peppermint extract into the mixture. Mix on low speed for another minute, allowing the mint flavor to blend seamlessly. The blend should be fragrant with peppermint, enhancing your Christmas Mint Candy with a refreshing taste that embodies holiday treats.
Step 4: Divide and Color the Mixture
Divide the candy mixture into three separate bowls to start adding festive colors. Into one bowl, knead in green food coloring, and into the second bowl, knead in red food coloring until fully incorporated. The final bowl can remain plain. Aim for vibrant colors that evoke the cheerful spirit of the holidays, creating a wonderful visual appeal for your candies.
Step 5: Chill the Mixture
Cover each bowl with plastic wrap and refrigerate for about 2 hours. This chilling step is crucial as it helps firm up the candy mixture, making it easier to shape. The colors should intensify slightly as they chill, enhancing the visual beauty of your Christmas Mint Candy.
Step 6: Prepare for Shaping
After chilling, line a baking sheet with parchment paper and dust it lightly with powdered sugar to prevent sticking. This will be the surface where you shape and set your delightful mints. Ensure you’re set up for success, creating a non-stick environment for your festive creations.
Step 7: Shape the Candies
Using a tablespoon, scoop portions of the chilled candy mixture and roll them into small balls in the palms of your hands. Aim for about 1 tablespoon per ball. Place each ball on the prepared baking sheet, creating a delightful assortment as you go. You’ll begin to see how your Christmas Mint Candy takes shape in vibrant colors.
Step 8: Flatten the Mints
Take a fork that has been dipped in powdered sugar and gently flatten each ball on the baking sheet. The fork should leave a charming pattern while preventing stickiness. You’ll want to ensure each piece is uniformly shaped and ready for the final hardening process, which is essential for the ideal texture of the candy.
Step 9: Hardening Process
Allow the mints to sit at room temperature for at least 4 hours to harden properly. This step is crucial as it ensures your Christmas Mint Candy achieves a melt-in-your-mouth texture that will impress your family and friends. The candies should feel firm yet still retain a delightful softness when bitten into.
Step 10: Store or Serve
Once hardened, store your Christmas Mint Candy in an airtight container in the refrigerator, separating layers with parchment paper. These treats can also be enjoyed right away. You’ll find that they last up to a week, so feel free to delight in them during the holiday festivities or gift them to loved ones in cute jars or containers!

Christmas Mint Candy Variations Made Easy
Feel free to sprinkle your creativity into this recipe, making it uniquely yours and even more delightful!
-
Flavor Twist: Experiment with Almond Extract instead of peppermint for a sweet, nutty profile. It creates a delightful surprise that’s perfect for any time of the year.
-
Color Swap: Try using Pastel Food Coloring for a softer appearance. These light hues are lovely for springtime celebrations like Easter, giving your candies a fresh and gentle look.
-
Heat It Up: Incorporate a few drops of Cinnamon Oil for a spicy warmth. It beautifully contrasts with the mint, bringing a warm twist that might just become your new favorite!
-
Roll in Sugar: For added sparkle, roll your mints in Colored Sanding Sugar before flattening. This gives a festive crunch and a touch of whimsy, making them even more eye-catching on your holiday platter.
-
Decorative Shapes: Use cookie cutters to create festive shapes like stars, trees, or hearts instead of balls. These charming forms are great for making your holiday parties even more fun!
-
Nutritional Boost: Consider replacing some powdered sugar with a Sugar Alternative to reduce calories. It allows everyone to enjoy these treats guilt-free!
-
Chocolate Delight: Drizzle melted Dark Chocolate over hardened mints for a luxurious finish. It brings an indulgent touch that pairs beautifully with the creamy texture of the candies.
-
Incorporate Other Candies: Mix in crushed Candy Canes or your favorite holiday chocolates for a fun crunch and additional layers of flavor. It’s a sweet way to make each bite extra special.
As you create your delicious candies, don’t hesitate to check out my guides on Fun Christmas Candy and Pineapple Cowboy Candy for more festive inspirations. Happy cooking!
How to Store and Freeze Christmas Mint Candy
Fridge: Store your Christmas Mint Candy in an airtight container for up to 1 week. Layer parchment paper between the candies to prevent sticking and maintain freshness.
Freezer: These delightful mints can be frozen for up to 3 months. Place them in a single layer on a baking sheet to freeze them initially, then transfer to an airtight container or freezer bag.
Reheating: No reheating is necessary, as the candies should retain their creamy texture when taken directly from the fridge or freezer. Simply let them sit at room temperature for a few minutes before enjoying.
Room Temperature: If you plan to serve the candies right away, keep them at room temperature for about 30 minutes. Just be mindful not to leave them out too long, as they may soften.
Make Ahead Options
These Christmas Mint Candy treats are perfect for meal prep enthusiasts! You can prepare the candy mixture up to 24 hours in advance; simply follow the first six steps, then cover and refrigerate the divided mixtures. This not only saves time on hectic days but also ensures the flavors meld beautifully. When you’re ready to serve, just roll and flatten the candies according to the final steps, allowing them to rest at room temperature for about 4 hours until they harden. To maintain quality, store any leftover mints in the refrigerator in an airtight container, where they’ll stay fresh for up to a week, making them a delightful treat ready for holiday gatherings!
What to Serve with Christmas Mint Candy?
Indulging in these creamy, festive delights is even better when paired with the right accompaniments!
-
Rich Hot Cocoa:
A warm cup of hot cocoa topped with whipped cream perfectly complements the minty sweetness, creating a cozy flavor experience. -
Gingerbread Cookies:
The spiced, chewy texture of gingerbread cookies pairs beautifully with the creamy mints, offering a delightful contrast in flavor. -
Vanilla Ice Cream:
The smooth, creamy texture of vanilla ice cream balances the minty freshness, making for a refreshing dessert combo. -
Christmas Punch:
A fruity holiday punch adds a refreshing burst that complements the sweet and minty flavors, great for festive gatherings. -
Chocolate-Dipped Pretzels:
The saltiness of pretzels covered in chocolate enhances the sweetness of the candies, providing a lovely textural contrast in each bite. -
Cheese Platter:
A selection of creamy cheeses pairs deliciously with the mints, offering a savory counterpart to their sweet flavor. -
Holiday Fruit Salad:
A colorful fruit salad brings a light, fresh element that balances out the richness of the candies while adding a festive touch. -
Eggnog:
This creamy, spiced drink matches the cozy vibe of the holidays, making it an excellent pairing with these delightful mint candies. -
Coffee:
A warm cup of coffee enhances the overall dessert experience, its bitterness contrasting beautifully with the sweet creaminess of the mints. -
Caramel Sauce:
Drizzle warm caramel sauce over the mints for an extra indulgent treat that takes the flavor to new heights.
Expert Tips for Christmas Mint Candy
-
Use Softened Ingredients: Ensure your cream cheese and butter are softened before mixing to achieve a creamy and smooth texture in your Christmas Mint Candy.
-
Gradual Sugar Addition: Add powdered sugar gradually to prevent lumps and ensure the mixture becomes thick and creamy without any graininess.
-
Refrigerate for Best Results: Don’t skip the chilling step! Refrigerating the mixture for 2 hours will help firm it up, making it easier to shape perfect mints.
-
Avoid Overworking Colors: When mixing food coloring, knead just until evenly incorporated. Overworking can cause the colors to lose vibrancy and become muddled.
-
Proper Flattening Technique: When flattening with a fork, dip it in powdered sugar each time to prevent sticking. This ensures a lovely design without mess.
-
Storage Tips: For best freshness, store your candies in an airtight container with layers of parchment paper in between to prevent sticking. Enjoy the festive flavors for up to a week!
Christmas Mint Candy Recipe FAQs
What type of cream cheese should I use for Christmas Mint Candy?
Absolutely! I recommend using full-fat cream cheese for the best flavor and texture. Make sure it’s softened to room temperature before mixing; this ensures a creamy, easily blendable base for your candies.
How long can I store Christmas Mint Candy?
You can store your Christmas Mint Candy in an airtight container in the fridge for up to 1 week. To keep them fresh and prevent sticking, layer the mints with parchment paper between them.
Can I freeze Christmas Mint Candy?
Very much so! To freeze, place the candies in a single layer on a baking sheet and freeze until solid. Then, transfer them to an airtight container or freezer bag and store for up to 3 months. Just let them sit at room temperature for a few minutes before enjoying!
What should I do if my mints are too soft?
If you find that the bottoms of your Christmas Mint Candy are soft, don’t worry! Simply flip them over and let them sit at room temperature for a bit longer to harden properly. If they still feel too soft after 4 hours, refrigerating them for a short while can help.
Are Christmas Mint Candy ingredients safe for pets or individuals with allergies?
It’s always best to be cautious! The primary ingredients are cream cheese and butter, which are safe for humans but can be harmful to pets, especially dogs. Additionally, if anyone has a dairy allergy, be sure to avoid the recipe or look for appropriate dairy alternatives like vegan cream cheese. Always check for allergies related to food coloring as well!

Irresistible Christmas Mint Candy for Sweet Holiday Joy
Ingredients
Equipment
Method
- In a stand mixer, combine softened cream cheese and softened butter. Beat on medium speed until smooth, about 2 to 3 minutes.
- Gradually add 1 cup of powdered sugar, mixing on low speed. Continue adding remaining powdered sugar, ensuring a smooth texture for 3 to 5 minutes.
- Incorporate peppermint extract into the mixture, mixing on low speed for another minute.
- Divide the candy mixture into three bowls; knead in green food coloring to one bowl, red food coloring to another, and leave one bowl plain.
- Cover bowls with plastic wrap and refrigerate for about 2 hours to firm up.
- Line a baking sheet with parchment paper and dust with powdered sugar.
- Scoop portions of the chilled mixture, roll into small balls, and place on the baking sheet.
- Flatten each ball gently with a fork dipped in powdered sugar.
- Allow the mints to sit at room temperature for at least 4 hours to harden.
- Store in an airtight container in the fridge, separating layers with parchment paper.