Introduction to Coconut Cream Dream Bars
There’s something magical about desserts that transport you back to simpler times. Coconut Cream Dream Bars do just that. With their creamy coconut filling and buttery graham cracker crust, they evoke memories of summer picnics and family gatherings. This recipe is perfect for those busy days when you want to impress your loved ones without spending hours in the kitchen. Just a few simple steps, and you’ll have a delightful treat that’s sure to bring smiles. Trust me, these bars are not just a dessert; they’re a sweet escape into nostalgia.
Why You’ll Love This Coconut Cream Dream Bars
These Coconut Cream Dream Bars are a game-changer for any dessert lover. They come together quickly, making them perfect for last-minute gatherings or a sweet treat after dinner. The combination of creamy coconut and crunchy crust creates a delightful contrast that’s hard to resist. Plus, they’re a hit with both kids and adults alike, ensuring everyone leaves the table with a smile. Who wouldn’t love that?
Ingredients for Coconut Cream Dream Bars
Gathering the right ingredients is the first step to creating these Coconut Cream Dream Bars. Each component plays a vital role in crafting that perfect balance of flavors and textures. Here’s what you’ll need:
- Graham cracker crumbs: These form the base of your bars, providing a sweet and crunchy crust.
- Unsalted butter: Melted butter binds the crumbs together and adds richness.
- Granulated sugar: A touch of sweetness enhances the crust’s flavor.
- Salt: Just a pinch elevates the overall taste, balancing the sweetness.
- Cream cheese: Softened cream cheese gives the filling a creamy texture and tangy flavor.
- Powdered sugar: This sweetens the cream cheese mixture and helps it blend smoothly.
- Vanilla extract: A classic flavor that complements the coconut beautifully.
- Coconut extract: Optional, but it intensifies the coconut flavor for true enthusiasts.
- Instant coconut cream pudding mix: This is the star of the filling, creating that luscious, creamy texture.
- Cold whole milk: Essential for mixing with the pudding to achieve the right consistency.
- Sweetened shredded coconut: Adds texture and a burst of coconut flavor throughout the filling.
- Whipped topping: Thawed whipped topping lightens the filling, making it airy and delightful.
- Heavy whipping cream: Used for the topping, it adds a rich, creamy layer.
- Extra whipped cream: Optional, but who doesn’t love a little extra creaminess on top?
- Shredded coconut (toasted): This garnish adds a crunchy texture and enhances the coconut flavor.
- White chocolate curls: Optional, but they add a touch of elegance and sweetness.
For exact measurements, check the bottom of the article where you can find everything listed for easy printing. Now that you have your ingredients ready, let’s dive into the fun part—making these dreamy bars!
How to Make Coconut Cream Dream Bars
Creating Coconut Cream Dream Bars is a delightful journey that combines simple steps with delicious results. Let’s break it down into easy-to-follow stages, ensuring you achieve that perfect balance of flavors and textures.
Step 1: Prepare the Crust
First things first, preheat your oven to 350°F. This is crucial for achieving that golden crust. While the oven warms up, grab a 9 × 13-inch baking dish and line it with parchment paper. Leave some overhang on the sides; this will make it easier to lift the bars out later.
Now, in a mixing bowl, combine the graham cracker crumbs, melted butter, sugar, and salt. Mix until it resembles damp sand. Press this mixture firmly into the bottom of your prepared dish. The crust is the foundation of your bars, providing a crunchy contrast to the creamy filling. Bake for 8–10 minutes until lightly golden, then let it cool completely.
Step 2: Make the Filling
While the crust cools, it’s time to whip up the filling. In a large bowl, whisk together the instant coconut cream pudding mix and cold whole milk. Do this for about 2 minutes until it thickens. Let it stand for 5 minutes to set.
In another bowl, beat the softened cream cheese until it’s smooth and fluffy. Add in the powdered sugar, vanilla extract, and coconut extract. Mix until creamy, scraping down the sides as needed. This step is vital; thorough mixing ensures a silky filling. Once combined, fold in the prepared pudding and shredded coconut until everything is evenly distributed.
Step 3: Assemble the Bars
Now comes the fun part—assembling your bars! Spread the coconut filling evenly over the cooled crust. Use a spatula to smooth the top, ensuring it looks inviting. A well-smooth surface not only enhances presentation but also helps with even slicing later on.
Step 4: Add the Topping
Next, let’s create that luscious topping. In a chilled bowl, beat the heavy whipping cream, powdered sugar, vanilla extract, and optional coconut extract until medium-stiff peaks form. This will give your bars a light and airy finish.
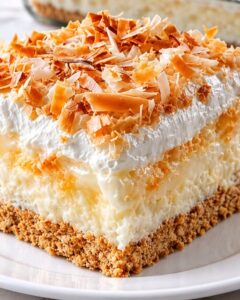
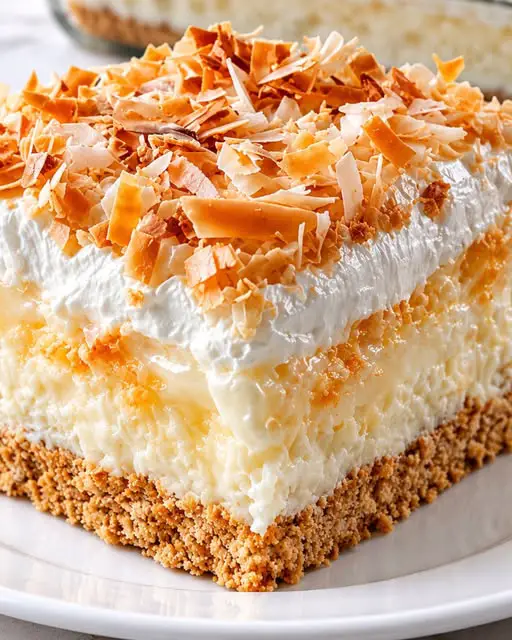
Spread the whipped cream evenly over the coconut filling. For an extra touch, sprinkle the toasted coconut and white chocolate curls on top. These add a delightful crunch and a hint of sweetness that elevates the dessert.
Step 5: Chill and Serve
Finally, cover the dish and refrigerate for at least 6 hours, preferably overnight. This chilling time is crucial; it allows the bars to set properly, making them easier to cut and enhancing the flavors. When you’re ready to serve, lift the dessert out using the parchment overhang and cut into squares. Enjoy the smiles as you share these Coconut Cream Dream Bars!
Tips for Success
- For a firmer filling, refrigerate overnight; it allows flavors to meld beautifully.
- Don’t overwhip the cream; stop when you see medium-stiff peaks for the best texture.
- Keep an eye on the coconut while toasting; it can go from golden to burnt in seconds.
- Use a sharp knife to cut the bars for clean edges.
- Experiment with different toppings like chocolate shavings or fresh fruit for a twist!
Equipment Needed
- Baking dish: A 9 × 13-inch dish is ideal, but any similar-sized dish will work.
- Parchment paper: Use it for easy removal; aluminum foil can be a substitute.
- Mixing bowls: A set of various sizes is handy for combining ingredients.
- Whisk: Essential for mixing; a fork can work in a pinch.
- Spatula: Great for spreading and smoothing; a large spoon can also do the job.
Variations of Coconut Cream Dream Bars
- Chocolate Coconut Dream Bars: Add a layer of chocolate ganache between the crust and filling for a rich twist.
- Gluten-Free Option: Substitute graham cracker crumbs with gluten-free cookies or almond flour for a gluten-free crust.
- Vegan Version: Use dairy-free cream cheese and coconut whipped cream to create a vegan-friendly dessert.
- Fruit-Infused Bars: Incorporate fresh pineapple or mango into the filling for a tropical burst of flavor.
- Nutty Coconut Bars: Mix in chopped nuts like pecans or almonds into the crust for added crunch and flavor.
Serving Suggestions for Coconut Cream Dream Bars
- Pair with a scoop of vanilla ice cream for a delightful contrast in temperature and texture.
- Serve alongside fresh fruit like strawberries or pineapple to enhance the tropical vibe.
- Drizzle with chocolate sauce for an indulgent touch.
- Garnish with mint leaves for a pop of color and freshness.
- Enjoy with a cup of coffee or iced tea for a refreshing afternoon treat.
FAQs about Coconut Cream Dream Bars
As you embark on your journey to create these Coconut Cream Dream Bars, you might have a few questions. Here are some common queries that can help you along the way:
Can I make Coconut Cream Dream Bars ahead of time?
Absolutely! In fact, making them a day in advance is ideal. This allows the flavors to meld and the filling to set perfectly. Just keep them covered in the fridge until you’re ready to serve.
What can I substitute for cream cheese?
If you’re looking for a lighter option, you can use Greek yogurt or mascarpone cheese. Both will give you a creamy texture while adding a unique flavor twist.
How do I store leftovers?
Store any leftover Coconut Cream Dream Bars in an airtight container in the refrigerator. They should stay fresh for up to 3 days, but trust me, they won’t last that long!
Can I freeze these bars?
Yes, you can freeze them! Just wrap the bars tightly in plastic wrap and then in aluminum foil. They can be frozen for up to 2 months. Thaw them in the fridge before serving.
What can I use instead of shredded coconut?
If you’re not a fan of shredded coconut, you can skip it altogether or replace it with finely chopped nuts for a different texture. Almonds or pecans work wonderfully!
Final Thoughts
Creating Coconut Cream Dream Bars is more than just baking; it’s about crafting memories and sharing joy. Each bite transports you to sun-soaked days, where laughter and sweetness fill the air. The creamy coconut filling paired with the crunchy crust is a delightful contrast that keeps you coming back for more. Whether you’re serving them at a family gathering or enjoying a quiet evening at home, these bars are sure to bring smiles all around. So, roll up your sleeves, gather your ingredients, and let the magic of these Coconut Cream Dream Bars brighten your day!
PrintCoconut Cream Dream Bars: A Decadent Recipe Delight
- Total Time: 6 hours 45 minutes
- Yield: 16 squares
- Diet: Vegetarian
Description
Coconut Cream Dream Bars are a decadent dessert featuring a graham cracker crust, creamy coconut filling, and a light whipped topping, all garnished with toasted coconut and optional white chocolate curls.
Ingredients
- 2 cups graham cracker crumbs
- ½ cup unsalted butter, melted
- 2 tbsp granulated sugar
- ¼ tsp salt
- 8 oz cream cheese, softened
- 1 cup powdered sugar
- 1 tsp vanilla extract
- ½ tsp coconut extract
- 2 packages (3.4 oz each) instant coconut cream pudding mix
- 3 cups cold whole milk
- 1½ cups sweetened shredded coconut
- 1 cup whipped topping, thawed
- 2 cups heavy whipping cream, cold
- ¼ cup powdered sugar
- 1 tsp vanilla extract
- ½ tsp coconut extract, optional
- 1 cup shredded coconut, toasted
- ¼ cup white chocolate curls, optional
- Extra whipped cream, optional
Instructions
- Preheat the oven to 350°F. Line a 9 × 13-inch baking dish with parchment paper, leaving some overhang on the sides for easy removal.
- Combine the graham cracker crumbs, melted butter, sugar, and salt in a bowl. Mix until the crumbs resemble damp sand.
- Press the mixture firmly into the bottom of the prepared dish, creating an even layer.
- Bake for 8–10 minutes, until lightly golden. Remove from the oven and let the crust cool completely.
- In a large bowl, whisk the instant coconut cream pudding mixes with the cold milk for about 2 minutes, until thickened.
- Let stand for 5 minutes while preparing the cream cheese mixture.
- In another bowl, beat the softened cream cheese until smooth and fluffy.
- Add the powdered sugar, vanilla extract, and coconut extract. Beat until creamy, scraping down the sides of the bowl as needed.
- Add the prepared pudding and mix on low speed until thoroughly combined.
- Fold the shredded coconut into the pudding mixture until evenly distributed.
- Gently fold in 1 cup of whipped topping to make the filling lighter and creamier.
- Spread the coconut filling evenly over the cooled crust. Smooth the top with a spatula.
- In a chilled bowl, beat the heavy whipping cream, powdered sugar, vanilla extract, and optional coconut extract until medium-stiff peaks form.
- Spread the whipped cream evenly over the coconut filling.
- Spread the shredded coconut for the garnish on a baking sheet.
- Bake at 350°F for 4–7 minutes, stirring once or twice, until lightly golden and fragrant. Watch carefully because coconut can burn quickly.
- Allow it to cool completely.
- Sprinkle the toasted coconut evenly over the whipped cream. Add white chocolate curls if desired.
- Cover the dish and refrigerate for at least 6 hours, preferably overnight.
- Lift the dessert from the pan using the parchment overhang, if desired. Cut into 16 squares with a sharp knife, wiping the blade between cuts.
Notes
- For best results, refrigerate overnight to allow the filling to set properly.
- Be careful not to overwhip the cream to avoid a grainy texture.
- Watch the coconut closely while toasting to prevent burning.
- Prep Time: 30 minutes
- Cook Time: 15 minutes
- Category: Dessert
- Method: Baking and Chilling
- Cuisine: American
Nutrition
- Serving Size: 1 square
- Calories: 320
- Sugar: 22g
- Sodium: 150mg
- Fat: 22g
- Saturated Fat: 13g
- Unsaturated Fat: 7g
- Trans Fat: 0g
- Carbohydrates: 30g
- Fiber: 1g
- Protein: 3g
- Cholesterol: 50mg