The kitchen filled with a delightful aroma as I pulled out crispy chicken cutlets, an unexpected twist on a classic favorite. Inspired by the bold flavors of a Caesar salad, these Crispy Chicken Caesar Cutlets blend perfectly with the crunch of romaine and the richness of Parmesan. Best of all, they come together in just 35 minutes, making them an ideal choice for quick weeknight meals or casual dinners that impress. Not only do they deliver restaurant-level flavor, but they’re also family-friendly, ensuring even the pickiest eaters will come back for seconds. Ready to take the plunge and whip up this delicious dish? Let’s dive in!
Why are these cutlets a game changer?
Quick Preparation: You’ll be amazed that in just 35 minutes, you can serve up restaurant-worthy crispy chicken cutlets. No need for hours in the kitchen!
Flavorsome Twist: The infusion of lemony Caesar flavor elevates your usual chicken dish, making it a hit with family and friends alike.
Family-Friendly: Even picky eaters will love these cutlets, thanks to their crunchy texture and familiar flavors. They pair beautifully with a fresh salad.
Versatile Serving: Serve them alongside roasted vegetables, buttery garlic bread, or even with a drizzle of homemade dressing for a complete meal that satisfies!
Meal Prep Friendly: You can store the cooked cutlets in an airtight container for up to 3 days, making them perfect for easy reheating on busy nights.
Crispy Chicken Caesar Cutlets Ingredients
For the Chicken Cutlets
- Boneless, skinless chicken breasts – Pounded to ¼ inch for even cooking, ensuring tender, juicy results.
- Kosher salt – Enhances flavor; feel free to substitute with sea salt for a different taste.
- Freshly ground black pepper – Adds heat and depth; freshly ground is preferred for maximum flavor.
- All-purpose flour – Acts as a coating for the chicken; gluten-free flour is a great substitute.
- Large eggs – Binds the coating ingredients together; aquafaba works well as a vegan alternative.
- Dijon mustard – Adds a tangy flavor boost; any mustard can be utilized if Dijon isn’t on hand.
- Worcestershire sauce – Brings umami to the mix; look for a vegan variety if needed.
- Panko breadcrumbs – Creates the all-important crispiness; regular breadcrumbs can be used but will be less crunchy.
- Finely grated Parmesan cheese – Infuses rich flavor; nutritional yeast can offer a vegan option.
- Garlic powder – Provides seasoning; fresh minced garlic can also be a wonderful addition.
- Paprika – Enhances color and flavor; smoked paprika lends a unique twist to the dish.
- Olive oil – Used for frying to achieve crispiness; canola or avocado oil serves as excellent substitutes.
For the Salad
- Romaine lettuce – A crunchy base for your Caesar salad; any leafy greens can serve as substitutes.
- Caesar dressing – Ties all flavors together; homemade dressing can elevate the dish further.
- Shaved or grated Parmesan cheese – A delightful finishing touch; omit entirely for a dairy-free option.
- Croutons – Add crunch and texture; use store-bought for convenience or make your own for extra love.
- Lemon wedges – Brighten up the dish; feel free to swap with lime for a different zing.
Enjoy crafting your Crispy Chicken Caesar Cutlets that blend lemony flavors with crunchy textures for a truly satisfying meal!
Step‑by‑Step Instructions for Crispy Chicken Caesar Cutlets
Step 1: Prepare Chicken
Start by seasoning the boneless, skinless chicken breasts generously with kosher salt and freshly ground black pepper on both sides. This step is crucial for flavor, so make sure to coat them evenly. Once seasoned, set the cutlets aside to absorb those flavors while you prepare the breading stations.
Step 2: Set Up Breading Stations
Create an efficient breading assembly line by placing individual shallow dishes for each coating ingredient: all-purpose flour, the egg mixture (whisked eggs, Dijon mustard, and Worcestershire sauce), and the panko mixture (panko breadcrumbs, grated Parmesan, garlic powder, and paprika). This organized setup will help streamline the breading process for your Crispy Chicken Caesar Cutlets.
Step 3: Bread Chicken
Take one seasoned chicken cutlet and dredge it thoroughly in the flour, shaking off any excess. Next, dip it into the egg mixture, making sure it’s completely coated, and then press it into the panko mixture, ensuring an even and generous coating. Repeat this for each cutlet, placing them on a plate in a single layer until you’re ready to fry.
Step 4: Fry Chicken
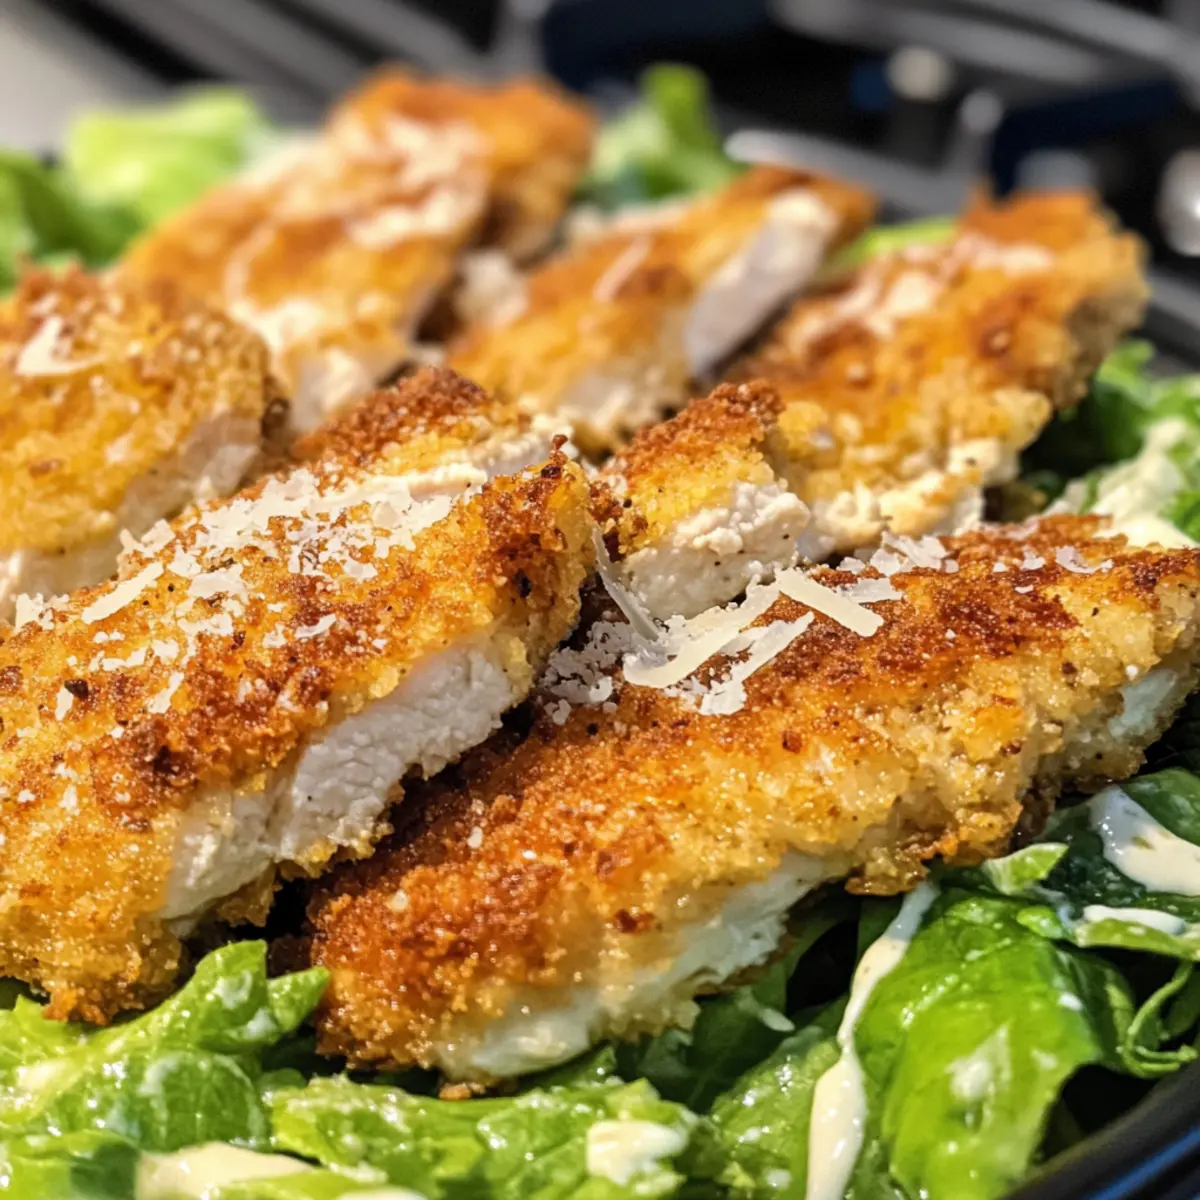
In a large skillet, heat about ¼ inch of olive oil over medium-high heat until it shimmers—this typically takes just a couple of minutes. Carefully add the breaded cutlets in a single layer, ensuring not to overcrowd the pan. Fry for 3-4 minutes on each side or until they turn golden brown and crispy, and the internal temperature reaches 165°F. Transfer the cooked cutlets to a plate lined with paper towels to drain any excess oil.
Step 5: Prepare Salad
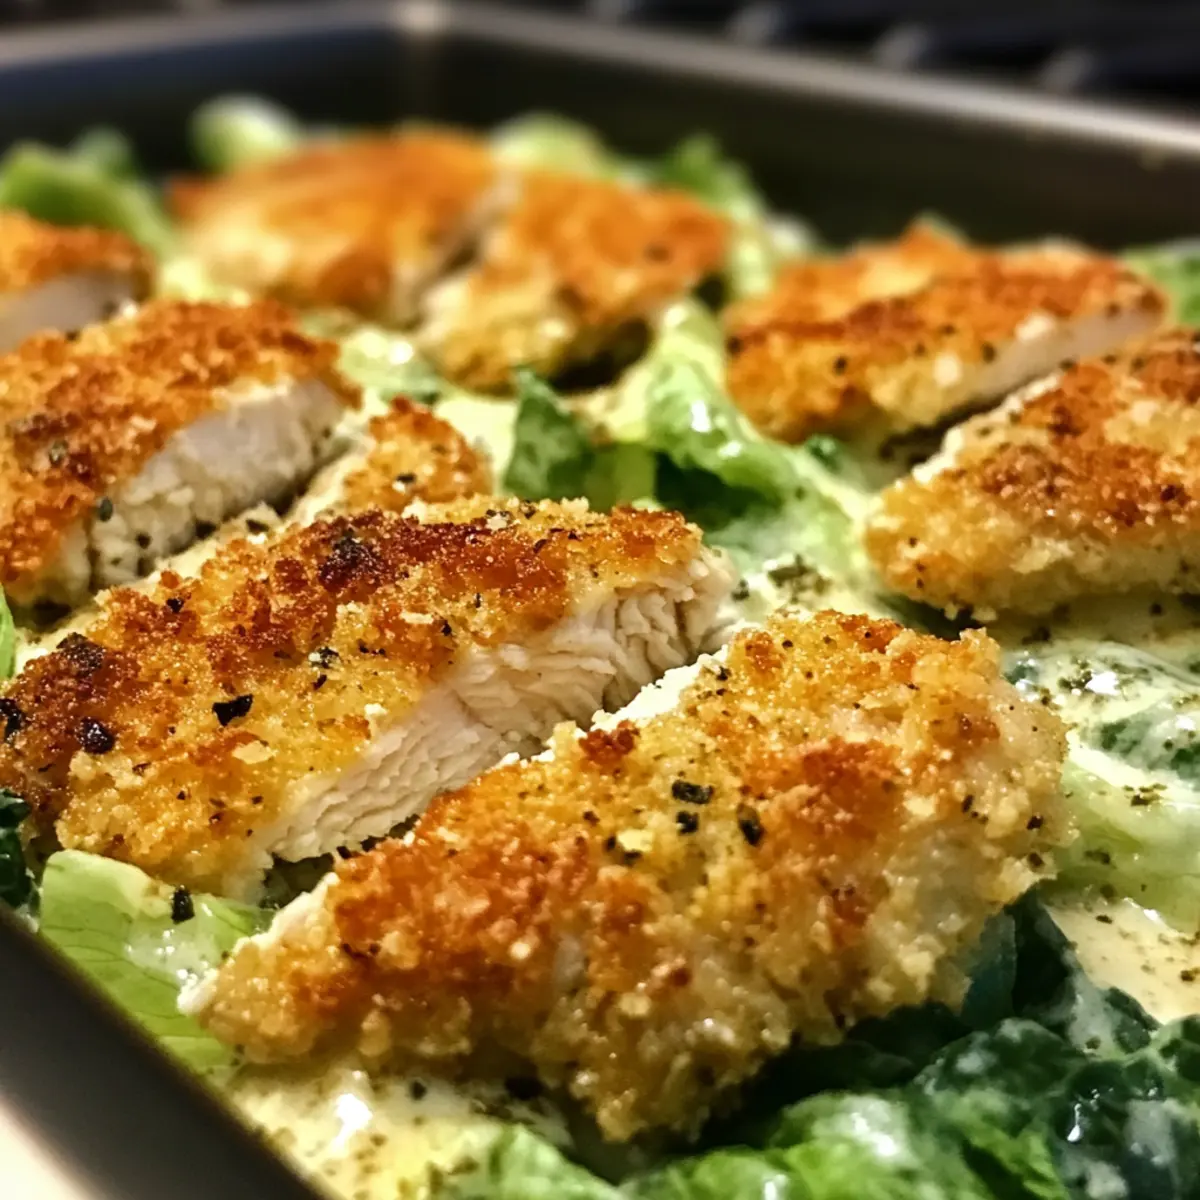
While the chicken is frying, chop the romaine lettuce into bite-sized pieces and place them in a large bowl. Drizzle your favorite Caesar dressing over the lettuce and toss it well until the leaves are evenly coated. Add store-bought or homemade croutons for added crunch, mixing them in gently so they don’t break apart.
Step 6: Serve
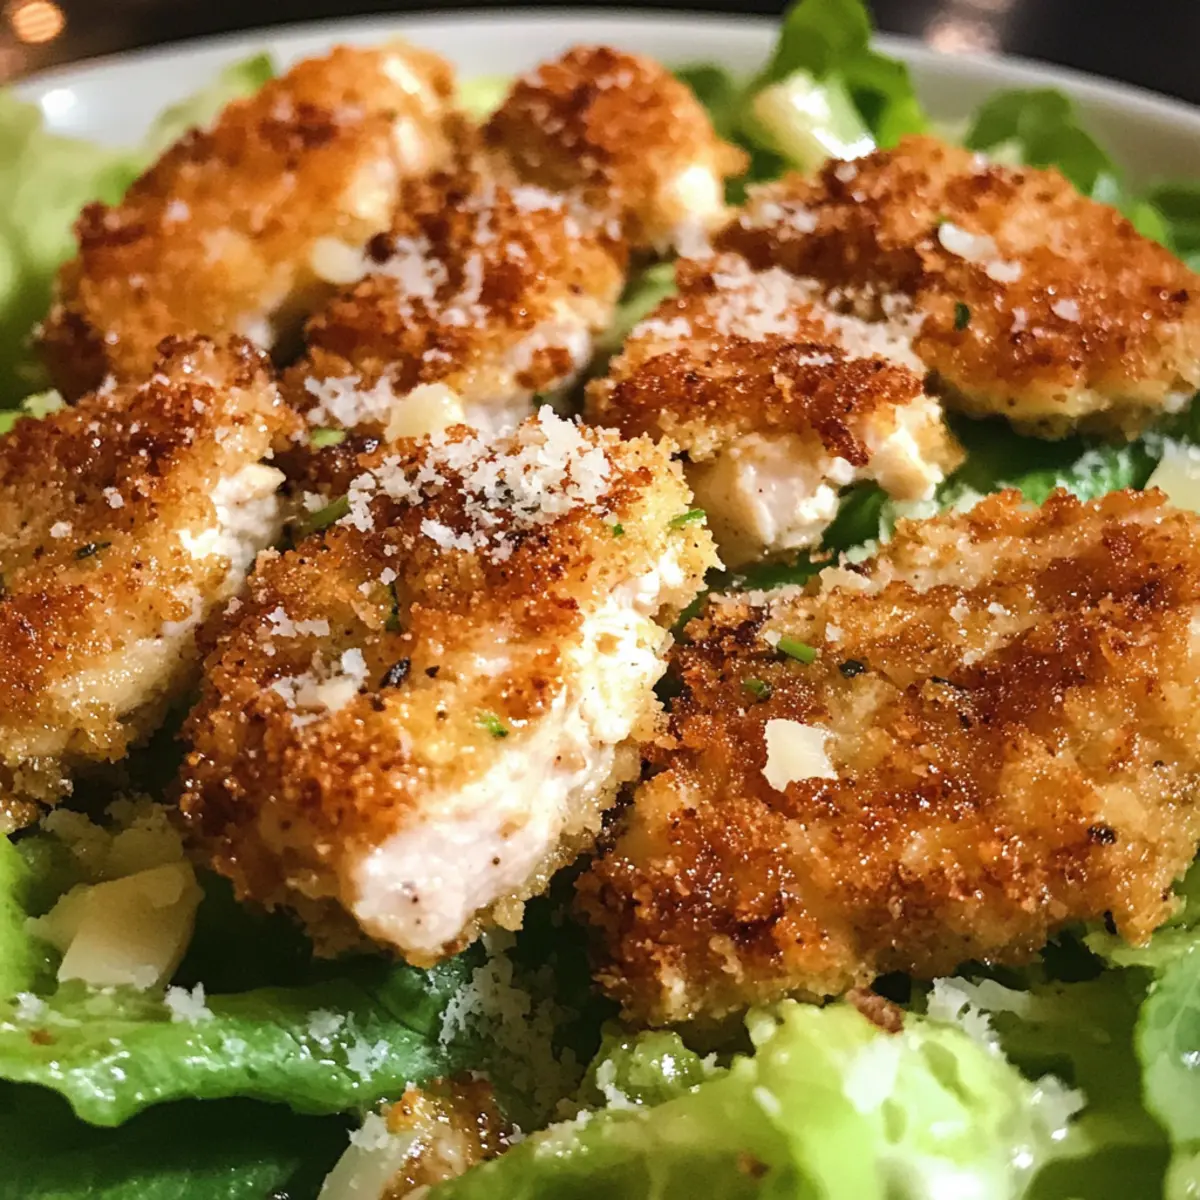
To plate up your Crispy Chicken Caesar Cutlets, place a generous portion of the tossed salad on each serving plate. Top the salad with the freshly fried chicken cutlets and sprinkle with shaved or grated Parmesan cheese for that final touch. Serve with lemon wedges on the side for a burst of freshness and enjoy this delightful meal!
How to Store and Freeze Crispy Chicken Caesar Cutlets
Fridge: Store cooked cutlets in an airtight container in the fridge for up to 3 days. This helps maintain their delicious flavor and texture.
Freezer: For longer storage, freeze the cutlets in a single layer on a baking sheet. Once frozen, transfer to a freezer-safe bag for up to 3 months.
Reheating: To reheat, place cutlets in an oven preheated to 375°F for about 10-15 minutes or until heated through, ensuring they stay crispy.
Make-Ahead Tips: You can bread the cutlets in advance and refrigerate them—just fry before serving for a fresh, quick meal that’s bursting with flavor!
What to Serve with Crispy Chicken Caesar Cutlets
Creating a balanced meal around your crispy chicken cutlets invites enjoyment and satisfaction at the dinner table.
-
Buttery Garlic Bread: This warm, toasted bread is the perfect sidekick, adding a rich flavor that complements the Caesar dressing beautifully. The buttery goodness enhances each bite of chicken.
-
Roasted Vegetables: A mix of seasonal veggies, roasted until tender, adds vibrant color and nutrition to your plate. Their caramelized edges and earthy flavors underscore the bright, zesty notes of the cutlets.
-
Creamy Mashed Potatoes: Soft and comforting, these mashed potatoes provide a silky texture that contrasts superbly with the crispy cutlets. A drizzle of warm gravy can amplify the experience, turning dinner into a feast.
-
Classic Caesar Salad: For a fresh and crunchy accompaniment, stick with tradition. The crispness of romaine and flavor of Caesar dressing keeps the meal cohesive and refreshing.
-
Herb Quinoa: Light and nutty, quinoa adds a wholesome touch while soaking up the delightful flavors of your cutlets. Toss it with fresh herbs and lemon juice for an extra zing.
-
Sparkling Water with Lemon: Refreshing bubbles and a citrus splash cleanse the palate between bites, balancing the richness of your meal and enhancing the dining experience.
-
Lemon Sorbet: As a delightful dessert to complete the meal, this light and tangy treat cleanses the palate. It’s the perfect ending, leaving you feeling refreshed and satisfied.
Crispy Chicken Caesar Cutlets Variations
Feel free to get creative and personalize your dish with delightful twists and substitutions!
-
Eggplant Replacement: Replace chicken with eggplant slices for a satisfying vegetarian version that’s still crispy and flavorsome.
Just slice, coat, and fry as you would the chicken for an equally delicious option. -
Gluten-Free Flour: Swap all-purpose flour with gluten-free flour for a friendly option for those with gluten sensitivities.
Your cutlets will still achieve that golden color and delightful crunch. -
Aquafaba Magic: For a vegan twist, use aquafaba in place of eggs, binding your coating while keeping everything plant-based.
You’ll be amazed at how wonderful they turn out! -
Flavored Breadcrumbs: Opt for spiced or herbed breadcrumbs instead of plain panko for an extra punch of flavor.
This little change can elevate your cutlets to a whole new level of deliciousness! -
Smoked Paprika Kick: Try smoked paprika instead of regular for a deeper, smokier flavor profile in your cutlets.
This gives a subtle depth that pairs beautifully with the Caesar dressing! -
Veggie-Salad Medley: Enhance the salad by adding extra vegetables like chopped cucumbers, cherry tomatoes, or red onions for added freshness and crunch.
These vibrant flavors and textures complement the crispiness of the cutlets perfectly. -
Spicy Kick: Mix some cayenne pepper into your panko for an exciting heat level.
This will wake up your taste buds in a delightful way! -
Dairy-Free Option: Omit the cheese and substitute nutritional yeast in the coating for a vegan cheese flavor.
It’s a perfect way to maintain that cheesiness without the dairy!
For those craving another family favorite, check out my recipe for Ground Chicken Broccoli Stir-Fry or treat yourself with Buffalo Chicken Macaroni! Your kitchen will be bustling with delicious options!
Make Ahead Options
These Crispy Chicken Caesar Cutlets are perfect for meal prep enthusiasts! You can season and bread the chicken cutlets up to 24 hours in advance. Simply prepare them as instructed, then place the breaded cutlets on a parchment-lined baking sheet and refrigerate. This helps to maintain their crispy texture when cooked. When you’re ready to enjoy, simply heat oil in a skillet and fry them as directed—this will ensure they stay golden and delicious. The salad components, like chopped romaine and croutons, can also be prepared up to 3 days ahead; just store them separately in airtight containers for optimal freshness. Enjoy restaurant-quality flavors with minimal effort on busy nights!
Expert Tips for Crispy Chicken Caesar Cutlets
-
Check the Oil Temperature: Ensure the oil is hot enough before adding the cutlets; otherwise, they may absorb too much oil and become soggy.
-
Use a Meat Thermometer: For perfectly cooked chicken, keep a meat thermometer on hand. Aim for an internal temperature of 165°F to guarantee safety and juiciness.
-
Avoid Pan Overcrowding: Fry in batches if necessary; overcrowding can lead to uneven cooking and less crispy cutlets.
-
Panko Breadcrumbs Are Key: Opt for panko breadcrumbs for maximum crunch. They create that signature crispy texture that elevates your Crispy Chicken Caesar Cutlets.
-
Experiment with Seasoning: Don’t hesitate to play with spices in the panko mixture, such as Italian seasoning or cayenne, for additional flavor depth.
-
Quick Salad Prep: Prepare the salad while the chicken fries to save time; tossing the romaine with dressing ahead ensures a fresh and crisp bite every time.
Crispy Chicken Caesar Cutlets Recipe FAQs
How do I choose the best chicken breasts for my cutlets?
Absolutely! When selecting chicken breasts, look for ones that are firm to the touch and without any dark spots or bruises. Fresh, high-quality cutlets will make all the difference in flavor and tenderness. If you can, opt for organic or free-range options for a richer taste.
What are the best storage methods for leftover cutlets?
Cooked cutlets can be stored in an airtight container in the fridge for up to 3 days. For optimal freshness, make sure they are completely cooled before storing to avoid moisture build-up. To reheat, place them in an oven preheated to 375°F for about 10-15 minutes until they’re heated through and crispy again.
Can I freeze the crispy chicken cutlets?
Yes, you can! To freeze, first place the cooked cutlets in a single layer on a baking sheet lined with parchment paper and freeze them until solid, about 1-2 hours. Then, transfer them to a freezer-safe bag or container. They can be stored in the freezer for up to 3 months. For reheating, bake them directly from frozen at 375°F for 15-20 minutes.
What should I do if my cutlets turn out soggy?
Very! If your cutlets are soggy, it could be due to the oil not being hot enough when frying. Ensure the oil shimmers before adding the cutlets. You can also drain them on paper towels after frying to remove extra grease. For an added crunch, try frying in smaller batches to maintain the oil temperature.
Are there any dietary considerations I should be aware of with this recipe?
This recipe is quite versatile! If you have a gluten allergy, you can substitute all-purpose flour and panko breadcrumbs with gluten-free alternatives. Additionally, to make it vegan, replace chicken with eggplant or cauliflower, use aquafaba for eggs, and nutritional yeast as a cheese substitute. Just remember to check ingredient labels for hidden allergens!

Crispy Chicken Caesar Cutlets for a Quick Flavor Packed Feast
Ingredients
Equipment
Method
- Season the chicken breasts with kosher salt and black pepper on both sides.
- Set up your breading stations with flour, the egg mixture, and the panko mixture.
- Dredge each seasoned chicken cutlet in the flour, dip in the egg mixture, and then coat in the panko mixture.
- In a skillet, heat olive oil over medium-high heat and fry the breaded cutlets until golden brown, about 3-4 minutes per side.
- Chop the romaine lettuce, toss with Caesar dressing, and add croutons for crunch.
- To serve, place salad on plates, top with chicken cutlets, and sprinkle with Parmesan. Serve with lemon wedges.