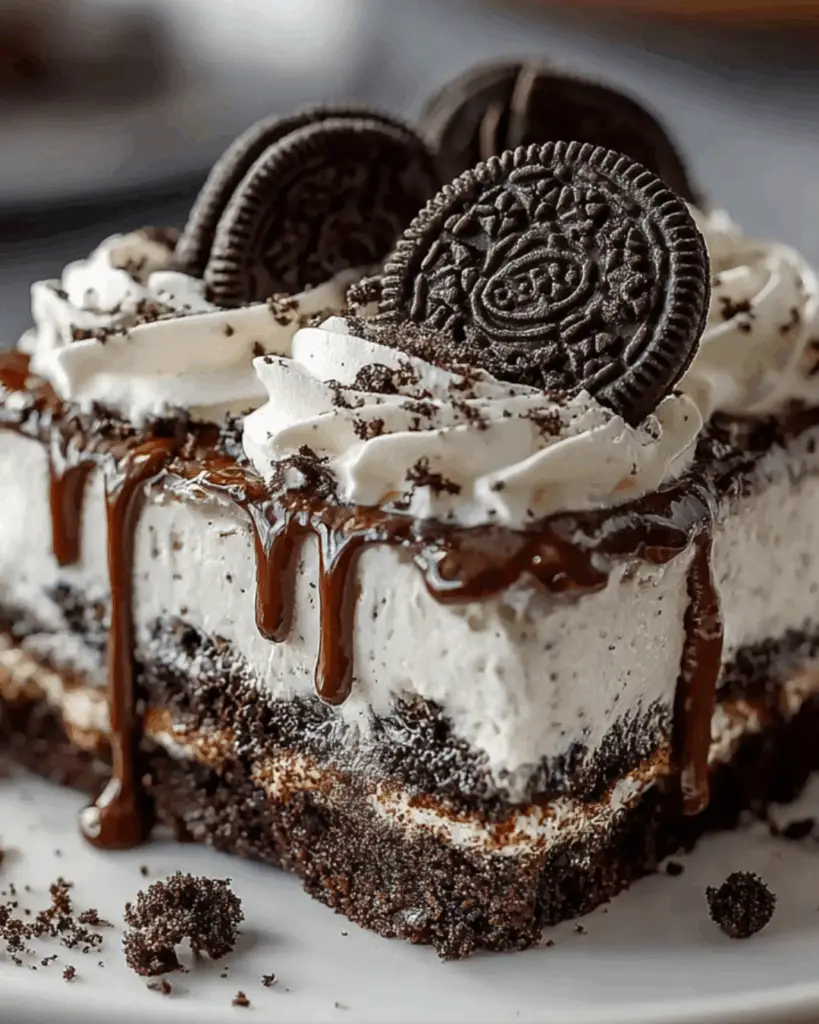
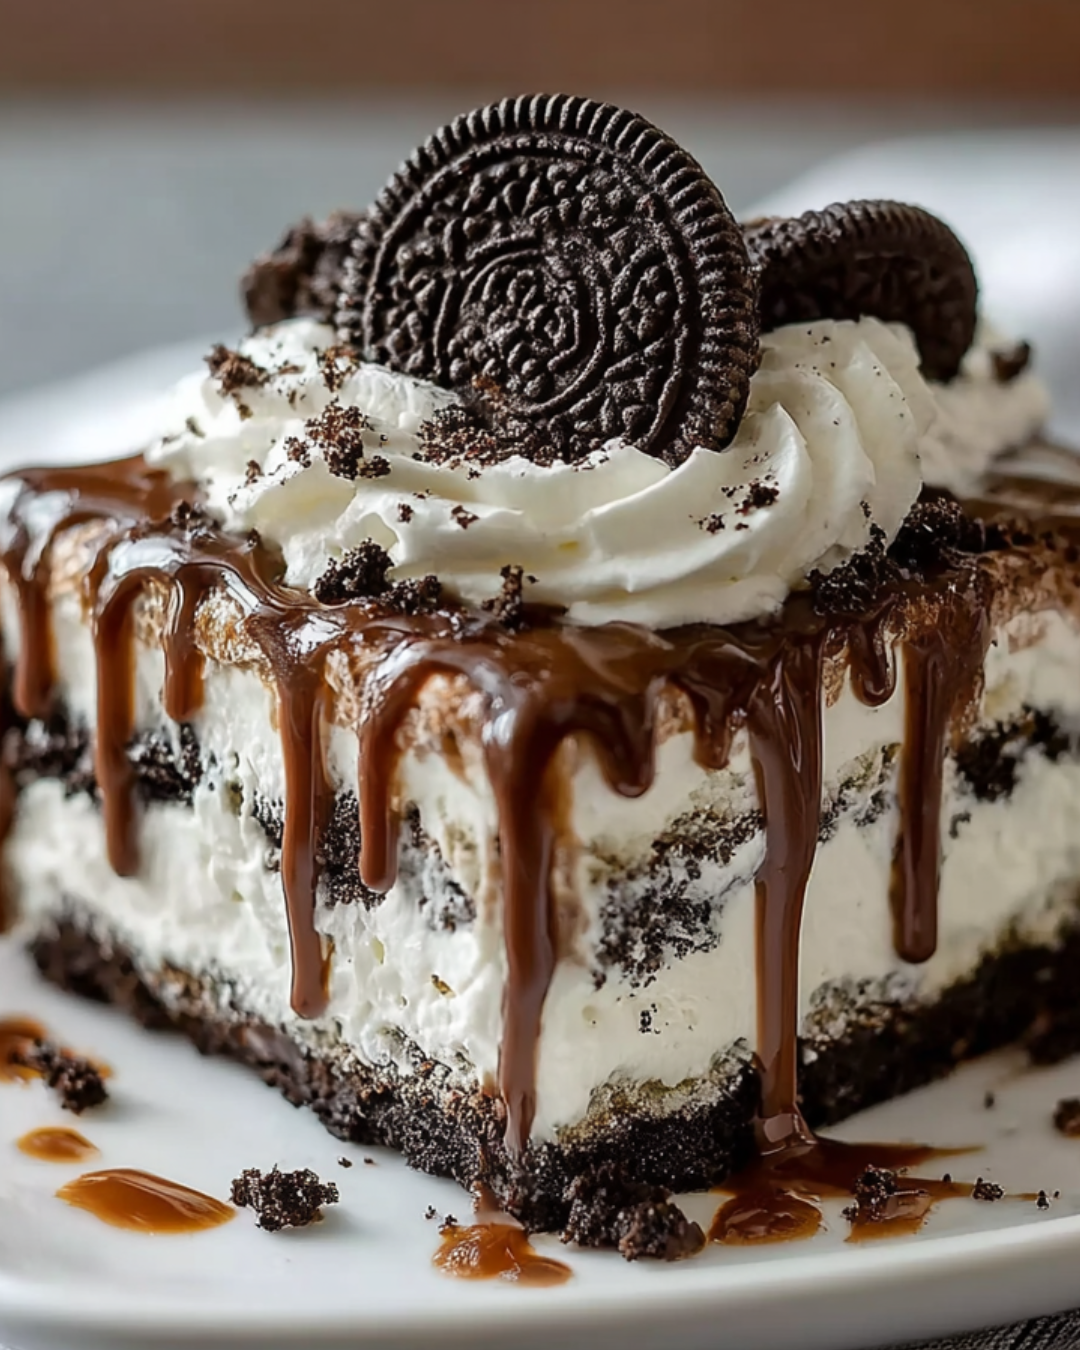
Introduction to Easy No Bake Oreo Lush Dessert
There’s something magical about desserts that require no baking, especially when they involve Oreos. The Easy No Bake Oreo Lush Dessert is a delightful treat that brings back memories of family gatherings and summer picnics. It’s the kind of dessert that makes you feel like a culinary rock star without spending hours in the kitchen. Perfect for busy days or when you want to impress your friends, this layered delight combines creamy textures and rich flavors. Trust me, once you serve this, you’ll be the hero of the dessert table!
Why You’ll Love This Easy No Bake Oreo Lush Dessert
This Easy No Bake Oreo Lush Dessert is a game-changer for anyone who loves sweet treats but hates the hassle of baking. It’s quick to whip up, taking just 20 minutes of your time, and the layers of creamy goodness will have your taste buds dancing. Plus, it’s a crowd-pleaser! Whether it’s a family dinner or a casual get-together, this dessert is sure to impress without breaking a sweat.
Ingredients for Easy No Bake Oreo Lush Dessert
Gathering the right ingredients is the first step to creating this delicious masterpiece. Here’s what you’ll need:
- Oreo cookies: The star of the show! These chocolatey delights form the base and add a rich flavor.
- Unsalted butter: This helps bind the crushed Oreos together for a sturdy crust.
- Cream cheese: Softened to perfection, it adds a creamy texture and tangy flavor to the dessert.
- Powdered sugar: Sweetens the cream cheese layer, making it irresistibly smooth.
- Whipped topping: Light and airy, it gives the dessert a fluffy finish. You can use Cool Whip or any similar brand.
- Instant vanilla pudding mix: This thickens the pudding layer and adds a sweet vanilla flavor.
- Milk: Essential for mixing with the pudding to achieve that perfect consistency.
- Additional whipped topping: For the final layer, it adds a beautiful finish and extra creaminess.
- Crushed Oreo cookies: Reserved for garnish, these add a delightful crunch on top.
For those looking to mix things up, consider using chocolate Oreo cookies for a richer flavor. You can also add a layer of fresh strawberries or raspberries for a fruity twist. All ingredient quantities are listed at the bottom of the article for easy printing!
How to Make Easy No Bake Oreo Lush Dessert
Creating the Easy No Bake Oreo Lush Dessert is a breeze! Follow these simple steps, and you’ll have a stunning dessert ready to impress. Let’s dive into the deliciousness!
Step 1: Prepare the Oreo Crust
Start by crushing the Oreo cookies. You can use a food processor for a fine crumb or place them in a zip-top bag and smash them with a rolling pin. Once crushed, mix the Oreos with melted butter until well combined. This mixture will form the crust, so press it firmly into the bottom of a 9×13 inch baking dish. Make sure it’s even and compact for the best results!
Step 2: Make the Cream Cheese Layer
In a medium bowl, beat the softened cream cheese and powdered sugar together until smooth and creamy. This step is crucial for achieving that luscious texture. Once combined, gently fold in 1 cup of whipped topping. This will lighten the mixture, making it airy and delightful. Spread this creamy layer evenly over the prepared Oreo crust, ensuring every bite will be rich and satisfying.
Step 3: Prepare the Pudding Layer
In another bowl, whisk together the instant vanilla pudding mix and milk for about 2 minutes. You want it to thicken nicely, creating a luscious layer. Once thickened, carefully spread the pudding mixture over the cream cheese layer. This adds a sweet, velvety texture that complements the other layers perfectly. Take your time to ensure it’s evenly distributed for a beautiful finish!
Step 4: Assemble the Dessert
Now it’s time to bring it all together! Top the pudding layer with the remaining cup of whipped topping, smoothing it out evenly. This fluffy layer adds a lightness that balances the richness below. Finally, sprinkle the reserved crushed Oreo cookies on top for garnish. This not only looks great but adds a delightful crunch to each bite!
Step 5: Chill and Serve
Cover the dish with plastic wrap and refrigerate for at least 4 hours, or overnight if you can wait! Chilling is essential for allowing the layers to set properly, making it easier to slice and serve. When you’re ready to enjoy, cut into squares and watch everyone’s eyes light up. This dessert is a showstopper!
Tips for Success
- Use room temperature cream cheese for easier mixing and a smoother texture.
- Don’t skip the chilling time; it’s crucial for the layers to set properly.
- For a fun twist, try adding a layer of your favorite fruit between the cream cheese and pudding layers.
- Keep extra crushed Oreos on hand for a last-minute garnish before serving.
- Feel free to experiment with different flavored pudding mixes for variety!
Equipment Needed
- 9×13 inch baking dish: A standard size for this dessert; any similar-sized dish will work.
- Mixing bowls: Use a medium bowl for the cream cheese layer and a larger one for the pudding.
- Food processor or rolling pin: For crushing Oreos; a zip-top bag works too!
- Whisk: Essential for mixing the pudding and milk smoothly.
- Plastic wrap: To cover the dessert while it chills in the fridge.
Variations
- Chocolate Lovers: Swap regular Oreos for chocolate Oreos to intensify the chocolate flavor.
- Fruity Delight: Add a layer of sliced strawberries or raspberries between the cream cheese and pudding layers for a refreshing twist.
- Nutty Crunch: Incorporate crushed nuts, like walnuts or pecans, into the crust for added texture and flavor.
- Gluten-Free Option: Use gluten-free Oreo cookies to make this dessert suitable for those with gluten sensitivities.
- Vegan Version: Substitute cream cheese with a vegan alternative and use coconut whipped cream instead of regular whipped topping.
Serving Suggestions
- Pair with a scoop of vanilla ice cream for an extra creamy experience.
- Serve alongside fresh berries for a pop of color and flavor.
- Drizzle chocolate or caramel sauce on top for added indulgence.
- Garnish with mint leaves for a refreshing touch.
- Present in individual cups for a fun, personal serving style.
FAQs about Easy No Bake Oreo Lush Dessert
Can I make this dessert ahead of time?
Absolutely! The Easy No Bake Oreo Lush Dessert is perfect for making ahead. Just prepare it the day before and let it chill overnight. This allows the flavors to meld beautifully.
How long can I store leftovers?
You can store leftovers in the refrigerator for up to 3 days. Just make sure to cover it well to keep it fresh. The layers will still taste delicious!
Can I use a different type of pudding mix?
Yes! Feel free to experiment with different flavors of instant pudding mix. Chocolate, butterscotch, or even cheesecake pudding can add a fun twist to your no bake dessert.
Is this dessert suitable for kids?
<pDefinitely! Kids love the creamy layers and the crunchy Oreo topping. Just be mindful of any allergies, especially with the cream cheese and whipped topping.
Can I freeze the Easy No Bake Oreo Lush Dessert?
While it’s best enjoyed fresh, you can freeze it for up to a month. Just make sure to wrap it tightly. Thaw it in the fridge before serving for the best texture.
Final Thoughts
The Easy No Bake Oreo Lush Dessert is more than just a sweet treat; it’s a celebration of simplicity and flavor. Each layer tells a story, from the crunchy Oreo crust to the creamy filling that melts in your mouth. This dessert brings people together, whether it’s a family gathering or a casual get-together with friends. The joy of serving something so delicious without the fuss of baking is truly rewarding. So, roll up your sleeves, gather your ingredients, and create a dessert that will leave everyone asking for seconds. Trust me, you won’t regret it!
PrintEasy No Bake Oreo Lush Dessert That You Can Make Today!
- Total Time: 4 hours 20 minutes
- Yield: 12 servings
- Diet: Vegetarian
Description
A delicious and easy no-bake dessert made with layers of Oreo cookies, cream cheese, and vanilla pudding.
Ingredients
- 1 package (15.25 oz) Oreo cookies
- 1/2 cup unsalted butter, melted
- 8 oz cream cheese, softened
- 1 cup powdered sugar
- 1 cup whipped topping (like Cool Whip)
- 1 package (3.4 oz) instant vanilla pudding mix
- 2 cups milk
- 1 cup whipped topping (for topping)
- 1/2 cup crushed Oreo cookies (for garnish)
Instructions
- Crush the Oreo cookies in a food processor or by placing them in a zip-top bag and using a rolling pin until finely crushed. Reserve 1/2 cup for garnish.
- In a medium bowl, combine the crushed Oreo cookies with melted butter. Mix until well combined, then press the mixture into the bottom of a 9×13 inch baking dish to form the crust.
- In a large bowl, beat the softened cream cheese and powdered sugar together until smooth and creamy. Fold in 1 cup of whipped topping until well combined. Spread this mixture evenly over the Oreo crust.
- In another bowl, whisk together the instant vanilla pudding mix and milk for about 2 minutes until thickened. Spread the pudding mixture over the cream cheese layer.
- Top the pudding layer with the remaining 1 cup of whipped topping, smoothing it out evenly.
- Sprinkle the reserved crushed Oreo cookies on top for garnish.
- Cover the dish with plastic wrap and refrigerate for at least 4 hours, or overnight, to allow the layers to set properly.
Notes
- For a chocolate twist, use chocolate Oreo cookies instead of regular Oreos.
- Add a layer of sliced strawberries or raspberries between the cream cheese and pudding layers for a fruity variation.
- Prep Time: 20 minutes
- Cook Time: 0 minutes
- Category: Dessert
- Method: No Bake
- Cuisine: American
Nutrition
- Serving Size: 1 slice
- Calories: 250
- Sugar: 10g
- Sodium: 200mg
- Fat: 15g
- Saturated Fat: 8g
- Unsaturated Fat: 7g
- Trans Fat: 0g
- Carbohydrates: 22g
- Fiber: 1g
- Protein: 3g
- Cholesterol: 30mg