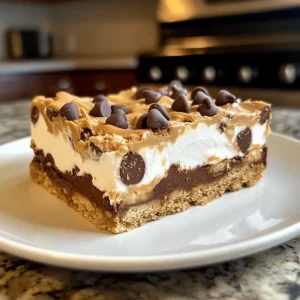
As the scent of melted chocolate and peanut butter wafted through my kitchen, I felt a wave of nostalgia wash over me. Those childhood days spent savoring a classic Fluffernutter sandwich inspired me to create these scrumptiously indulgent Fluffernutter Bars. With layers of gooey marshmallow fluff, rich peanut butter cups, and an easy, no-bake cookie base, this recipe brings the beloved flavors of that sandwich to life in a delightful dessert. Not only are they incredibly simple to whip up, but these bars also make for the perfect crowd-pleaser at get-togethers, ensuring there are no leftovers! So, are you ready to dive into this sweet little adventure and recreate a timeless treat?

Why Are These Fluffernutter Bars Irresistible?
Layers of Flavor: Every bite features creamy, sticky marshmallow fluff, rich peanut butter, and a decadent cookie base that creates a symphony of taste.
No-Bake Convenience: No oven? No problem! These bars are super easy to make with minimal effort, letting you whip up dessert in no time.
Childhood Nostalgia: Bringing back fond memories of the classic Fluffernutter sandwich, they are sure to charm both young and old alike.
Adaptable Delight: Whether you prefer dark chocolate chips or a dash of sea salt on top, there’s room for your creativity!
Perfect for sharing, these bars are a definite crowd-pleaser, making them a great addition alongside treats like Cranberry Crumble Bars or Brulee Cheesecake Bars.
Fluffernutter Bars Ingredients
For the Cookie Base
- Butter – Provides richness and moisture; use softened butter for easier blending.
- Peanut Butter – Adds flavor and creaminess; regular peanut butter is recommended, as natural varieties can separate.
- Brown Sugar – Supplies sweetness and moisture; can substitute with coconut sugar for a different flavor.
- Egg – Acts as a binder for the cookie dough; ensure the egg is at room temperature for even mixing.
- Vanilla Extract – Enhances the overall flavor; use pure vanilla extract for the best taste.
- All-Purpose Flour – Provides structure to the cookie dough; gluten-free flour blends can be used as an alternative.
For the Filling
- Peanut Butter Cups – Adds delicious bits of chocolate and peanut butter; adjust quantity for a more intense flavor.
- Chocolate Chips – Introduces extra chocolate richness; use milk or dark chocolate chips based on preference.
- Marshmallow Creme or Fluff – Forms a creamy layer; if using regular marshmallows, melt and spread thinly instead.
With these ingredients, you will create Fluffernutter Bars that are not only indulgent but also brings back the joy of childhood!
Step‑by‑Step Instructions for Fluffernutter Bars
Step 1: Preheat and Prepare the Pan
Begin by preheating your oven to 350°F (175°C). While it heats up, take an 8×11 inch baking pan and line it with parchment paper, ensuring the paper hangs over the edges for easy removal later. This prevents the Fluffernutter Bars from sticking and makes clean-up a breeze.
Step 2: Cream the Butter and Sugar
In a large mixing bowl, combine 1 cup of softened butter with 1 cup of brown sugar. Using an electric mixer, cream the mixture on medium speed for about 3 minutes until it’s light and fluffy. This step is crucial as it creates a base for your Fluffernutter Bars that is both rich and airy.
Step 3: Add the Peanut Butter and Egg
Next, add in 1 cup of peanut butter, 1 egg, and 1 teaspoon of vanilla extract to the creamed mixture. Mix on low speed until all the ingredients are combined smoothly. The mixture should have a uniform texture, indicating that the flavors are well incorporated into your cookie base.
Step 4: Incorporate the Flour and Chocolate
Gradually add 2 cups of all-purpose flour into the batter, mixing until just combined. Once it reaches a dough-like consistency, gently fold in 1 cup of chocolate chips using a spatula. This will deliver delightful pockets of chocolate throughout your Fluffernutter Bars that complement the other flavors perfectly.
Step 5: Press the Dough into the Pan
Take 2/3 of the cookie dough and press it evenly into the bottom of your prepared baking pan. It’s important to compact the dough so that it forms a solid base for your Fluffernutter Bars. Make sure the dough is evenly spread to ensure uniform baking and texture across the bars.
Step 6: Add the Marshmallow Fluff
Spread a generous layer of marshmallow fluff over your cookie base, filling every corner of the pan for that delightful, sticky goodness. For an extra treat, you can also sprinkle chopped peanut butter cups over the fluff for added richness and flavor.
Step 7: Layer with Peanut Butter Cups
Following the marshmallow fluff, layer the peanut butter cups over the fluff. Distribute them evenly across the surface, ensuring that each bar will be filled with delicious chunks of chocolate and peanut butter when sliced.
Step 8: Top with Remaining Dough
Now, take the remaining cookie dough and gently spread it over the top of the peanut butter cups. Press lightly to create an even layer, ensuring some peanut butter cups stay visible for eye-catching appeal. This top layer will provide a wonderful contrast to the gooey filling beneath.
Step 9: Bake the Bars
Slide the pan into your preheated oven and bake for 25 minutes. Keep an eye on them; they should turn a lovely golden brown around the edges while still appearing soft in the center. This slight underbaking will ensure your Fluffernutter Bars remain chewy and irresistible.
Step 10: Cool and Slice
Once baked, remove the pan from the oven and let it cool in the pan for about 1 hour. This cooling period allows the bars to set properly. Afterward, lift the bars out using the parchment paper, place them on a cooling rack, and let them cool completely before slicing into squares. This patience pays off with perfectly formed Fluffernutter Bars!

Make Ahead Options
These Fluffernutter Bars are a fantastic option for meal prep, saving you time for busy weeknights! You can prepare the cookie base and layer it with marshmallow fluff up to 24 hours in advance. Simply press the cookie dough into the pan, spread the marshmallow fluff, and refrigerate until ready to bake. This keeps the bars fresh while enhancing the flavors. The bars can also be baked ahead of time and stored in an airtight container at room temperature for up to 3 days. When you’re ready to serve, just slice and enjoy, or warm them slightly for that fresh-out-of-the-oven taste. Your family will love the homemade goodness of these Fluffernutter Bars, even on your busiest days!
What to Serve with Fluffernutter Bars?
Set the stage for a delightful dessert spread with tasty additions that complement the ooey-gooey goodness of your Fluffernutter Bars.
-
Creamy Vanilla Ice Cream: A scoop of this creamy treat balances the sweetness and adds a delightful contrast to the warm bars. Just imagine each bite melting together with the rich flavors!
-
Fresh Fruit Salad: Bright, juicy fruits like strawberries and bananas provide a refreshing contrast, cutting through the richness of the bars for a light finish.
-
Chocolate Dipped Strawberries: These sweet, chocolate-covered gems mirror the bars’ flavors while offering a delightful crunch, ensuring your dessert table dazzles.
-
Peanut Butter Milkshake: Combine decadence and nostalgia with this creamy shake made of vanilla ice cream and peanut butter. It’s like bringing the flavors of Fluffernutter Bars into a glass!
-
Caramel Sauce Drizzle: A simple drizzle of homemade or store-bought caramel enhances the bars’ flavors, adding an inviting, gooey contrast that you can’t resist.
-
Coffee or Espresso: A cup of brewed coffee or espresso pairs beautifully, the rich bitterness balancing the sweetness and enhancing the chocolate and peanut butter notes.
Transform your dessert experience with these delightful pairings, ensuring that your Fluffernutter Bars steal the show!
How to Store and Freeze Fluffernutter Bars
Room Temperature: Keep Fluffernutter Bars in an airtight container at room temperature for up to 2-3 days. This will preserve their ooey-gooey texture and rich flavors.
Fridge: For a firmer texture, refrigerate the bars in an airtight container for up to 5 days. Chilling enhances their shape and makes slicing much easier.
Freezer: You can freeze these delicious bars for up to 3 months. Wrap individual squares tightly in plastic wrap and then place them in a freezer bag to prevent freezer burn.
Reheating: When ready to enjoy, let thaw in the fridge overnight or at room temperature for a couple of hours. For a gooey treat, warm them in the microwave for 10-15 seconds!
Fluffernutter Bars Variations & Substitutions
Feel free to explore these delightful twists and substitutions to make these Fluffernutter Bars truly your own!
- Nut-Free: Swap peanut butter for sunflower seed butter to cater to nut allergies.
- Gluten-Free: Use a gluten-free flour blend to make these bars suitable for gluten-sensitive friends.
- Chocolate Choices: Experiment with dark or white chocolate chips for a different flavor profile.
- Flavored Peanut Butter: Try using flavored peanut butter, such as cinnamon or honey, for a unique taste.
- Extra Crunch: Add crushed pretzels or graham crackers to the dough for a delightful crunch.
- Sea Salt Finish: A sprinkle of flaky sea salt on top enhances the sweet and salty contrast beautifully.
- Layered Treats: Create a third layer with caramel or fudge spread for an extra indulgent treat.
- Caramel Drizzle: Drizzle warm caramel sauce over the finished bars for an irresistible sweet finish.
Just like these bars, baking is all about mixing flavors and memories, reminiscent of those childhood moments enjoying a classic Cranberry Crumble Bars or a rich slice of Brulee Cheesecake Bars. So, get creative and enjoy each scrumptious bite!
Expert Tips for Fluffernutter Bars
- Don’t Overbake: Aim for golden edges and a slightly soft center for the best texture; overbaking leads to dry bars.
- Use Room Temperature Ingredients: Ensure your butter, egg, and peanut butter are at room temperature for easier mixing and better consistency in your Fluffernutter Bars.
- Cookie Dough Shortcut: If pressed for time, use pre-made cookie dough as the base to make this recipe even simpler and faster.
- Chill Before Cutting: Refrigerate the bars for about 30 minutes after cooling to make slicing easier and achieve cleaner edges.
- Store Properly: Keep any leftovers in an airtight container at room temperature for up to 2-3 days to maintain freshness and texture.

Fluffernutter Bars Recipe FAQs
How do I choose the right peanut butter for Fluffernutter Bars?
Absolutely! For the best results, use regular peanut butter as it provides the desired consistency and flavor. Natural peanut butter can separate and might result in a less creamy texture in your bars. A good rule of thumb is to look for a brand that uses just peanuts and salt for that classic taste!
What is the best way to store leftover Fluffernutter Bars?
You can store Fluffernutter Bars in an airtight container at room temperature for up to 2-3 days. This helps retain their delightful gooeyness. For optimal freshness, I often recommend refrigerating them for a firmer texture, allowing you to slice them more easily. They can be stored this way for up to 5 days.
Can I freeze Fluffernutter Bars, and how should I do it?
Absolutely, you can freeze these delicious bars! To do this, wrap individual squares tightly in plastic wrap, making sure to eliminate as much air as possible. Next, place them in a freezer bag to prevent freezer burn. They can stay fresh in the freezer for up to 3 months. When you’re ready to enjoy them, let them thaw in the fridge overnight or at room temperature for a couple of hours before serving. For a delightful treat, pop them in the microwave for 10-15 seconds for that warm, gooey goodness!
What should I do if my Fluffernutter Bars turn out too crumbly?
Very good question! If your bars end up crumbly, it’s likely because the dough was overmixed or there wasn’t enough moisture. To fix this, ensure your butter and peanut butter are adequately softened before mixing. You could also add a splash of milk to the dough to help bring it all together. If it seems too dry as you mix, adding in a little extra melted butter can also make a big difference!
Are there any dietary considerations for Fluffernutter Bars?
Yes, definitely! If you’re accommodating allergies, you can easily swap out the peanut butter for almond butter or sun butter for a nut-free version. Be sure to check the labels on all ingredients to avoid any allergens. Additionally, for gluten-free options, using a gluten-free flour blend can work wonders without sacrificing flavor. Enjoy guilt-free!
Can pets eat any of the ingredients in Fluffernutter Bars?
Not at all! It’s best to keep these delicious bars away from pets. Chocolate, peanut butter, and sugar can be harmful to dogs and other pets. Always ensure that your sweet treats are stored out of their reach, and instead, offer them pet-safe snacks!

Irresistible Fluffernutter Bars for the Ultimate Sweet Indulgence
Ingredients
Equipment
Method
- Preheat your oven to 350°F (175°C) and line an 8x11 inch baking pan with parchment paper.
- Combine 1 cup of softened butter with 1 cup of brown sugar and cream together on medium speed for about 3 minutes.
- Add in 1 cup of peanut butter, 1 egg, and 1 teaspoon of vanilla extract, mixing until smooth.
- Gradually mix in 2 cups of all-purpose flour and fold in 1 cup of chocolate chips.
- Press 2/3 of the dough evenly into the bottom of the prepared baking pan.
- Spread marshmallow fluff over the cookie base, filling every corner.
- Layer peanut butter cups evenly over the fluff.
- Spread the remaining cookie dough on top of the peanut butter cups.
- Bake for 25 minutes, until edges are golden brown and center appears soft.
- Cool in the pan for 1 hour, then lift out and cool completely before slicing.