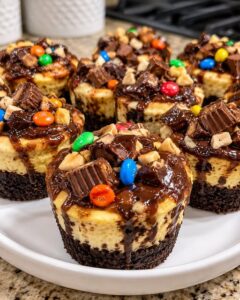
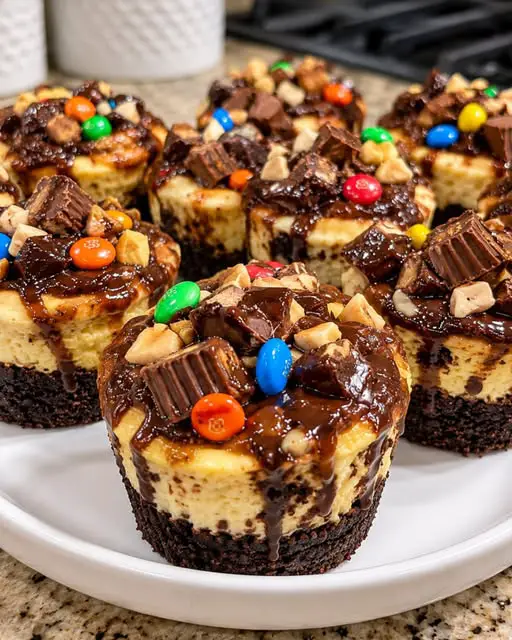
Introduction to Loaded Brownie Cheesecake Cups
There’s something magical about desserts that combine two favorites into one delightful treat. Loaded Brownie Cheesecake Cups are just that—a rich, fudgy brownie base topped with a creamy cheesecake layer.
Whether you’re looking to impress guests or simply satisfy a sweet tooth after a long day, these cups are the perfect solution. They’re easy to whip up and even easier to devour. Plus, who can resist a dessert that’s as fun to make as it is to eat? Let’s dive into this decadent delight that’s sure to become a staple in your dessert repertoire!
Why You’ll Love This Loaded Brownie Cheesecake Cups
These Loaded Brownie Cheesecake Cups are a dream come true for any dessert lover.
They combine the rich, chocolatey goodness of brownies with the creamy texture of cheesecake, creating a flavor explosion in every bite.
Not only are they quick to prepare, but they also look impressive enough to wow your friends and family.
Perfect for gatherings or a cozy night in, these cups are sure to satisfy your sweet cravings!
Ingredients for Loaded Brownie Cheesecake Cups
Creating these Loaded Brownie Cheesecake Cups is a breeze with the right ingredients. Here’s what you’ll need:
- Unsalted butter: This adds richness to the brownie layer. Melt it for a smooth batter.
- Granulated sugar: Sweetens both the brownie and cheesecake layers, balancing the flavors perfectly.
- Eggs: Essential for binding the ingredients together and providing structure.
- Vanilla extract: A must-have for enhancing the overall flavor profile.
- Unsweetened cocoa powder: Gives the brownies their deep chocolate flavor. Opt for high-quality cocoa for the best results.
- All-purpose flour: Helps create a chewy texture in the brownie base.
- Salt: Just a pinch enhances the sweetness and balances the flavors.
- Mini chocolate chips: Optional, but they add extra chocolatey goodness to the brownies.
- Cream cheese: The star of the cheesecake layer, providing that creamy, luscious texture.
- Sour cream: Optional, but it adds an extra layer of creaminess to the cheesecake.
- Semisweet chocolate: Used for the ganache, it adds a rich, glossy finish to your cups.
- Heavy whipping cream: Essential for making the ganache smooth and pourable.
- Caramel sauce: Drizzle it on top for a sweet contrast to the chocolate.
- Crushed chocolate sandwich cookies or brownie crumbs: These make for a delightful crunchy topping.
- Whipped cream: A light and fluffy addition that makes everything feel a bit more indulgent.
- Chopped nuts: Pecans or walnuts add a nice crunch and flavor, but they’re optional.
- Flaky sea salt: A sprinkle on top enhances the sweetness and adds a gourmet touch.
For exact measurements, check the bottom of the article where you can find everything listed for easy printing. Happy baking!
How to Make Loaded Brownie Cheesecake Cups
Prepare the Brownie Base
To kick things off, preheat your oven to 325°F. Grab a 12-cup muffin pan and line it with paper or foil liners.
In a mixing bowl, whisk together the melted unsalted butter and granulated sugar until smooth.
Next, add in the eggs and vanilla extract, mixing until everything is well combined.
Now, gently fold in the cocoa powder, flour, and salt. Be careful not to overmix; just stir until you see no dry flour.
If you’re feeling extra indulgent, toss in some mini chocolate chips for that added chocolatey goodness.
Divide the brownie batter evenly among the liners, using about 1–2 tablespoons per cup.
Bake for 20–25 minutes, until the edges are set but the centers still have a slight jiggle.
Let them cool in the pan for about 30 minutes before moving on to the cheesecake layer.
Make the Cheesecake Filling
Now, let’s create that creamy cheesecake layer! In a separate bowl, beat the softened cream cheese until it’s smooth and free of lumps.
Add the granulated sugar and mix until creamy.
Next, beat in the egg and vanilla extract, ensuring everything is just combined.
If you want an extra creamy texture, stir in the sour cream, but don’t overmix.
The goal is a smooth, velvety filling that will complement the brownie base perfectly.
Once your cheesecake mixture is ready, it’s time to layer it over the brownie base.
This is where the magic happens, so let’s keep going!
Layer and Bake
Spoon the cheesecake mixture over the cooled brownie batter in each liner, filling them about three-quarters full.
This layering creates that beautiful contrast between the rich brownie and creamy cheesecake.
Gently tap the muffin pan on the counter to release any air bubbles trapped in the filling.
Now, it’s time to bake! Place the pan in the oven and bake for 20–25 minutes.
You’ll know they’re done when the cheesecake centers are mostly set but still have a slight jiggle.
Once baked, let them cool in the pan for about 30 minutes.
Then, refrigerate for at least 2 hours until they’re completely chilled.
This chilling time is crucial for the flavors to meld beautifully.
Prepare the Chocolate Ganache
While your cheesecake cups are chilling, let’s whip up that luscious chocolate ganache.
Start by placing the chopped semisweet chocolate in a heatproof bowl.
In a small saucepan, heat the heavy whipping cream until it’s steaming but not boiling.
Pour the hot cream over the chocolate and let it sit for about 2 minutes.
This allows the chocolate to soften.
Then, stir until the mixture is smooth and glossy.
Let the ganache cool slightly before you drizzle it over your cheesecake cups.
Load the Cups with Toppings
Now comes the fun part—decorating your Loaded Brownie Cheesecake Cups!
If you prefer, you can remove the cups from their liners for a more elegant presentation.
Drizzle each cup generously with the chocolate ganache and caramel sauce.
Then, sprinkle on crushed chocolate sandwich cookies or brownie crumbs for that delightful crunch.
Don’t forget to add mini chocolate chips for an extra touch of sweetness.
Top it all off with a swirl of whipped cream, chopped nuts, or a sprinkle of flaky sea salt.
Feel free to get creative with your toppings; the sky’s the limit!
Tips for Success
- Use room-temperature cream cheese for a smoother cheesecake layer.
- Don’t overmix the cheesecake filling; it should be creamy but not airy.
- Check for doneness by looking for a slight jiggle in the center.
- Chill the cups before decorating for easier topping application.
- Experiment with toppings to make each cup uniquely yours!
Equipment Needed
- Muffin pan: A standard 12-cup muffin pan works best, but you can use silicone molds for easy removal.
- Mixing bowls: A medium bowl for the brownie batter and a separate one for the cheesecake filling.
- Whisk: A simple whisk or electric mixer will do the trick.
- Spatula: Use a rubber spatula for folding ingredients and scraping down the sides.
- Heatproof bowl: Essential for making the chocolate ganache; a glass bowl works great.
Variations
- Gluten-Free: Substitute all-purpose flour with a gluten-free flour blend for a delicious gluten-free option.
- Nut-Free: Omit the nuts in the toppings or use crushed graham crackers for a similar crunch without the allergens.
- Cheesecake Flavor Twist: Add a tablespoon of lemon juice or zest to the cheesecake layer for a refreshing citrus flavor.
- Peanut Butter Lovers: Swirl in some creamy peanut butter into the cheesecake mixture before baking for a nutty twist.
- Vegan Option: Use a plant-based cream cheese and substitute eggs with flaxseed meal mixed with water for a vegan-friendly dessert.
Serving Suggestions
- Pair with a scoop of vanilla ice cream for a delightful contrast in temperature and texture.
- Serve alongside fresh berries for a pop of color and a hint of tartness.
- Complement with a rich coffee or espresso to enhance the chocolate flavors.
- Present on a decorative platter for an elegant touch at gatherings.
FAQs about Loaded Brownie Cheesecake Cups
Can I make Loaded Brownie Cheesecake Cups ahead of time?
Absolutely! These cups can be made a day in advance. Just store them in the refrigerator after they cool completely. This allows the flavors to meld beautifully, making them even more delicious!
What can I use instead of cream cheese?
If you’re looking for a substitute, try using mascarpone cheese or a vegan cream cheese alternative. Both will give you a creamy texture, though the flavor may vary slightly.
How do I know when the cheesecake layer is done?
The cheesecake should be mostly set but still have a slight jiggle in the center when you take it out of the oven. It will firm up as it cools, so don’t worry if it looks a bit wobbly!
Can I freeze these Loaded Brownie Cheesecake Cups?
Yes, you can freeze them! Just make sure they are well-wrapped in plastic wrap or stored in an airtight container. Thaw them in the refrigerator before serving for the best texture.
What toppings can I use for these cups?
The options are endless! You can use crushed cookies, caramel sauce, fresh fruit, or even a drizzle of peanut butter. Get creative and make them your own!
Final Thoughts
Creating Loaded Brownie Cheesecake Cups is more than just baking; it’s about crafting a moment of joy.
Each bite delivers a delightful blend of rich brownie and creamy cheesecake, making it a dessert that brings smiles all around.
Whether you’re celebrating a special occasion or simply indulging after a long day, these cups are sure to impress.
The best part? They’re customizable, allowing you to unleash your creativity with toppings.
So, gather your ingredients, roll up your sleeves, and dive into this delicious adventure.
You’ll find that these little cups of happiness are worth every minute spent in the kitchen!
PrintLoaded Brownie Cheesecake Cups: A Decadent Delight!
- Total Time: 2 hours 55 minutes
- Yield: 12 cups
- Diet: Vegetarian
Description
Loaded Brownie Cheesecake Cups are a decadent dessert combining rich brownie and creamy cheesecake layers, topped with chocolate ganache and various toppings.
Ingredients
- For the brownie layer:
- ½ cup unsalted butter, melted
- 1 cup granulated sugar
- 2 large eggs
- 1 tsp vanilla extract
- ⅓ cup unsweetened cocoa powder
- ½ cup all-purpose flour
- ¼ tsp salt
- ⅓ cup mini chocolate chips (optional)
- For the cheesecake layer:
- 16 oz cream cheese, softened
- ½ cup granulated sugar
- 1 large egg
- 1 tsp vanilla extract
- 2 tbsp sour cream (optional, for extra creaminess)
- For the chocolate ganache:
- 4 oz semisweet chocolate, chopped
- ½ cup heavy whipping cream
- For the toppings:
- ¼ cup caramel sauce
- ½ cup crushed chocolate sandwich cookies or extra brownie crumbs
- ¼ cup mini chocolate chips
- Whipped cream, as desired
- Chopped pecans or walnuts (optional)
- Flaky sea salt (optional)
Instructions
- Prepare the brownie base
- Preheat the oven to 325°F. Line a 12-cup muffin pan with paper or foil liners.
- In a bowl, whisk together the melted butter and sugar.
- Add the eggs and vanilla extract, mixing until smooth.
- Stir in the cocoa powder, flour, and salt until just combined. Fold in the mini chocolate chips if using.
- Divide the brownie batter evenly among the 12 liners, using approximately 1–2 tablespoons per cup.
- Make the cheesecake filling
- In a separate bowl, beat the softened cream cheese until smooth.
- Add the sugar and mix until creamy.
- Beat in the egg and vanilla extract until just combined.
- Stir in the sour cream, if using. Avoid overmixing.
- Layer and bake
- Spoon the cheesecake mixture over the brownie batter in each liner, filling each cup about three-quarters full.
- Gently tap the pan on the counter to release large air bubbles.
- Bake for 20–25 minutes, until the cheesecake centers are mostly set with a slight jiggle.
- Cool in the pan for about 30 minutes, then refrigerate for at least 2 hours until completely chilled.
- Prepare the chocolate ganache
- Place the chopped chocolate in a heatproof bowl.
- Heat the whipping cream in a small saucepan until steaming but not boiling.
- Pour the hot cream over the chocolate and let stand for 2 minutes.
- Stir until smooth and glossy. Allow the ganache to cool slightly before decorating.
- Load the cups with toppings
- Remove the chilled cups from their liners if desired.
- Drizzle each cup with chocolate ganache and caramel sauce.
- Sprinkle with crushed cookies or brownie crumbs and mini chocolate chips.
- Add a swirl of whipped cream, chopped nuts, or a tiny pinch of flaky sea salt.
- Serve chilled.
Notes
- Use room-temperature cream cheese for a smooth cheesecake layer.
- Don’t overbake; the cheesecake will firm up as it cools.
- Chill before decorating for easier topping.
- Add chocolate chips to the brownie batter for extra chocolatey flavor.
- Customize toppings with crushed cookies, peanut butter cups, or extra caramel.
- Prep Time: 30 minutes
- Cook Time: 25 minutes
- Category: Dessert
- Method: Baking
- Cuisine: American
Nutrition
- Serving Size: 1 cup
- Calories: 300
- Sugar: 20g
- Sodium: 150mg
- Fat: 18g
- Saturated Fat: 10g
- Unsaturated Fat: 6g
- Trans Fat: 0g
- Carbohydrates: 30g
- Fiber: 2g
- Protein: 4g
- Cholesterol: 80mg