Introduction to Muddy Buddy Rice Krispies
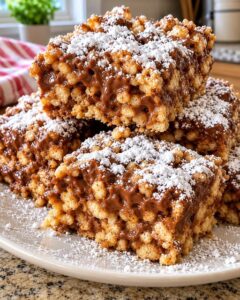
There’s something magical about the combination of chocolate and peanut butter that takes me back to my childhood. Muddy Buddy Rice Krispies are a delightful twist on the classic Rice Krispies treats, bringing that nostalgia right into your kitchen. Whether you’re looking for a quick solution for a busy day or a sweet treat to impress your loved ones, this recipe has you covered. With just a few simple ingredients, you can whip up a batch that’s sure to satisfy any sweet tooth. Trust me, these treats will become a favorite in no time!
Why You’ll Love This Muddy Buddy Rice Krispies
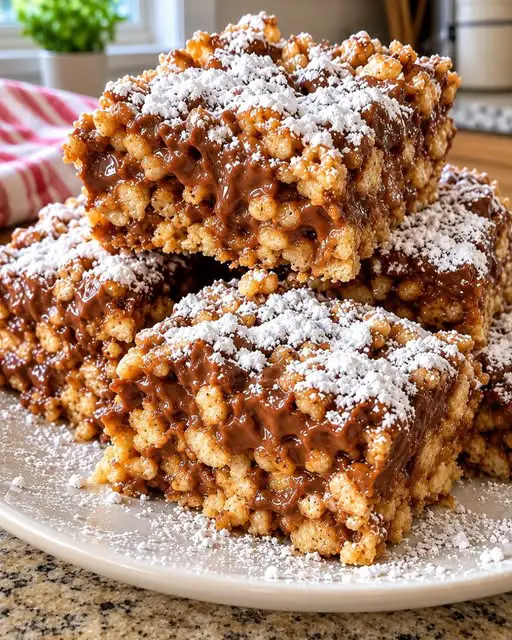
Muddy Buddy Rice Krispies are not just easy to make; they’re a joy to eat! In just 40 minutes, you can create a dessert that’s both indulgent and satisfying. The rich chocolate and creamy peanut butter blend perfectly with the crispy cereal, making each bite a delightful experience. Plus, they’re a hit at parties, family gatherings, or even just a cozy night in. Who wouldn’t love that?
Ingredients for Muddy Buddy Rice Krispies
Gathering the right ingredients is the first step to creating these delightful Muddy Buddy Rice Krispies. Here’s what you’ll need:
- Rice Krispies cereal: The base of our treats, providing that satisfying crunch.
- Unsalted butter: Adds richness and helps bind everything together. You’ll need it for both the treats and the coating.
- Mini marshmallows: These melt down to create a gooey, sweet texture that holds the cereal together.
- Vanilla extract: A splash of this enhances the overall flavor, making it even more delicious.
- Salt: Just a pinch to balance the sweetness and elevate the flavors.
- Semi-sweet chocolate chips: The star of the show! They melt beautifully for that rich chocolate coating.
- Creamy peanut butter: Adds a nutty flavor and creaminess that pairs perfectly with chocolate.
- Powdered sugar: This gives the final touch of sweetness and helps create that signature coating.
- Cocoa powder (optional): For those who want an extra chocolatey kick, this can be added to the powdered sugar mix.
For exact measurements, check the bottom of the article where you can find everything listed for easy printing. Happy cooking!
How to Make Muddy Buddy Rice Krispies
Prepare the Rice Krispies Treats
Let’s kick things off by preparing the Rice Krispies treats. First, grab a 9-by-13-inch baking pan and lightly grease it or line it with parchment paper. This will make it easier to remove the treats later. In a large saucepan, melt 4 tablespoons of unsalted butter over low heat. Once melted, add in the mini marshmallows. Stir continuously until they’re completely melted and smooth. Remove the pan from heat, then stir in the vanilla extract and salt. Finally, fold in the Rice Krispies cereal until every piece is coated in that gooey goodness.
Cut into Squares
After letting the mixture cool for about 20 minutes, it’s time to cut it into squares. Carefully remove the treats from the pan and place them on a cutting board. Use a sharp knife to cut them into 16 even squares. This step is crucial for even coating later, so take your time!
Prepare the Chocolate Peanut Butter Coating
Now, let’s make that irresistible chocolate peanut butter coating. In a microwave-safe bowl, combine the semi-sweet chocolate chips, ½ cup of creamy peanut butter, and 2 tablespoons of butter. Microwave the mixture in 20-second intervals, stirring in between, until it’s smooth and creamy. Once melted, stir in the vanilla extract. Allow the mixture to cool slightly; this will make it easier to coat the Rice Krispies squares without breaking them apart.
Coat the Rice Krispies
Time to coat those Rice Krispies squares! Place them in a large mixing bowl, then pour the chocolate peanut butter mixture over them. Gently turn each square until they’re coated on all sides. Be careful during this step; you want to keep the squares intact while ensuring they’re covered in that delicious chocolatey goodness. It’s a messy job, but someone’s got to do it!
Add the Powdered Sugar
Next, let’s add that sweet finishing touch. In a large resealable bag, combine the powdered sugar and cocoa powder if you’re using it. Add a few of the chocolate-coated squares at a time, seal the bag, and gently shake until they’re completely covered. This step gives them that signature Muddy Buddy look!
Chill and Serve
Finally, transfer the coated squares to a parchment-lined tray. Pop them in the refrigerator for about 20–30 minutes, or until the chocolate coating has set. Once chilled, you can serve them straight from the fridge or at room temperature. Either way, they’re sure to be a hit!
Tips for Success
- Use fresh marshmallows for the best texture; stale ones can affect the gooeyness.
- Don’t rush the melting process; low heat ensures a smooth mixture.
- For easier cutting, lightly grease your knife before slicing the squares.
- Experiment with different chocolate types for unique flavors.
- Store leftovers in an airtight container to keep them fresh longer.
Equipment Needed
- 9-by-13-inch baking pan: A standard size for even treats; a glass dish works too.
- Large saucepan: Essential for melting butter and marshmallows; a non-stick pot is ideal.
- Mixing bowl: For coating the squares; any large bowl will do.
- Microwave-safe bowl: Needed for melting chocolate; a glass bowl is perfect.
- Sharp knife: For cutting the treats; a pizza cutter can also work!
Variations
- Nutty Twist: Add chopped nuts like almonds or walnuts for an extra crunch and flavor.
- Gluten-Free Option: Use gluten-free Rice Krispies to make this treat suitable for those with gluten sensitivities.
- Vegan Version: Substitute the butter with coconut oil and use dairy-free chocolate chips for a vegan-friendly treat.
- Flavor Infusion: Experiment with flavored extracts like almond or hazelnut for a unique twist.
- Fruit Additions: Toss in dried fruits like cranberries or raisins for a chewy texture and added sweetness.
Serving Suggestions
- Pair with Milk: A classic glass of cold milk complements the sweetness perfectly.
- Presentation: Serve on a colorful platter for a festive touch at gatherings.
- Ice Cream Side: These treats go wonderfully with a scoop of vanilla ice cream.
- Garnish: Drizzle with extra chocolate or sprinkle with crushed nuts for added flair.
FAQs about Muddy Buddy Rice Krispies
Can I make Muddy Buddy Rice Krispies ahead of time?
Absolutely! These treats can be made a day in advance. Just store them in an airtight container at room temperature or in the refrigerator to keep them fresh.
What can I substitute for Rice Krispies?
If you’re looking for a change, you can use other crispy cereals like Corn Pops or even granola for a different texture and flavor.
How do I store leftovers?
To keep your Muddy Buddy Rice Krispies fresh, store them in an airtight container at room temperature. They should last for about a week, but trust me, they won’t last that long!
Can I use crunchy peanut butter instead of creamy?
Definitely! Crunchy peanut butter will add an extra layer of texture to your treats, making them even more delightful.
Are Muddy Buddy Rice Krispies suitable for kids?
Yes! These treats are a hit with kids and adults alike. Just be mindful of any nut allergies if you’re serving them to little ones.
Final Thoughts
Creating Muddy Buddy Rice Krispies is more than just whipping up a dessert; it’s about crafting sweet memories. Each bite transports me back to carefree days filled with laughter and joy. The combination of chocolate and peanut butter, paired with that satisfying crunch, makes these treats irresistible. Whether you’re sharing them with family or enjoying them solo, they bring a smile to your face. So, roll up your sleeves and dive into this delightful recipe. Trust me, once you make them, you’ll find yourself reaching for another square, savoring every delicious moment!
PrintMuddy Buddy Rice Krispies: A Sweet Delight to Try!
- Total Time: 40 minutes
- Yield: 16 squares
- Diet: Vegetarian
Description
Muddy Buddy Rice Krispies are a delicious twist on the classic Rice Krispies treats, coated in a rich chocolate peanut butter mixture and dusted with powdered sugar.
Ingredients
- 6 cups Rice Krispies cereal
- 4 tbsp unsalted butter
- 1 package (10 oz) mini marshmallows
- ½ tsp vanilla extract
- ¼ tsp salt
- 1 cup semi-sweet chocolate chips
- ½ cup creamy peanut butter
- 2 tbsp unsalted butter
- 1 tsp vanilla extract
- 1½ cups powdered sugar
- 2 tbsp cocoa powder (optional)
Instructions
- Prepare the Rice Krispies Treats
- Lightly grease a 9-by-13-inch baking pan or line it with parchment paper.
- Melt 4 tablespoons of butter in a large saucepan over low heat.
- Add the mini marshmallows and stir until completely melted.
- Remove from heat and stir in vanilla extract and salt.
- Add the Rice Krispies cereal and gently fold until evenly coated.
- Transfer the mixture to the prepared pan.
- Lightly press into an even layer without packing it too tightly.
- Allow to cool for about 20 minutes.
- Cut into Squares
- Once completely cooled, remove the treats from the pan.
- Cut into 16 even squares.
- Set aside.
- Prepare the Chocolate Peanut Butter Coating
- Combine chocolate chips, peanut butter, and 2 tablespoons of butter in a microwave-safe bowl.
- Microwave in 20-second intervals, stirring between each, until smooth.
- Stir in vanilla extract.
- Let the mixture cool slightly so it is easier to coat the treats.
- Coat the Rice Krispies
- Place the Rice Krispies squares in a large bowl.
- Pour the chocolate peanut butter mixture over them.
- Gently turn each square until coated on all sides.
- Work carefully to keep the squares from breaking apart.
- Add the Powdered Sugar
- Combine powdered sugar and cocoa powder, if using, in a large resealable bag.
- Add a few chocolate-coated squares at a time.
- Seal the bag and gently shake until completely covered.
- Transfer the coated squares to a parchment-lined tray.
- Chill and Serve
- Refrigerate for 20–30 minutes, or until the chocolate coating has set. Serve chilled or at room temperature.
Notes
- For a richer chocolate flavor, use dark chocolate chips.
- Store leftovers in an airtight container at room temperature.
- These treats can be made ahead of time and stored in the refrigerator.
- Prep Time: 30 minutes
- Cook Time: 10 minutes
- Category: Dessert
- Method: No-Bake
- Cuisine: American
Nutrition
- Serving Size: 1 square
- Calories: 180
- Sugar: 12g
- Sodium: 80mg
- Fat: 8g
- Saturated Fat: 3g
- Unsaturated Fat: 5g
- Trans Fat: 0g
- Carbohydrates: 24g
- Fiber: 1g
- Protein: 2g
- Cholesterol: 10mg