Introduction to Red Velvet Oreo Pound Cake
There’s something magical about the combination of red velvet and Oreo cookies, isn’t there? The rich, velvety texture paired with the crunch of Oreos creates a dessert that feels like a celebration in every bite. This Red Velvet Oreo Pound Cake is not just a treat; it’s a quick solution for those busy days when you want to impress your loved ones without spending hours in the kitchen. With its vibrant color and decadent flavor, this cake is sure to become a favorite at gatherings or simply as a sweet indulgence for yourself. Let’s dive into this delightful recipe!
Why You’ll Love This Red Velvet Oreo Pound Cake
This Red Velvet Oreo Pound Cake is a game-changer for dessert lovers. It’s incredibly easy to whip up, making it perfect for both novice and seasoned bakers. The rich flavors of red velvet and Oreo cookies create a taste sensation that’s hard to resist. Plus, it’s a showstopper at any gathering, ensuring you’ll impress friends and family without breaking a sweat. Who wouldn’t love that?
Ingredients for Red Velvet Oreo Pound Cake
Gathering the right ingredients is the first step to creating this delightful Red Velvet Oreo Pound Cake. Each component plays a crucial role in achieving that perfect balance of flavor and texture. Here’s what you’ll need:
- All-purpose flour: The backbone of your cake, providing structure and stability.
- Unsweetened cocoa powder: Adds a rich chocolate flavor that complements the red velvet beautifully.
- Baking powder: This leavening agent helps the cake rise, giving it that fluffy texture.
- Salt: Enhances the flavors and balances the sweetness.
- Unsalted butter: For a rich, creamy base that adds moisture and flavor.
- Granulated sugar: Sweetens the cake and contributes to its tender crumb.
- Large eggs: Essential for binding the ingredients and adding richness.
- Sour cream: Provides moisture and a slight tang, making the cake incredibly tender.
- Vanilla extract: A classic flavor enhancer that rounds out the cake’s taste.
- Red food coloring: Gives the cake its signature vibrant hue; feel free to adjust for a deeper color.
- White vinegar: Reacts with the baking soda to create a lighter texture.
- Oreo cookies: The star of the show! Chopped Oreos add delightful crunch and flavor.
- Cream cheese: Used in the glaze for a rich, tangy finish.
- Powdered sugar: Sweetens the glaze and gives it that smooth texture.
- Milk: Adjusts the consistency of the glaze to your liking.
- White chocolate chips (optional): For an extra touch of sweetness and elegance.
For exact measurements, check the bottom of the article where you can find everything listed for easy printing. Happy baking!
How to Make Red Velvet Oreo Pound Cake
Creating this Red Velvet Oreo Pound Cake is a delightful journey that’s easier than you might think. Follow these simple steps, and you’ll have a stunning dessert that’s sure to impress. Let’s get started!
Step 1: Preheat and Prepare
First things first, preheat your oven to 325°F. This ensures even baking. While that’s heating up, grab your 10–12-cup Bundt pan or a 10-inch tube pan. Grease and flour it well to prevent sticking. Trust me, there’s nothing worse than a cake that won’t come out of the pan. With the oven warming and the pan ready, you’re on your way to cake perfection!
Step 2: Mix Dry Ingredients
In a medium bowl, whisk together the all-purpose flour, cocoa powder, baking powder, and salt. This step is crucial as it evenly distributes the leavening agents and flavors. Make sure there are no lumps in the flour. A smooth mixture will lead to a beautifully textured cake. Set this bowl aside for now; we’ll come back to it shortly.
Step 3: Cream Butter and Sugar
In a large mixing bowl, beat the softened unsalted butter and granulated sugar together for about 4–5 minutes. You want this mixture to be light and fluffy. This step is vital because it incorporates air into the batter, giving your cake that lovely rise. Don’t rush it; the fluffier the mixture, the better your cake will be!
Step 4: Add Eggs
Now, it’s time to add the eggs. Incorporate them one at a time, mixing well after each addition. Using room-temperature eggs helps them blend more easily into the batter. This ensures a smooth consistency, which is key for a moist cake. Keep mixing until everything is well combined.
Step 5: Combine Wet Ingredients
In a separate bowl, mix together the sour cream, vanilla extract, red food coloring, and white vinegar. This mixture adds moisture and that signature red hue to your cake. The vinegar reacts with the baking powder, enhancing the cake’s texture. Stir until everything is well combined, and then we’ll bring it all together.
Step 6: Combine Mixtures
Now, it’s time to combine the dry and wet mixtures. Add the flour mixture to the butter mixture in three additions, alternating with the sour cream mixture. Mix on low speed just until combined. Be careful not to overmix; this can lead to a dense cake. You want a smooth batter, but a few lumps are perfectly fine!
Step 7: Fold in Oreos
Gently fold the chopped Oreo cookies into the batter. This step adds delightful chunks of cookie throughout the cake, enhancing both flavor and texture. Use a spatula to carefully incorporate them without deflating the batter. You want those Oreo pieces to be evenly distributed for that perfect bite!
Step 8: Bake
Spoon the batter into your prepared pan and smooth the top with a spatula. Bake in the preheated oven for 60–75 minutes. To check for doneness, insert a toothpick into the center of the cake. If it comes out clean or with a few moist crumbs, your cake is ready. Keep an eye on it; every oven is a little different!
Step 9: Cool and Glaze
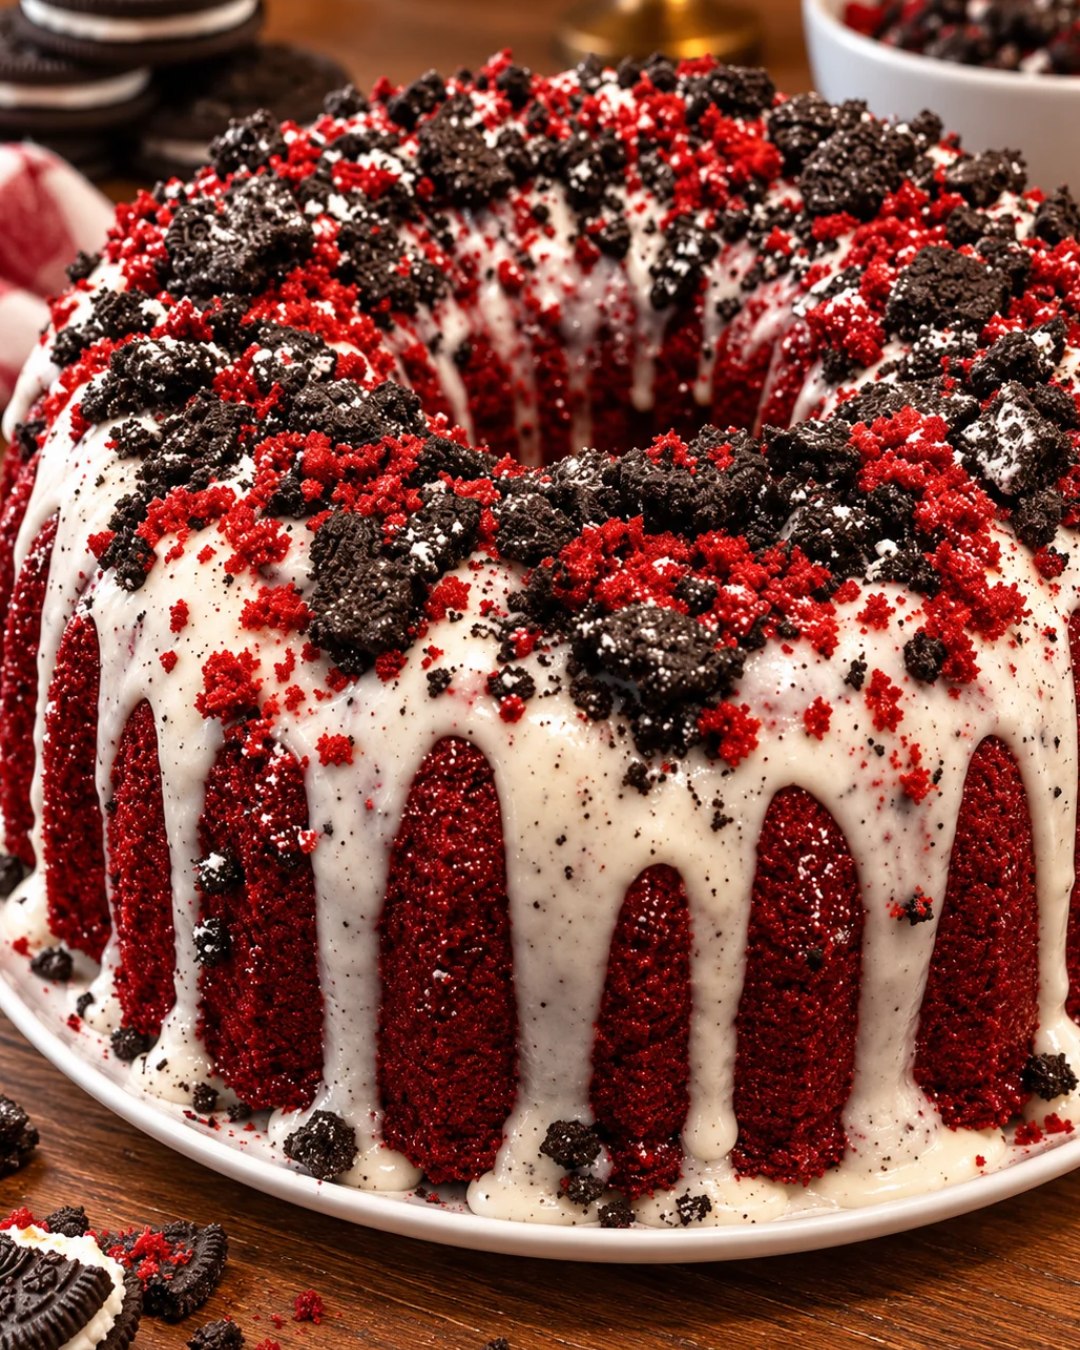
Once baked, let the cake rest in the pan for 15–20 minutes. This helps it firm up a bit. Then, invert it onto a wire rack to cool completely. While it cools, prepare the cream cheese glaze by beating together softened cream cheese and butter until smooth. Gradually mix in powdered sugar and milk until you reach a thick but pourable consistency. Drizzle this luscious glaze over the cooled cake, and sprinkle with crushed Oreos for that extra touch!
Tips for Success
- Always use room-temperature ingredients for better blending and texture.
- Don’t overmix the batter once you add the flour; a few lumps are okay!
- Toss chopped Oreos with a teaspoon of flour to prevent them from sinking.
- Check for doneness carefully; pound cakes can be dense, so trust your toothpick!
- For a deeper red color, opt for concentrated gel food coloring.
Equipment Needed
- 10–12-cup Bundt pan or 10-inch tube pan: If you don’t have these, a regular cake pan works too.
- Mixing bowls: A set of various sizes will do the trick.
- Electric mixer: A hand mixer is perfect if you don’t have a stand mixer.
- Spatula: Essential for folding in those delicious Oreos.
- Wire rack: If you lack one, a plate can work for cooling.
Variations
- Gluten-Free Option: Substitute all-purpose flour with a gluten-free flour blend to make this cake gluten-free.
- Chocolate Lovers: Add an extra 1/4 cup of cocoa powder for a more intense chocolate flavor.
- Nutty Twist: Fold in 1/2 cup of chopped walnuts or pecans for added crunch and flavor.
- Red Velvet Cheesecake: Create a layered cake by adding a cheesecake layer in between the red velvet layers.
- Vegan Version: Replace eggs with flax eggs and use plant-based butter and sour cream for a vegan-friendly treat.
Serving Suggestions
- Pair with Coffee: A warm slice of cake goes perfectly with a rich cup of coffee or espresso.
- Ice Cream Delight: Serve with a scoop of vanilla or cookies and cream ice cream for an indulgent treat.
- Fresh Berries: Add a side of fresh strawberries or raspberries for a refreshing contrast.
- Elegant Presentation: Dust with powdered sugar or cocoa powder for a beautiful finish.
FAQs about Red Velvet Oreo Pound Cake
Can I use different types of Oreos in this recipe?
Absolutely! While classic Oreos are fantastic, feel free to experiment with different flavors like mint or peanut butter. Each variation will add a unique twist to your Red Velvet Oreo Pound Cake.
How should I store the leftover cake?
Store your glazed cake in an airtight container in the refrigerator. It will stay fresh for up to four days. Just make sure to let it come to room temperature before serving for the best flavor.
Can I freeze this cake?
Yes, you can freeze the unglazed cake! Wrap it tightly in plastic wrap and then in aluminum foil. It will keep well for up to three months. Just thaw it in the fridge overnight before glazing and serving.
What can I substitute for sour cream?
If you don’t have sour cream on hand, plain Greek yogurt works as a great substitute. It will provide similar moisture and tanginess to your cake.
Why is my cake dense?
A dense cake can result from overmixing the batter or not using room-temperature ingredients. Make sure to mix just until combined and allow your eggs and sour cream to warm up before using them.
Final Thoughts
Creating this Red Velvet Oreo Pound Cake is more than just baking; it’s about crafting a moment of joy. Each slice offers a delightful blend of flavors and textures that can brighten any day. Whether you’re celebrating a special occasion or simply treating yourself, this cake is sure to impress. The vibrant red hue and creamy glaze make it a feast for the eyes as well as the palate. So, roll up your sleeves, gather your ingredients, and dive into this delicious adventure. Trust me, the smiles and compliments you’ll receive will be worth every minute spent in the kitchen!
PrintRed Velvet Oreo Pound Cake: Indulge in Decadence Today!
- Total Time: 1 hour 45 minutes
- Yield: 12 servings
- Diet: Vegetarian
Description
Indulge in the decadence of Red Velvet Oreo Pound Cake, a delightful dessert featuring rich flavors of red velvet and Oreo cookies, topped with a creamy glaze.
Ingredients
- 3 cups all-purpose flour
- 1/4 cup unsweetened cocoa powder
- 1 teaspoon baking powder
- 1/2 teaspoon salt
- 1 cup unsalted butter, softened
- 2 1/2 cups granulated sugar
- 5 large eggs, at room temperature
- 1 cup sour cream, at room temperature
- 1 tablespoon vanilla extract
- 1 tablespoon red food coloring, or as needed
- 1 teaspoon white vinegar
- 12 Oreo cookies, roughly chopped
- 4 oz cream cheese, softened
- 2 tablespoons unsalted butter, softened
- 1 cup powdered sugar
- 2–3 tablespoons milk
- 4 Oreo cookies, crushed
- 2 tablespoons white chocolate chips, melted (optional)
Instructions
- Preheat the oven to 325°F. Grease and flour a 10–12-cup Bundt pan or a 10-inch tube pan.
- In a medium bowl, whisk together the flour, cocoa powder, baking powder, and salt. Set aside.
- In a large bowl, beat the softened butter and granulated sugar for 4–5 minutes until light and fluffy.
- Beat in the eggs one at a time, mixing well after each addition.
- In a separate bowl, mix the sour cream, vanilla extract, red food coloring, and white vinegar until combined.
- Add the flour mixture to the butter mixture in three additions, alternating with the sour cream mixture. Mix on low speed just until combined.
- Gently fold the chopped Oreo cookies into the batter.
- Spoon the batter into the prepared pan and smooth the top.
- Bake for 60–75 minutes, or until a toothpick inserted into the center comes out clean.
- Let the cake rest in the pan for 15–20 minutes, then invert it onto a wire rack to cool completely.
- Beat the cream cheese and butter until smooth, then add powdered sugar and vanilla, gradually mixing in milk until the glaze reaches a thick but pourable consistency.
- Drizzle the cream cheese glaze over the cooled cake and sprinkle with crushed Oreo cookies and melted white chocolate if desired.
- Let the glaze set for about 15 minutes, then cut into slices and enjoy.
Notes
- Use room-temperature ingredients for better blending.
- Don’t overmix the batter once the flour is added.
- Toss chopped Oreos with 1 teaspoon of flour to prevent sinking.
- Check for doneness carefully, as pound cakes can be dense.
- For a deeper red color, use concentrated gel food coloring.
- Store the glazed cake covered in the refrigerator for up to 4 days.
- Prep Time: 30 minutes
- Cook Time: 60-75 minutes
- Category: Dessert
- Method: Baking
- Cuisine: American
Nutrition
- Serving Size: 1 slice
- Calories: 450
- Sugar: 35g
- Sodium: 200mg
- Fat: 22g
- Saturated Fat: 12g
- Unsaturated Fat: 8g
- Trans Fat: 0g
- Carbohydrates: 60g
- Fiber: 2g
- Protein: 6g
- Cholesterol: 90mg