As I stood in my kitchen, the sweet aroma of ripe bananas filled the air, transporting me back to cherished childhood memories. That’s when the idea struck me—why not blend that nostalgia into a delightful Banana Pudding Cheesecake? This cheesecake is not just a dessert; it’s a creamy, no-bake celebration that captures the comforting flavors of banana pudding while offering a luxurious twist. With a crunchy Nilla Wafer crust and layers of velvety filling, this treat is perfect for everyone, from busy weeknights to special occasions. Who doesn’t crave a dessert that’s simple to whip up yet impressively delicious? Get ready to indulge in a slice of heaven that will leave your taste buds dancing! Curious how to achieve that creamy perfection? Let’s dive into the recipe!
Why is this Banana Pudding Cheesecake irresistible?
Creamy, No-Bake Delight: This recipe simplifies your dessert-making with a luscious no-bake option that’s perfect for warm days.
Nostalgic Flavor: Each bite is a trip down memory lane, blending the familiar tastes of banana pudding with the luxuriousness of cheesecake.
Easy to Prepare: With minimal ingredients and straightforward steps, you’ll have a stunning dessert ready in no time, making it an ideal choice for busy weeknights.
Crowd-Pleasing Treat: The delightful combination of Nilla Wafer crust and creamy filling means it’s guaranteed to be a hit at gatherings or family dinners.
Versatile Options: Feel free to customize with variations—try adding chocolate or caramel layers if you’re in the mood for something different! This Banana Pudding Cheesecake is so versatile that it’s similar to other favorites like Creme Brulee Cheesecake and Caramel Brownie Cheesecake, making it a staple in your dessert repertoire.
Banana Pudding Cheesecake Ingredients
For the Crust
• Nilla Wafers – This classic cookie provides a crunchy foundation; feel free to substitute with graham crackers for a change.
• Brown Sugar – Adds sweetness and a slightly rich flavor; both light and dark options work beautifully.
• Unsalted Butter – Essential for binding the crust; ensure it’s melted for perfect mixing.
For the Filling
• Cream Cheese – A vital component for that creamy cheesecake base; let it reach room temperature for easy blending.
• White Granulated Sugar – Sweetens the cheesecake to perfection.
• Pure Vanilla Extract – Elevates the flavor; avoid imitation for the best taste.
• Bananas (mashed) – Brings natural sweetness and moisture; use ripe bananas for optimal flavor.
• Sour Cream – Adds a tangy richness; it’s best at room temperature.
• Heavy Cream – Create a light, whipped topping; using cold cream helps achieve better peaks.
• Large Eggs – Help the cheesecake set as it bakes; room temperature eggs mix more evenly.
• Crushed Nilla Wafers – Folded into the filling, it provides additional texture within the cheesecake.
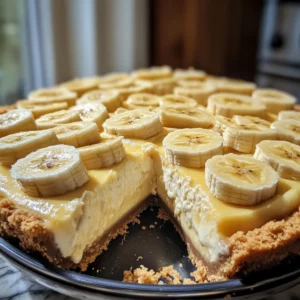
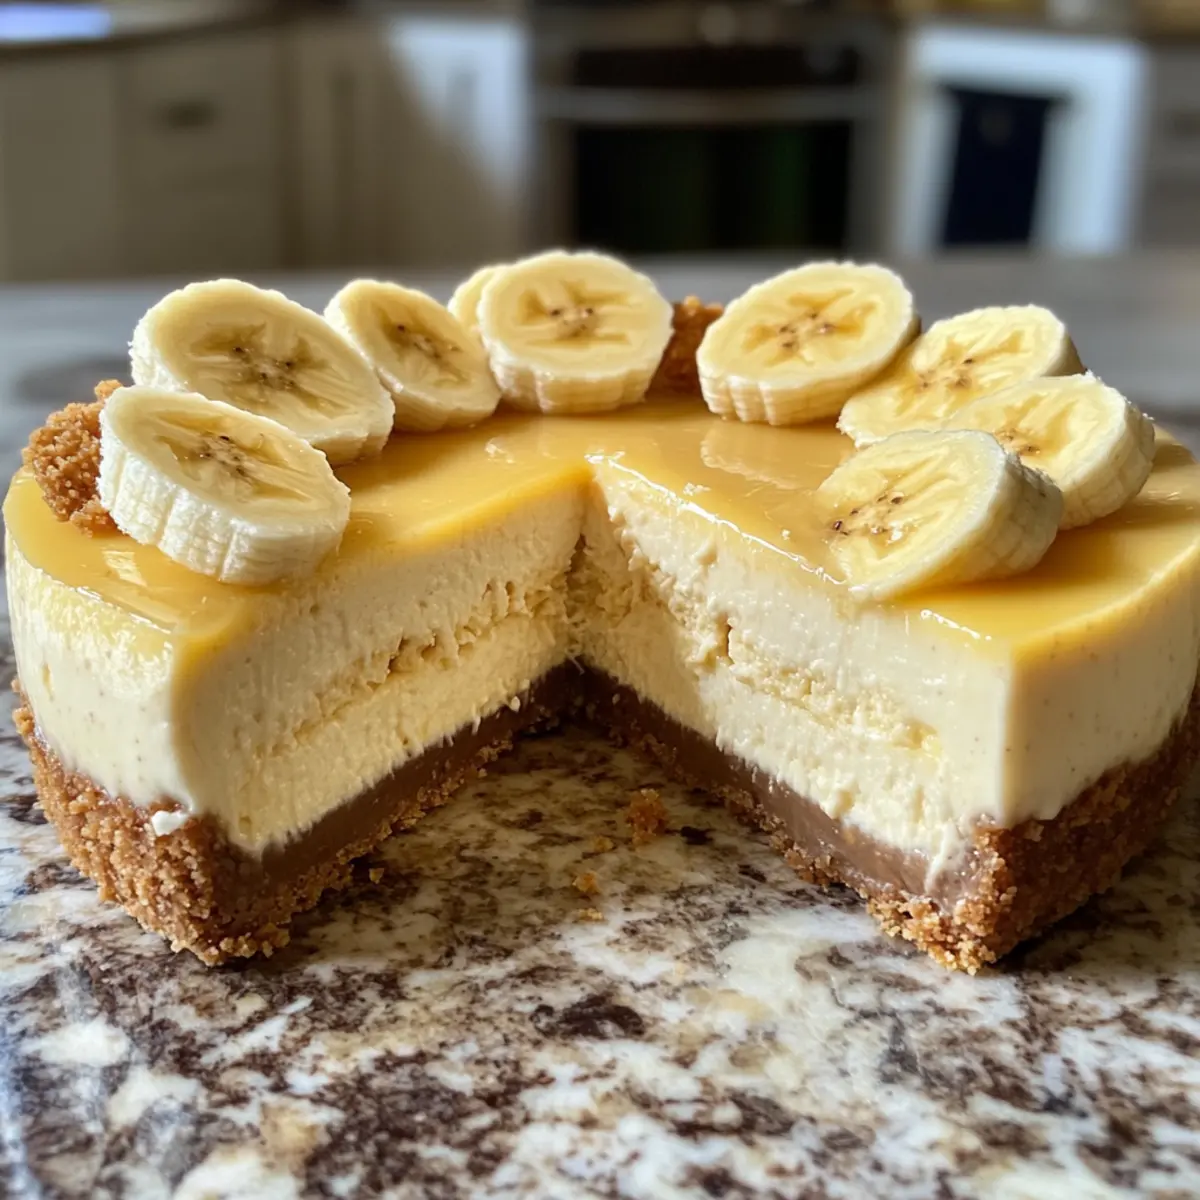
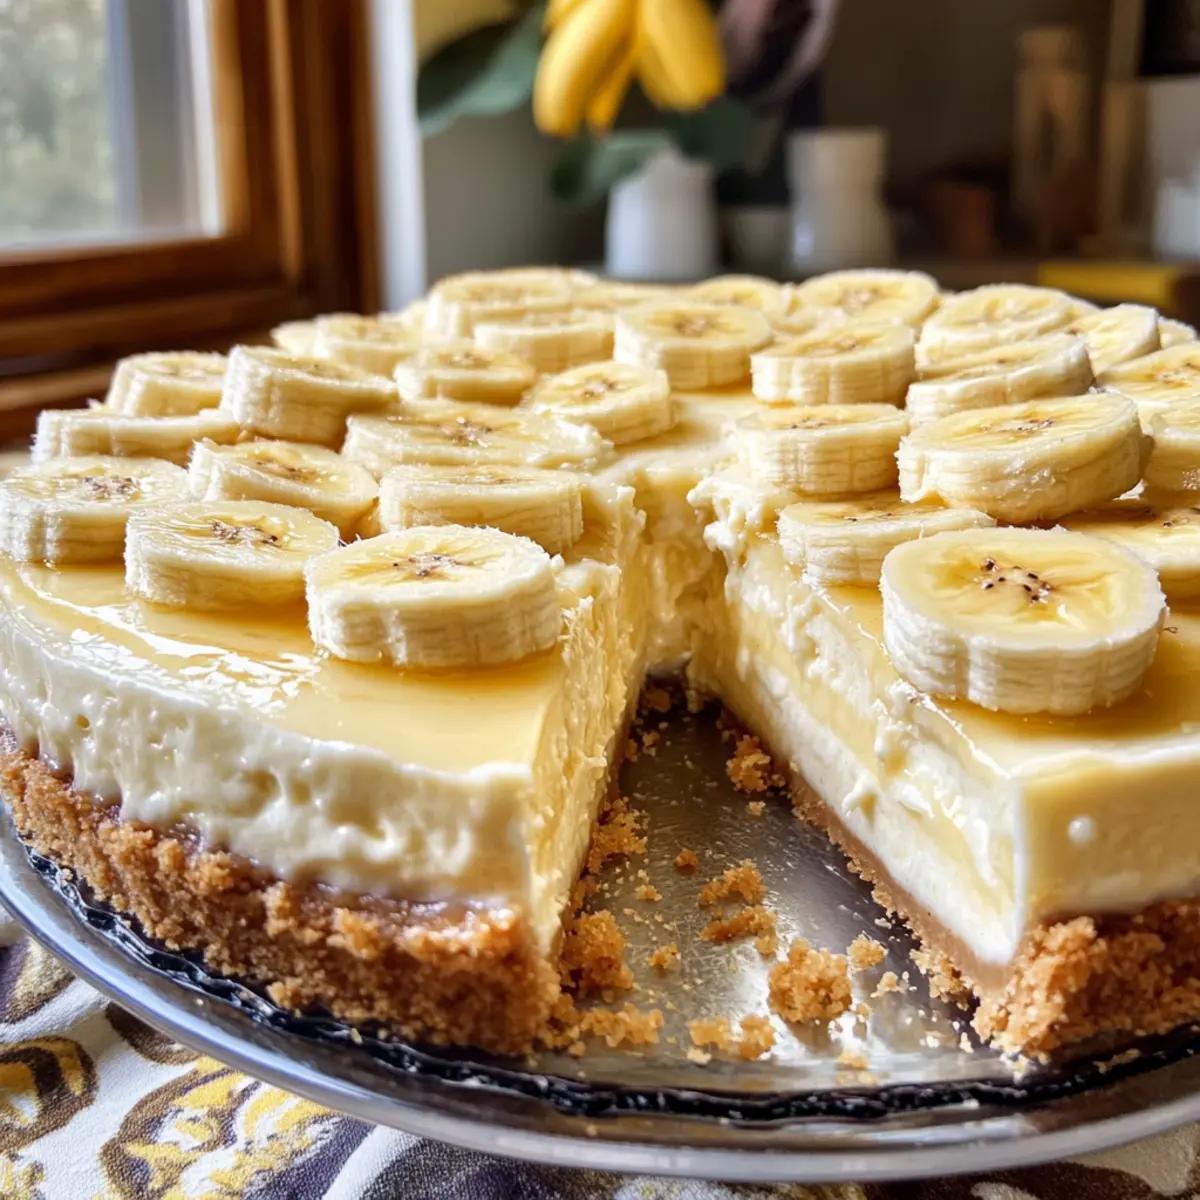
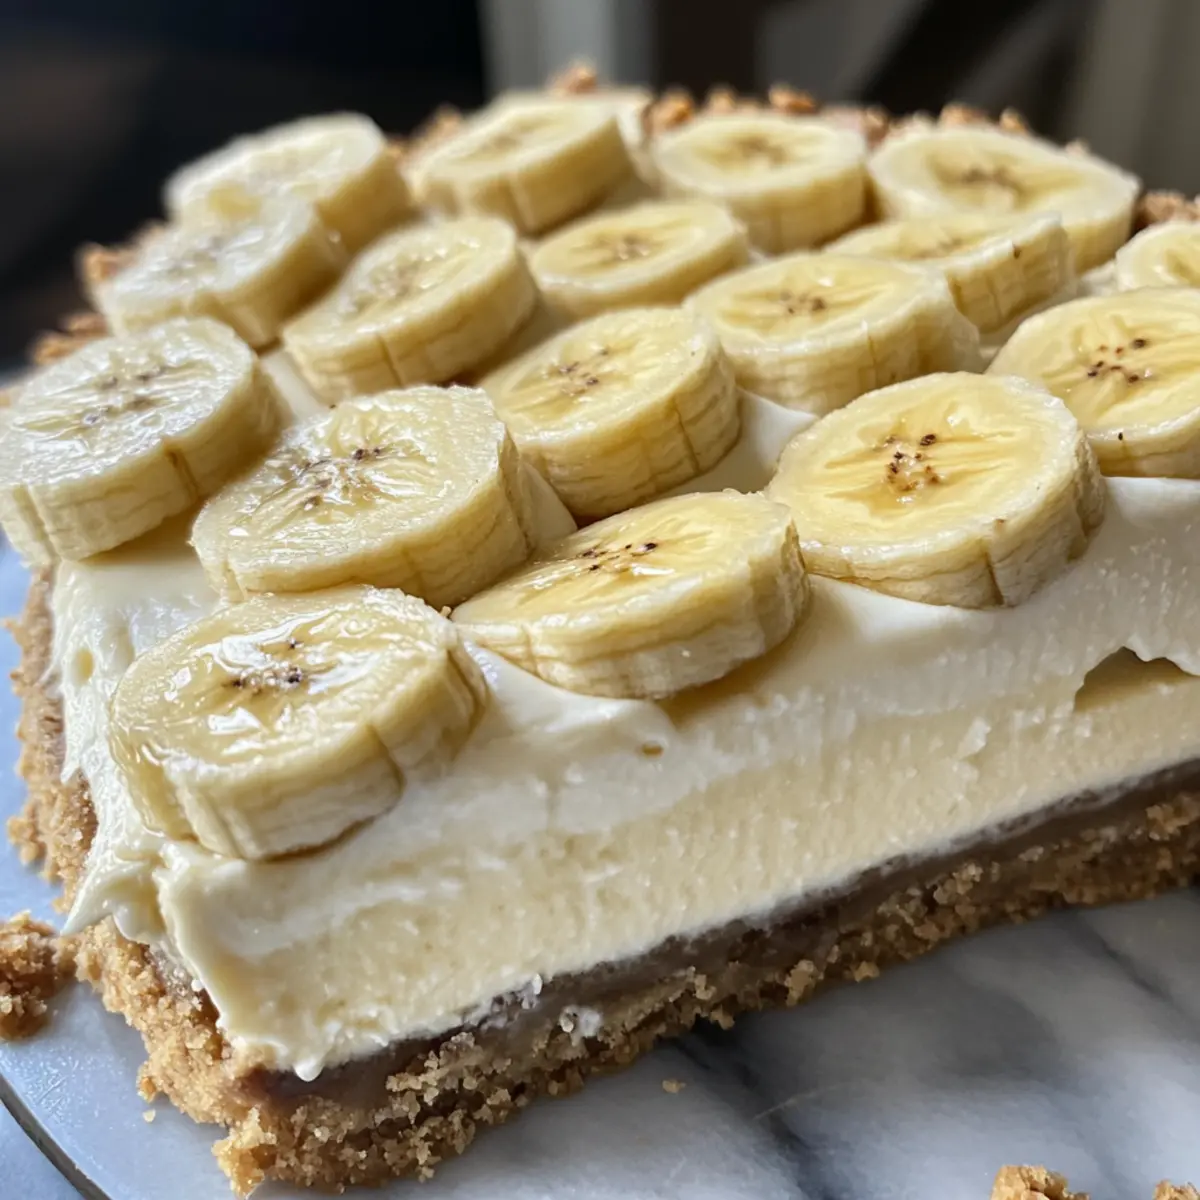
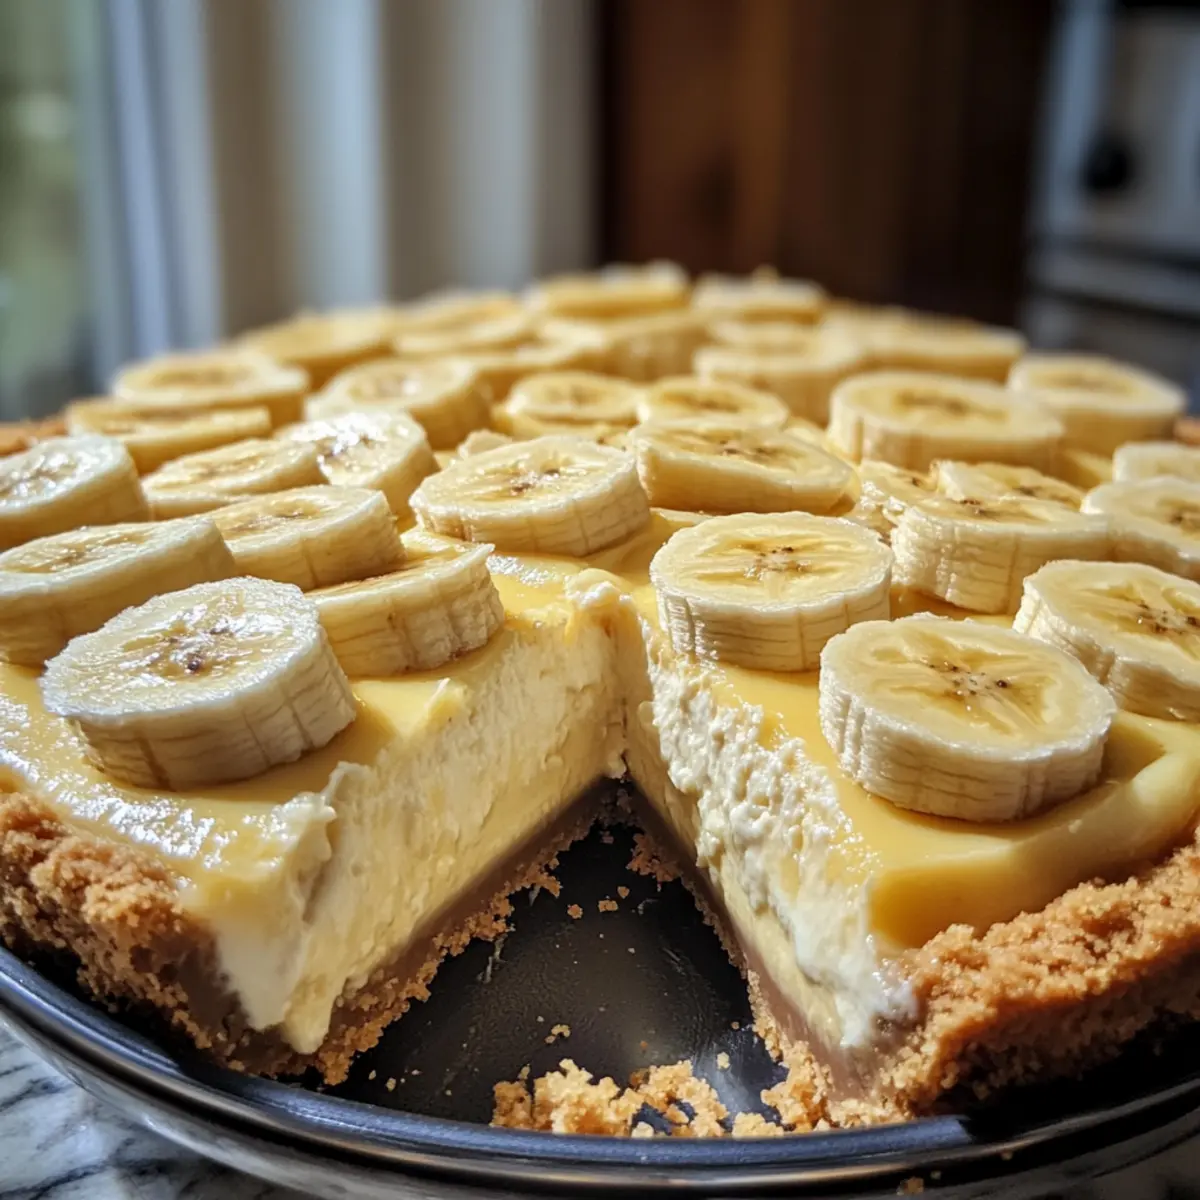
• Bananas (sliced) – Fresh banana slices add a delightful layer; they enhance both flavor and visual appeal.
• Instant Vanilla Pudding – Simplifies the topping process; mix this with cold milk for best results.
• Milk – Needed to mix with the pudding; ensure it’s cold to achieve the right consistency.
Feel ready to embark on a delicious journey with this Banana Pudding Cheesecake? Let’s keep the momentum going and prepare to craft this delicious dessert!
Step‑by‑Step Instructions for Banana Pudding Cheesecake
Step 1: Preheat the Oven
Start by preheating your oven to 325°F (160°C). While the oven warms up, prepare a 9-inch springform pan by spraying the sides with nonstick cooking spray and lining the bottom with parchment paper. This will ensure easy removal of your delicious Banana Pudding Cheesecake after baking.
Step 2: Make the Crust
In a food processor, blend about 2 cups of Nilla Wafers into fine crumbs. Transfer the crumbs to a mixing bowl, then combine them with 1/4 cup of brown sugar and 1/2 cup of melted unsalted butter. Mix until well combined, then press this mixture firmly into the bottom of your prepared pan. Bake the crust for 11 minutes until it’s lightly golden, then remove it to cool.
Step 3: Prepare the Filling
In a large mixing bowl, beat 16 ounces of room temperature cream cheese and 3/4 cup of white granulated sugar with an electric mixer until the mixture is smooth and creamy. Next, gradually incorporate 1 cup of mashed ripe bananas, 1 teaspoon of pure vanilla extract, 1 cup of sour cream, and 1 cup of heavy cream, mixing until everything is thoroughly combined. Finally, add 3 large eggs, one at a time, mixing just until blended.
Step 4: Layer the Cake
Pour half of the creamy cheesecake filling over the cooled Nilla Wafer crust. Scatter 1 cup of sliced bananas and 1/2 cup of crushed Nilla Wafers evenly across the first layer for added texture. Carefully spoon the remaining cheesecake batter over the top, ensuring that the bananas and crumbs are nestled beneath the creamy filling.
Step 5: Create the Water Bath
To prevent cracking and ensure an even bake, place your springform pan into a larger baking dish. Fill the baking dish with hot water until it reaches halfway up the sides of the springform pan. Bake the Banana Pudding Cheesecake in the preheated oven for 80 to 90 minutes, or until the center is set but still has a slight jiggle when gently shaken.
Step 6: Cool the Cheesecake
When the cheesecake is baked, turn off the oven and crack open the door. Allow it to cool in the oven for 30 minutes, which helps prevent drastic temperature changes. Once cooled, remove the cheesecake from the oven and water bath, and let it cool completely at room temperature. Then, refrigerate for at least 6 hours, or preferably overnight, to achieve the perfect texture.
Step 7: Whip the Topping
When you’re ready to serve the Banana Pudding Cheesecake, make the fluffy topping. In a mixing bowl, whisk together 1 package of instant vanilla pudding and 2 cups of cold milk until smooth. In another bowl, whip 1 cup of cold heavy cream until stiff peaks form. Gently fold the whipped cream into the pudding mixture, being careful not to deflate the cream, then spread it evenly over the chilled cheesecake.
Step 8: Garnish and Serve
To add the finishing touch, top your Banana Pudding Cheesecake with additional sliced bananas and extra crushed Nilla Wafers for flair and texture. Cut into slices and serve this crowd-pleasing dessert chilled, allowing everyone to enjoy its creamy, nostalgic flavors on special occasions or just because!
Make Ahead Options
These Banana Pudding Cheesecake is perfect for busy home cooks looking to save time and effort! You can prepare the crust and filling separately up to 24 hours in advance. Simply make the Nilla Wafer crust, cool it, and store it tightly wrapped at room temperature. For the filling, mix the cheesecake batter and refrigerate it until you’re ready to bake. Just before serving, whip the pudding topping and spread it over the chilled cheesecake. This way, your dessert retains its creamy texture and flavor, ensuring it’s just as delightful when you finish it up as it was when freshly made!
Expert Tips for Banana Pudding Cheesecake
-
Room Temperature Ingredients: Ensure your cream cheese, sour cream, and eggs are at room temperature for a smoother filling and easier mixing.
-
Water Bath Technique: Don’t skip the water bath! It keeps the cheesecake moist and helps prevent cracking for a perfect Banana Pudding Cheesecake.
-
Gentle Folding: When incorporating whipped cream into the pudding, fold gently to maintain airiness and lightness—this ensures a fluffy topping.
-
Chill Time: Patience is key! Allow the cheesecake to chill for at least 6 hours or overnight for the best flavor and texture development.
-
Tidy Presentation: For clean slices, use a hot, wet knife to cut your Banana Pudding Cheesecake, wiping it clean between cuts for a beautiful presentation.
Banana Pudding Cheesecake Variations
Feel free to customize your Banana Pudding Cheesecake for a delightful twist that will excite your taste buds.
-
Graham Cracker Crust: Swap out Nilla Wafers for crushed graham crackers to create a subtly different flavor and texture.
-
Chocolate Lover’s Delight: Add cocoa powder to the filling for a rich, chocolatey version that pairs beautifully with bananas.
-
Caramel Swirl: Drizzle warm caramel sauce into the cheesecake batter before baking for an irresistible layer of gooey goodness.
-
Dairy-Free Option: Use dairy-free cream cheese and coconut cream for the topping to make this a creamy yet vegan-friendly treat.
-
Layered Surprise: Incorporate a layer of crushed Oreos between the cheesecake layers for a decadent texture contrast.
-
Spiced Variation: Sprinkle in some cinnamon or nutmeg for a warm spice twist that elevates the classic flavors.
-
Nutty Crunch: Add chopped pecans or walnuts to the crust for an extra crunch and depth of flavor.
-
Tropical Twist: Mix in shredded coconut and a splash of rum extract into the filling for a tropical departure that’s perfect for summer.
Whether you’re in the mood for something rich and chocolatey or a bit of a tropical escape, these variations can add the perfect touch to your Banana Pudding Cheesecake. Try them out, and don’t forget about other appealing recipes like Pineapple Heaven Cheesecake or Sugar Cookie Cheesecake to keep your dessert rotation fresh and exciting!
What to Serve with Banana Pudding Cheesecake
Treat yourself to a delightful culinary experience by pairing this luscious dessert with complementary dishes that enhance its comforting flavors.
-
Fresh Berries: The tartness of strawberries, blueberries, or raspberries adds a refreshing contrast, brightening every creamy bite.
-
Whipped Cream: Light and airy, whipped cream is the perfect accompaniment, adding an extra layer of indulgence to each slice of cheesecake.
-
Coffee: A cup of rich, dark coffee plays beautifully against the sweet banana flavors, providing a warm, cozy complement.
-
Chocolate Drizzle: For a touch of decadence, add a drizzle of chocolate syrup on top of your cheesecake—an irresistible pairing.
-
Ice Cream: Creamy vanilla or banana-flavored ice cream creates an indulgent treat, perfect for layering next to your cheesecake on a warm day.
-
Fruit Salad: A chilled fruit salad featuring melons and citrus provides a refreshing counterbalance, enhancing the dessert’s nostalgic flavor profile.
-
Toasted Coconut: Sprinkling toasted coconut flakes on top can introduce a sweet crunch that echoes the crunchy Nilla Wafer crust.
-
Sparkling Wine: A glass of bubbly complements the creamy richness of the cheesecake while adding a festive touch to your dessert table.
How to Store and Freeze Banana Pudding Cheesecake
Fridge: Store any leftover Banana Pudding Cheesecake in an airtight container in the refrigerator for up to 5 days, ensuring it’s well-covered to prevent drying out.
Freezer: For longer storage, the cheesecake can be frozen without the topping. Wrap it tightly in plastic wrap and then foil; it will keep well in the freezer for up to 2 months.
Thawing: When ready to enjoy, transfer the cheesecake to the fridge to thaw overnight. Add fresh whipped cream and banana slices before serving for the best experience.
Reheating: If you’re looking to serve it slightly warm, gently thaw and warm individual slices in the microwave for about 10-15 seconds, but avoid overheating to maintain texture.
Banana Pudding Cheesecake Recipe FAQs
What kind of bananas should I use for the Banana Pudding Cheesecake?
Absolutely! It’s best to use ripe bananas, as they provide natural sweetness and moisture to the filling. Look for bananas with a few brown spots on the peel, as they indicate peak ripeness and flavor.
How should I store any leftover Banana Pudding Cheesecake?
I recommend storing your leftover cheesecake in an airtight container in the refrigerator. It should stay fresh for up to 5 days. Make sure to cover it well to prevent it from drying out or absorbing other odors.
Can I freeze Banana Pudding Cheesecake?
Yes, you can! For freezing, I suggest wrapping the cheesecake tightly in plastic wrap and then adding a layer of aluminum foil for extra protection. It will keep in the freezer for up to 2 months. Just remember to freeze it without the whipped topping, and add that fresh when you’re ready to serve.
What should I do if my cheesecake cracks while baking?
Very! To help prevent cracking in your Banana Pudding Cheesecake, always use a water bath during baking. If a crack does appear, don’t worry! It’s a common issue. You can cover it with your whipped topping, which will make it look beautiful and delicious regardless.
Are there any dietary considerations I should keep in mind for this dessert?
Definitely! If you’re accommodating guests with dietary restrictions, be sure to note that this cheesecake contains dairy, eggs, and gluten from the Nilla Wafers. For a gluten-free option, consider using gluten-free cookies for the crust, and for those with dairy allergies, you can explore alternative cream cheese and heavy cream options available in stores!
How long can I leave the Banana Pudding Cheesecake out at room temperature?
It’s best to limit leaving the cheesecake out to around 2 hours, especially if it’s warm outside. Beyond that, the dairy ingredients can become unsafe to consume. If you’re serving it at a gathering, you can keep it chilled until ready to slice for your guests!
Creamy Banana Pudding Cheesecake: No-Bake Bliss Awaits
Ingredients
Equipment
Method
- Preheat the oven to 325°F (160°C). Prepare a 9-inch springform pan with nonstick spray and parchment paper.
- In a food processor, blend Nilla Wafers into fine crumbs. Combine crumbs with brown sugar and melted butter, then press into the bottom of the pan. Bake for 11 minutes and cool.
- In a bowl, beat cream cheese and sugar until smooth. Gradually add mashed bananas, vanilla extract, sour cream, and heavy cream. Add eggs one at a time, mixing until blended.
- Pour half the cheesecake filling over the crust. Scatter sliced bananas and crushed Nilla Wafers. Spoon remaining filling over the top.
- Place the springform pan in a larger baking dish and fill with hot water halfway up the sides. Bake for 80-90 minutes until the center is set with a slight jiggle.
- Turn off the oven, crack the door, and cool for 30 minutes. Remove from oven and water bath, let cool completely, then refrigerate for at least 6 hours.
- Whisk instant vanilla pudding and cold milk until smooth. Whip cold heavy cream until stiff peaks and fold into the pudding. Spread over chilled cheesecake.
- Garnish with additional sliced bananas and crushed Nilla Wafers. Cut into slices and serve chilled.